Sponsored

Steeda RLCA spherical bushing installation?

NGOT8R

Well-Known Member
Joined
Jul 19, 2020
Threads
113
Messages
5,997
Reaction score
4,065
Location
Florida
First Name
Adrian
Vehicle(s)
2019 Bullitt
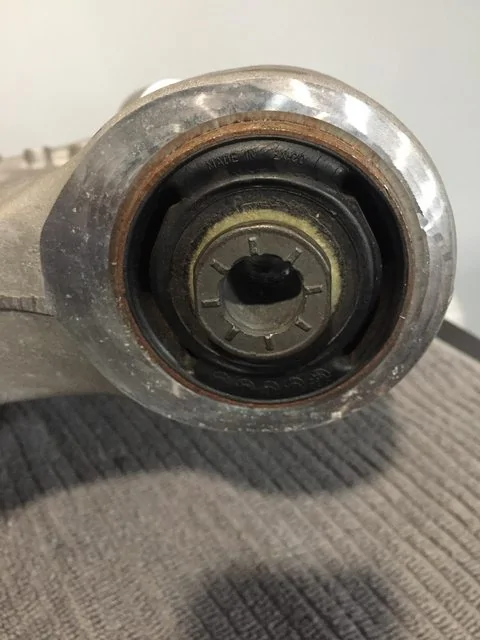
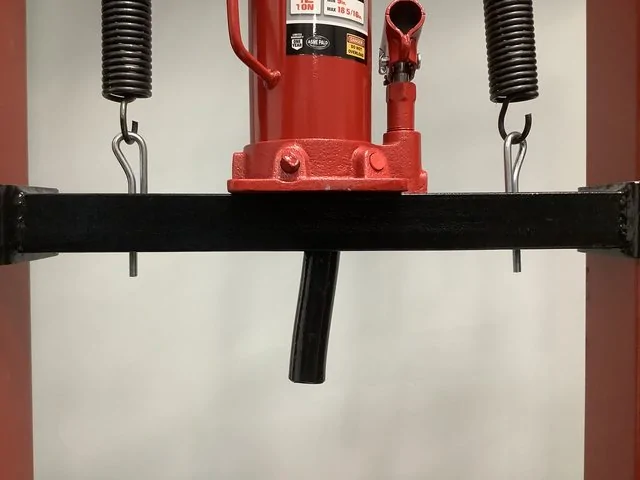
I have done some searching here on Steeda’s RLCA spherical bushings and while there are several who reference having them, information seems to be ambiguous as to what size press is needed to install them. I have read that a 20-50 ton press is needed. While this sounds like a mod that many people would love to have done to their Mustang, there’s not a whole lot of info on installation, which leads me to believe many are apprehensive about doing it because of the level of difficulty. I have a set for my 2019 Bullitt and a 12 ton shop press, but I’m wondering if it really takes more than 12 tons to press the old ones out and the new ones in? If I missed it during my search and someone knows of a detailed installation video, will you please post the link here? Thanks.
Sponsored


NowhereFast

Well-Known Member
Joined
Jun 15, 2016
Threads
3
Messages
66
Reaction score
21
Location
Long Island, NY
Vehicle(s)
2016 Mustang GT Prem. PP, 1999 WS6,2010 Expedition
I used a ball joint press to install mine, you shouldn't need a heavy duty press to put them in. It's not a super difficult job, hardest part is getting the springs back in, especially if they're factory.
 
OP
OP
NGOT8R

NGOT8R

Well-Known Member
Joined
Jul 19, 2020
Threads
113
Messages
5,997
Reaction score
4,065
Location
Florida
First Name
Adrian
Vehicle(s)
2019 Bullitt
I used a ball joint press to install mine, you shouldn't need a heavy duty press to put them in. It's not a super difficult job, hardest part is getting the springs back in, especially if they're factory.
Was it necessary to use penetrating oil around the stock bushing sleeve before pressing it out and did you freeze the new bushing prior to pressing it in? I just bought my press a few months ago for another job and would like to get my money’s worth out of it.
 

moffetts

Well-Known Member
Joined
Nov 30, 2015
Threads
14
Messages
978
Reaction score
325
Location
San Mateo CA
Vehicle(s)
Black Whippled 2015 GT PP
I used a ball joint press to install mine, you shouldn't need a heavy duty press to put them in. It's not a super difficult job, hardest part is getting the springs back in, especially if they're factory.

You may not need a "heavy duty press" to push the bearings *IN*, but you will probably need a 20 ton (at least) press to get the stock bushings *OUT*. It's not an easy job. Don't underestimate it. For me, a 10 ton just barely was enough to get one of the bushings out but it did not budge the other side. Even a 20 ton press was not sufficient until I drilled it out and attacked the sleeve with a sawzall.
 
OP
OP
NGOT8R

NGOT8R

Well-Known Member
Joined
Jul 19, 2020
Threads
113
Messages
5,997
Reaction score
4,065
Location
Florida
First Name
Adrian
Vehicle(s)
2019 Bullitt
You may not need a "heavy duty press" to push the bearings *IN*, but you will probably need a 20 ton (at least) press to get the stock bushings *OUT*. It's not an easy job. Don't underestimate it. For me, a 10 ton just barely was enough to get one of the bushings out but it did not budge the other side. Even a 20 ton press was not sufficient until I drilled it out and attacked the sleeve with a sawzall.
I wonder if some of the difficulty in removing them comes from rust and oxidation around the bushing sleeve from having been on the cars that have been exposed to the elements for a period of time? I’m hoping I’ll catch a break since my car is still very new with only 471 miles on it and hasn’t been exposed to any harsh environments yet. If the 12 ton doesn’t do it I’ll have to find a reputable shop to remove them for me. I can’t believe Steeda or BMR hasn’t done a detailed installation video on this install yet.
 

Sponsored

Grimreaper

Well-Known Member
Joined
Jan 23, 2019
Threads
14
Messages
585
Reaction score
281
Location
Dallas
Vehicle(s)
2017 GT
Ball joint press and a sawzall with very careful cuts. Do two 180v degrees apart and bearing comes out easy
 

Thub

Well-Known Member
Joined
Mar 7, 2018
Threads
16
Messages
120
Reaction score
43
Location
Elgin, Illinois
First Name
Jim
Vehicle(s)
2018 GT 6 speed
There seems to be a huge amount of variation in press force. I attempted this with a balljoint press two weeks ago, and even with heat (not a lot of heat, because aluminum) and penetrating oil, i ended up mushrooming the aluminum tool steeda includes. Ultimately, i gave up and decided to find a shop to do it.
My car's a daily with 33k on it, oxidation was very evident on the aluminum.
 

NightmareMoon

Well-Known Member
Joined
Nov 22, 2015
Threads
41
Messages
5,623
Reaction score
4,643
Location
Austin
Vehicle(s)
2016 Mustang GT PP
Vehicle Showcase
1
Used a large screw type bushing tool on my car. It took a lot of force. My mechanic’s press wasn’t even close (but it was <10 tons)

One of my stock LRCA bushings was torn, so they needed to go.
 
OP
OP
NGOT8R

NGOT8R

Well-Known Member
Joined
Jul 19, 2020
Threads
113
Messages
5,997
Reaction score
4,065
Location
Florida
First Name
Adrian
Vehicle(s)
2019 Bullitt
Ok folks, I too am now a believer in how difficult this install is. Yesterday I removed the passenger side RLCA in preparation for pressing out the stock bushing and installing the Steeda Bearing this morning. Let me say that the stock bushing bent my 12 ton press shaft and didn’t move at all! With the press damaged, I decided to use it for what I could and pressed out the rubber bushing from the cup in case I decide to cut the sleeve. Needless to say, I will be enlisting the help of a machine shop for the rest of this job. I decided to quit while I was ahead because I didn’t want to muck anything up. So far, I managed not to damage to the control arm. Take a look at the results here.

aZ9Ux2Vl.jpg

cPXAi5Ml.jpg

9r6NiJBl.jpg

K785EQLl.jpg

QrIULg4l.jpg

VDesSwzl.jpg

lYjZsBrl.jpg

5KwZX9Sl.jpg

nDA4Iz5l.jpg
 

Sponsored

moffetts

Well-Known Member
Joined
Nov 30, 2015
Threads
14
Messages
978
Reaction score
325
Location
San Mateo CA
Vehicle(s)
Black Whippled 2015 GT PP
Haha oh yeah, that looks familiar. Cutting the sleeve on the bushing is not for the faint of heart.
 
OP
OP
NGOT8R

NGOT8R

Well-Known Member
Joined
Jul 19, 2020
Threads
113
Messages
5,997
Reaction score
4,065
Location
Florida
First Name
Adrian
Vehicle(s)
2019 Bullitt
Haha oh yeah, that looks familiar. Cutting the sleeve on the bushing is not for the faint of heart.
Right! I have been staring at this thing ever since, trying to figure out if I should hack away at it with a saw blade, but I know that would take forever to do. I can’t see not having this mod done though after researching how much flex is in the stock bushings, which are a huge contributor in the snapping of half-shafts. It is not something that I will be excited to do again EVER! Hell, I’m dreading taking the left control arm off and reinstalling everything once I get the bearings in. SMDH
 

moffetts

Well-Known Member
Joined
Nov 30, 2015
Threads
14
Messages
978
Reaction score
325
Location
San Mateo CA
Vehicle(s)
Black Whippled 2015 GT PP
When you reinstall, make sure the front 24mm bolt that holds the control arm to the subframe is properly torqued. That bolt is very difficult to get to once you put the half shaft and spring back in.
 
OP
OP
NGOT8R

NGOT8R

Well-Known Member
Joined
Jul 19, 2020
Threads
113
Messages
5,997
Reaction score
4,065
Location
Florida
First Name
Adrian
Vehicle(s)
2019 Bullitt
When you reinstall, make sure the front 24mm bolt that holds the control arm to the subframe is properly torqued. That bolt is very difficult to get to once you put the half shaft and spring back in.
Copy that! I noticed it was hard to get to with the half shaft in place during removal. Had to add a couple of extensions and use a breaker bar. I believe the torque spec on those bolts is 166 ft-lbs. Does the suspension need to be loaded before torquing these bolts or can I torque them before reinstalling the springs? Thanks


Top