Sponsored

Stereo Information (Wiring, Upgrades, etc...)

acull2000

Well-Known Member
Joined
Dec 7, 2015
Threads
24
Messages
275
Reaction score
43
Location
UK
Vehicle(s)
iPace
Great diagram [MENTION=20499]mumbles[/MENTION].

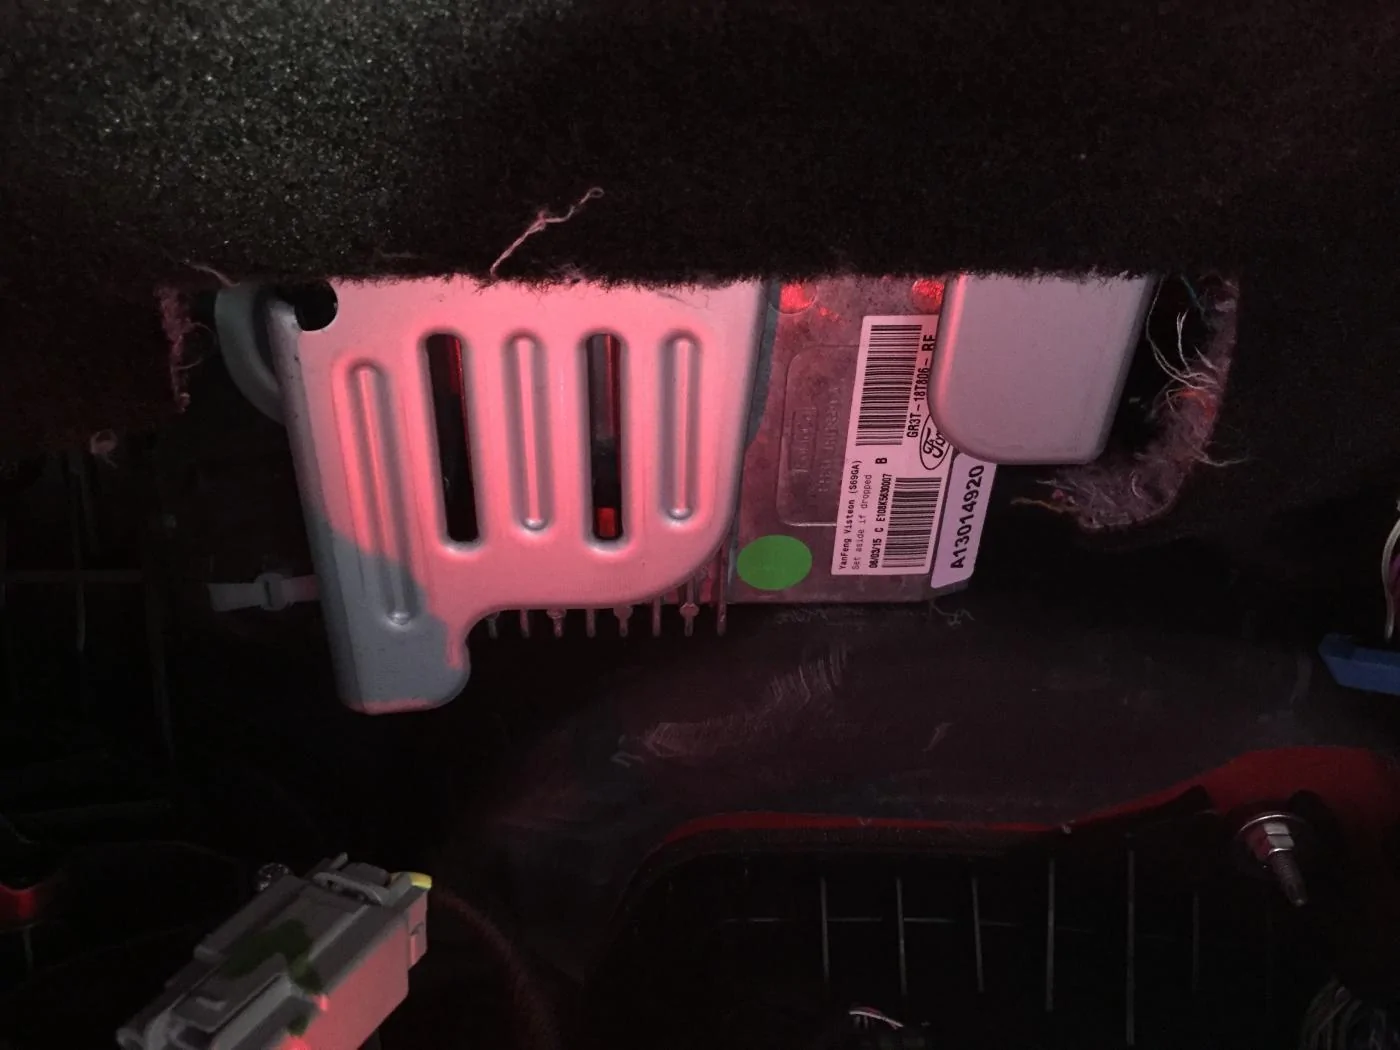
For anyone interested, I can confirm the position of the amp seems to be the same on the EU variants. Looks something like this before you remove the panel, in the left hand side footwell:

As Fenix says, you don't "have" to remove the trim panel, but it makes things easier...

  1. Pop off the cap on the hood release
  2. Push a 10mm socket into the hole of the hood release, and it will pop free the handle
  3. Pull up on the lower door scuff panels to create some room to wiggle the kick panel free
  4. Grabbing the rear of the kick panel, pull out towards the center console to free the rear retainer
  5. Still holding the rear of the kick panel, pull towards you to free the front retainers
IMG_7689.jpg
Sponsored


Mid_life_crisis

Well-Known Member
Joined
Sep 4, 2016
Threads
10
Messages
158
Reaction score
16
Location
Raleigh, NC
Vehicle(s)
2016 ecoboost premium
Ok folks, new diagram time...
This one shows how you would add aftermarket processors and amps by utilizing some connectors from Molex that just plug into the connectors at the factory amp. Racemaster did an awesome job using the 90 degree version of these plugs and enclosing them in a "project" box.

This diagram is pretty generic, so please remember that there are literally hundreds of ways this could be done...
It looks like the molex connectors being purchased are bypassing the amplifier by connecting to the cable that was plugged into the amplifier at the factory. What happens to the noise cancellation circuitry? Seeing as it appears to be just being ignored, does the H/U do anything trying to compensate for the lack of effect? Or is it moot because that signal is just ignored anyway? Do you know if the engine noise is carried on those wires? Does bypassing them cut out the fake engine noise?
 

mumbles

Well-Known Member
Joined
Dec 22, 2015
Threads
16
Messages
933
Reaction score
266
Location
ATL
First Name
Eric
Vehicle(s)
'16 GT Prem OW
It looks like the molex connectors being purchased are bypassing the amplifier by connecting to the cable that was plugged into the amplifier at the factory. What happens to the noise cancellation circuitry? Seeing as it appears to be just being ignored, does the H/U do anything trying to compensate for the lack of effect? Or is it moot because that signal is just ignored anyway? Do you know if the engine noise is carried on those wires? Does bypassing them cut out the fake engine noise?
Correct, both factory amp and noise cancellation is bypassed. I can't imagine the head unit trying to compensate, a number of folks have done this and nobody has reported ill effects.
 

Mid_life_crisis

Well-Known Member
Joined
Sep 4, 2016
Threads
10
Messages
158
Reaction score
16
Location
Raleigh, NC
Vehicle(s)
2016 ecoboost premium
I think you may have just helped me to identify exactly which pins to remove from the amp to disable the fake engine noises once and for all :)

Do you have to remove any trim panels to get to the amp, or is it just sat there?
Don't forget to share your results.
 

Sponsored

HextallS550

Well-Known Member
Joined
Jan 2, 2017
Threads
19
Messages
1,182
Reaction score
663
Location
Dearborn, MI
Vehicle(s)
2017 GT
Which ACM should be used for a 2017 base to Sync 3 swap? I've seen two types one has a single black Fakra connector one has a black and yellow Fakra....
 

mumbles

Well-Known Member
Joined
Dec 22, 2015
Threads
16
Messages
933
Reaction score
266
Location
ATL
First Name
Eric
Vehicle(s)
'16 GT Prem OW
anyone find if non board mount versions exist for the 0160 connector?

Ramb
Yes... the board mount is a Molex 34691-0160, while the non board mount is a Molex 34690-0160
 

mumbles

Well-Known Member
Joined
Dec 22, 2015
Threads
16
Messages
933
Reaction score
266
Location
ATL
First Name
Eric
Vehicle(s)
'16 GT Prem OW

BDMACH1

Well-Known Member
Joined
Oct 16, 2015
Threads
16
Messages
880
Reaction score
347
Location
Ravenna, Ohio
First Name
Bob
Vehicle(s)
2016 Mustang GT/CS
Ok folks, new diagram time...
This one shows how you would add aftermarket processors and amps by utilizing some connectors from Molex that just plug into the connectors at the factory amp. Racemaster did an awesome job using the 90 degree version of these plugs and enclosing them in a "project" box.

This diagram is pretty generic, so please remember that there are literally hundreds of ways this could be done... although I have shown the center channel speaker, it's just for reference and is not part of the amplified output.

S550_Prem_Custom_Stereo.jpg
Nice work Man! :thumbsup:

Do those molex connectors for the amp come with pins too? or....do we order those seperate??
 

Sponsored

mumbles

Well-Known Member
Joined
Dec 22, 2015
Threads
16
Messages
933
Reaction score
266
Location
ATL
First Name
Eric
Vehicle(s)
'16 GT Prem OW

aehchi

Member
Joined
Mar 12, 2017
Threads
1
Messages
11
Reaction score
8
Location
Chicago
Vehicle(s)
2015 EcoBoost Premium
Speaker Upgrade

So, I've been watching this blog for about a year and a half to get ideas about upgrading my Shaker Pro system. I'm a professional musician and thought that I was getting the best sound when chose the Shaker, but was surprised at how mediocre the sound was (someone here described it as "muddy" and I find that accurate).

I went to a guy here is Chicago who does all the high-end car stereo upgrades in town and he suggested a DSP/Amp combo (Mosconi or Audison) and new speakers. But then he said that there would likely be a hum or buzz in the speakers are very low levels - which would drive me crazy. So, I decided to simply replace the speakers and see what happened. It took a long time to find the specs on the original speakers and longer to find replacements that matched those specs, but I did. I'm putting this info out here, because I got my car back yesterday and the sound difference is remarkable. I had so much trouble finding accurate info, that I wanted to share what I found so the next guy has less trouble.

I did not want any cosmetic changes or to change the headunit or amp. This was crucial. I needed better quality speakers that matched the specs of the originals so that they could just be dropped in. Here is the info:

Front Stage:
6.5" mid-woofer = 2 ohm, 35 watt rms
3.25" midrange = 2 ohm, 25 watt rms
Tweeter = 2 ohm, no wattage info

Rear Stage:
6.5" coaxial = 2 ohm, 25 watt rms
Subwoofer = dedicated amp in the enclosure, 2 ohm, no wattage info

Front Stage Replacements:
Mid-woofer and tweeter = JBL GX600C
Midrange = JBL GX302

Rear Stage Replacements:
Coaxials = JBL Club 6520 OR Infinity Kappa 62.11i (may need to widen holes so magnet will fit)

Woofer/amp Replacement:
Woofer = Kicker CompR 43CWR82
Amp = Sound Ordnance M100-2
You will need a grill for the sub, so I suggest the Kicker GR80 8"

Total cost of parts: about $475 ($515 if you buy the Metra Speaker Mounting Brackets (which you get free if you order the speakers from Crutchfield). I went through Amazon and got all these components (except the Sound Ordnance) for less than anywhere else.

As I mentioned, I got the car back yesterday. No one can tell that any work has been done (all looks factory), except the sub (only because the factory grill doesn't fit over the Kicker sub).

...and, the sound has improved 1000%. Cleaner highs and mids and sufficient bass (though you could go with a bigger amp/sub if you want more thump). You may also look for a different midrange to balance the tweeter - I bought a coax and that may be too much high frequency for some. Just make sure to match the specs of the JBL GX302 (2-2.3 ohm, 25 watt RMS). Don't forget the Dynomat.

Still looking for info on the center channel speaker specs, but for now, it doesn't seem to matter.
 
Last edited:

Fenix

Well-Known Member
Joined
Jul 3, 2016
Threads
8
Messages
203
Reaction score
45
Location
Ohio
Vehicle(s)
2016 GT Premium Shadow Black
Anyone know what the voltage from the "audio enable" pin is? Hoping I can use this to turn on my amp as it can detect anywhere from 5v-12v for remote on.
PremDiagram.jpg
 

mumbles

Well-Known Member
Joined
Dec 22, 2015
Threads
16
Messages
933
Reaction score
266
Location
ATL
First Name
Eric
Vehicle(s)
'16 GT Prem OW
Anyone know what the voltage from the "audio enable" pin is? Hoping I can use this to turn on my amp as it can detect anywhere from 5v-12v for remote on.
I think it is 6v, but I'll be measuring and will post it here...
 

mumbles

Well-Known Member
Joined
Dec 22, 2015
Threads
16
Messages
933
Reaction score
266
Location
ATL
First Name
Eric
Vehicle(s)
'16 GT Prem OW
Yep, +6v...
Sponsored

 
Last edited:


Top