Sponsored

Brake Pad Replacement Questions

UnhandledException

Well-Known Member
Joined
Apr 22, 2017
Threads
103
Messages
1,029
Reaction score
543
Location
States
Vehicle(s)
2017 GT350
Hello Forum,

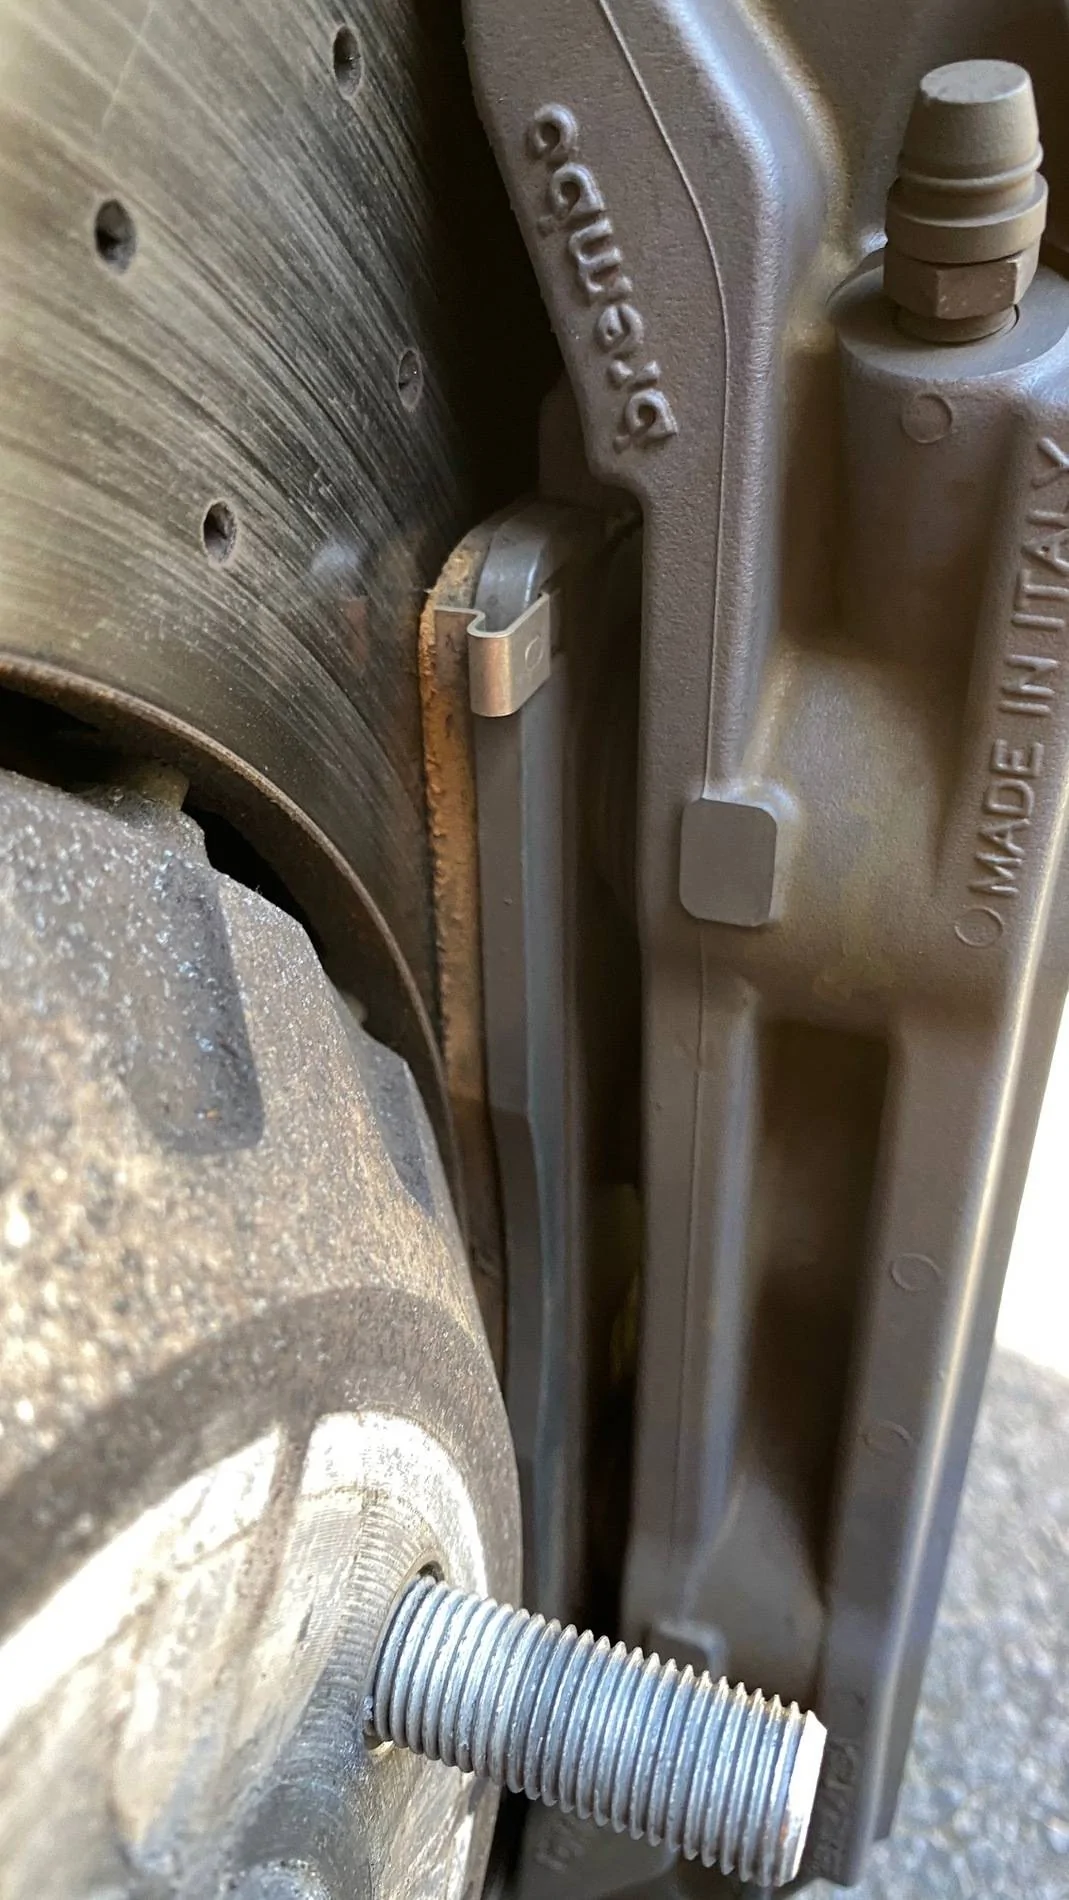
After 59,000 miles, I think it's time for me to change the brake pads. The fronts are down to as much as backing plate whereas rears are a little more. I do have some questions with the procedure and the replacement pads:

- I have read various threads as to what the right way is for doing the pad replacements. Some threads show special tools to spread the pistons as well as the rear hand brake spring. I found one video online which shows a much easier way where he recommends to unscrew the brake fluid reservoir cap and push the pistons out. This also does not require any special tools. Is there anything wrong with this procedure? Is there a better/another DIY that explains this?

- I don't track this car (you can tell from 59,000 miles = stock pads). That being said, I dont know whether I should get different pads or stock. What is the best street pad?

- Some threads I read talks about these bolts and that they need to be replaced. Is this true for someone who will change these pads only every 60,000 miles? Should I get new bolts?

- Why is anti sieze required where blue loctite is on these bolts? Isn't this the complete opposite of what OEM install has?

- How long does the ROTORS last? Can I use them with a different pad than OEM?

Any other suggestions, etc I should know before I attempt this?

Thanks a lot
Sponsored


Tomster

Beware of idiots
Joined
Feb 20, 2016
Threads
288
Messages
16,068
Reaction score
17,100
Location
FL
First Name
Tom
Vehicle(s)
'20 RR GT500R(CFTP), 18 OW GT350R Base, '17 AG GT350R Electronics Pack, '97 PG Cobra Convertible
Technically, you are supposed to replace the caliper bolts. Most say it is due to the antifriction (locktite). If you use blue locktite on the old bolts you will be fine. Do not use Red locktite. Anti-seize? No. Clear all the old blue locktite off the bolt before reusing. A small amount of blue locktite on the old bolt before reuse will be fine.

I use OEM stock pads. They dust, but they work great.

I am able to use my hands and the old brake pads to push the caliper pistons in. When you do, realize that the pistons on the other side of the caliper will move out, so it is helpul to have a friend hold the pistons in using an old brake pad. It will take a lot of muscle and they move very slow. If you want, you can buy the caliper piston compression tool, but I don't use it. I don't unscrew the reservoir cap. Maybe it will make it easier? I don't know, but I wouldn't take the cap off and leave it like that for any period of time. 59,000 miles? You should probably bleed your brakes when you are done. Heck, Id go ahead and flush the system by bleeding until they were clear with all new fluid.

Yes you use the old rotors. The rotor is stamped on the hat with a minimum thickness. Use calipers to measure the thickness of your rotor. If it is thicker than the stamped specification, then you can turn them to a perfect machined surface, but its not recommended. I'd just leave them as is if there are no major defects.

The calipers are heavy. Plan on using some cord or wire to suspend them while you are working on the brakes. If you installed caliperfexion studs, the job would be much easier.

Rear pads are simple. You pop the pins, and the old pads slide right out. Before doing so, be sure to compress the pistons so that you can slide the new pads in.

OEM pads come with a small tube of lubricant. lubricate the contact areas of the caliper and pads. No need to lube anywhere else, although I do use a small amount on the pins.
 

proeagles

Well-Known Member
Joined
Sep 17, 2019
Threads
0
Messages
293
Reaction score
177
Location
Covington, LA
First Name
Scott
Vehicle(s)
2019 Shelby GT 350, 2019 BMW X3, 2019 Honda Civic
You will get a lot of different opinions on this. I used Hawk pads all the time back in the day when I was racing and doing a lot of HPDEs. They are great products and I see no reason why you wouldn't be happy with the ones in the video. Venting the master cylinder is a good idea to relieve the pressure in the brake line so that you can push the pads back easy as shown. As far as how long the rotors will last is an impossible question to answer since it depends on how you drive your car. I would be tempted to change the rotors and pads at the same time with 60K miles on them. I'm also not a big fan of mixing compounds on the rotor surface without some sort of resurfacing. There is a specification on rotor thickness and if you have a micrometer you can measure your current thickness and determine how much rotor you've used and how much you have left. You always want to use anti seize with dissimilar metals and if you use it on the back of the pads as shown, you have to use one specified for brakes. Blue loctite is recommended for the the bolts that hold the caliper on to the bracket just to keep it from backing off.
 
OP
OP

UnhandledException

Well-Known Member
Joined
Apr 22, 2017
Threads
103
Messages
1,029
Reaction score
543
Location
States
Vehicle(s)
2017 GT350
Technically, you are supposed to replace the caliper bolts. Most say it is due to the antifriction (locktite). If you use blue locktite on the old bolts you will be fine. Do not use Red locktite. Anti-seize? No. Clear all the old blue locktite off the bolt before reusing. A small amount of blue locktite on the old bolt before reuse will be fine.

I use OEM stock pads. They dust, but they work great.

I am able to use my hands and the old brake pads to push the caliper pistons in. When you do, realize that the pistons on the other side of the caliper will move out, so it is helpul to have a friend hold the pistons in using an old brake pad. It will take a lot of muscle and they move very slow. If you want, you can buy the caliper piston compression tool, but I don't use it. I don't unscrew the reservoir cap. Maybe it will make it easier? I don't know, but I wouldn't take the cap off and leave it like that for any period of time. 59,000 miles? You should probably bleed your brakes when you are done. Heck, Id go ahead and flush the system by bleeding until they were clear with all new fluid.

Yes you use the old rotors. The rotor is stamped on the hat with a minimum thickness. Use calipers to measure the thickness of your rotor. If it is thicker than the stamped specification, then you can turn them to a perfect machined surface, but its not recommended. I'd just leave them as is if there are no major defects.

The calipers are heavy. Plan on using some cord or wire to suspend them while you are working on the brakes. If you installed caliperfexion studs, the job would be much easier.

Rear pads are simple. You pop the pins, and the old pads slide right out. Before doing so, be sure to compress the pistons so that you can slide the new pads in.

OEM pads come with a small tube of lubricant. lubricate the contact areas of the caliper and pads. No need to lube anywhere else, although I do use a small amount on the pins.
Thank you so much for your response.

Some follow up questions:

- After posting this thread, further googling/youtube taught me that it might be a good idea to install this stud conversion kit. I think I will go ahead and use the studs instead of these bolts. Are there any issues/things to be aware of with these studs? I am guessing I need to use compressed air to clean the threads. I do not want to use tap/die on this.

- Dont you need to remove/release parking break springs for the rear rotors?

- I have never bleeded the brake fluid/replaced it. Are there any instructions anywhere?

Thanks again.
 
OP
OP

UnhandledException

Well-Known Member
Joined
Apr 22, 2017
Threads
103
Messages
1,029
Reaction score
543
Location
States
Vehicle(s)
2017 GT350
Also here is the picture of the fronts. Rears are a little better, I would say 30-40% more than this.

5-AAB99-F4-1-FBD-4-E1-F-B602-09209582686-D.webp
 

Sponsored

ZX3ST

Well-Known Member
Joined
Jan 21, 2018
Threads
6
Messages
326
Reaction score
307
Location
STL
First Name
Mike
Vehicle(s)
2018 GT350, Kona Blue, J3116
Hard to tell from the angle of that picture, but I don't think you're yet due for pads. The OEM pads are only 9mm thick when new. Looks like you have a ways to go before you get to the squeakers.
 
OP
OP

UnhandledException

Well-Known Member
Joined
Apr 22, 2017
Threads
103
Messages
1,029
Reaction score
543
Location
States
Vehicle(s)
2017 GT350
Hard to tell from the angle of that picture, but I don't think you're yet due for pads. The OEM pads are only 9mm thick when new. Looks like you have a ways to go before you get to the squeakers.
I have measured it and using those digital calipers, its around 5mm.

The metal squealer is precisely midway between the backing plate and the rotor. If that helps.
 

raptor17GT

Well-Known Member
Joined
Aug 9, 2019
Threads
23
Messages
1,928
Reaction score
1,503
Location
Scotland
Vehicle(s)
Mustang GT Manual 2017 - now sold ☹
i think you'll find it much easier to push the pistons back if you open the brake reservoir since it will allow the fluid to move back up the pipes. The problem would be if you've previously topped up the fluid when the pads were worn down as then you will get an overflow and brake fluid is not something you want anywhere else other than the brake system. Plenty of how to guides out there, end of the day moving pistons back is the same pretty much for any car. I have a pad spreader which pushes both sides out at the same time and applies equal pressure across the full piston face (all the pistons)
 

Tomster

Beware of idiots
Joined
Feb 20, 2016
Threads
288
Messages
16,068
Reaction score
17,100
Location
FL
First Name
Tom
Vehicle(s)
'20 RR GT500R(CFTP), 18 OW GT350R Base, '17 AG GT350R Electronics Pack, '97 PG Cobra Convertible
Thank you so much for your response.

Some follow up questions:

- After posting this thread, further googling/youtube taught me that it might be a good idea to install this stud conversion kit. I think I will go ahead and use the studs instead of these bolts. Are there any issues/things to be aware of with these studs? I am guessing I need to use compressed air to clean the threads. I do not want to use tap/die on this. See instructions in attached file. Also buy the stud extension sleeves. They hold your caliper so you don't have to hang them with a wire.

- Dont you need to remove/release parking break springs for the rear rotors? NO

- I have never bleeded the brake fluid/replaced it. Are there any instructions anywhere? I use the motive power bleeder. You can do it manually, but this is much easier and you don't need another person to pump the brakes. See below for a youtube link?

Thanks again.
 

Attachments

Tomster

Beware of idiots
Joined
Feb 20, 2016
Threads
288
Messages
16,068
Reaction score
17,100
Location
FL
First Name
Tom
Vehicle(s)
'20 RR GT500R(CFTP), 18 OW GT350R Base, '17 AG GT350R Electronics Pack, '97 PG Cobra Convertible
Hard to tell from the angle of that picture, but I don't think you're yet due for pads. The OEM pads are only 9mm thick when new. Looks like you have a ways to go before you get to the squeakers.
He can definitely get more miles out of those pads. However, as I have learned the hard way, brake pads don't always wear evenly. If I was him, I'd take the front tires off and check the inside pad as well. He's probably fine.
 

Sponsored

JAJ

Well-Known Member
Joined
Apr 9, 2016
Threads
4
Messages
2,221
Reaction score
1,976
Location
Vancouver BC
Vehicle(s)
2016 GT350 Track Pack
So, here's what I suggest, based on you only doing this once every three years or so:

Tools - front first - here's the simplest set that works remarkably well:

upload_2020-5-11_10-29-31.webp


1. The cheap (big) pry bars fit nicely between the used pads and you can press them back to reset the pistons very easily. Nothing fancy - I have the big red Girodisk spreader but I use these because they're just so easy to use.

2. The long bolts are M14x2 x 180 mm. You use them by unscrewing, one at a time, the factory 100 mm bolts and putting these in "finger tight", maybe 5 full turns. Before I switched to Caliperfexion studs, I used these and they work great. Once both are in place, you just slide the caliper outward to remove the rotor.

3. The T60 torx bit is how you remove and reinstall the factory bolts.

So, that's the tool set.

The procedure is as follow - this may be repeating the video, or it might disagree - I haven't watched - but it's how I do it:

1. Setup: first, loosen the brake fluid reservoir cap and check to see how much room there is - if it's full, use a turkey baster to take some out to make room for the fluid that'll be pushed out of the calipers when you push the pistons in.

2. Setup: second, drive the pad retainer pins back so they're ready to come out, but don't take them all the way out yet.

3. With the steering wheel pointed straight ahead, undo the upper caliper mounting bolt and screw in the long bolt about 5 turns. Then remove the lower bolt and screw in its long bolt.

4. Slide the caliper out onto the long bolts. If the brake line gets tight, turn the steering a bit to create some slack. Make sure the rotor doesn't fall off.

5. Remove the rotor and set it aside

6. Use the two long pry bars, in the position shown, to press the old pads apart and move the pistons in to make room for the new pads. Make sure the reservoir doesn't overflow while you're doing this.

7. Remove the pad retaining pins that you loosened at the beginning.

8. Remove the old pads and put the new ones in place. Start with the inboard pad and thread the retaining pin first through it then through the outer pad and into the caliper body. Ditto the lower pin. Seat the pins in the outer hole, but don't drive them all the way in.

9. While pushing against the anti-rattle spring, get the pads into place in the pad pocket and fully back against the pistons. This isn't really a "step" but it's an important checkpoint.

10. Put the rotor back on and slide the caliper back into place. It's easier to maneuver the caliper if you can put a lug nut on to hold the rotor in place, but that only works if you have open-end lug nuts on hand. You could stack a few washers too I suppose - you don't need a lot of thickness to take up the slack and pin the rotor in place.

11. Once the caliper is back against the bosses, swap the long caliper bolts back to the short bolts and torque to spec.

12. Once the caliper is solidly in place, drive the pad retaining pins through from inside the wheel well until the heads are flush with the caliper body. This is done last because you don't want to be banging on these when the caliper is hanging out in space on the long bolts.

That's it. Do one side at a time and pump the brake pedal down between sides to seat the new pads and push any extra fluid out of the reservoir and into the caliper where it belongs.
 

Caballus

Well-Known Member
Joined
Jan 24, 2016
Threads
43
Messages
3,613
Reaction score
2,087
Location
Over Yonder
Vehicle(s)
GT350
...- After posting this thread, further googling/youtube taught me that it might be a good idea to install this stud conversion kit. I think I will go ahead and use the studs instead of these bolts. Are there any issues/things to be aware of with these studs? I am guessing I need to use compressed air to clean the threads. I do not want to use tap/die on this...
I am a huge fan of Caliperfexion studs. Inexpensive, easy to install, and saves tons of work/heartache. I don't think I'm alone, as I've never heard anyone complain about them. As for cleaning the threads, a good brush and compressed air does the job. The instructions lay everything out and you can find good videos online. The key is taking your time and paying attention to detail.
 

JAJ

Well-Known Member
Joined
Apr 9, 2016
Threads
4
Messages
2,221
Reaction score
1,976
Location
Vancouver BC
Vehicle(s)
2016 GT350 Track Pack
The rear pads are easiest because the rears have a "top loader" caliper so you don't have to remove the rotor to access the pads. You just drive the pins out, spread the pads apart with a pair of pry bars or even just screwdrivers prying against the (iron) rotor (on both sides of the rotor at the same time) and bung in the new pads. However, if the rotor is worn down - at 60k miles it's probably done - then you have some work to do. I wrote a description in another thread on how to remove the parking brake bracket (a diabolical design) with just a couple of easy-to procure-on-Amazon tools that make the job as simple as it can be. If you need that info, post here and I'll find it - it might be on another forum.
 

key01

Well-Known Member
Joined
Nov 10, 2017
Threads
9
Messages
1,425
Reaction score
1,401
Location
Chicagoland
Vehicle(s)
2017 GT350 now gone to a great home.
Congrats on your putting the miles on your 350. Those pads and rotors appear to have worn well over all of those miles. As Tomster said you need to look at the wear of the inboard pads to make sure all is working properly.
 

Tank

9/11 - Never Forget
Joined
Feb 19, 2016
Threads
36
Messages
3,065
Reaction score
1,794
Location
Above the Notches
Vehicle(s)
G0853
Good info!

A couple of points:

  1. If your going with another brand of pad, take some fine sandpaper to scuff up and remove the pad material from your old ones. Light scuffing, nothing crazy.
  2. When you’re done, you need to bed the new pads. Google it, all sorts of info out there.
Sponsored


Top