Sponsored

What did you do to your S550 Mustang today?!

FreePenguin

Well-Known Member
Joined
Sep 29, 2019
Threads
81
Messages
5,354
Reaction score
3,704
Location
Ohio
First Name
Donald
Vehicle(s)
17 mustang
Vehicle Showcase
1
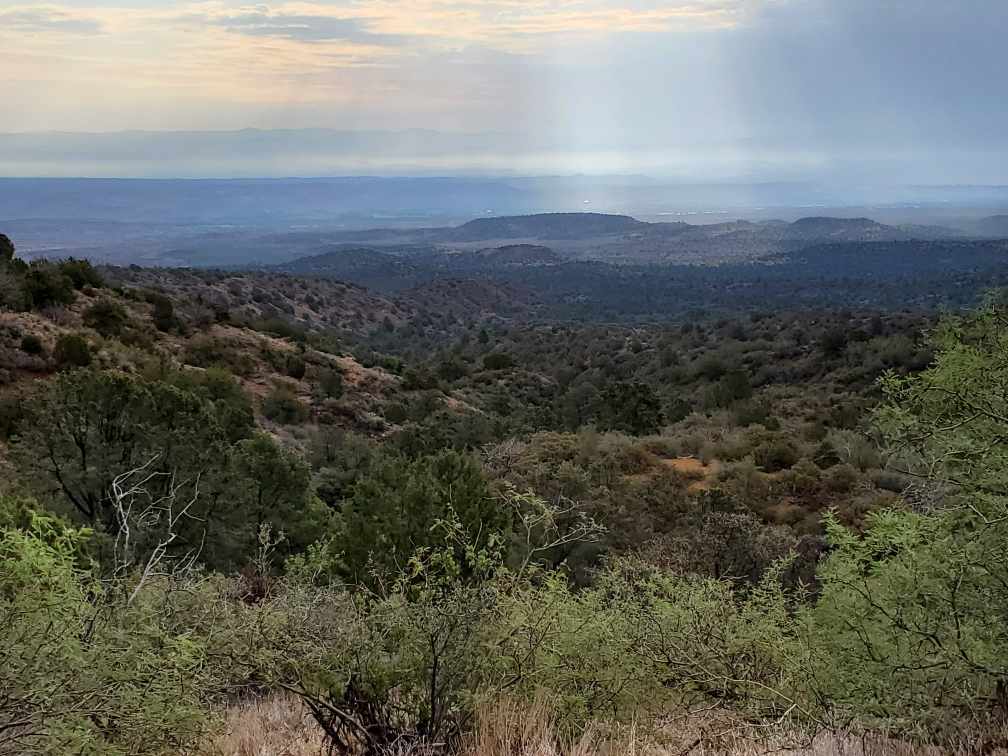
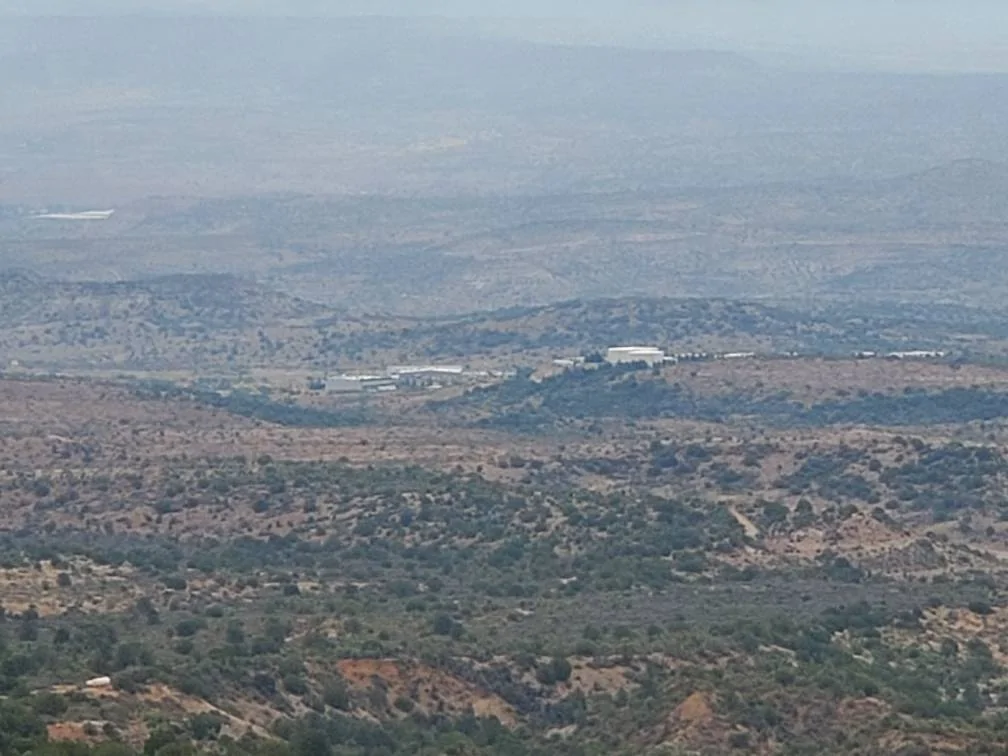
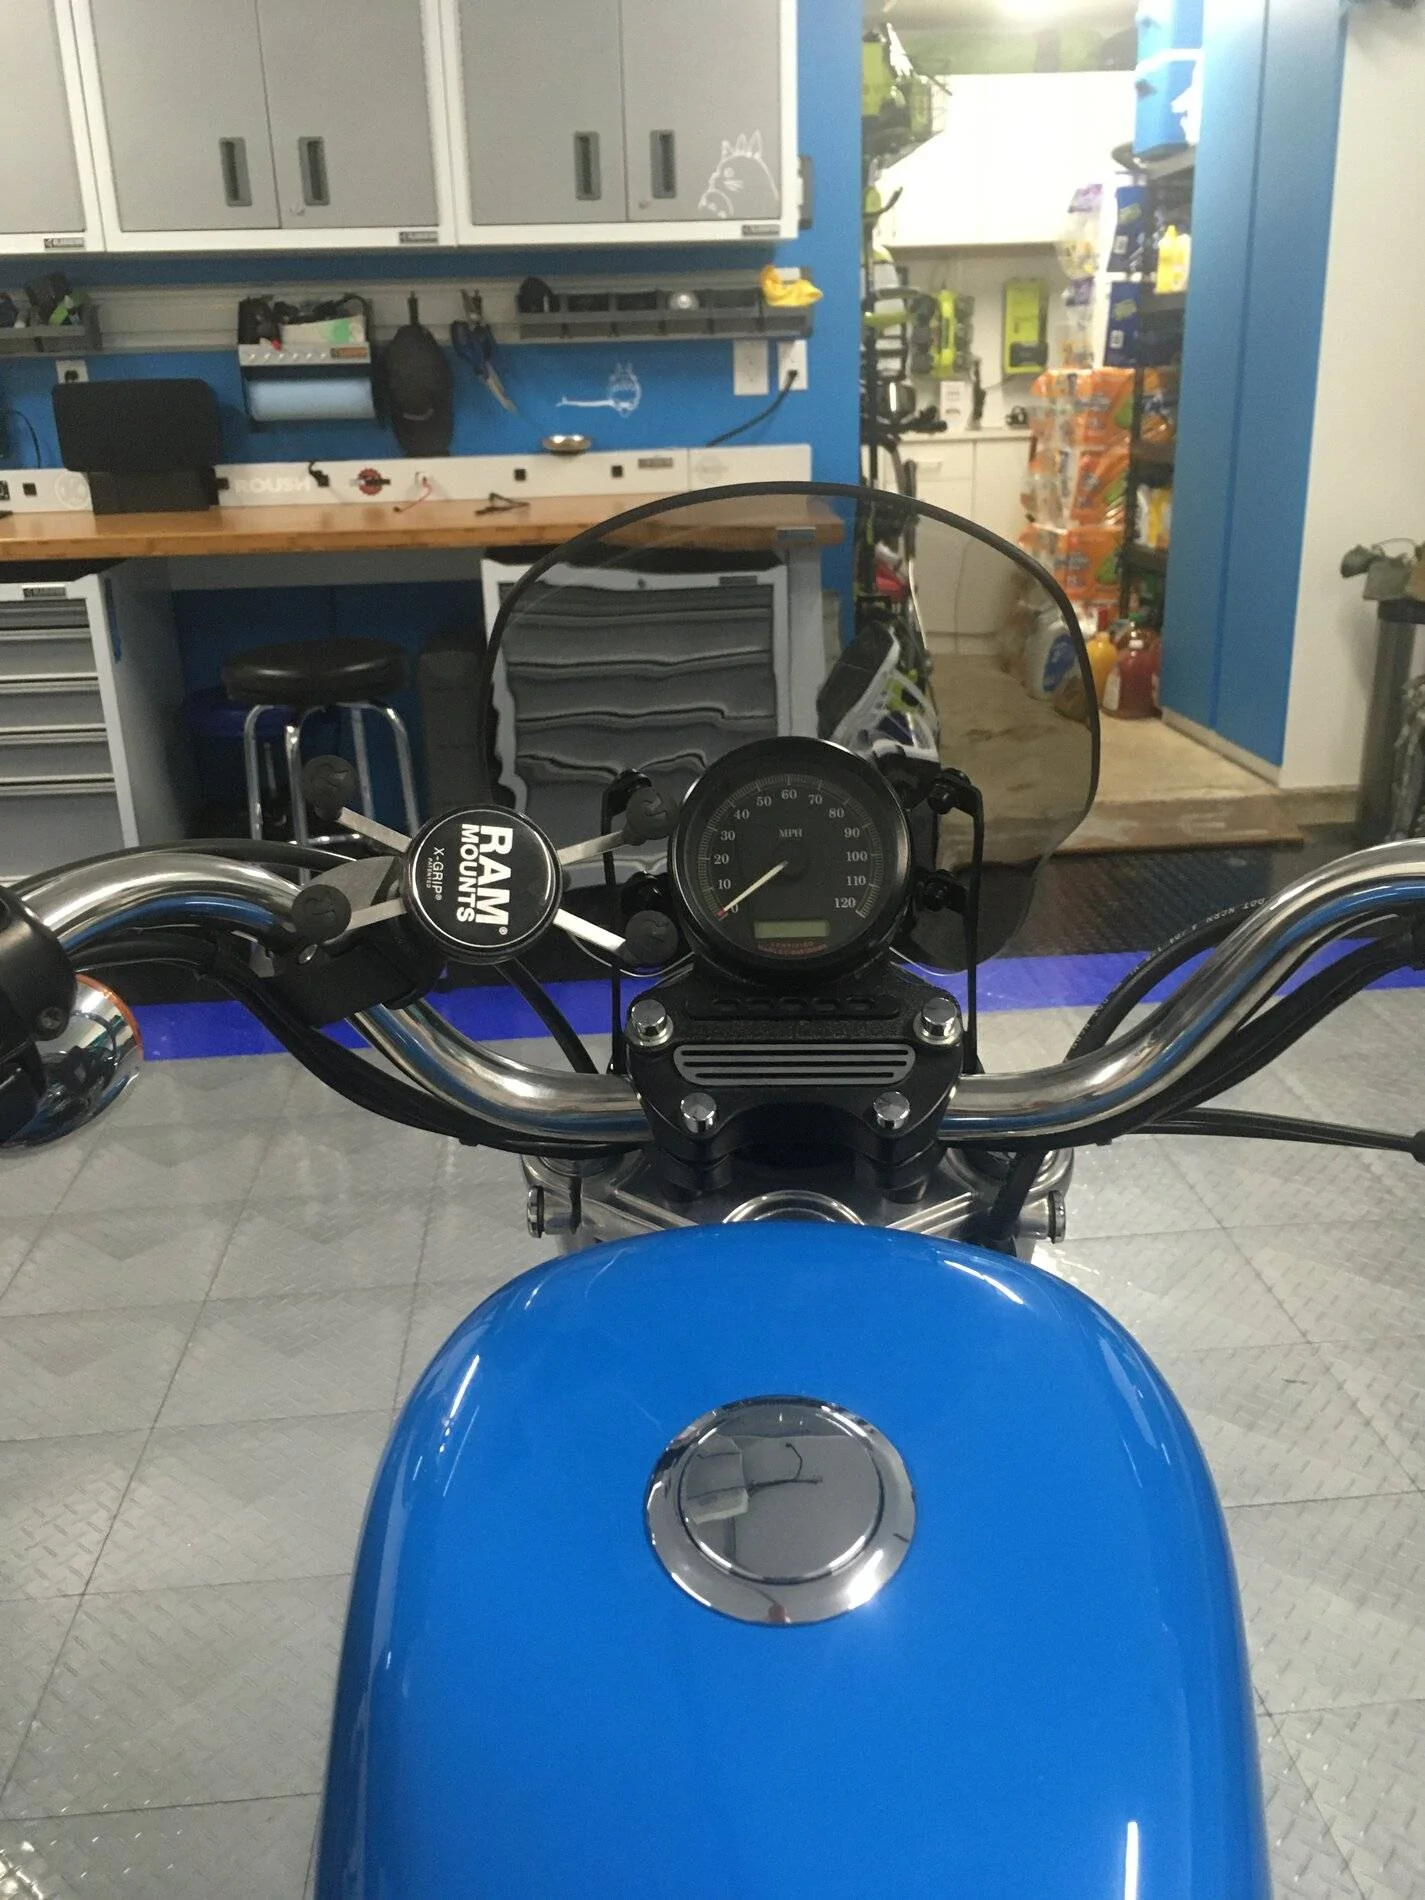
Took my car to the gym, that's about it. I put a little windshield on my sportster, didn't think it would do anything, and I honestly always hated my sportster on the highway due to wind but absolute hoot on the back roads or rural areas town hopper. The little windshield made me love this thing. just rode for hours, the wind is like 60% reduced. really actually had a great time.

I am so glad I didn't have my car, the highway got shut down due to wrecks, man like a thousand cars stopped for hours. I filtered through them all easy enough. nimble little sporty.

I dont think it looks badass by any means, but I do think the windshield doesnt look terrible. Worth its weight in gold though. 6 years of having it, ive hated every ride on highway. feel like im being blown off the bike. Today is the first time I enjoyed myself. grinned ear to ear. was a fun time. needed it after all the stuff thats gone down.

not to mention, I got 110 miles on 2 gallons of fuel in my sporty today. lol. @ 87 octane.
IMG_1881.JPG


IMG_1829.JPG
Sponsored


cmxPPL219

Well-Known Member
Joined
Feb 7, 2019
Threads
2
Messages
576
Reaction score
577
Location
Toronto, Canada
First Name
Eric
Vehicle(s)
2019 Mustang GT PP2
Finally got around to installing a few mods that were sitting for a bit:

FP Magneride Lowering Springs
FP GT350 Front Adjustable Strut Mounts (Camber Plates)
FP Mustang Open Back Wheel Nuts
Steeda Front & Rear Endlinks
Steeda Trans Bushing Insert
Steeda Shifter Bracket

Yup, the car is dirty, some quick smartphone pics will have to do for now 😄 :

IMG_5687.JPG

IMG_5695.JPG

IMG_5599.JPG

IMG_5653.JPG

IMG_5907.JPG

IMG_5909.JPG

IMG_6034.JPG

IMG_6036.JPG

IMG_6104.JPG

IMG_6113.JPG

IMG_6133.JPG

IMG_6172.JPG

IMG_6136.webp

IMG_6204.JPG

IMG_6202.JPG

IMG_6043.JPG

IMG_6045.JPG

IMG_6056.JPG

IMG_6060.JPG

IMG_6058.JPG

IMG_6054.JPG

IMG_6066.JPG

IMG_6090.JPG

IMG_6072.JPG
IMG_6074.JPG

IMG_6076.JPG

IMG_6078.JPG

IMG_6143.JPG

IMG_6151.JPG

IMG_6149.JPG
 
Last edited:

Phoneman1223

Well-Known Member
Joined
Dec 5, 2018
Threads
0
Messages
123
Reaction score
179
Location
Dale City, VA
First Name
Jason
Vehicle(s)
2018 Mustang GT
Finally got around to installing a few mods that were sitting for a bit:

FP Magneride Lowering Springs
FP GT350 Front Adjustable Strut Mounts (Camber Plates)
FP Mustang Open Back Wheel Nuts
Steeda Front & Rear Endlinks
Steeda Trans Bushing Insert
Steeda Shifter Bracket

Yup, the car is dirty, some quick smartphone pics will have to do for now 😄 :

IMG_5687.JPG

IMG_5695.JPG

IMG_5599.JPG

IMG_5653.JPG

IMG_5907.JPG

IMG_5909.JPG

IMG_6034.JPG

IMG_6036.JPG

IMG_6104.JPG

IMG_6113.JPG

IMG_6133.JPG

IMG_6172.JPG

IMG_6136.JPG

IMG_6204.JPG

IMG_6202.JPG

IMG_6043.JPG

IMG_6045.JPG

IMG_6056.JPG

IMG_6060.JPG

IMG_6058.JPG

IMG_6054.JPG

IMG_6066.JPG

IMG_6090.JPG

IMG_6072.JPG
IMG_6074.JPG

IMG_6076.JPG

IMG_6078.JPG

IMG_6143.JPG

IMG_6151.JPG

IMG_6149.JPG
So I got a set of the Steeda adjustable end links ready to install and had some install advice about initial length when bolting up to sway bar. Did you do the work yourself?
 

cmxPPL219

Well-Known Member
Joined
Feb 7, 2019
Threads
2
Messages
576
Reaction score
577
Location
Toronto, Canada
First Name
Eric
Vehicle(s)
2019 Mustang GT PP2
So I got a set of the Steeda adjustable end links ready to install and had some install advice about initial length when bolting up to sway bar. Did you do the work yourself?
Awesome :thumbsup:
Are you lowering the car? This matters, because depending on how much it's lowered if you are lowering, it may affect how much you need to adjust the endlinks.

Otherwise, first, what you want to do is adjust each endlink's length till they're equal to the stock endlinks.

Next, install one end of the endlink into the strut and the other into the sway bar. For the rear, one end into the sway bar, the other end into the spring bucket.
At this point, you want to make sure the endlink stud is going into the holes of the sway bar and strut endlink bracket or rear spring bucket, passing through relatively freely - the amount of adjustment you may or may not have to do to achieve this, depends on if you're lowering, and how low.

Then, for front - tighten the endlink nut on the strut. For rear, tighten the endlink nut on the sway bar. Begin to tighten (but leave loose somewhat) the nut on front sway bar, and the nut on rear spring bucket.

Last, put wheels on, lower the car. Now, check how freely endlink studs pass through the holes on remaining ends that are still loose.
Adjust length if necessary. Fully tighten remaining loose nuts.
What this last step does is prevents sway bar pre-load (adding tension to the bar) which is not desirable in most cases, especially a street car. Loading the suspension makes this adjustment as accurate as possible.
 
Last edited:

Sponsored

95CobraR

Well-Known Member
Joined
Dec 21, 2018
Threads
63
Messages
1,072
Reaction score
843
Location
Sandy Springs, GA
First Name
Doc
Vehicle(s)
2019 Shelby GT350, 2025 Porsche 911 Turbo
Vehicle Showcase
9
2015 Only? I sold mine.
 

Phoneman1223

Well-Known Member
Joined
Dec 5, 2018
Threads
0
Messages
123
Reaction score
179
Location
Dale City, VA
First Name
Jason
Vehicle(s)
2018 Mustang GT
Awesome :thumbsup:
Are you lowering the car? This matters, because depending on how much it's lowered if you are lowering, it may affect how much you need to adjust the endlinks.

Otherwise, first, what you want to do is adjust each endlink's length till they're equal to the stock endlinks.

Next, install one end of the endlink into the strut and the other into the sway bar. For the rear, one end into the sway bar, the other end into the spring bucket.
At this point, you want to make sure the endlink stud is going into the holes of the sway bar and strut endlink bracket or rear spring bucket, passing through relatively freely - the amount of adjustment you may or may not have to do to achieve this, depends on if you're lowering, and how low.

Then, for front - tighten the endlink nut on the strut. For rear, tighten the endlink nut on the sway bar. Begin to tighten (but leave loose somewhat) the nut on front sway bar, and the nut on rear spring bucket.

Last, put wheels on, lower the car. Now, check how freely endlink studs pass through the holes on remaining ends that are still loose.
Adjust length if necessary. Fully tighten remaining loose nuts.
What this last step does is prevents sway bar pre-load (adding tension to the bar) which is not desirable in most cases, especially a street car. Loading the suspension makes this adjustment as accurate as possible.
So car is lowered 1” all the way around and there definitely is preload on sway bars now with stock end links. With the car being lowered I will do that process but start with new links around a 1/2” shorter or a little shorter than stock because based on location and geometry of suspension, where the sway bars are located inboard of wheel hub I don’t think the drop of 1” is at the links. Hope that makes sense as far as initial setting. Since I do all my work on car in driveway, with the wheels off car and up on Jack stands, I can duplicate a loaded suspension by jacking up lower control arms to lift car off Jack stands a little bit and adjust end links as you described insuring the loose link stud moves freely.
One more question, do you want the sway as level to the ground when doing all this. Because i know the sway bars can pivot a little bit in there mounts. The car has Ford Performance track bars with the stock style rubber bushings and the bars do not articulate very much. I know Steeda and some of the other manufacturers you some kind of poly bushing and grease them so the sway bars actually articulated in the mounts to diminish the false spring rate caused by rubber bushings. Maybe I’m talking myself into new sway bar mounts, lol
 

WD Pro

Well-Known Member
Joined
Jan 18, 2018
Threads
132
Messages
6,772
Reaction score
13,559
Location
United Kingdom
Vehicle(s)
Lime GT
Vehicle Showcase
1
Wrapped my prop rod in tesa tape. No more burned fingers for me. (Yes I know I can buy hood struts but I don't want to)
20210607_191554.webp
I was impressed with the amount of shit you got for this post and wanted in on a bit of the action … :giggle:

I tried a bit of silicon ring adjustment wrap. We needed to buy some for my misses ring (on her finger :facepalm:). It’s as tight as it can be getting it over her knuckle, but it will still turn when it’s in place (it’s got a big rock :cwl:) due to her fingers and knuckles looking like Dumbledores wand …

1626611137481.jpeg


Anyhow, this came with the kit and I’m not sure how big of a ring band it was intended for, but it works perfectly and looks neat on the hood prop :

B1-AA8-A91-9-B8-E-4-F2-C-B47-A-BC738-F7-A6-D5-B.jpg


WD :like:
 

Sponsored

cmxPPL219

Well-Known Member
Joined
Feb 7, 2019
Threads
2
Messages
576
Reaction score
577
Location
Toronto, Canada
First Name
Eric
Vehicle(s)
2019 Mustang GT PP2
will do that process but start with new links around a 1/2” shorter or a little shorter than stock
The Steeda endlinks can be adjusted shorter than stock, but it's not a huge amount shorter than stock I notice, so look for this when you're installing and adjusting.
I can duplicate a loaded suspension by jacking up lower control arms to lift car off Jack stands a little bit and adjust end links as you described insuring the loose link stud moves freely.
Yup, :thumbsup: I actually forgot to type out what I do is have 2 sets of ramps, but your method also obviously works

One more question, do you want the sway as level to the ground when doing all this. Because i know the sway bars can pivot a little bit in there mounts. The car has Ford Performance track bars with the stock style rubber bushings and the bars do not articulate very much. I know Steeda and some of the other manufacturers you some kind of poly bushing and grease them so the sway bars actually articulated in the mounts to diminish the false spring rate caused by rubber bushings. Maybe I’m talking myself into new sway bar mounts, lol
So this is a good question. It's called the sway bar "nominal position", and essentially, the sway bar's flat area where you mount that end of the endlink into the holes located there - to your point, some sway bars rotate freely in their bushings, some don't. As a result, the flat area will be seen to rotate upward or downward. Usually, the sway bar should come to rest in it's nominal position and you use that as a reference. A good idea is to take a pic before unbolting the stock components, and use this as a reference when putting stuff back together, in case the sway bar does rotate up or down.
If it moves, as a rule, that bar flat area should be somewhat parallel to the ground, with the sway bar being as perpendicular to the bar itself as possible. (Like a "T".)
One note, in the rear, even with the stock height and stock endlinks, the rear endlinks will be at an angle, so it won't be possible to get the rear perpendicular to the ground.
 

cmxPPL219

Well-Known Member
Joined
Feb 7, 2019
Threads
2
Messages
576
Reaction score
577
Location
Toronto, Canada
First Name
Eric
Vehicle(s)
2019 Mustang GT PP2
I was impressed with the amount of shit you got for this post and wanted in on a bit of the action … :giggle:

I tried a bit of silicon ring adjustment wrap. We needed to buy some for my misses ring (on her finger :facepalm:). It’s as tight as it can be getting it over her knuckle, but it will still turn when it’s in place (it’s got a big rock :cwl:) due to her fingers and knuckles looking like Dumbledores wand …

1626611137481.jpeg


Anyhow, this came with the kit and I’m not sure how big of a ring band it was intended for, but it works perfectly and looks neat on the hood prop :

B1-AA8-A91-9-B8-E-4-F2-C-B47-A-BC738-F7-A6-D5-B.jpg


WD :like:
Haha that hood rod prop mod is awesome! I liked Ice445's, this is also good too
 

19s550gt

Active Member
Joined
Jan 27, 2020
Threads
2
Messages
40
Reaction score
98
Location
Burlington NC
First Name
Brian
Vehicle(s)
19 gt pp1
I really like the look of the bullitt grille! Did you get it from ebay or otherwise?
Yes sir just a cheap one off eBay! I got it for like $87! The main reason is because it is fully open on the air intake side!
thanks; Brian
 

shogun32

Well-Known Member
Joined
Feb 8, 2019
Threads
92
Messages
16,223
Reaction score
14,019
Location
Northern VA
First Name
Matt
Vehicle(s)
'19 GT/PP, '23 GB Mach1, '12 Audi S5 (v8+6mt)
Vehicle Showcase
2
I wonder whether I do the economy of the USA better by buying a car from a USA manufacturer that is made in another country or by buying a foreign manufacturer's car that is made in the USA.
the latter. manufacturing plants in country contribute to the economy. The former is just an accounting gimick and the profits are banked in the other country (or Ireland/Netherlands) in a fantastic rigging of corporate accounting.
 

fmc_smt

Well-Known Member
Joined
Jun 4, 2018
Threads
39
Messages
1,293
Reaction score
2,622
Location
Cottonwood , Arizona
Vehicle(s)
2015 gt , 2015 Escape , 2015 F250
Vehicle Showcase
1
Nothing , let the Mistress rest . Took out the side by side for a ride . Nice weather trail was wet , so no dust . In the last pic I can see where I work .
Resized_20210717_071636.jpeg
Resized_20210717_073030.jpeg
Resized_20210717_075403.webp
Sponsored


Top