Sponsored
Rear end project is done!
OP
OP
DeadSpool
Well-Known Member
- Joined
- Dec 1, 2019
- Threads
- 43
- Messages
- 235
- Reaction score
- 555
- Location
- Fort McMurray, Alberta
- Vehicle(s)
- 2016 GTT
- Thread starter
- #17
Thanks man, just waiting on the springs and kmember to come back from powder then can start assembling.Brilliant job on the rear end btw
Thanks man!Sexy!
carguy231
Well-Known Member
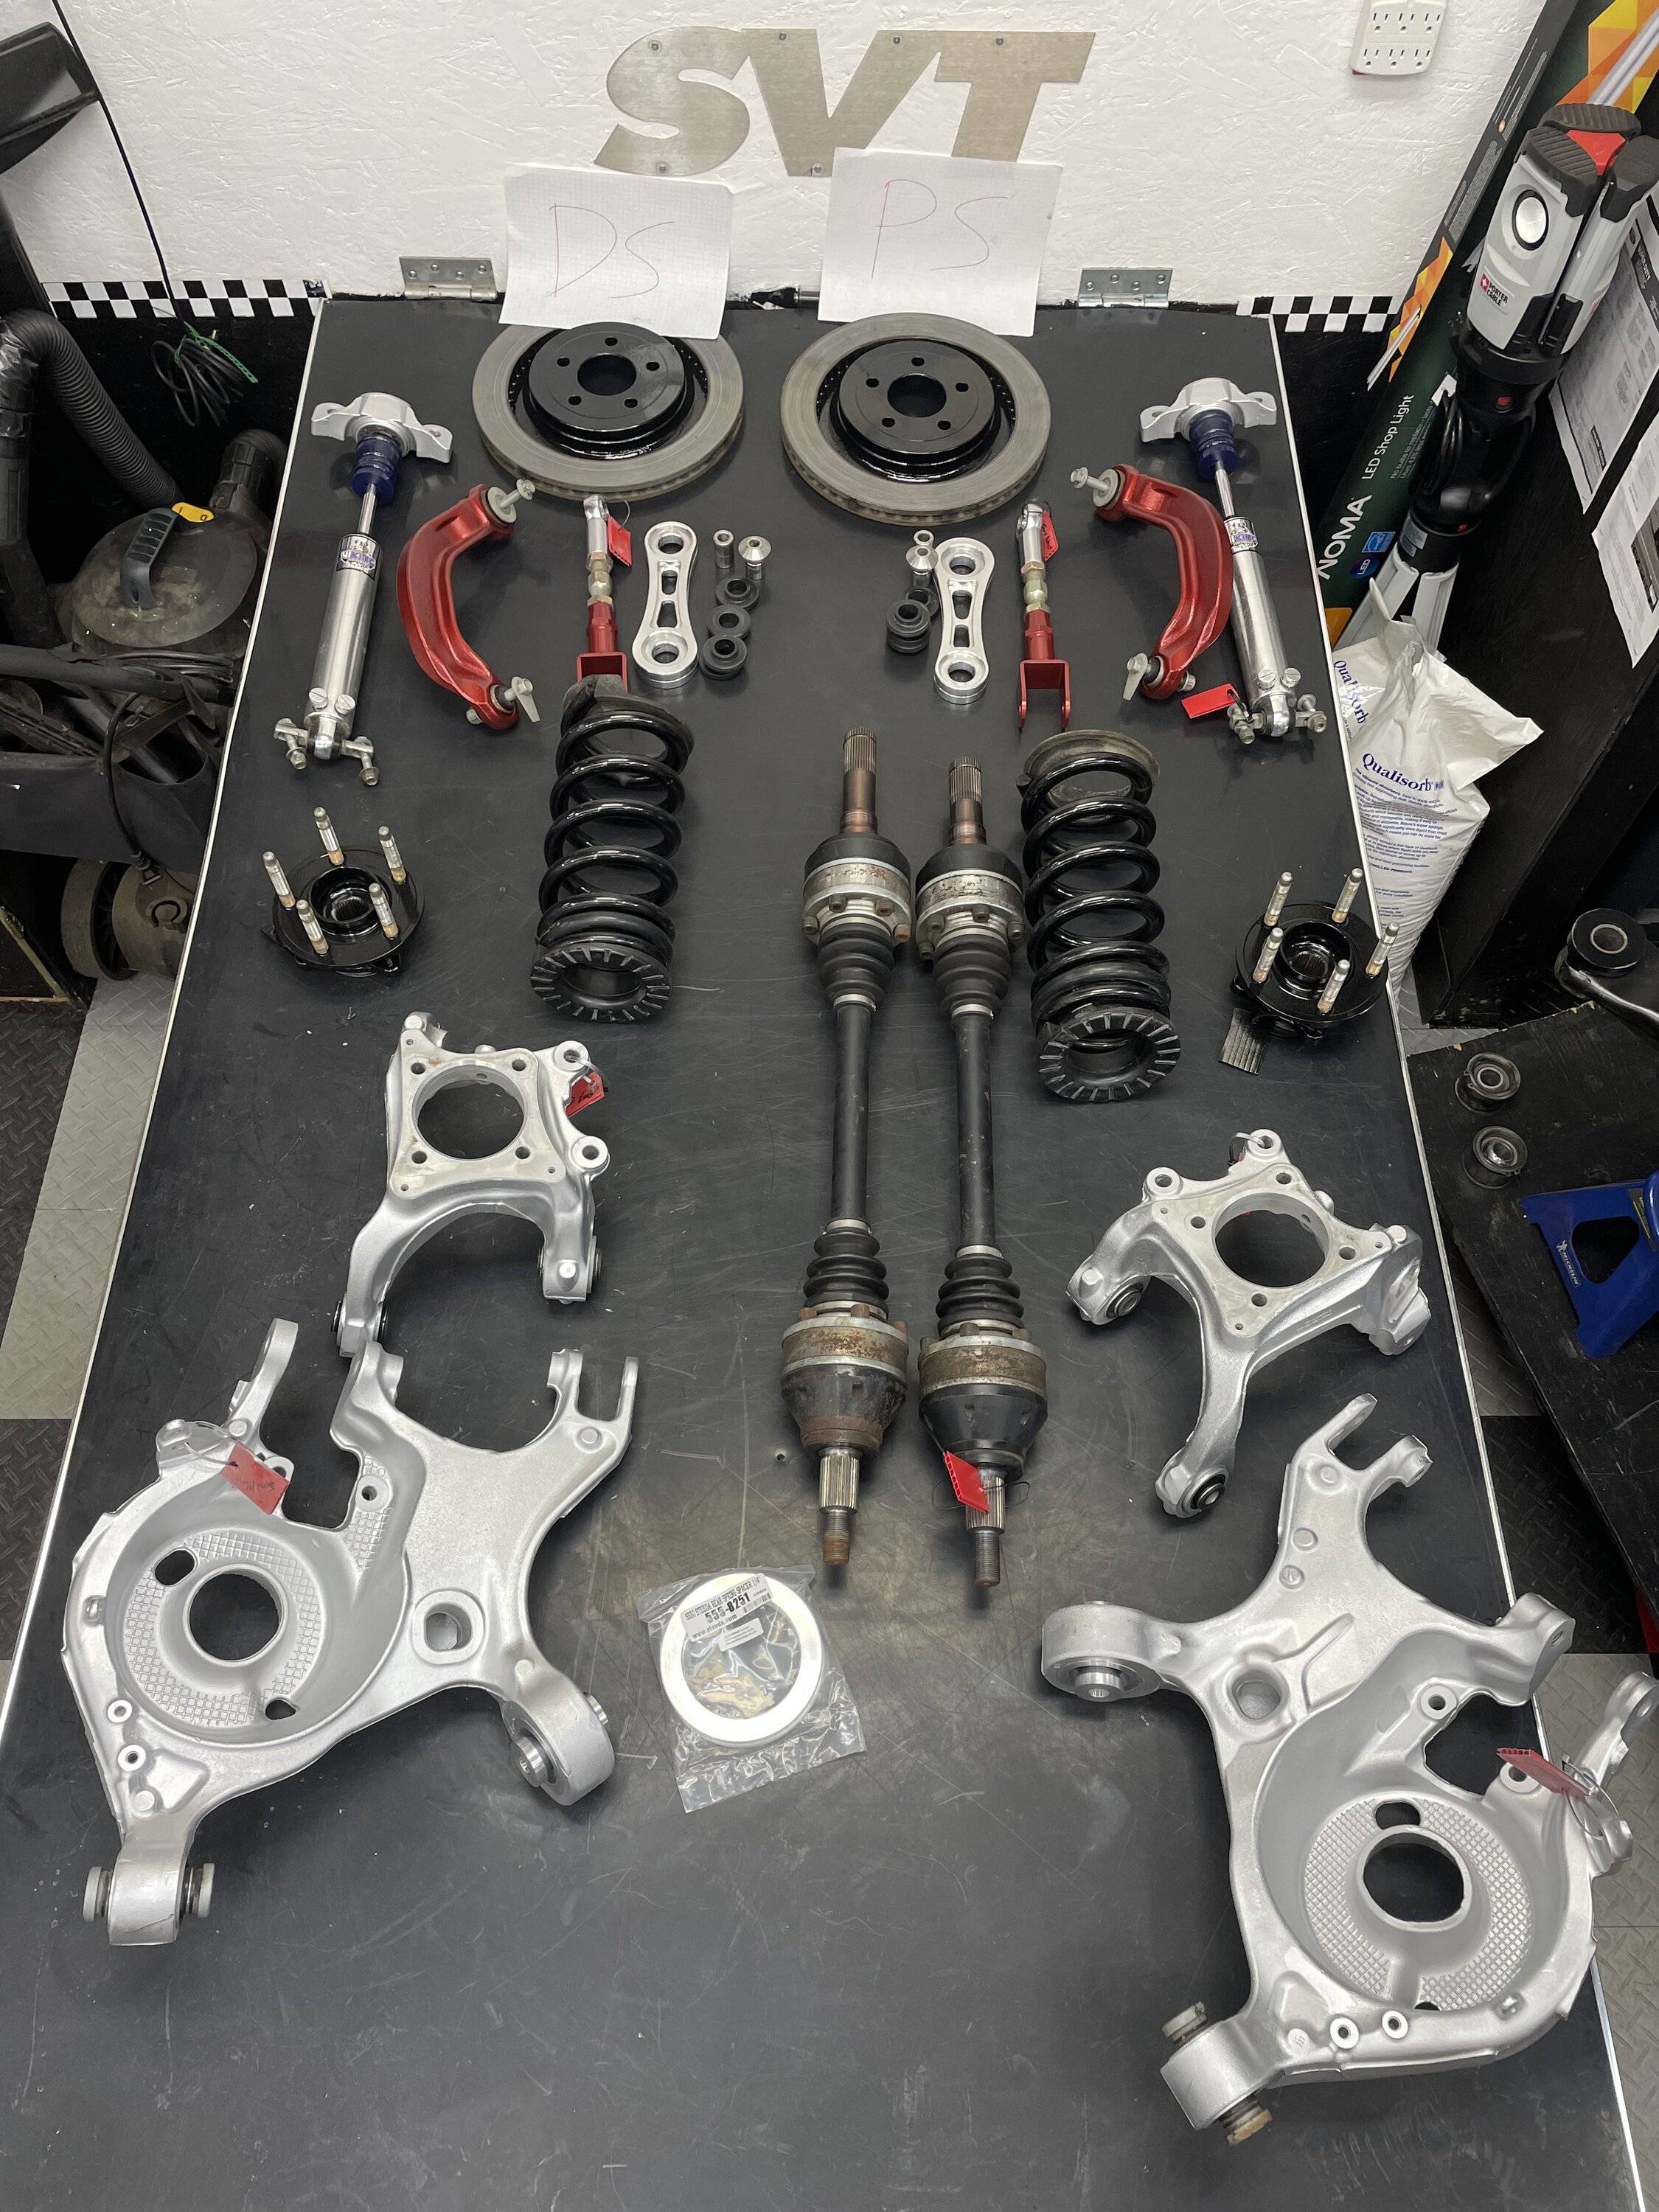
Big job! Nice though.I snapped/bent my diff bolts and ruined the bushings I had in there. Since it’s winter up here in Alberta I had the time for this little project. Pulled everything, degreased, sand blasted, painted and powder coated. Installed solid diff bushings, subframe bushings, lower control arm and toe link bearings.
She looks pretty good but more importantly it won’t snap again. A bonus is it’s clean, a lot easier to inspect in the pit.
A big thanks to Kelly Aiken for all the help!View attachment 734932 View attachment 734933

BMR Solid Diff Mounts
Kelltrac Big Bertha Bolts
Kelltrac Bushing upgrade kit w/irs lockouts
FRPP Toelink bearing
Steeda verticle links
Iron 8.8 diff case
Torsion diff
3.15 FRPP gears
FRPP Wheel hubs
DSS 1600hp axles
GT350 Springs
Viking Crusader shocks

OP
OP
DeadSpool
Well-Known Member
- Joined
- Dec 1, 2019
- Threads
- 43
- Messages
- 235
- Reaction score
- 555
- Location
- Fort McMurray, Alberta
- Vehicle(s)
- 2016 GTT
- Thread starter
- #19
Thanks!Big job! Nice though.
OP
OP
DeadSpool
Well-Known Member
- Joined
- Dec 1, 2019
- Threads
- 43
- Messages
- 235
- Reaction score
- 555
- Location
- Fort McMurray, Alberta
- Vehicle(s)
- 2016 GTT
- Thread starter
- #20
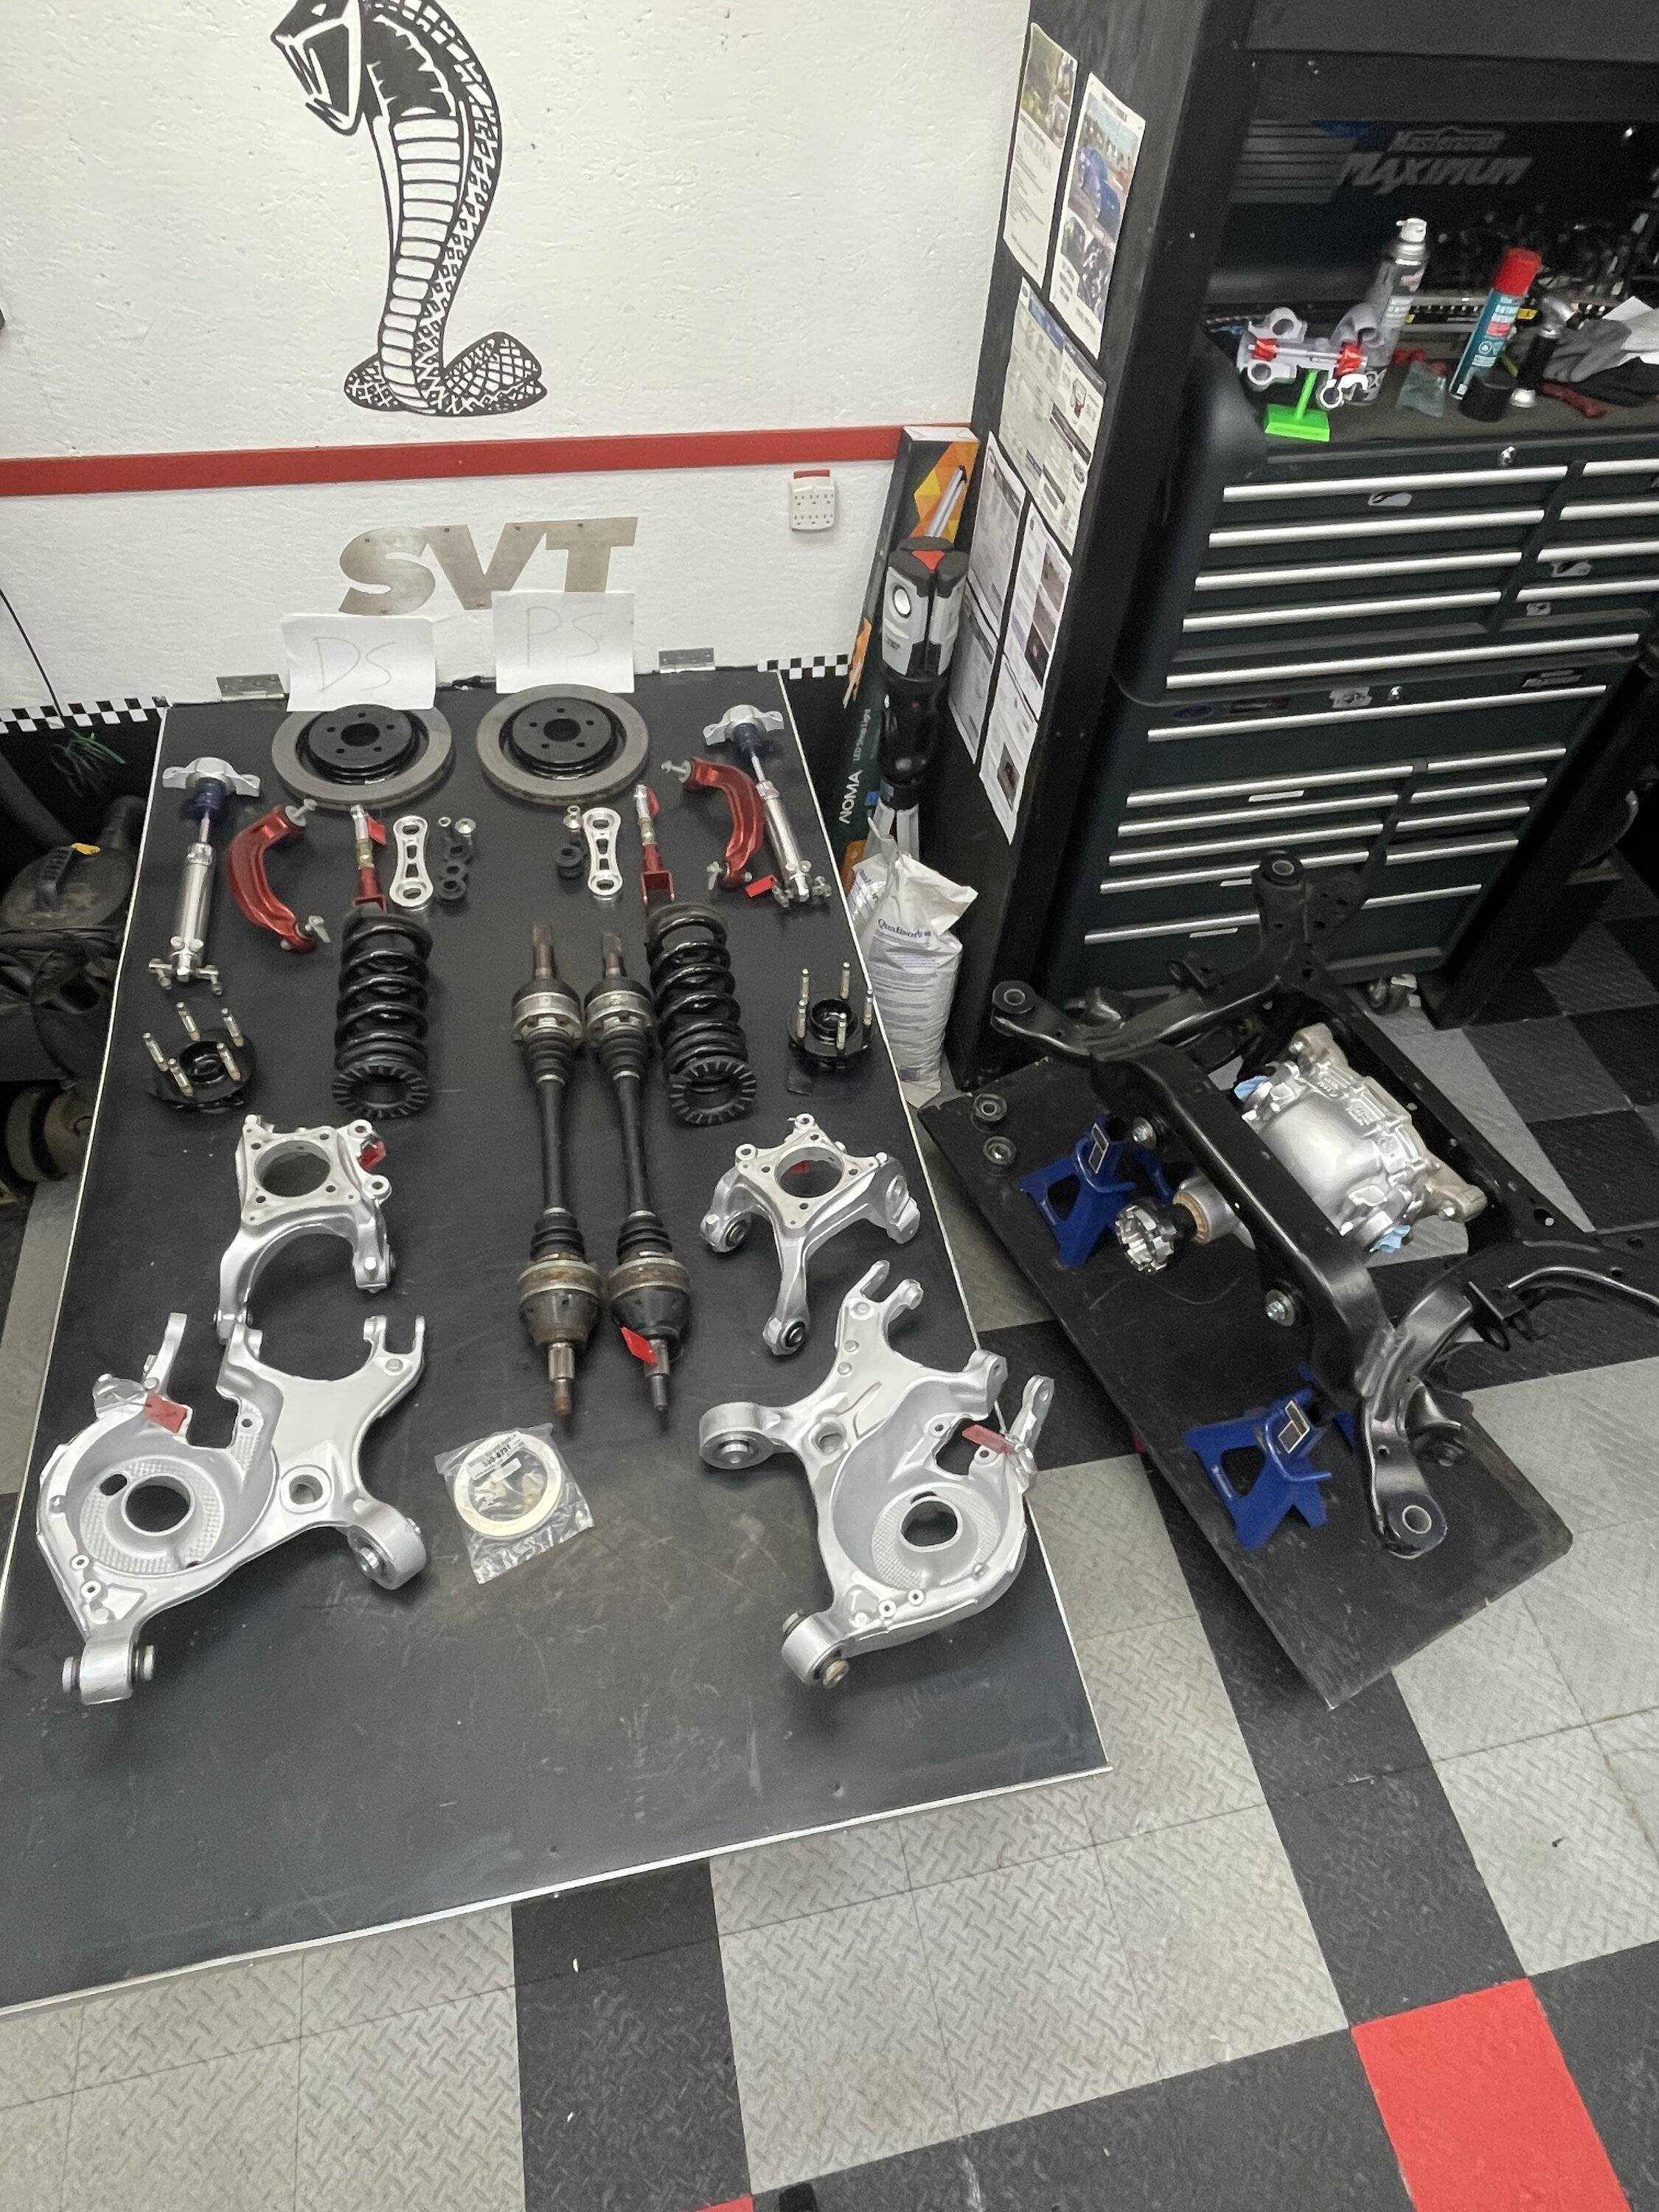
Here, I just got the springs back from powder. It’s all done, just have to put it back in car.


Sponsored
MrMike
Well-Known Member
This looks great!
Can you share the part numbers for the GT350 rear springs that you used please?
I've been researching using them as well and everything I've read says you need to use two left springs. I believe it's FR3Z-5560-Y but I'd like to be 100% since you've actually mounted and used them in the same year of GT no less.
OP
OP
DeadSpool
Well-Known Member
- Joined
- Dec 1, 2019
- Threads
- 43
- Messages
- 235
- Reaction score
- 555
- Location
- Fort McMurray, Alberta
- Vehicle(s)
- 2016 GTT
- Thread starter
- #22
Yes I can confirm that is the correct part number and use two lefts. Ran these all last season.FR3Z-5560-Y
monte87
Well-Known Member
- Joined
- Mar 30, 2021
- Threads
- 251
- Messages
- 2,255
- Reaction score
- 1,157
- Location
- NY-SHITTY!!!
- First Name
- Anthony
- Vehicle(s)
- 2023 Mach 1
1st off your stang is WICKED!!!!!! Looks Bada$$!!Yes I can confirm that is the correct part number and use two lefts. Ran these all last season.
I am also doing GT350 spring swap on my 21 non-pp GT.. Non magna-ride car.
So you use 2 LEFT REAR SPRINGS? (FR3Z-5560-Y)
and also 2 LEFT REAR SPRING PADS? I'm assuming because you had 2 Left springs that you used 2 left pads.. Just want to clarify?
Thanks Anthony
monte87
Well-Known Member
- Joined
- Mar 30, 2021
- Threads
- 251
- Messages
- 2,255
- Reaction score
- 1,157
- Location
- NY-SHITTY!!!
- First Name
- Anthony
- Vehicle(s)
- 2023 Mach 1
How did the GT350 spring swap go?? Just curious, been following and learning from this thread. Since you used 2 LEFT REAR SPRINGS, did you go with 2 LEFT UPPER SPRING PADS as well for install?This looks great!
Can you share the part numbers for the GT350 rear springs that you used please?
I've been researching using them as well and everything I've read says you need to use two left springs. I believe it's FR3Z-5560-Y but I'd like to be 100% since you've actually mounted and used them in the same year of GT no less.
How does car ride and sit after install? What Strut and shock package did you go with??
Thanks Anthony
WD Pro
Well-Known Member
- Joined
- Jan 18, 2018
- Threads
- 132
- Messages
- 6,798
- Reaction score
- 13,639
- Location
- United Kingdom
- Vehicle(s)
- Lime GT
- Vehicle Showcase
- 1
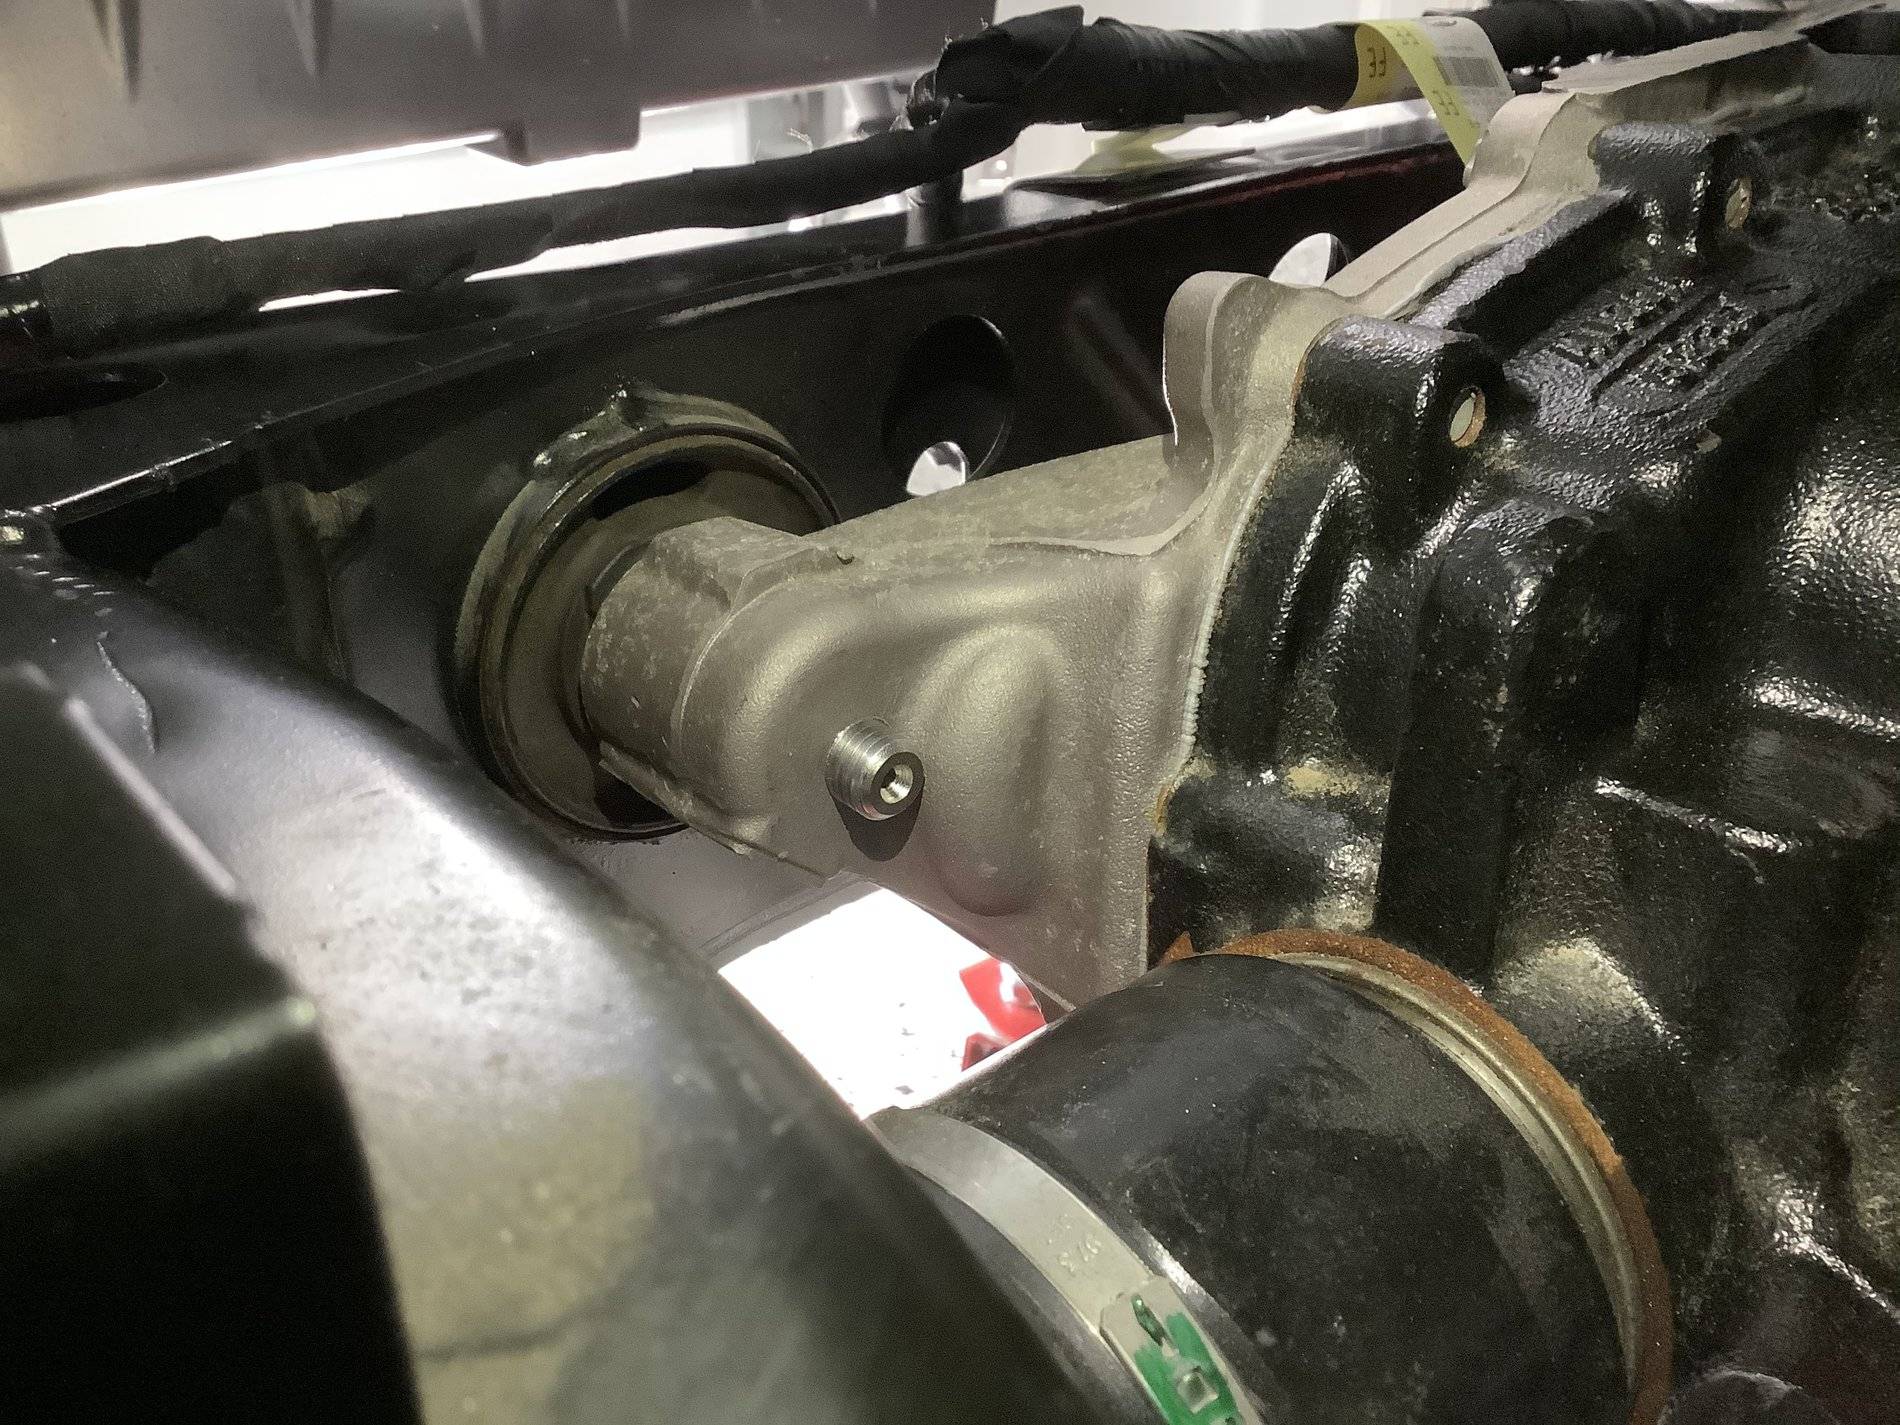
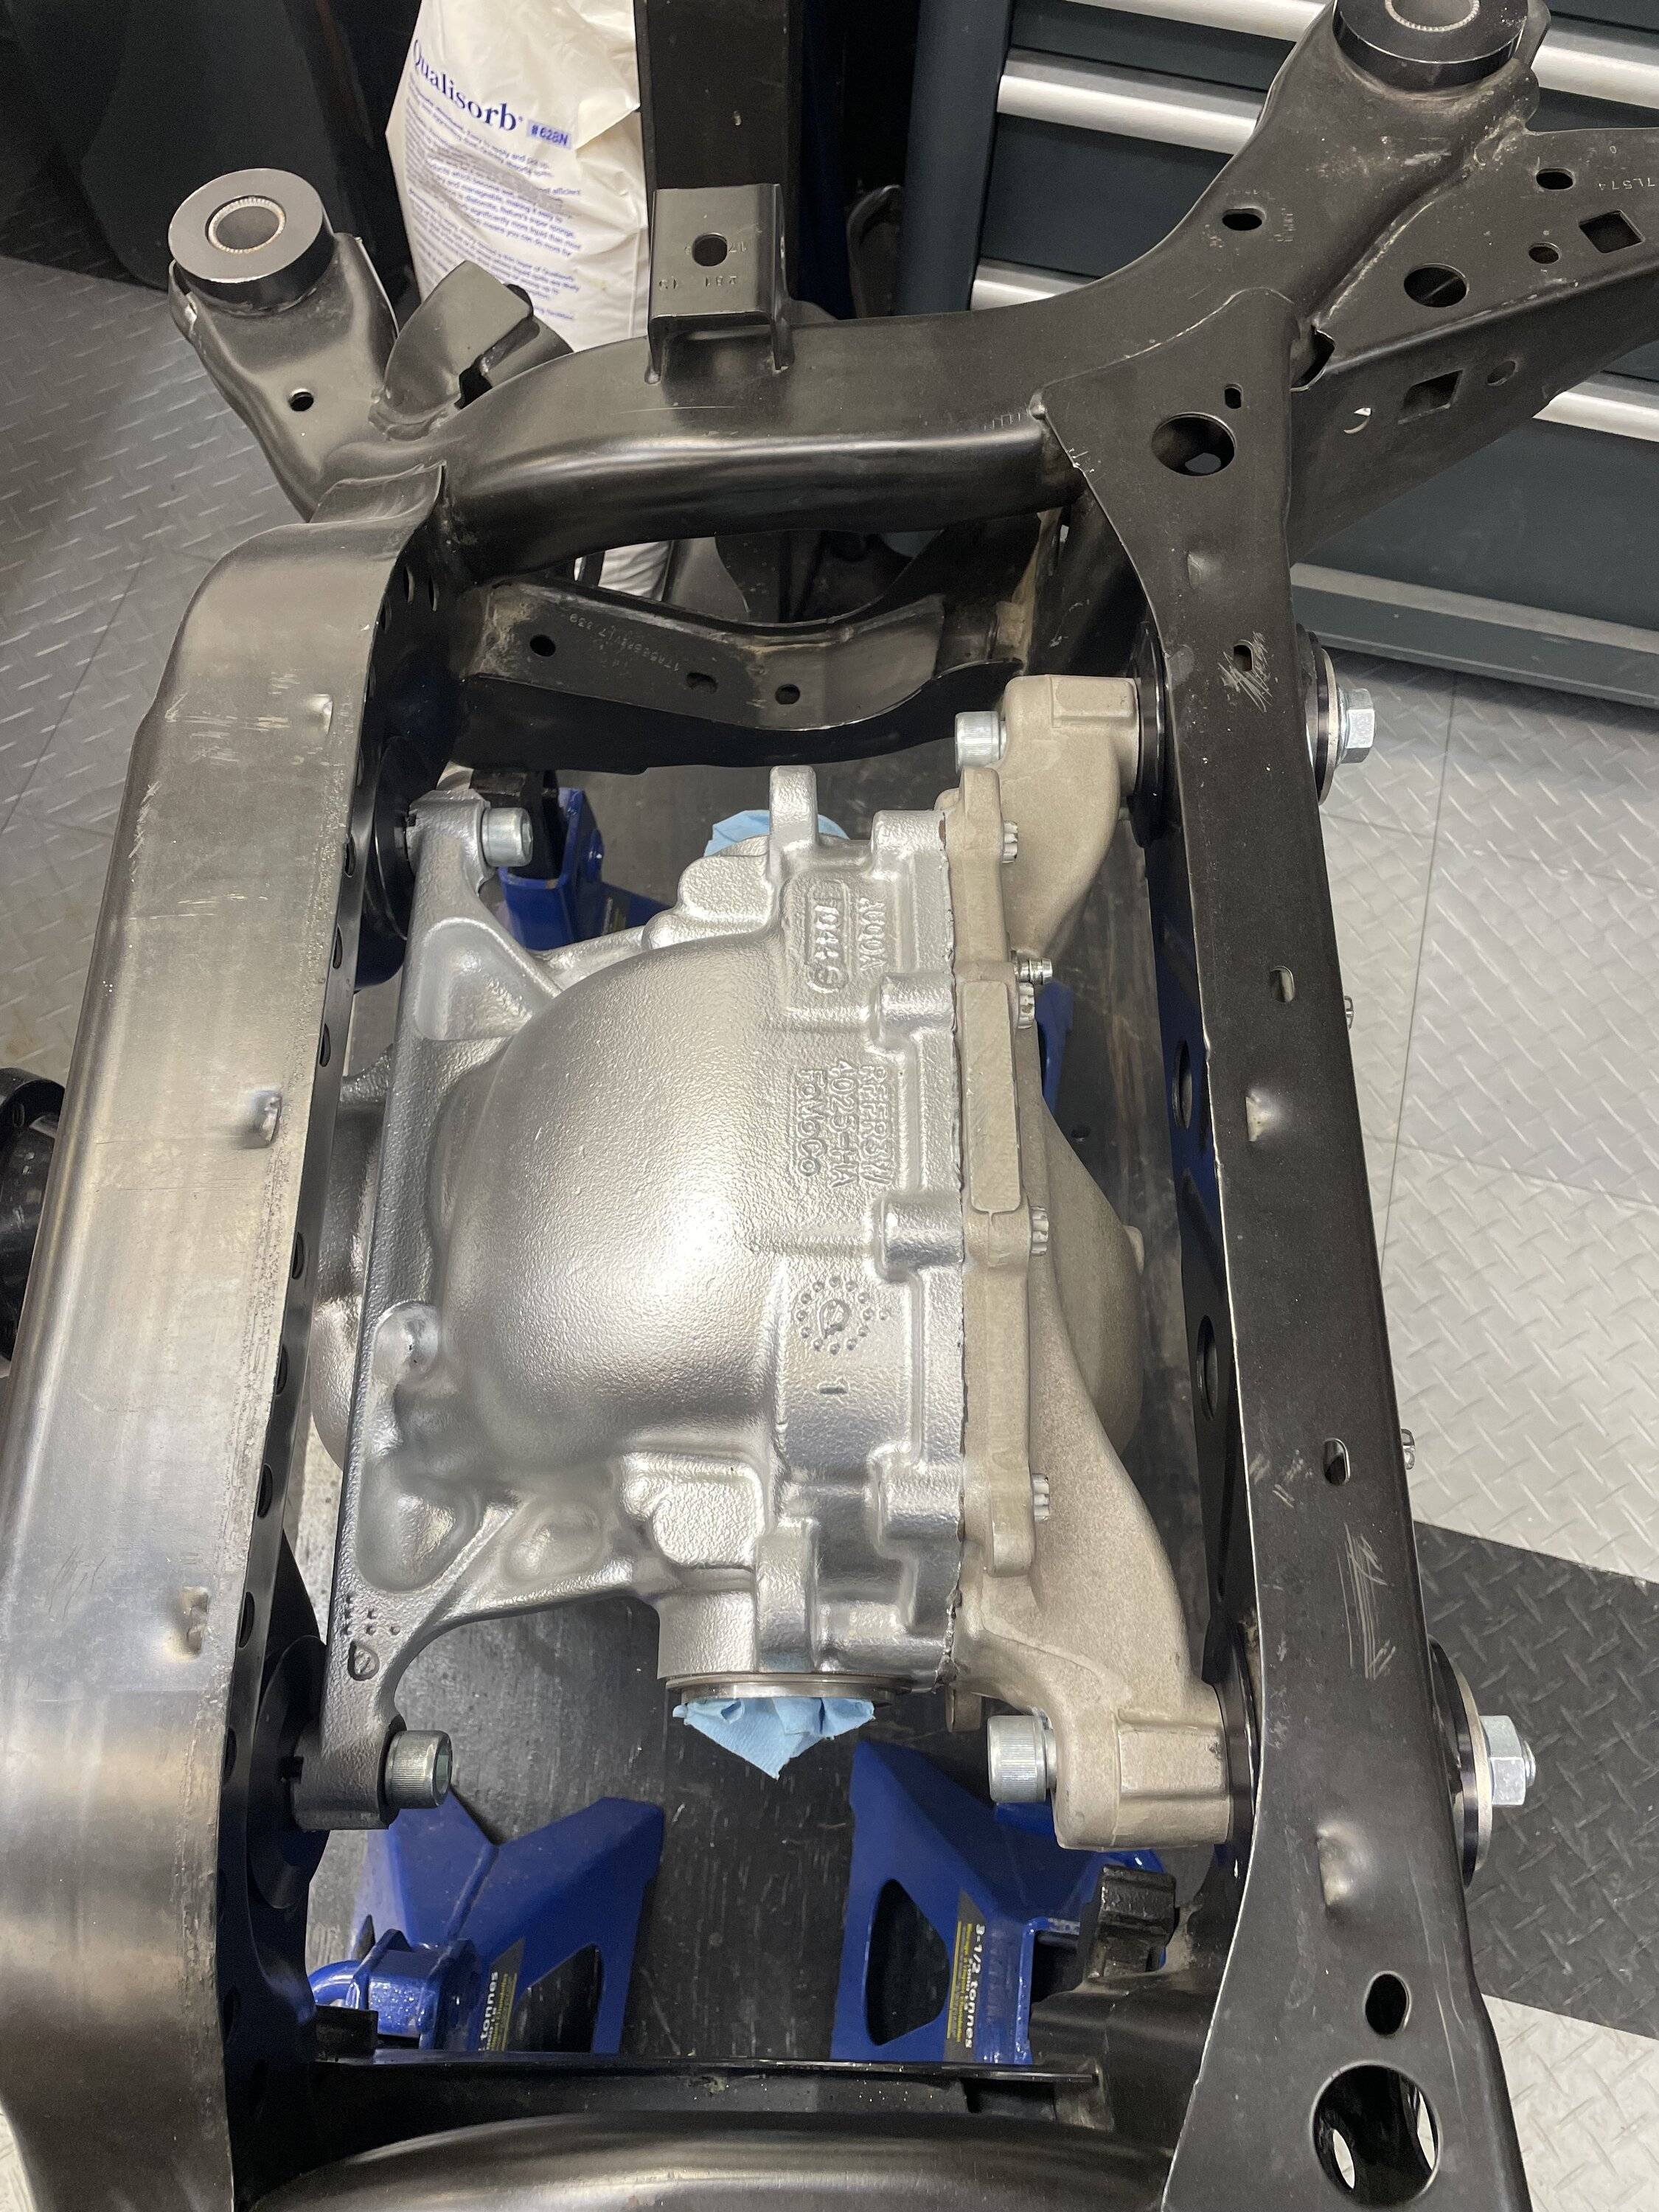
@DeadSpool - I have a quick question for you if that's OK ?
Did you have to relieve the ears of the diff cover to give a flat area for the through bolt heads ?

If so, how did you do it and did you take any photos that you could share ?
Thanks and best regards,
WD
Did you have to relieve the ears of the diff cover to give a flat area for the through bolt heads ?

If so, how did you do it and did you take any photos that you could share ?
Thanks and best regards,
WD
Sponsored
monte87
Well-Known Member
- Joined
- Mar 30, 2021
- Threads
- 251
- Messages
- 2,255
- Reaction score
- 1,157
- Location
- NY-SHITTY!!!
- First Name
- Anthony
- Vehicle(s)
- 2023 Mach 1
WOW!!! Looks badass WD!!!!!!!!!!!!!!!@DeadSpool - I have a quick question for you if that's OK ?
Did you have to relieve the ears of the diff cover to give a flat area for the through bolt heads ?
If so, how did you do it and did you take any photos that you could share ?
Thanks and best regards,
WD
Ant
WD Pro
Well-Known Member
- Joined
- Jan 18, 2018
- Threads
- 132
- Messages
- 6,798
- Reaction score
- 13,639
- Location
- United Kingdom
- Vehicle(s)
- Lime GT
- Vehicle Showcase
- 1
That's not my photo, its @DeadSpool 's to highlight the area I had asked the question aboutWOW!!! Looks badass WD!!!!!!!!!!!!!!!
Ant
I have a diff cover that I'm in the process of modifying - I'm just trying to future proof it as much as possible whilst its easy to work on / whilst its off the car
This is the new one (to replace the one with the broken bolt) that I snapped (no pun intended) a picture of before it went on the car :
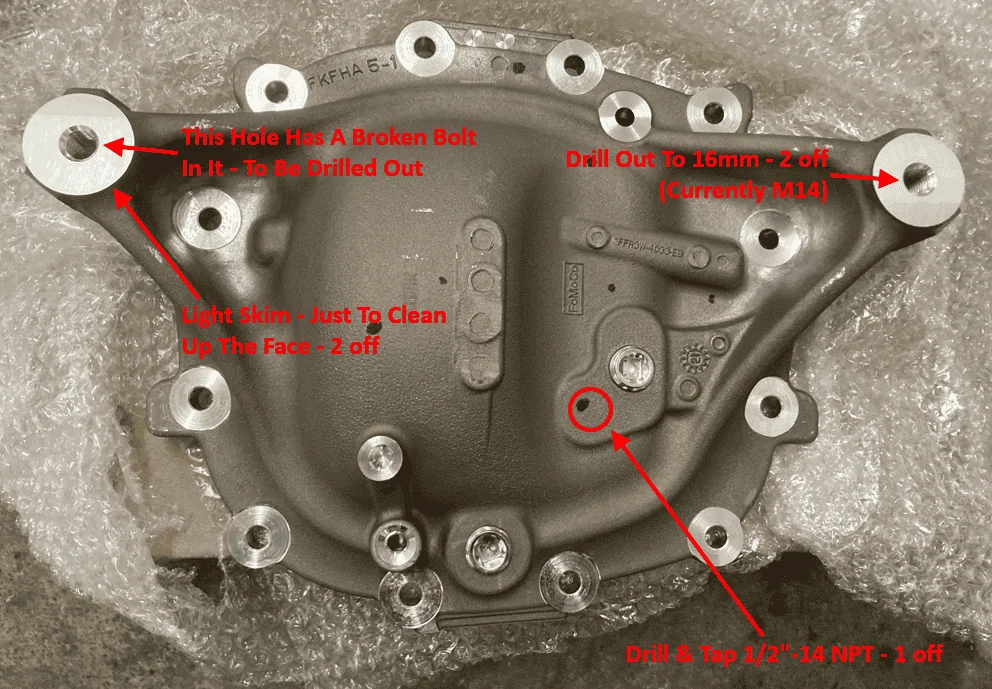
Mods required to the old one are in red, but I'm now wondering about the backside of the ears
WD
NGOT8R
Well-Known Member
Is this what you’re inquiring about @WD? If so, I didn’t have to relieve any areas on my diff. for my through bolt kit install.That's not my photo, its @DeadSpool 's to highlight the area I had asked the question about
I have a diff cover that I'm in the process of modifying - I'm just trying to future proof it as much as possible whilst its easy to work on / whilst its off the car
This is the new one (to replace the one with the broken bolt) that I snapped (no pun intended) a picture of before it went on the car :

Mods required to the old one are in red, but I'm now wondering about the backside of the ears
WD
Steeda did tell me that some machining would be required if I wanted to run a nut on the ends of the through bolts though. I didn’t see it as necessary for my application and it’s been holding up fine for the past 3+ years.
OP
OP
DeadSpool
Well-Known Member
- Joined
- Dec 1, 2019
- Threads
- 43
- Messages
- 235
- Reaction score
- 555
- Location
- Fort McMurray, Alberta
- Vehicle(s)
- 2016 GTT
- Thread starter
- #30
Yup, The only pic I have where you can kinda see it is here, zoom in on the ears. Just used a rotary tool with an aluminum burr bit. Took 2mins.@DeadSpool - I have a quick question for you if that's OK ?
Did you have to relieve the ears of the diff cover to give a flat area for the through bolt heads ?
If so, how did you do it and did you take any photos that you could share ?
Thanks and best regards,
WD
Sponsored