Sponsored

StangTime

Well-Known Member
Joined
Apr 16, 2019
Threads
77
Messages
3,491
Reaction score
3,884
Location
Ontario 🇨🇦
First Name
Todd
Vehicle(s)
19' GT PP1 Manual
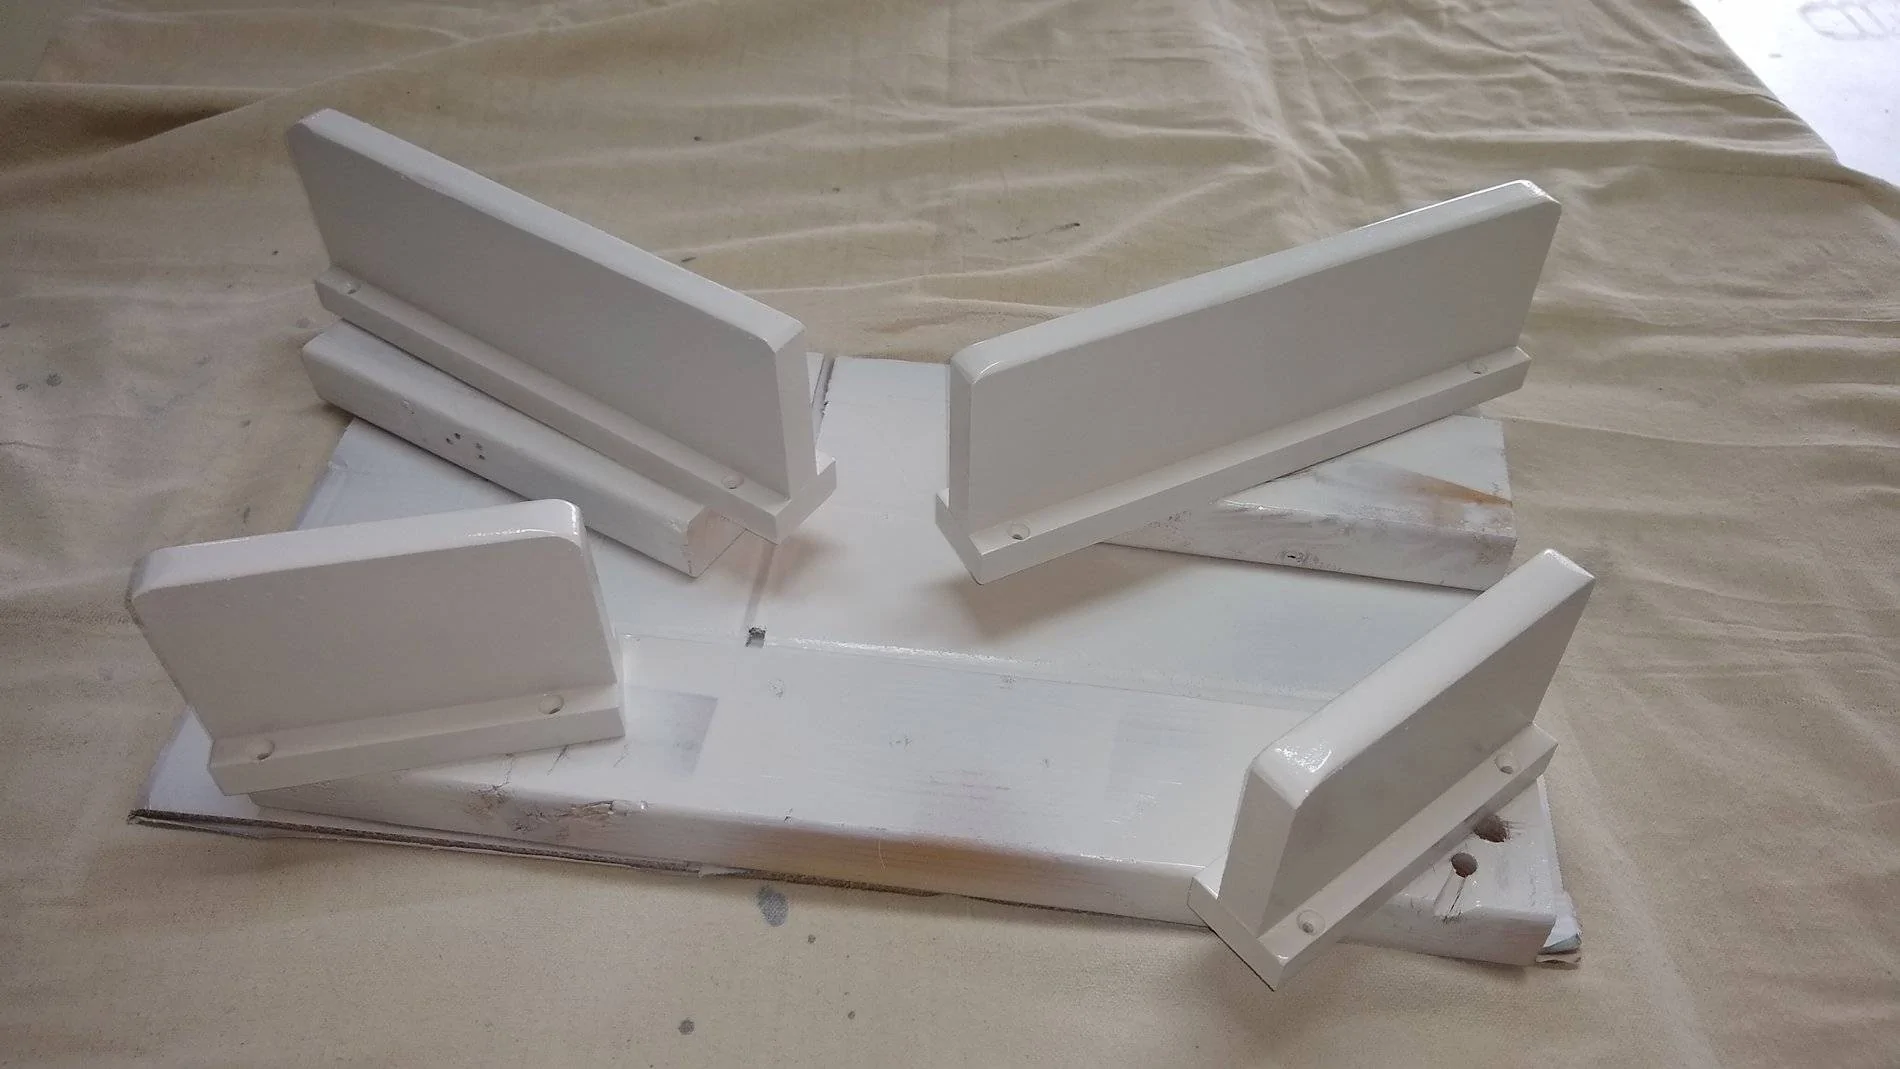
Round off the corners before you paint them to prevent the corners from digging into and shredding the padding on the trunk floor. It will happen over time if you carry stuff in the trunk.
Sponsored

 
OP
OP
mikes2017gt

mikes2017gt

Well-Known Member
Joined
Feb 21, 2017
Threads
59
Messages
936
Reaction score
311
Location
San Antonio, TX
Vehicle(s)
17 GT Prem M/T 3.55
You know, I thought about that after I finished all the machining work but skipped it b/c I was in a hurry to get the supports built. Crap.

You make a good point though, and I don't want the padding underneath the cover shedding anymore than it already is. Guess I never noticed it before, but before I didn't have a gloss white amp rack in the spare tire well. The padding underneath that stupid cover actually sheds a little bit.

I guess I will round over the tops of the supports. I can't paint them today anyway b/c it's raining outside. I don't spray paint anything with the car in the garage. Overspray drifts a really long way. I washed/waxed the car yesterday; it needed it. No way I'm putting it out in the rain. But I can sand. OK, that's my job for today.
 
OP
OP
mikes2017gt

mikes2017gt

Well-Known Member
Joined
Feb 21, 2017
Threads
59
Messages
936
Reaction score
311
Location
San Antonio, TX
Vehicle(s)
17 GT Prem M/T 3.55
The rain stopped so I was able to put the car outside and get this done.

Rounded over the top edges of the braces so they don't dig into the trunk floor. There's 7 coats of paint on these. I used 1 and 1/4" cans of spray paint. MDF soaks up paint like...MDF. Especially on the cut edges, which is basically what these are...all cut edges. :facepalm:
IMG_20201017_161103164.jpg
IMG_20201017_161047480.jpg


I'll let them dry overnight. Tomorrow I'll use template tape to secure them in place on the amp rack, while I mark the locations for the threaded inserts.

I don't know how long those top load-bearing surfaces will stay all nice and pretty white, but it's certainly better than not painting the braces or having no braces at all.

If they get too banged up or dirty, I can always pull them out and paint them black...they'd match the amps that way. That's one of the reasons I'm going through the trouble of using threaded inserts to mount them vs. just screwing them down.
 
Last edited:
OP
OP
mikes2017gt

mikes2017gt

Well-Known Member
Joined
Feb 21, 2017
Threads
59
Messages
936
Reaction score
311
Location
San Antonio, TX
Vehicle(s)
17 GT Prem M/T 3.55
I haven't had time to do any EQ or tuning work yet. But I did notice one thing.

I created three presets on the TWK:

1. Time alignment for the driver
2. Time alignment for the passenger
3. No time alignment at all so I could A/B things easier later.

Well, I tried the passenger preset while sitting in the drivers seat; the bass was better and the mids were skewed right. The mid part was predictable but the bass was not.

I tried the no time alignment preset and it sounds WAY better than either of the time alignment presets. WTH? The bass, particularly sort of vanishes on many songs when the driver time aligned preset is loaded. I'm assuming it has something to do with the delays, but I measured pretty accurately.

I'm probably putting the cart before the horse here. I should EQ the system first and then worry about TA, right?
 

StangTime

Well-Known Member
Joined
Apr 16, 2019
Threads
77
Messages
3,491
Reaction score
3,884
Location
Ontario 🇨🇦
First Name
Todd
Vehicle(s)
19' GT PP1 Manual
First I would check to make sure all three configurations are exactly the same in every way except for the distance settings.
Did you set the distance to your sub as the farthest speaker?
Time alignment should be done before EQ.
Just wanted to add that I recently re-measured my distances using a piece of string taped to the center of the drivers headrest. I used a marker to put a black dot on the string where the center of the drivers were. Then took the string and measured the marks along a tape measure on the floor. Previously I had measured in the car with a tape measure from my nose to the grilles and I didn't do a very accurate job. When I input my new distances my sound stage got even more accurate.
 
Last edited:

Sponsored

OP
OP
mikes2017gt

mikes2017gt

Well-Known Member
Joined
Feb 21, 2017
Threads
59
Messages
936
Reaction score
311
Location
San Antonio, TX
Vehicle(s)
17 GT Prem M/T 3.55
Thanks, @StangTime Yes, the sub was measured as the furthest speaker. I measured from the sub's grill, to the driver's headrest and then added 6 inches or so to account for the distance from the back of the headrest to where my ears would be. I noticed that when using the "driver" preset, if I move my head right up near the windshield the bass sounds like it's supposed to.

I copied the Driver preset, renamed it Passenger and then changed the distances accordingly. Made a second copy of Driver and named it "No EQ/No TA" and removed the distances. I haven't touched the EQ on any preset yet, so they are all the same, except the distances settings for DRiver/Passenger presets.

But even bass response aside, my imaging stinks. Vocals come out of my steering wheel. This could also be b/c the mids are so overpowering in this Morel set. I guess I just did a lousy job measuring. I'll have to try your string method.

I will also recheck my polarity. I'm 100% positive they are all in polarity b/c I checked multiple times, but I'll do it again. Upon initial fire-up, my mids and sub were out of phase, but I flipped the polarity switch in the TUN software and then they checked out OK.
 

Cathul

Well-Known Member
Joined
Sep 4, 2017
Threads
5
Messages
868
Reaction score
383
Location
Germany
First Name
Peter
Vehicle(s)
Ford Mustang GT
Don‘t judge the system before you have done the EQ work. Equalizing the drivers to match each other alters the sound significantly. And when you have set crossovers, eq et. al you need to adjust time alignment anyway for maximum summing. Best would be allpass filters to get maximum summing, but as far as I know the TwK doesn’t have allpass filters, is that correct?
 

StangTime

Well-Known Member
Joined
Apr 16, 2019
Threads
77
Messages
3,491
Reaction score
3,884
Location
Ontario 🇨🇦
First Name
Todd
Vehicle(s)
19' GT PP1 Manual
Level matching the speakers so the percieved volume at the listening position is important for getting staging correct even when the timing is spot on. REW makes this easy using the "offset level" adjustment when doing your tuning. Once you have baseline measures of each driver, open the overlays window and raise or lower your offset to get close to your curve. Reduce the loudest drivers down to match the driver that is the lowest. Apply those offsets to your level trims in the DSP. If these are more than -6db use the gain adjustment on the amp and set the DSP trim to 0. This will help keep the noise floor down.
Sit in the car and confirm your levels and even adjust them while you listen. You can hear the stage move around.

Example:
My left tweeter is 2dB lower than my right tweeter. My right tweeter is 5.5dB lower relative to the right mid-bass. My mid-basses are the same level because my legs are attenuating the left mid-bass. You should start to have a good stage with levels matched even without time alignment.

As far as polarity goes, if it's wrong you will see a huge dip at your crossover point in REW when measuring pairs of right or left side drivers. Flip the polarity switch and observe what happens to the dip.
 
Last edited:
OP
OP
mikes2017gt

mikes2017gt

Well-Known Member
Joined
Feb 21, 2017
Threads
59
Messages
936
Reaction score
311
Location
San Antonio, TX
Vehicle(s)
17 GT Prem M/T 3.55
Thanks guys. I'm still learning what the TWK-88 can do, but as far as I know it does not have all pass filters. Lowpass, highpass, bandpass or no filter at all for every channel. Plus a polarity flip and level control for each channel, of course.

It's very apparent to me that I have lot of work to do before I can even say I have a baseline tune. This is the main disadvantage of full active vs. using the passive xovers the component set came with.

So for level matching, do I play pink noise through just one driver at a time (e.g. the left midrange) while all the other drivers are off, measure it's level, then repeat the process for the right midrange and so on?
 

Cathul

Well-Known Member
Joined
Sep 4, 2017
Threads
5
Messages
868
Reaction score
383
Location
Germany
First Name
Peter
Vehicle(s)
Ford Mustang GT
Exactly. And do this after equalizing each single driver to the target curve as this makes judgment on the levels a lot easier if the response is within 1-2 dB on each driver. So do EQ first, then measure each driver, set smoothing for both drivers of a pair to 1/1 Oktave and see how much and which driver to lower in volume. And all in relation to the overall target curve of course.
 

Sponsored

StangTime

Well-Known Member
Joined
Apr 16, 2019
Threads
77
Messages
3,491
Reaction score
3,884
Location
Ontario 🇨🇦
First Name
Todd
Vehicle(s)
19' GT PP1 Manual
Thanks guys. I'm still learning what the TWK-88 can do, but as far as I know it does not have all pass filters. Lowpass, highpass, bandpass or no filter at all for every channel. Plus a polarity flip and level control for each channel, of course.

It's very apparent to me that I have lot of work to do before I can even say I have a baseline tune. This is the main disadvantage of full active vs. using the passive xovers the component set came with.

So for level matching, do I play pink noise through just one driver at a time (e.g. the left midrange) while all the other drivers are off, measure it's level, then repeat the process for the right midrange and so on?
That's exactly how. RTA each speaker by using the moving mic method with all speakers muted. Hit Save. Move to the next. Once done you will have a group of measures. Import a house curve and save the whole group. Do your adjustments virtually in REW. Then update your DSP. Remeasure and adjust.
 

StangTime

Well-Known Member
Joined
Apr 16, 2019
Threads
77
Messages
3,491
Reaction score
3,884
Location
Ontario 🇨🇦
First Name
Todd
Vehicle(s)
19' GT PP1 Manual
Exactly. And do this after equalizing each single driver to the target curve as this makes judgment on the levels a lot easier if the response is within 1-2 dB on each driver. So do EQ first, then measure each driver, set smoothing for both drivers of a pair to 1/1 Oktave and see how much and which driver to lower in volume. And all in relation to the overall target curve of course.
You use 1/1 smoothing?
I measure using 1/12 octave and smooth to 1/3 octave.
 

Cathul

Well-Known Member
Joined
Sep 4, 2017
Threads
5
Messages
868
Reaction score
383
Location
Germany
First Name
Peter
Vehicle(s)
Ford Mustang GT
For level settings? I measure in 1/48th and adjust for the specific task. Level settings with 1/1 after i have done the individual drivers eq. 1/12 for equalizing the single drivers response. Point is, after doing the EQ you get just the overall response without all the small dips and peaks that are of no interest for setting the level between drivers when using 1/1 octave smoothing, but can easily see if one driver is 1-2 dB louder than the other driver.
 

StangTime

Well-Known Member
Joined
Apr 16, 2019
Threads
77
Messages
3,491
Reaction score
3,884
Location
Ontario 🇨🇦
First Name
Todd
Vehicle(s)
19' GT PP1 Manual
For level settings? I measure in 1/48th and adjust for the specific task. Level settings with 1/1 after i have done the individual drivers eq. 1/12 for equalizing the single drivers response. Point is, after doing the EQ you get just the overall response without all the small dips and peaks that are of no interest for setting the level between drivers when using 1/1 octave smoothing, but can easily see if one driver is 1-2 dB louder than the other driver.
I see. 1/1 octave for level matching makes sense.
 
OP
OP
mikes2017gt

mikes2017gt

Well-Known Member
Joined
Feb 21, 2017
Threads
59
Messages
936
Reaction score
311
Location
San Antonio, TX
Vehicle(s)
17 GT Prem M/T 3.55
You guys are awesome. Thank you very much @Cathul and @StangTime

I'm going to finish up the physical install (get the trunk floor supports installed) so that part of the overall build will be finally completed and I have full use of the car again, and I'll move to tuning. I'm going to have lots of questions, I'm sure.
Sponsored


Top