Sponsored
Mustang System 2.0
- Thread starter mikes2017gt
- Start date
- Watchers 22
StangTime
Well-Known Member
- Joined
- Apr 16, 2019
- Threads
- 81
- Messages
- 3,594
- Reaction score
- 4,093
- Location
- Ontario 🇨🇦
- First Name
- Todd
- Vehicle(s)
- 19' GT PP1 Manual
Ford didn't line up the driver position on the door with the panel for whatever reason. So it's not your fault. I saw these little relief cuts they put on the backside of the grille and my Spidy senses started tingling. I was thinking WTF who designs a door like this? It's this kind of shit you just cannot plan for until your eyeballs deep into the install.Tell me: What install goes from start to finish with no issues? None of them, that's how many.
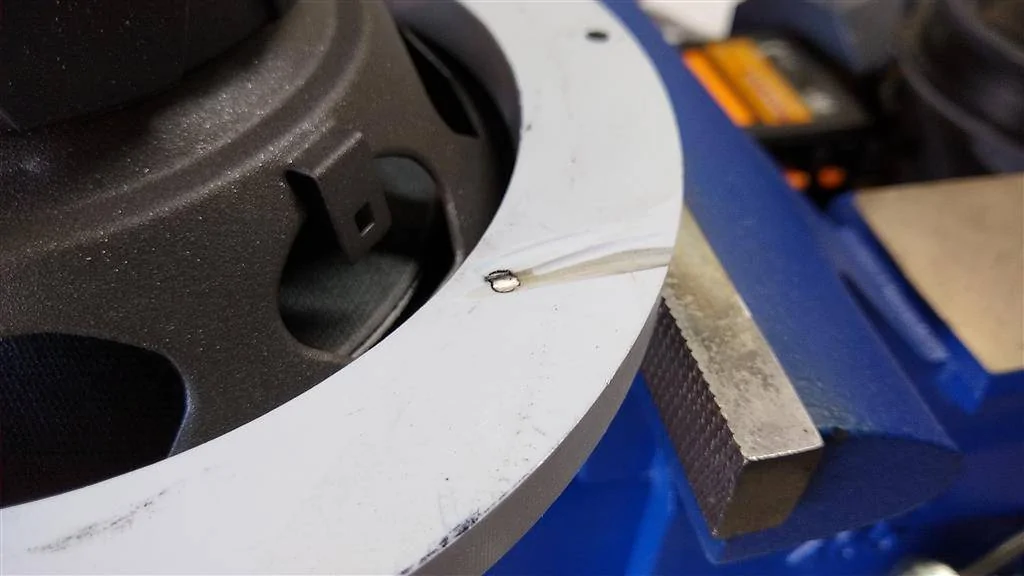
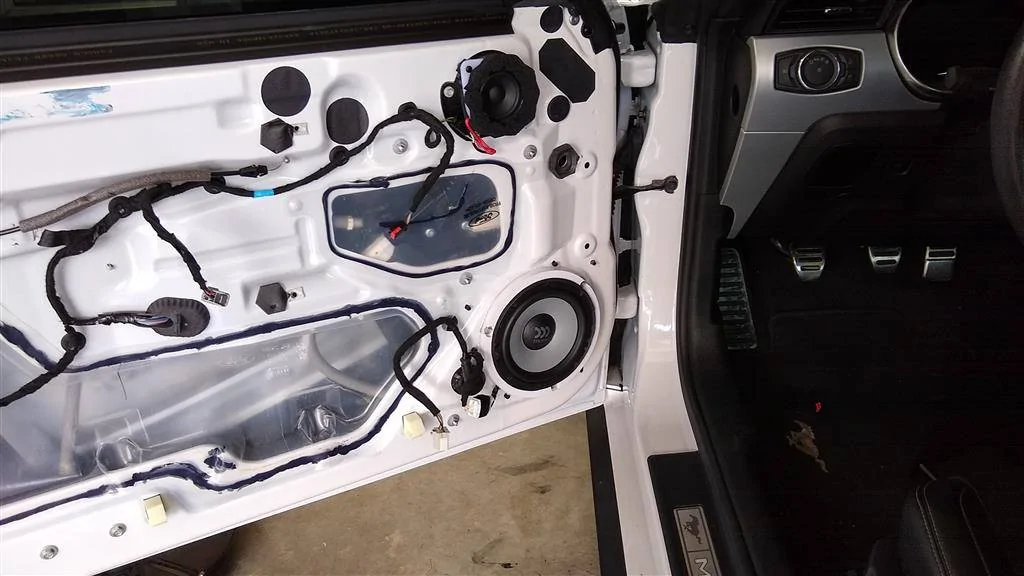
Then things continued to go south. Wonderful. Decided to see what it sounded like with the door panel on. Put that on, all the screws, etc. Cranked it up and I heard it. The unmistakable sound of cone slap. The midbass was hitting something, but how?
This pic sucks but it's the best I can do. I am using the correct Metra adapters for the midbasses, but somehow the driver is off-center. It is skewed up and backwards, towards the rear of the car. Everything looks fine without the door panel, but looking through the grill it's obvious. It is mounted 100% correctly. The driver is flat on the adapter, the adapter is flat on the door. and all 3 factory screw mounting locations line up perfectly. I am totally clueless on this one and that really ticks me off.

I pulled the door panel and surmised it was hitting somewhere here, where I circled in red. This is the passenger door panel...I didn't take pics of the driver's...was too pissed to think about it.
Tomorrow is the A-pillars and tweets and if that goes quickly I'll get the power cable installed. As there's currently a piece of 4-gauge installed I MIGHT be able to use the 4-gauge as a pull string and pull the 0-gauge through. Probably not b/c that would be too easy, but we'll see how it goes.


I had a hard time with the A-pillars, they are simply not designed to be removed with the windshield in place. I'm pretty sure they are installed on the line before the windshield goes in. You CAN get them back in but not without a fight. I absolutely hated this part of the install. Hope you have better luck getting them back in than I did.
blakedanatural
Well-Known Member
- Joined
- Dec 21, 2014
- Threads
- 75
- Messages
- 264
- Reaction score
- 24
- Location
- West Chester,Pa
- Vehicle(s)
- Mustang 5.0 Premium
Omg this install is way over my skill set. It loks really good and I can imagine it sounds really good. Also the JL audio is a good penny.
Qu8Storm
Well-Known Member
It’s not that hard
Omg this install is way over my skill set. It loks really good and I can imagine it sounds really good. Also the JL audio is a good penny.
Sponsored
OP
OP
mikes2017gt
Well-Known Member
- Joined
- Feb 21, 2017
- Threads
- 64
- Messages
- 999
- Reaction score
- 343
- Location
- San Antonio, TX
- Vehicle(s)
- 17 GT Prem M/T 3.55
- Thread starter
- #21
Got the templates for the midbass spacer rings made. I'd have the rings made out of PVC, but apparently Amazon's not giving me the 2-day shipping I'm paying for.  The PVC will be here tomorrow...hopefully early.
Big thanks to @StangTime for sharing the attached PDF of the spacer rings he built! This made it super-easy for me to get the overall size cut out.
The outer diameter is 193mm (or 7-5/8) and the inner diameter has to be customized to whatever the mounting diameter of your driver is. In my case with the Morel Maximo Ultra's, it's 5-5/8.
I used the mounting rings the Morel's come with to get the inner diameter. Not shown in this pic, I used a jigsaw to cut away most of the material inside to have less work to do on the router table...and LESS MDF DUST. I hate MDF. This is 1/2" MDF, BTW. If any MDF scraps are bigger than about 10" square, I keep them. Made this out of a chewed-up scrap piece, but the center part I needed was spotless. Keep your scraps, guys!
Finished product.


I was going to pull the door panels and get the drivers and Metra spacers out so I could mark the mounting holes, but it's 95 in the garage today and I was sweating like crazy, which goes REAL well with MDF dust. Tarred and feathered, anyone? I was covered in MDF dust.
By the time I finished vacuuming, putting tools away and using the leaf blower to blow the dust out of the garage, I was shot. After 30 years of doing this stuff, the mind is willing but the flesh is weak(er)! LOL!
More tomorrow.
The PVC will be here tomorrow...hopefully early.Big thanks to @StangTime for sharing the attached PDF of the spacer rings he built! This made it super-easy for me to get the overall size cut out.
The outer diameter is 193mm (or 7-5/8) and the inner diameter has to be customized to whatever the mounting diameter of your driver is. In my case with the Morel Maximo Ultra's, it's 5-5/8.
I used the mounting rings the Morel's come with to get the inner diameter. Not shown in this pic, I used a jigsaw to cut away most of the material inside to have less work to do on the router table...and LESS MDF DUST. I hate MDF. This is 1/2" MDF, BTW. If any MDF scraps are bigger than about 10" square, I keep them. Made this out of a chewed-up scrap piece, but the center part I needed was spotless. Keep your scraps, guys!

Finished product.


I was going to pull the door panels and get the drivers and Metra spacers out so I could mark the mounting holes, but it's 95 in the garage today and I was sweating like crazy, which goes REAL well with MDF dust. Tarred and feathered, anyone? I was covered in MDF dust.
By the time I finished vacuuming, putting tools away and using the leaf blower to blow the dust out of the garage, I was shot. After 30 years of doing this stuff, the mind is willing but the flesh is weak(er)! LOL!
More tomorrow.
Attachments
-
417.8 KB Views: 190
Last edited:
OP
OP
mikes2017gt
Well-Known Member
- Joined
- Feb 21, 2017
- Threads
- 64
- Messages
- 999
- Reaction score
- 343
- Location
- San Antonio, TX
- Vehicle(s)
- 17 GT Prem M/T 3.55
- Thread starter
- #22
What's going on? Do I have the Mustang and Cooking forums confused? Nope. Say hello to my new midrange spacer plates. Or what they will be made out of.

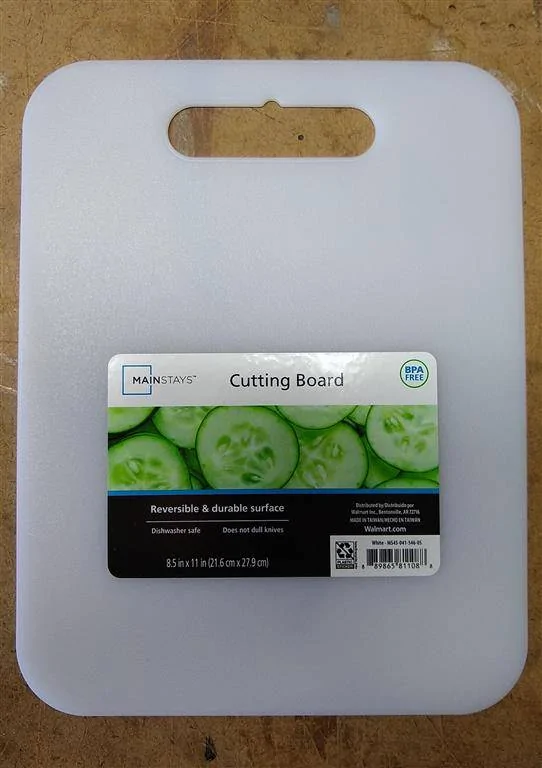
Walmart to the rescue. I wasn't going to wait for 3 days for Amazon to deliver a $20 square of PVC. This fine product cost me $.95 with tax and it was free instant shipping b/c I went and bought it.
Lousy pic, but it appears to be about 5/32" thick vs. the 1/4" that the clear, acrylic spacers are made from. That 3-4 16ths I'll get back is more than enough.

I'm just not comfortable with how close the mid surround is to the inside of the grill. Probably a 50-50 shot it would rub. Being I have the template made already, making two new spacers out of this here cutting board will take an hour, if that. The door panels will already be off b/c I'll be making/installing the midbass rings. I wouldn't use 1/8" material for a midbass ring, but for a small oval for a driver that weighs maybe 1.5-2 ounces it'll be more than good enough.
Last edited:
OP
OP
mikes2017gt
Well-Known Member
- Joined
- Feb 21, 2017
- Threads
- 64
- Messages
- 999
- Reaction score
- 343
- Location
- San Antonio, TX
- Vehicle(s)
- 17 GT Prem M/T 3.55
- Thread starter
- #23
It was only 93F/40% humidity in the garage today so I was able to get a decent amount done. Definitely some sarcasm here, but if you live down south like me, I'm sure you know where I'm coming from.
As a recap, today's task was to make new adapter plates for the midbasses and the mids and hopefully get them installed. I got halfway there, but I'm good with my progress. I really took my time making the adapters because:
Used my MDF template to mark my cuts onto the 1/2"PVC. Drilled holes to play "connect the dots" with the jigsaw. Note the bar clamp in the pic. I used two of these to clamp the PVC sheet to the bench. If you're new to fabrication (or woodworking), trust me, you NEED TO clamp your workpiece down. If you don't the jigsaw or circular saw will grab it and bad things will happen. "Safety First" is not corny; it will save your fingers or more.
Rough cut out. Yes, they're ugly, but just wait.

Oooh, pretty! This was my first time machining PVC. There was like 1" of "snow" in my garage. But I have to say it's 1,000 times better than MDF b/c it doesn't stick to anything. Vacuumed right up...after 15 minutes of vacuuming, yeah, but it's all gone.
Laid the Metra adapter ring on top to mark the mounting holes and everything lined up perfectly. Kudos to @StangTime for accurate dimensions on his PDF.
Ring mounted to the door to check the accuracy of my drilling skills. I was 99% spot on. A little wiggling and everything fits. I checked both rings this way.
A bit of machining involved here. The mounting holes need to be countersunk so that the mounting screws are long enough to get a good bite into the nuts in the door. I used a 5/8 Forstner Bit to make the countersinks. Countersinks are about 5/16" deep. I eyeballed it. Shown here with driver mounted already. Note the gasket tape squish-out through the holes in the frame. It's on there really securely; MUCH more secure feeling than on the Metra ring.
Before mounting with the gasket tape.
I used the 1" coarse-thread screws that came with the driver to mount it. They were too long and stuck out about 1/4". They hit the door, so I had to take the angle grinder to them. This created some divots in the back of the ring, but as I'll be RTVing these rings to the doors, the RTV will take up any gaps. I'm very impressed with how well these coarse head screws (I think they are #8) bite into the PVC. I pre-drilled 3/16" mounting holes and they were perfect. It was "medium difficult" to get the screws fully seated, which means the mounting holes were spot-on. I've made rings from MDF before I can confidently say the drivers didn't feel this "welded in" like they do with these PVC rings. PVC rocks!
Out of order but hey, you got pics. I used the angle grinder to cut a slot for the speaker wire. I thought about drilling a hole through the top of the ring, but it would've been too close to the edge for my liking. This worked out well.
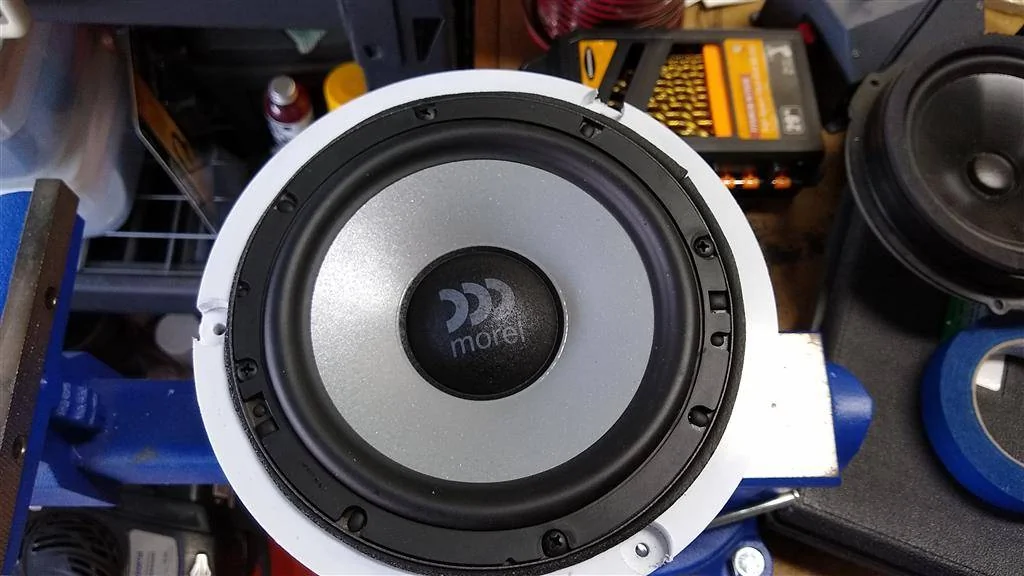
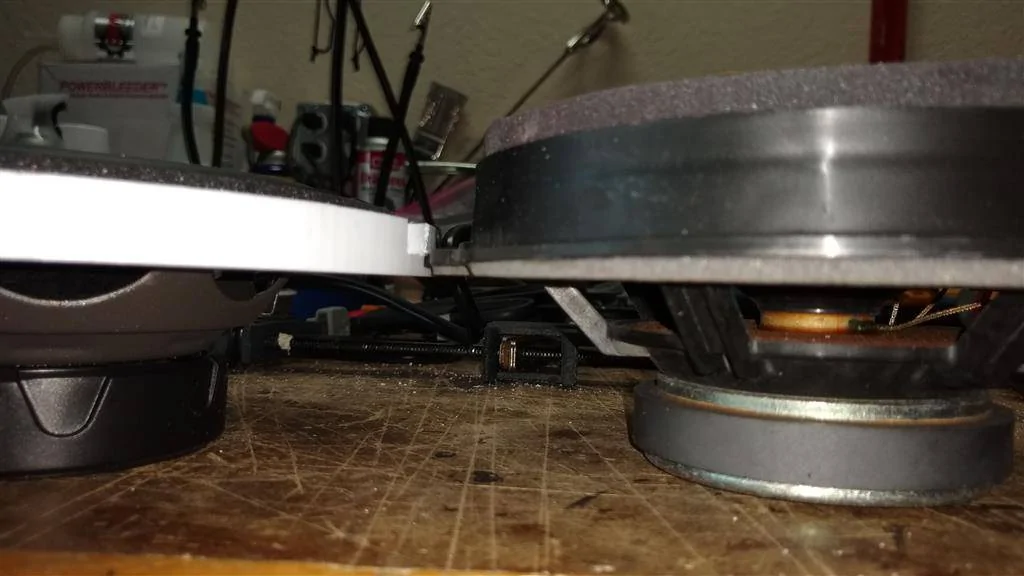
Some shots of the Morel driver in a 1/2" ring next to the stock speaker. The mounting depth is identical! You couldn't plan that. Even better, the installed height is about 1/2" less. No more cone slapping the door panel!
So now I had both midbass rings made and one midbass mounted it it's ring. I could pull the passenger door panel and get the midbasses mounted and done...but I'd still have mid adapter plates to make out of 1/8" thick material and have to deal with the router bit of death. As I was still feeling energetic, I opted for the latter. The midbass rings are fully machined at this point, so I think it was the right decision.
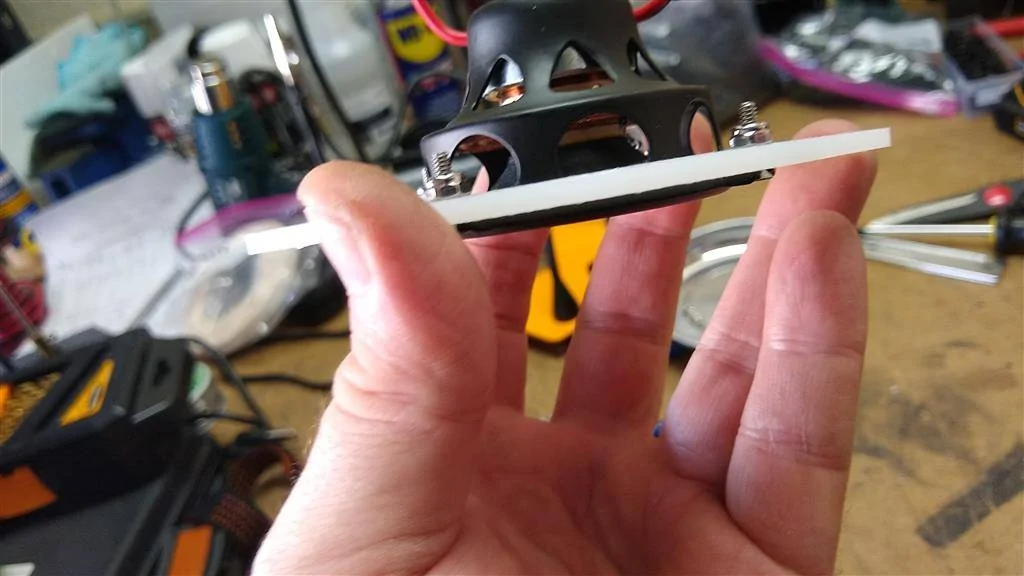
I am really proud of the acrylic plates...came out darn good for my first time working with acrylic. But obviously they were the wrong part. "A" for execution, "D-" for planning.
Traced out my shapes onto the fine quality, $.95, 5/32" thick cutting board using the template from previous posts. Yes, I know what these look like....lemons! You got a dirty mind, pal!!!
Used the acrylic plates to cut the inner circle.
Drilled the mounting holes, used new nylon lock nuts and here you go.
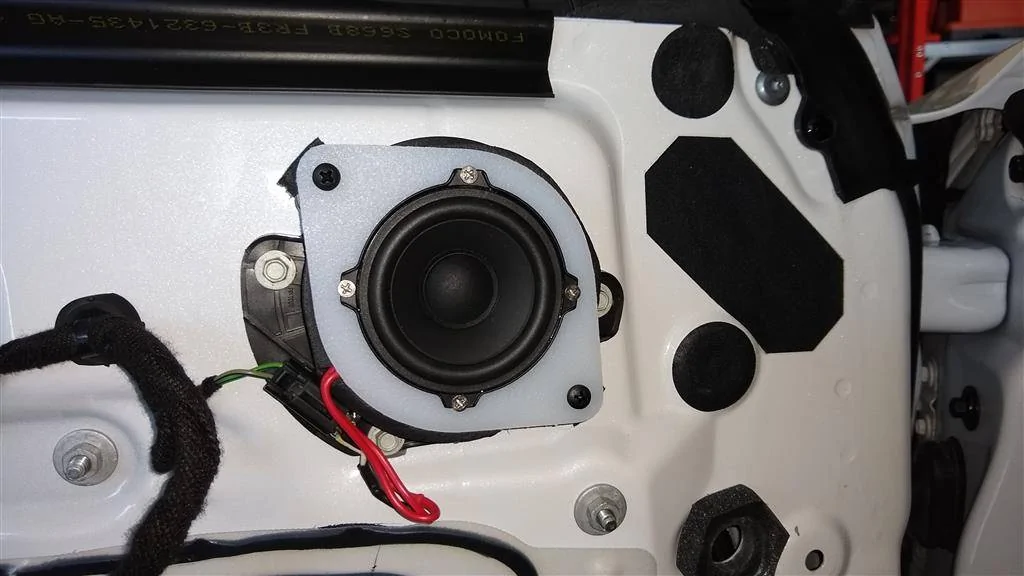
In the door. This is very secure. As the adapter plate is so small and the driver is through-bolted to it, the assembly is a lot stiffer than I thought it would be (that's what she said!). Pleased with how it turned out. I put a foam ring around it later, but didn't take a pic. This assembly sits about 1/8" lower than with the acrylic plates, so door panel clearance is fixed.
That's where I stopped b/c I was honestly shot. Experience tells me when to stop. I learned the hard way that when you continue past the point of exhaustion, you rush, you get sloppy, you make mistakes and/or you get hurt. Nobody's paying me for my time, so I get to choose my knock-it-off point.
Tomorrow I'll get all the drivers mounted. The RTV silicone needs 24 hours to fully cure, so after mounting it all up, the door panels will have to stay off until Tuesday morning.
I am using this stuff.
More tomorrow. There's nothing like doing the same work twice. :( That's what I've wound up doing for my front stage, but the payoff will be a rock-solid front stage that I can throw power at without worrying about door panel interference. If you've ever had to deal with that before, you know it's a huge disappointment and an even bigger PITA to rectify. I'm glad I'm fixing it now vs. later. Thanks for following along!
As a recap, today's task was to make new adapter plates for the midbasses and the mids and hopefully get them installed. I got halfway there, but I'm good with my progress. I really took my time making the adapters because:
- I didn't want to screw up the material and have to start over
- A 1/2" flush trim bit spinning at 25,000 rpm is no joke. When you have a tiny piece of 1/8" thick material in your hands, it's damn-serious-as-a-heart-attack no joke
- It was damn hot
Used my MDF template to mark my cuts onto the 1/2"PVC. Drilled holes to play "connect the dots" with the jigsaw. Note the bar clamp in the pic. I used two of these to clamp the PVC sheet to the bench. If you're new to fabrication (or woodworking), trust me, you NEED TO clamp your workpiece down. If you don't the jigsaw or circular saw will grab it and bad things will happen. "Safety First" is not corny; it will save your fingers or more.
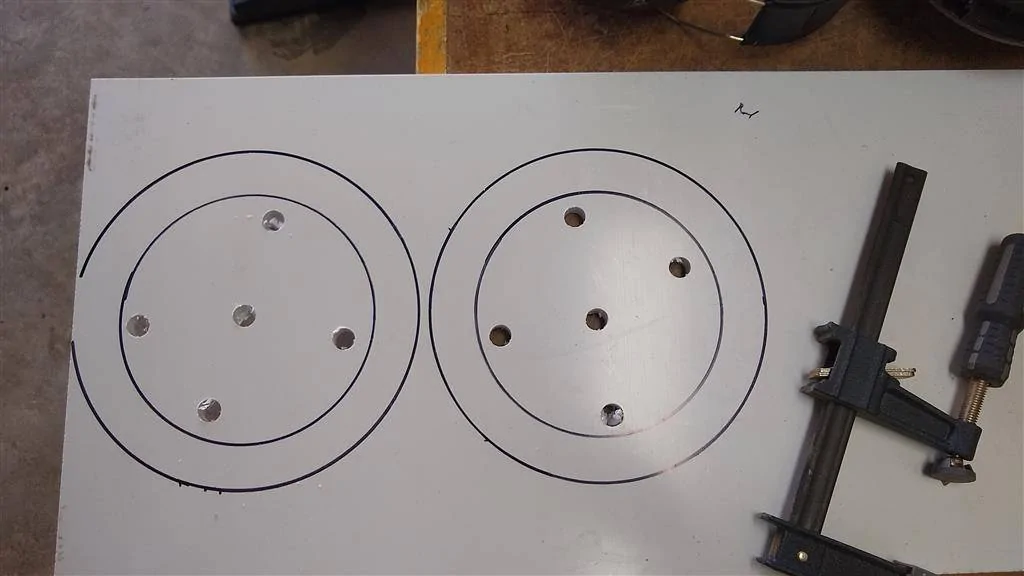
Rough cut out. Yes, they're ugly, but just wait.

Oooh, pretty! This was my first time machining PVC. There was like 1" of "snow" in my garage. But I have to say it's 1,000 times better than MDF b/c it doesn't stick to anything. Vacuumed right up...after 15 minutes of vacuuming, yeah, but it's all gone.

Laid the Metra adapter ring on top to mark the mounting holes and everything lined up perfectly. Kudos to @StangTime for accurate dimensions on his PDF.

Ring mounted to the door to check the accuracy of my drilling skills. I was 99% spot on.
A little wiggling and everything fits. I checked both rings this way.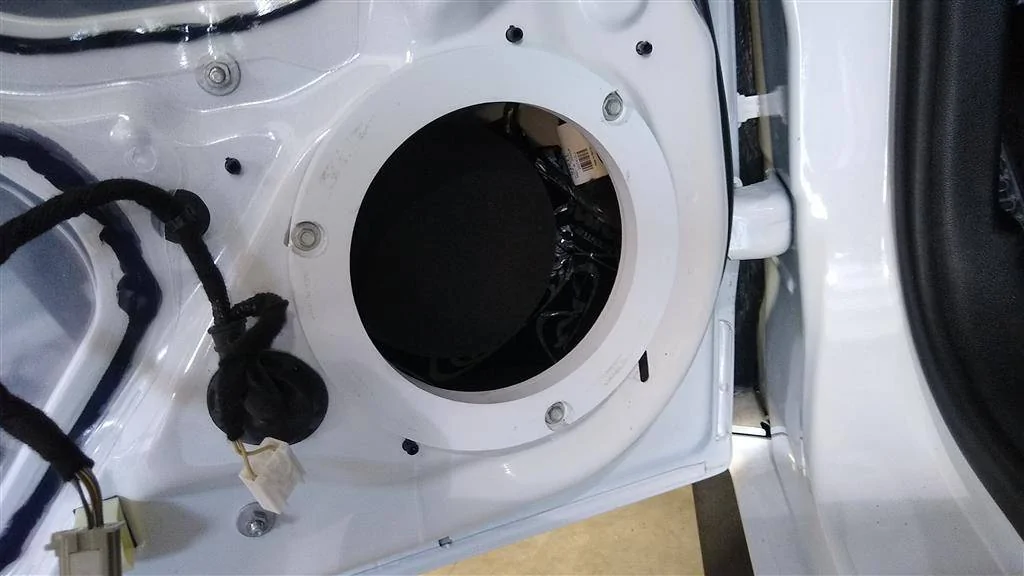

A bit of machining involved here. The mounting holes need to be countersunk so that the mounting screws are long enough to get a good bite into the nuts in the door. I used a 5/8 Forstner Bit to make the countersinks. Countersinks are about 5/16" deep. I eyeballed it. Shown here with driver mounted already. Note the gasket tape squish-out through the holes in the frame. It's on there really securely; MUCH more secure feeling than on the Metra ring.
Before mounting with the gasket tape.

I used the 1" coarse-thread screws that came with the driver to mount it. They were too long and stuck out about 1/4". They hit the door, so I had to take the angle grinder to them. This created some divots in the back of the ring, but as I'll be RTVing these rings to the doors, the RTV will take up any gaps. I'm very impressed with how well these coarse head screws (I think they are #8) bite into the PVC. I pre-drilled 3/16" mounting holes and they were perfect. It was "medium difficult" to get the screws fully seated, which means the mounting holes were spot-on. I've made rings from MDF before I can confidently say the drivers didn't feel this "welded in" like they do with these PVC rings. PVC rocks!
Out of order but hey, you got pics. I used the angle grinder to cut a slot for the speaker wire. I thought about drilling a hole through the top of the ring, but it would've been too close to the edge for my liking. This worked out well.

Some shots of the Morel driver in a 1/2" ring next to the stock speaker. The mounting depth is identical! You couldn't plan that. Even better, the installed height is about 1/2" less. No more cone slapping the door panel!

So now I had both midbass rings made and one midbass mounted it it's ring. I could pull the passenger door panel and get the midbasses mounted and done...but I'd still have mid adapter plates to make out of 1/8" thick material and have to deal with the router bit of death. As I was still feeling energetic, I opted for the latter. The midbass rings are fully machined at this point, so I think it was the right decision.
I am really proud of the acrylic plates...came out darn good for my first time working with acrylic. But obviously they were the wrong part. "A" for execution, "D-" for planning.
Traced out my shapes onto the fine quality, $.95, 5/32" thick cutting board using the template from previous posts. Yes, I know what these look like....lemons! You got a dirty mind, pal!!!

Used the acrylic plates to cut the inner circle.

Drilled the mounting holes, used new nylon lock nuts and here you go.

In the door. This is very secure. As the adapter plate is so small and the driver is through-bolted to it, the assembly is a lot stiffer than I thought it would be (that's what she said!). Pleased with how it turned out. I put a foam ring around it later, but didn't take a pic. This assembly sits about 1/8" lower than with the acrylic plates, so door panel clearance is fixed.
That's where I stopped b/c I was honestly shot. Experience tells me when to stop. I learned the hard way that when you continue past the point of exhaustion, you rush, you get sloppy, you make mistakes and/or you get hurt. Nobody's paying me for my time, so I get to choose my knock-it-off point.
Tomorrow I'll get all the drivers mounted. The RTV silicone needs 24 hours to fully cure, so after mounting it all up, the door panels will have to stay off until Tuesday morning.
I am using this stuff.

More tomorrow. There's nothing like doing the same work twice. :( That's what I've wound up doing for my front stage, but the payoff will be a rock-solid front stage that I can throw power at without worrying about door panel interference. If you've ever had to deal with that before, you know it's a huge disappointment and an even bigger PITA to rectify. I'm glad I'm fixing it now vs. later. Thanks for following along!
Last edited:
StangTime
Well-Known Member
- Joined
- Apr 16, 2019
- Threads
- 81
- Messages
- 3,594
- Reaction score
- 4,093
- Location
- Ontario 🇨🇦
- First Name
- Todd
- Vehicle(s)
- 19' GT PP1 Manual
Looks great Mike! I knew you would be impressed by how solid those PVC rings are. I will never do another MDF adapter (like you said "tarred and feathered". PVC is now my go-to material for strength, water resistance and ease of clean-up. The mid-bass drivers look solid too.
Now you need a foam ring to be the same height (or a little higher) as the OEM driver assembly to seal your door panel. Hopefully you can make those Sound-Skins foam strips work for you.
Now you need a foam ring to be the same height (or a little higher) as the OEM driver assembly to seal your door panel. Hopefully you can make those Sound-Skins foam strips work for you.
OP
OP
mikes2017gt
Well-Known Member
- Joined
- Feb 21, 2017
- Threads
- 64
- Messages
- 999
- Reaction score
- 343
- Location
- San Antonio, TX
- Vehicle(s)
- 17 GT Prem M/T 3.55
- Thread starter
- #25
Hey Todd! Thanks for the kind words. The PVC ring is extremely strong; I'm really impressed. I happen to have enough SoundSkins foam strips left to just complete both front doors. I also have the outer rings from the Fast Rings set that I didn't use, so I have options, thankfully.
Will be getting both doors finished today, but the door panels will have to stay off until tomorrow to let the RTV cure. I'd rather mount the empty rings to the door and then mount the drivers after the RTV has cured, but the screws were kind of difficult to drive into the ring and I'd rather do that work on the workbench where I can hold the screwdriver straight and not risk it slipping and punching through the cone.
Will be getting both doors finished today, but the door panels will have to stay off until tomorrow to let the RTV cure. I'd rather mount the empty rings to the door and then mount the drivers after the RTV has cured, but the screws were kind of difficult to drive into the ring and I'd rather do that work on the workbench where I can hold the screwdriver straight and not risk it slipping and punching through the cone.
Sponsored
OP
OP
mikes2017gt
Well-Known Member
- Joined
- Feb 21, 2017
- Threads
- 64
- Messages
- 999
- Reaction score
- 343
- Location
- San Antonio, TX
- Vehicle(s)
- 17 GT Prem M/T 3.55
- Thread starter
- #26
The doors are finally finished. Still have to put the door panels back on but that's so easy it doesn't count as work.
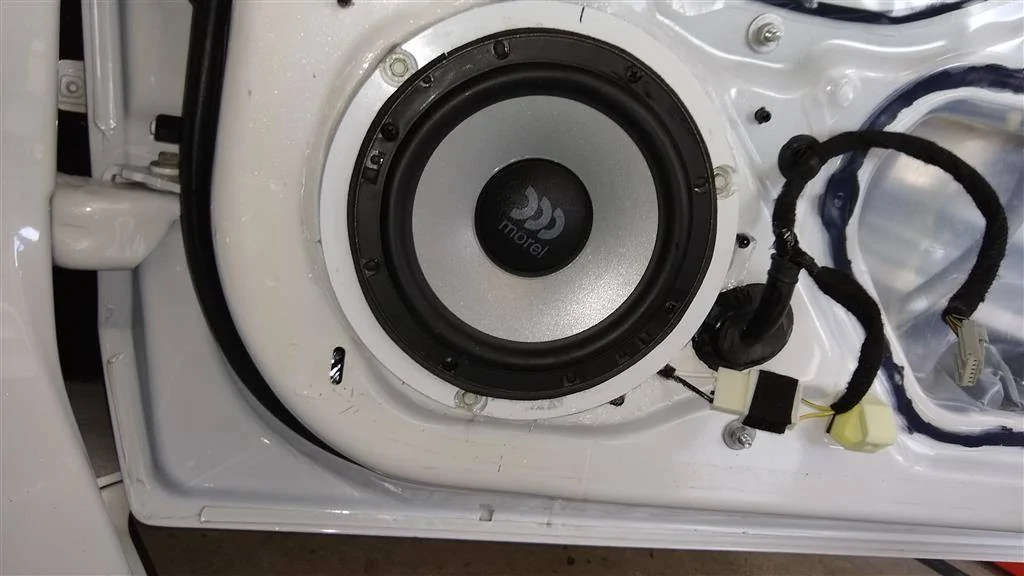
Midbasses mounted in the driver's and passenger's doors.
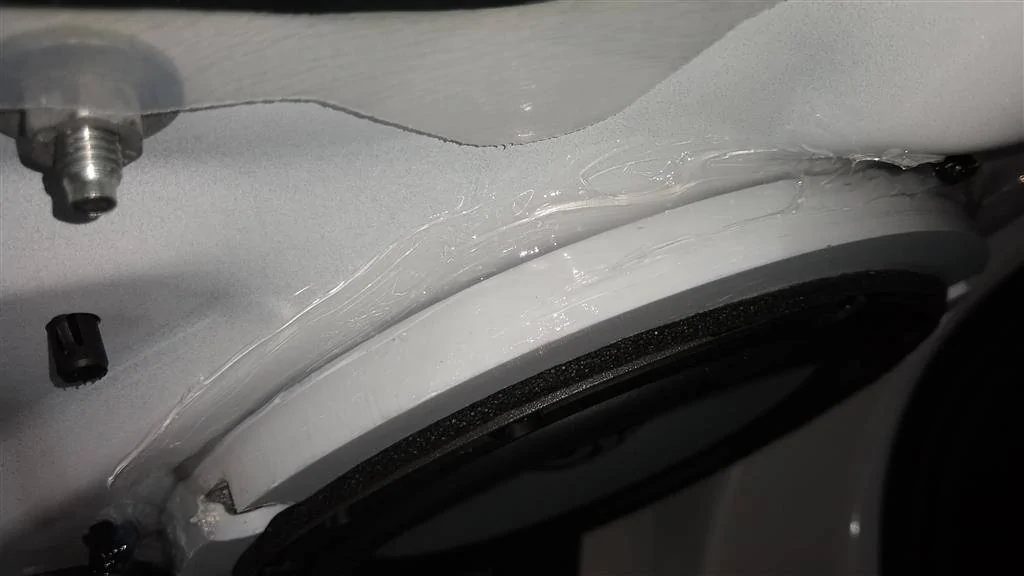
I put a thick bead of RTV silicone on the back of the ring and once it was screwed down tightly, I ran another bead around the perimeter and smooshed it in with my finger. These are sealed up tight. I thought about RTVing the drivers to the rings (I've done it in the past) but decided against it. Odds are most 6.5" drivers will fit in this cutout, so I shouldn't have to remove the rings, but might need to remove the drivers down the road. Just used gasket tape on the driver to ring interface.
Finished mounting the mids as well. Door shots. Foam will go on tomorrow, right before I button up the doors.
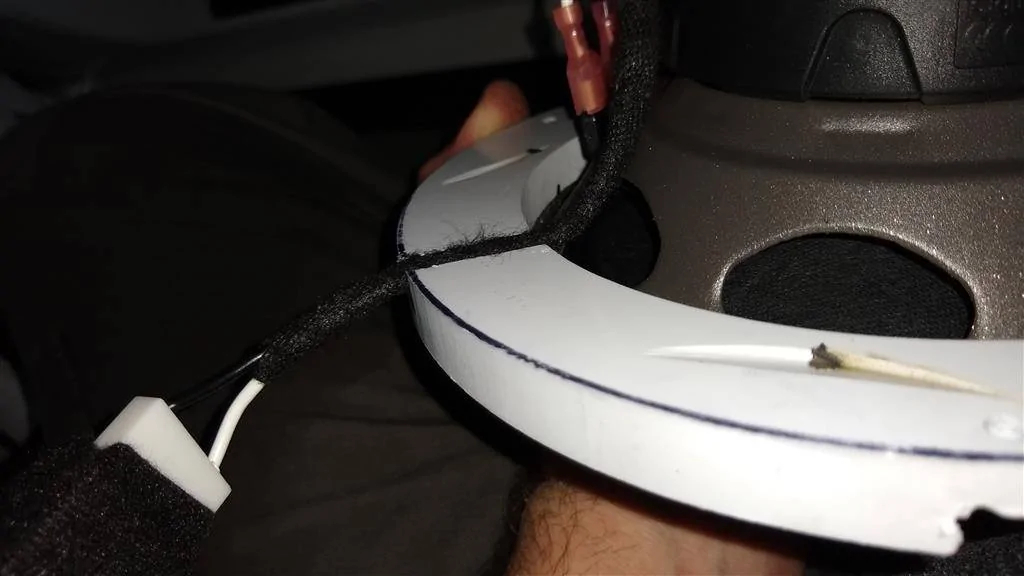
I ran a polarity check and I'm good to go. Ironically, the factory tweets are wired out of phase. Probably has something to do with Forscan tomfoolery. I'll be fixing that problem though. Speaking of tweets...
I pulled the passenger A-pillar. Honestly, it was dead easy. A little careful wiggling and it came right out. With all the tabs, clips and slots though, I can tell it's going to be a PITA to get back in. But first things first.
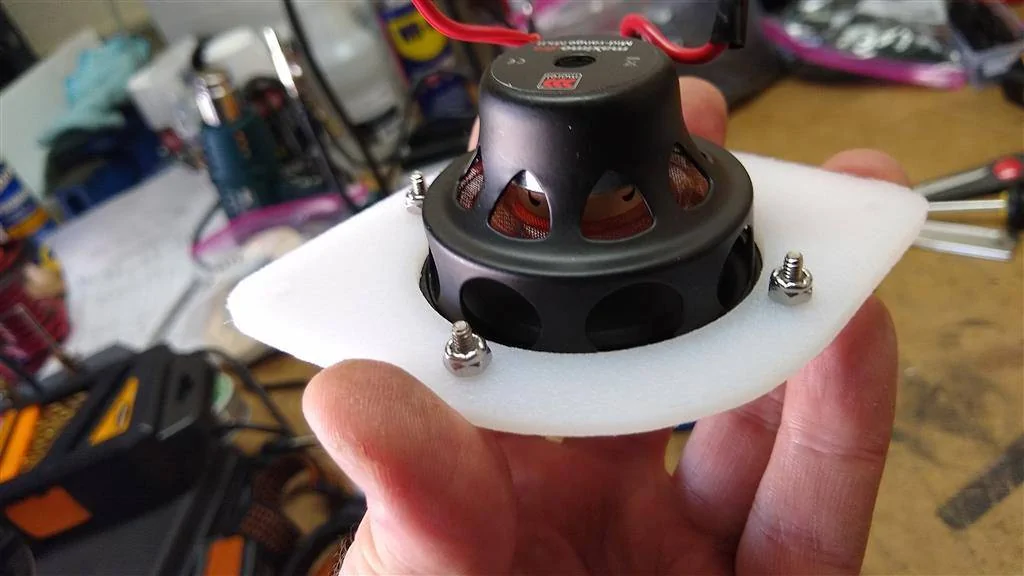
There was no way the Morel tweet was going to be a snap-in, or even a force-in. Wouldn't even get into the stock mounting hole. All the factory tabs and such are still in place in this pic.
With a Dremel and sanding drum I carefully cut away more and more to get the tweet to at least get in to the top part of the hole. No dice, now the bottom row of slots (that plastic welded on piece) was in the way. The Morel tweet has these "barrels" that the wires go into and they stick out. Note in this pic there's also no mounting hole/threaded hole on the back of the tweet. Really wish there was.
Long story short, I wound up completely gutting the tweeter mounting hole. This was the only way I was going to get it in there.
So this is how I want it to look. Wish it was actually mounted and done, but I'm just holding it in place. You can see it is a nice fit.
So how to mount the thing? I'm open to suggestions. One idea I'm working with is using a steel strap held in with two screws. One in the "barrel" sticking up that the stock plastic-welded piece was on, and the other end with a screw at a right angle into the side of the clip. I would hot glue the strap to the back of the tweet, then once it's where I want it, run a bead of hot glue all around it to fix it in place.
If the tweets had a threaded hole on the back I'd be done already. I'm open to suggestions on how to mount them. What is challenging is that the hole in the A-pillar really has to be opened all the way up to get the tweet in. At that point there's almost no friction-fit capability, the tweet just falls through. I could hot glue it without the metal strap, but trying to hold the tweet in the perfect position and angle with one hand while gluing with the other sounds...difficult.
I might be able to put a bunch of tape on the front of the tweeter/a-pillar and use that to hold the tweet in place while I pour hot glue on the back, but that sounds kinda "iffy."
Thoughts are appreciated.
Midbasses mounted in the driver's and passenger's doors.

I put a thick bead of RTV silicone on the back of the ring and once it was screwed down tightly, I ran another bead around the perimeter and smooshed it in with my finger. These are sealed up tight. I thought about RTVing the drivers to the rings (I've done it in the past) but decided against it. Odds are most 6.5" drivers will fit in this cutout, so I shouldn't have to remove the rings, but might need to remove the drivers down the road. Just used gasket tape on the driver to ring interface.
Finished mounting the mids as well. Door shots. Foam will go on tomorrow, right before I button up the doors.
I ran a polarity check and I'm good to go. Ironically, the factory tweets are wired out of phase. Probably has something to do with Forscan tomfoolery. I'll be fixing that problem though. Speaking of tweets...
I pulled the passenger A-pillar. Honestly, it was dead easy. A little careful wiggling and it came right out. With all the tabs, clips and slots though, I can tell it's going to be a PITA to get back in. But first things first.
There was no way the Morel tweet was going to be a snap-in, or even a force-in. Wouldn't even get into the stock mounting hole. All the factory tabs and such are still in place in this pic.

With a Dremel and sanding drum I carefully cut away more and more to get the tweet to at least get in to the top part of the hole. No dice, now the bottom row of slots (that plastic welded on piece) was in the way. The Morel tweet has these "barrels" that the wires go into and they stick out. Note in this pic there's also no mounting hole/threaded hole on the back of the tweet. Really wish there was.

Long story short, I wound up completely gutting the tweeter mounting hole. This was the only way I was going to get it in there.


So this is how I want it to look. Wish it was actually mounted and done, but I'm just holding it in place. You can see it is a nice fit.


So how to mount the thing? I'm open to suggestions. One idea I'm working with is using a steel strap held in with two screws. One in the "barrel" sticking up that the stock plastic-welded piece was on, and the other end with a screw at a right angle into the side of the clip. I would hot glue the strap to the back of the tweet, then once it's where I want it, run a bead of hot glue all around it to fix it in place.


If the tweets had a threaded hole on the back I'd be done already. I'm open to suggestions on how to mount them. What is challenging is that the hole in the A-pillar really has to be opened all the way up to get the tweet in. At that point there's almost no friction-fit capability, the tweet just falls through. I could hot glue it without the metal strap, but trying to hold the tweet in the perfect position and angle with one hand while gluing with the other sounds...difficult.
I might be able to put a bunch of tape on the front of the tweeter/a-pillar and use that to hold the tweet in place while I pour hot glue on the back, but that sounds kinda "iffy."
Thoughts are appreciated.
Last edited:
OP
OP
mikes2017gt
Well-Known Member
- Joined
- Feb 21, 2017
- Threads
- 64
- Messages
- 999
- Reaction score
- 343
- Location
- San Antonio, TX
- Vehicle(s)
- 17 GT Prem M/T 3.55
- Thread starter
- #27
Just went and looked at the tweet situation again with a critical eye. If I had the hands of a neurosurgeon, I could've Dremeled-out the hole "that much smaller" and I'd have a bit of a friction fit to work with...it would help. But when I tell you there's about a 32nd difference (.8mm, I looked it up) b/t the tweet sliding into the hole or not, I'm not kidding. This is just a PITA situation. At least hot glue is reversible/undoable. I need a third hand to apply the glue while I hold the tweet in place. I'll figure it out...will probably involve blue painter's tape.
OP
OP
mikes2017gt
Well-Known Member
- Joined
- Feb 21, 2017
- Threads
- 64
- Messages
- 999
- Reaction score
- 343
- Location
- San Antonio, TX
- Vehicle(s)
- 17 GT Prem M/T 3.55
- Thread starter
- #30
I treated the outer door skin with two layers of Dynamat Xtreme and used the large pad that goes behind the driver from the Fast Rings set. I opted not to treat the inner door skin at this time. I can always go back and do it later on.Doors finished? I cannot see any sound treatment on the interior metal sheet. ;)
Sponsored