Sponsored

Let's talk brake cooling

dires114

Active Member
Joined
Apr 13, 2019
Threads
1
Messages
36
Reaction score
14
Location
Sacramento, CA
Vehicle(s)
2007 GT500, 2017 Focus RS, 2019 GT350R
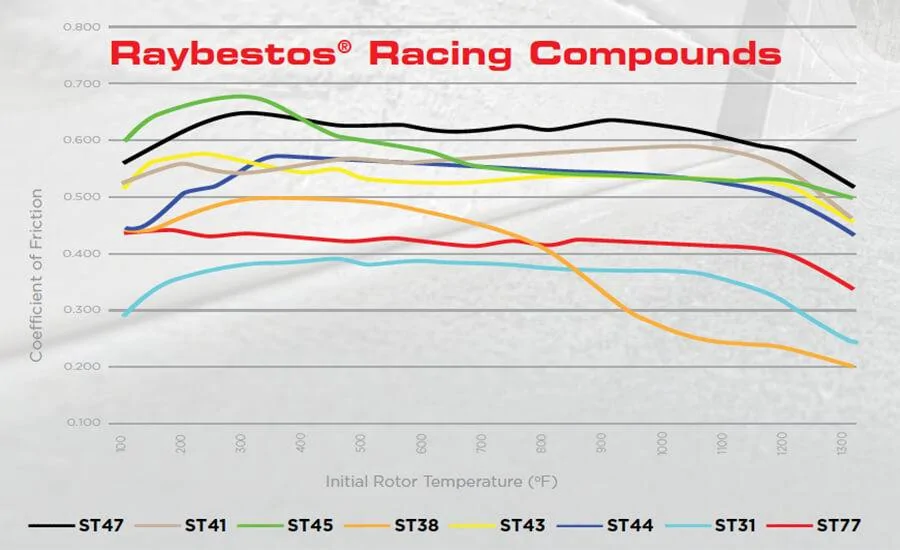
Any reason for choosing the ST43 over the ST47 or ST45? According to the Raybestos compound sheet below, this is what they say about the ST47:
"If you are looking for the most advanced performing road race brake pad, that will simply out perform all the rest, this is it."
Sounds like the winner to me. ;) Note that all Raybestos compounds look to cost the same for our cars so price should is not a deciding factor.


https://www.porterfield-brakes.com/images/raycomp2008_11_06_03_19_04.pdf

Have run both ST47 and ST43 on my GT500. They both wear exceptionally well and both treat rotors amazingly well (much better than PFCs in fact). Like CSL said, ST43 has smoother engagement, which leads to easier modulation. ST47 has absolutely incredible bite, but also great modulation for me, easier to modulate than any of the PFCs I've tried or the DSUNO. ST47 has a rock solid pedal feel, better than any pad I've tried. At least that's how it felt in a 2 ton pig.
Sponsored


dires114

Active Member
Joined
Apr 13, 2019
Threads
1
Messages
36
Reaction score
14
Location
Sacramento, CA
Vehicle(s)
2007 GT500, 2017 Focus RS, 2019 GT350R
Just a thought ... we all want cooling air blown into the bell/hat, where it will be diverted into the rotor vanes and then blown out the outer perimeter of the friction ring, cooling the disc. But that’s assuming the bell is built the way a normal competition bell is built: solid. These SHW bells have radial pins. How much of an effect would these openings have to allowing that air to escape past the entire bell and out the other side, bypassing the vanes altogether? Has anyone studied this?

I’m assuming all the GT4 and FP350S teams are using traditional bell designs, so is it just us who are trying to adapt traditional cooling methods to nontraditional 2-piece rotor design?
 
OP
OP
honeybadger

honeybadger

Just don't care
Joined
Apr 20, 2016
Threads
59
Messages
3,716
Reaction score
6,264
Location
COTA
First Name
Kevin
Vehicle(s)
'17 GT350
Had the chance to really put the new ducts to work at COTA this weekend. All I can say is holy s***. I'll let the data do the talking:

COTA braking.png


Yep. That's right. 1.54g braking. I never got above 1.3 before - even using my aggressive G-Loc pads. These were on my Raybestos ST43s which are a fairly mellow endurance pad. They have good bite - I'd say similar to OEM. The ~1.5g was repeated for multiple laps at multiple turns, so not a fluke in the data.
 

Epiphany

Well-Known Member
Joined
Oct 11, 2015
Threads
69
Messages
7,485
Reaction score
11,741
Location
Global
Vehicle(s)
I like to disassemble things.
Clearly, your legs are stronger than before.


:)
 
OP
OP
honeybadger

honeybadger

Just don't care
Joined
Apr 20, 2016
Threads
59
Messages
3,716
Reaction score
6,264
Location
COTA
First Name
Kevin
Vehicle(s)
'17 GT350
So bringing this one back from the dead. Was watching my man Jackie Ding and they showed some of the brake deflector/ducting on a 991.2 GT3. This got me thinking about my own deflectors. Here's the part that intrigued me:


So went to dig up some pics on the internet and found this:
1623341826655.png


So the upper one (green arrows) is the one predominantly shooting into the "eye" of the rotor. The red arrows more aims at the bottom of the rotor.

I went to look at my Vorshlag-inspired DIY ones to compare. Pics below (car is sitting on its tires, so car is at proper ride height).

Wheels straight:

IMG_1798.JPEG

IMG_1799.JPEG


Definitely not pointing into the rotor itself - but the knuckle (this isn't surprising since Vorshlag designed these on a GT with the other type of knuckle). Overall height appears to be right. If you can point more into the rotor opening, you'd be dead one.

IMG_1800.JPEG
IMG_1801.JPEG


There appears to be a fair amount of area to the right of the deflector that could be utilized to ensure air doesn't miss the deflector and interact with the sway bar.
IMG_1802.JPEG


Okay, wheels turned to almost full lock - open side.

IMG_1803.JPEG


Even more pointing towards the middle of the knuckle

IMG_1804.JPEG


On the other side...not much room between the tire and the frame rails
IMG_1807.JPEG


Again, air being directed to the knuckle vs. rotor
IMG_1808.JPEG


So my initial thinking is that figuring out how to capture more air near the frame rails and then get that air into the rotor vs. knuckle is probably a good first step. Thoughts?
 

Sponsored

Venom52

Well-Known Member
Joined
Nov 15, 2018
Threads
0
Messages
106
Reaction score
99
Location
Central Texas
First Name
Dean
Vehicle(s)
21 GT500 CFTP, 23 Durango SRT 392
I would make sure the tunnels in the belly pan are clear and not obstructed.
 
OP
OP
honeybadger

honeybadger

Just don't care
Joined
Apr 20, 2016
Threads
59
Messages
3,716
Reaction score
6,264
Location
COTA
First Name
Kevin
Vehicle(s)
'17 GT350
I would make sure the tunnels in the belly pan are clear and not obstructed.
You mean on the underside of the actual belly plan? Or the proper ducting from the front bumper to the wheel well?
 

Venom52

Well-Known Member
Joined
Nov 15, 2018
Threads
0
Messages
106
Reaction score
99
Location
Central Texas
First Name
Dean
Vehicle(s)
21 GT500 CFTP, 23 Durango SRT 392
You mean on the underside of the actual belly plan? Or the proper ducting from the front bumper to the wheel well?
The tunnels underneath i believe are what feed the vorshlag diverters based on the pp1 set he built. Granted the added airflow from the OEM ducting adds even more direct air.
 
OP
OP
honeybadger

honeybadger

Just don't care
Joined
Apr 20, 2016
Threads
59
Messages
3,716
Reaction score
6,264
Location
COTA
First Name
Kevin
Vehicle(s)
'17 GT350
I’d take this with a grain of salt—ultimately their answer is to buy a race brake kit like their kit and if that doesn’t work, then add ducting (but just do it right).

The fundamentals in the article are good, though. As with everything, you need to make sure you’re doing it right. And it’s important to understand the parts you’re using, understand how you’re using them, and what conditions they’re seeing.

Unfortunately getting real data is quite hard. Those little temp stickers that you put on the caliper don’t help much. By the time you’ve come into the pits, you’ve already allowed the brakes to cool down too much to be usable data. You’d really need something IR sensors on the rotors that are datalogging live to understand if you’re overheating the brakes and where in the brake system you’re seeing the heat (inside rotor/outside rotor/etc.).

I should say, there are some tricks to understanding your brakes. If you’re glazing the pads, you’re likely getting them too hot. Also, if your outside pads are wearing much faster than the inside ones, you’re probably overcooling the inside of the rotor (not always the case, though). Temp sensors are the only sure way to know, though.

I’ve personally run OEM pads, a couple of the G-Loc lines, and Raybestos ST43s. All have difference coefficient of friction at different temps. I now run the ST43s…the graph of coefficient of friction is below.

1623473549325.jpeg


In my experience with these pads, they work best when you can manage the temps a bit. After 4-5 brake applications that don’t allow the brakes to cool down thoroughly, you lose a bit of that bite. This is common with the OEM ducting and my Vorhslag-inspired ducting. When I had hoses, I didn’t have this issue, though my pedal had less bite going into the huge brake zones after straightaways - my conclusion is that the deflectors cool better when pointing straight, but efficiency tanks when the wheels are turned. Meanwhile, the ducts and hosing weren’t as overall efficient, but were better when the wheels were turned.

I’m hoping if I can make the deflectors a bit more efficient, I can combine the best of both. We’ll see.
Sponsored


Top