Sponsored
EFI
Well-Known Member
- Joined
- May 19, 2015
- Threads
- 65
- Messages
- 5,287
- Reaction score
- 4,732
- Location
- Masshole central
- Vehicle(s)
- 5.Br0
You don't have to remove the grill itself, but you do have to remove the bumper and leave the grill attached to it while you remove the fog lights.
Crew4991
Well-Known Member
- Joined
- Sep 11, 2020
- Threads
- 14
- Messages
- 1,248
- Reaction score
- 2,588
- Location
- Phoenix Arizona / Denver Colorado
- First Name
- Crew
- Vehicle(s)
- Ford Mustang GT/CS, Dodge Viper SRT10
Removing the bumper isn't too difficult, just a bunch of bolts to undo mainly. The hardest part I thought was getting at the two fender bolts that hold the bumper to the fender as they are at a strange angle and not much working room. Take your time and good luck with the delete!
OP
OP
IanKar
Well-Known Member
- Thread starter
- #5
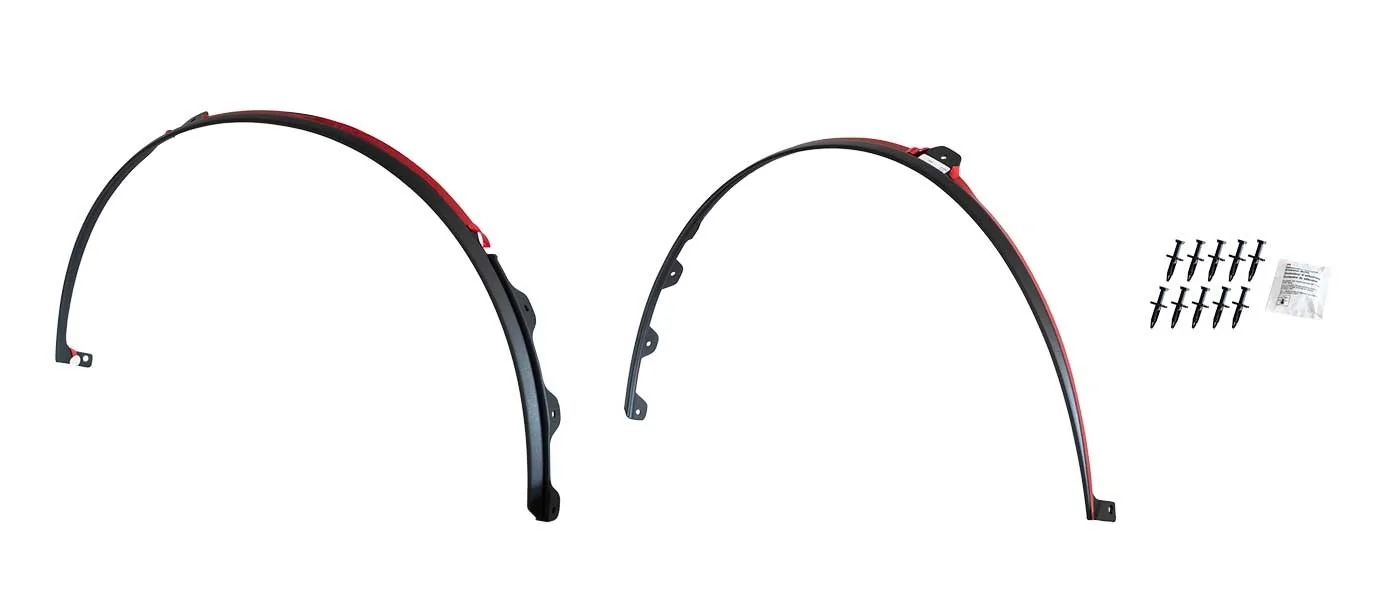
I have front fender flares. Aren't these glued to the bumper as well?Removing the bumper isn't too difficult, just a bunch of bolts to undo mainly. The hardest part I thought was getting at the two fender bolts that hold the bumper to the fender as they are at a strange angle and not much working room. Take your time and good luck with the delete!

Sponsored
Crew4991
Well-Known Member
- Joined
- Sep 11, 2020
- Threads
- 14
- Messages
- 1,248
- Reaction score
- 2,588
- Location
- Phoenix Arizona / Denver Colorado
- First Name
- Crew
- Vehicle(s)
- Ford Mustang GT/CS, Dodge Viper SRT10
Yeah they are attached to the bumper. Just leave them on and take the front bumper cover off as a whole unit. Easier that way.I have front fender flares. Aren't these glued to the bumper as well?
OP
OP
IanKar
Well-Known Member
- Thread starter
- #7
Appreciate the reply. As they are glued to the side fender they too are glued to the front bumper? So one cannot just detach. Unless the fender flare portion that runs over the bumper is just fastened to the bumper with the grommets?Yeah they are attached to the bumper. Just leave them on and take the front bumper cover off as a whole unit. Easier that way.
Charlemagne
Well-Known Member
- Joined
- Jan 14, 2021
- Threads
- 1
- Messages
- 1,971
- Reaction score
- 3,477
- Location
- Czech Republic (Europe)
- First Name
- Nick
- Vehicle(s)
- Tempest 2021 Mustang Mach 1 Velocity Blue M3440
- Vehicle Showcase
- 1
If I remember correctly, the 3M tape ends on the end of the well liner, the last 20 cm or so don't have 3M tape, like on this pic.

Edit:
Yeah, you can see it clearly in this video, the tape doesn't touch the bumper. Just pop those 3 rivets and you can remove the bumper.
Haven't seen this video before, that's some really nice Velocity Blue car right there
Edit:
Yeah, you can see it clearly in this video, the tape doesn't touch the bumper. Just pop those 3 rivets and you can remove the bumper.
Haven't seen this video before, that's some really nice Velocity Blue car right there
Last edited:
OP
OP
IanKar
Well-Known Member
- Thread starter
- #10
Had a good look. I have the handling package and it looks a bit more than just a few bolts. Looks like the bottom splitter is connected to the bottom under carriage plastic panel and top splitter. There are also a load of plastic fasteners to remove as well. I'll have to see if these need coming out or it's a matter of a few bolts. I suppose that's the joys of any mod.
Last edited:
Sponsored
Coastal-Mach
Well-Known Member
- Joined
- Oct 21, 2021
- Threads
- 22
- Messages
- 2,053
- Reaction score
- 4,101
- Location
- Wilmington, NC
- First Name
- Anthony
- Vehicle(s)
- 2023 BMW M440i, 2026 GMC Denali, 2021 Jeep JK
Hey Ian,Had a good look. I have the handling package and it looks a bit more than just a few bolts. Looks like the bottom splitter is connected to the bottom under carriage plastic panel and top splitter. There are also a load of plastic fasteners to remove as well. I'll have to see if these need coming out or it's a matter of a few bolts. I suppose that's the joys of any mod.
If I remember correctly there is a video on YT, where a guy shows how to remove the covers without removing the bumper. It’s a yellow M1, if memory serves.
OP
OP
IanKar
Well-Known Member
- Thread starter
- #12
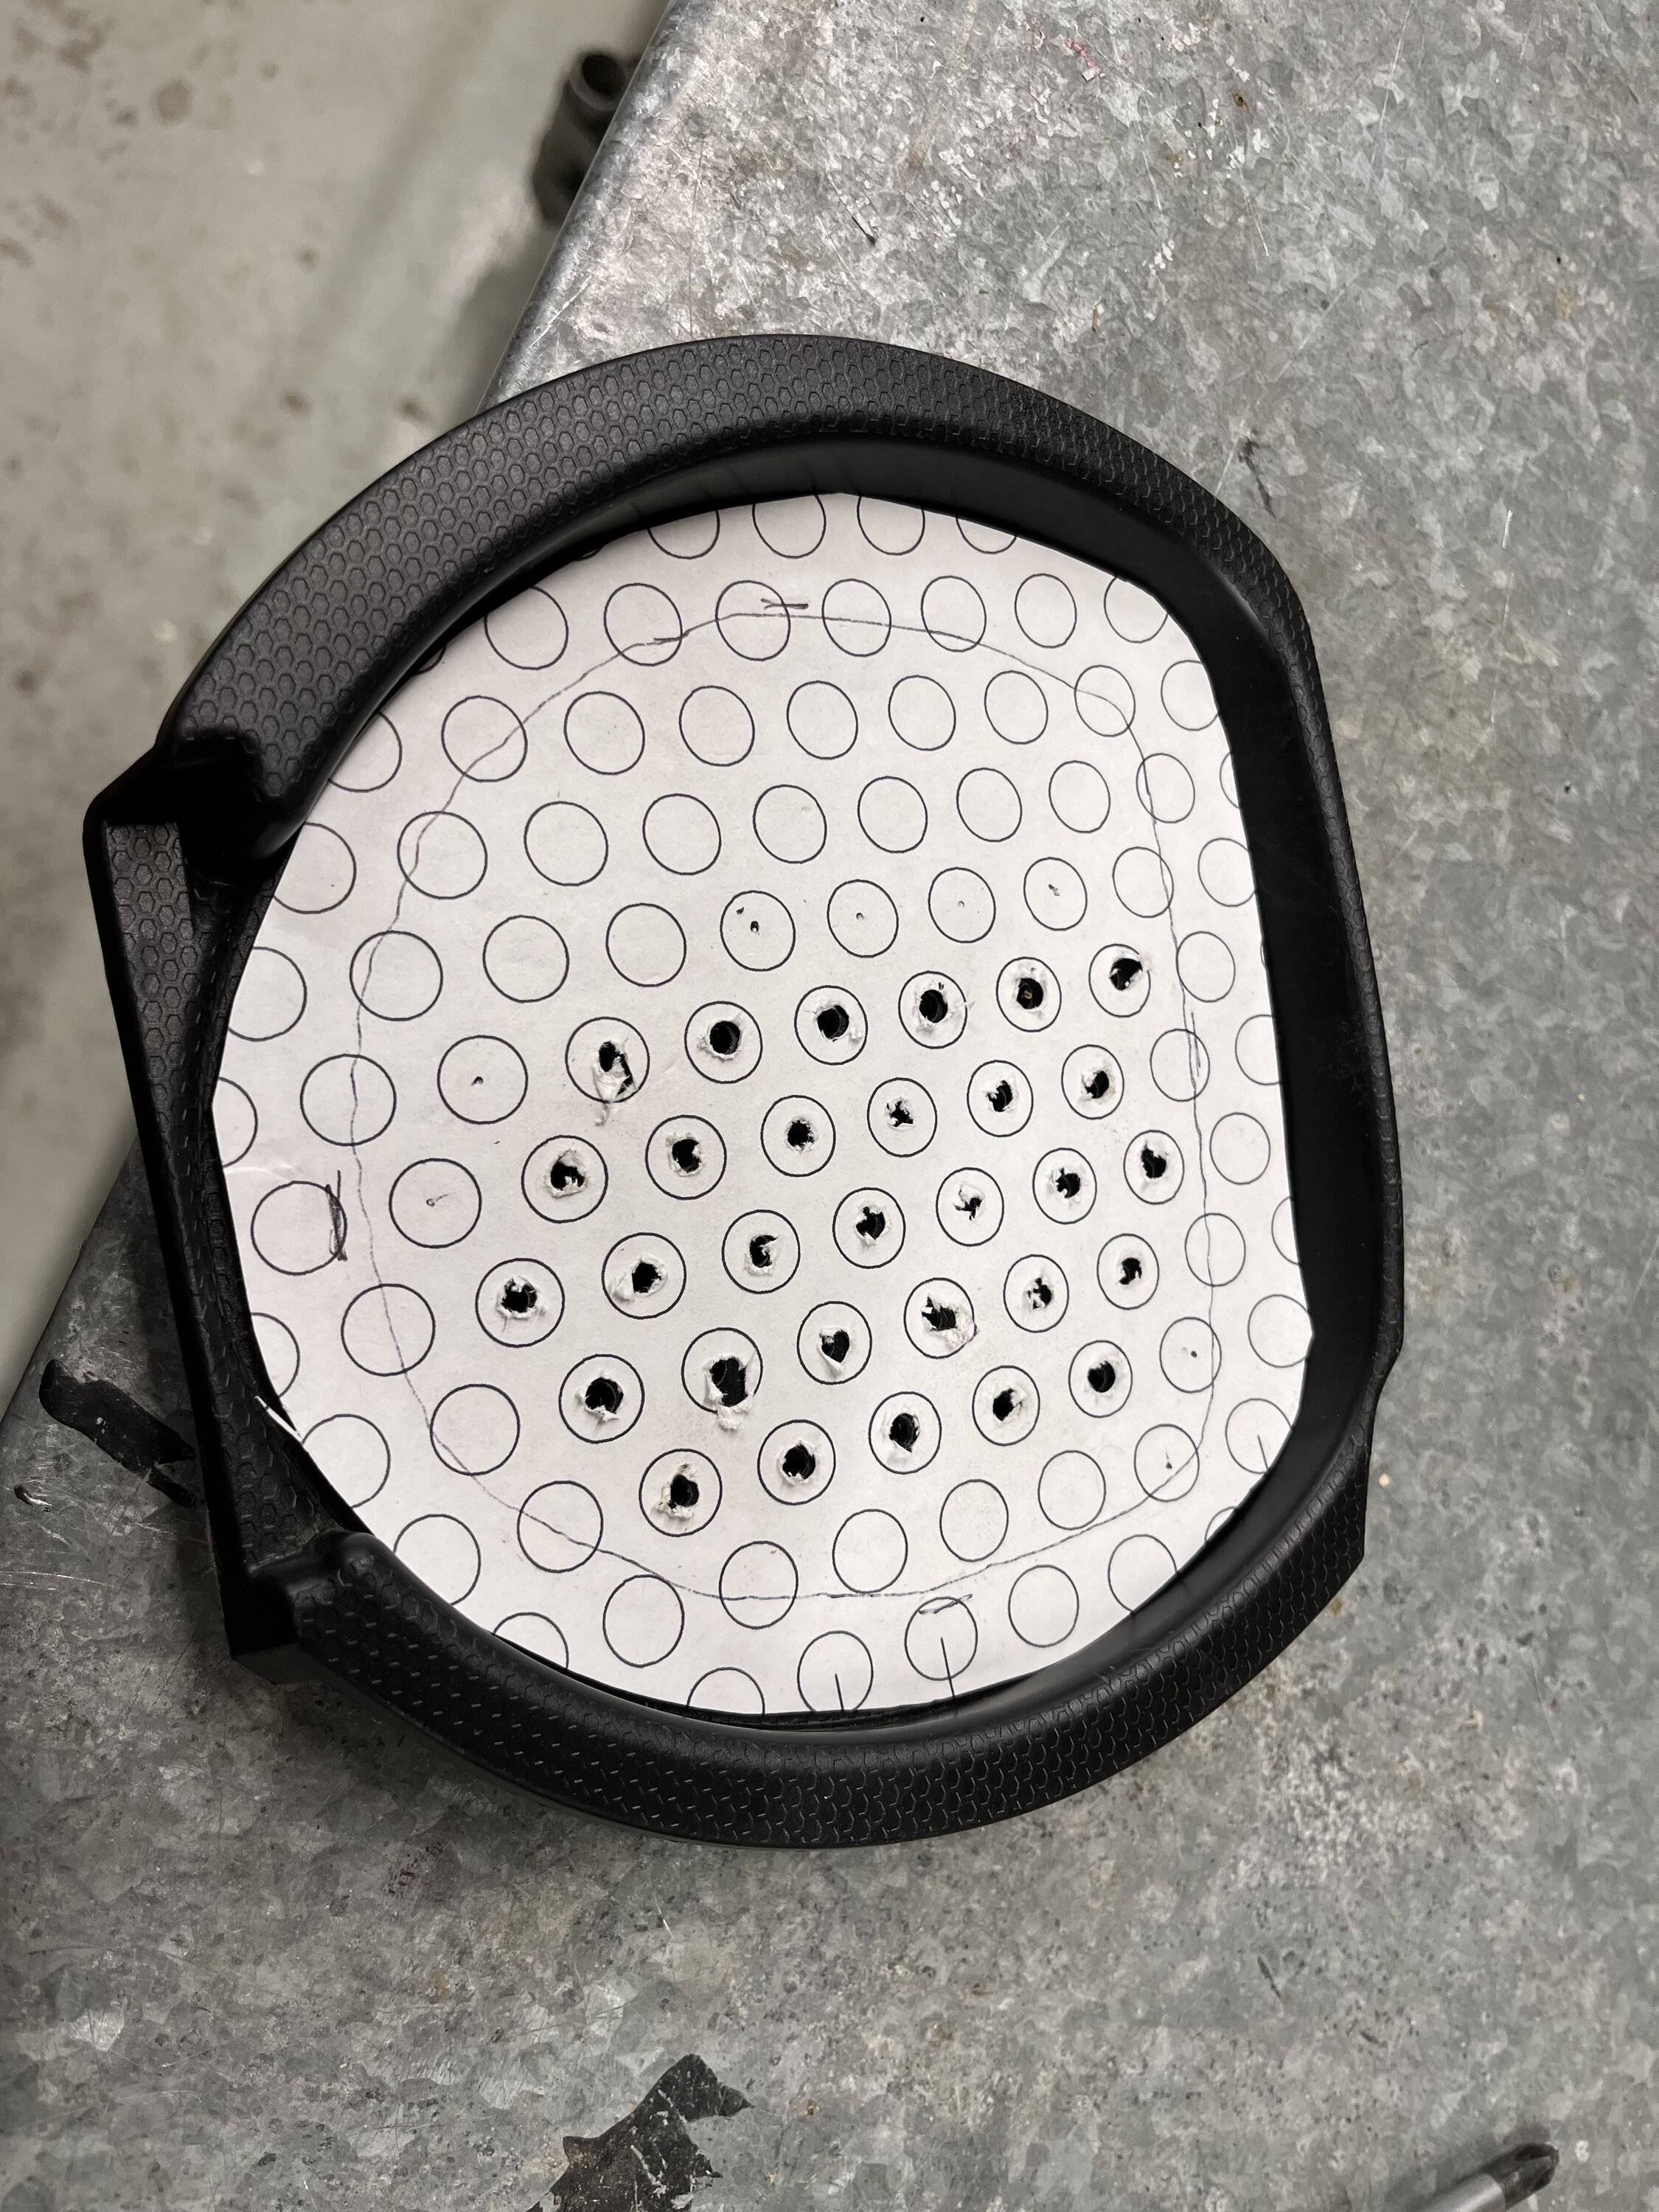
Yes I have seen that. But I don't want to leave 2 gaping holes. I want to drill a whole lot of holes in the blanks so that they represent a grid but this will weaken them. So I want to fix some mesh or perforated ss plate on the blanks for support and then reinstall them. The issue is how to get them back in. I will try reverse the procedure and since the blanks will have holes in them, put a bent wire through and pull towards me and hopefully they will click back in place. But if it don't work, then I will need to remove the bumper. Or just leave gaping holes but concerned about stones flying through these fog light holes.Hey Ian,
If I remember correctly there is a video on YT, where a guy shows how to remove the covers without removing the bumper. It’s a yellow M1, if memory serves.

Last edited:
Coastal-Mach
Well-Known Member
- Joined
- Oct 21, 2021
- Threads
- 22
- Messages
- 2,053
- Reaction score
- 4,101
- Location
- Wilmington, NC
- First Name
- Anthony
- Vehicle(s)
- 2023 BMW M440i, 2026 GMC Denali, 2021 Jeep JK
If you know someone with a 3D printer, they could make you a set to modify the mesh and keep the mounting points.Yes I have seen that. But I don't want to leave 2 gaping holes. I want to drill a whole lot of holes in the blanks so that they represent a grid but this will weaken them. So I want to fix some mesh or perforated ss plate on the blanks for support and then reinstall them. The issue is how to get them back in. I will try reverse the procedure and since the blanks will have holes in them, put a bent wire through and pull towards me and hopefully they will click back in place. But if it don't work, then I will need to remove the bumper. Or just leave gaping holes but concerned about stones flying through these fog light holes.

I do not think you can buy the covers separate from the grill. If you figure out how to do it, let me know. I like that mesh.
OP
OP
IanKar
Well-Known Member
- Thread starter
- #14
I still wonder if a plastic piece as a perforated plate will hold up. But if it's configured properly, I'm sure it would work. But I thought of bypassing that by fixing the perf plate on the original blanks (now drilled to match the perf plate) and reinserting them using the same mounting points. That way I am using the same piece and its mounting points. I'll let you know how it works out.
OP
OP
IanKar
Well-Known Member
- Thread starter
- #15
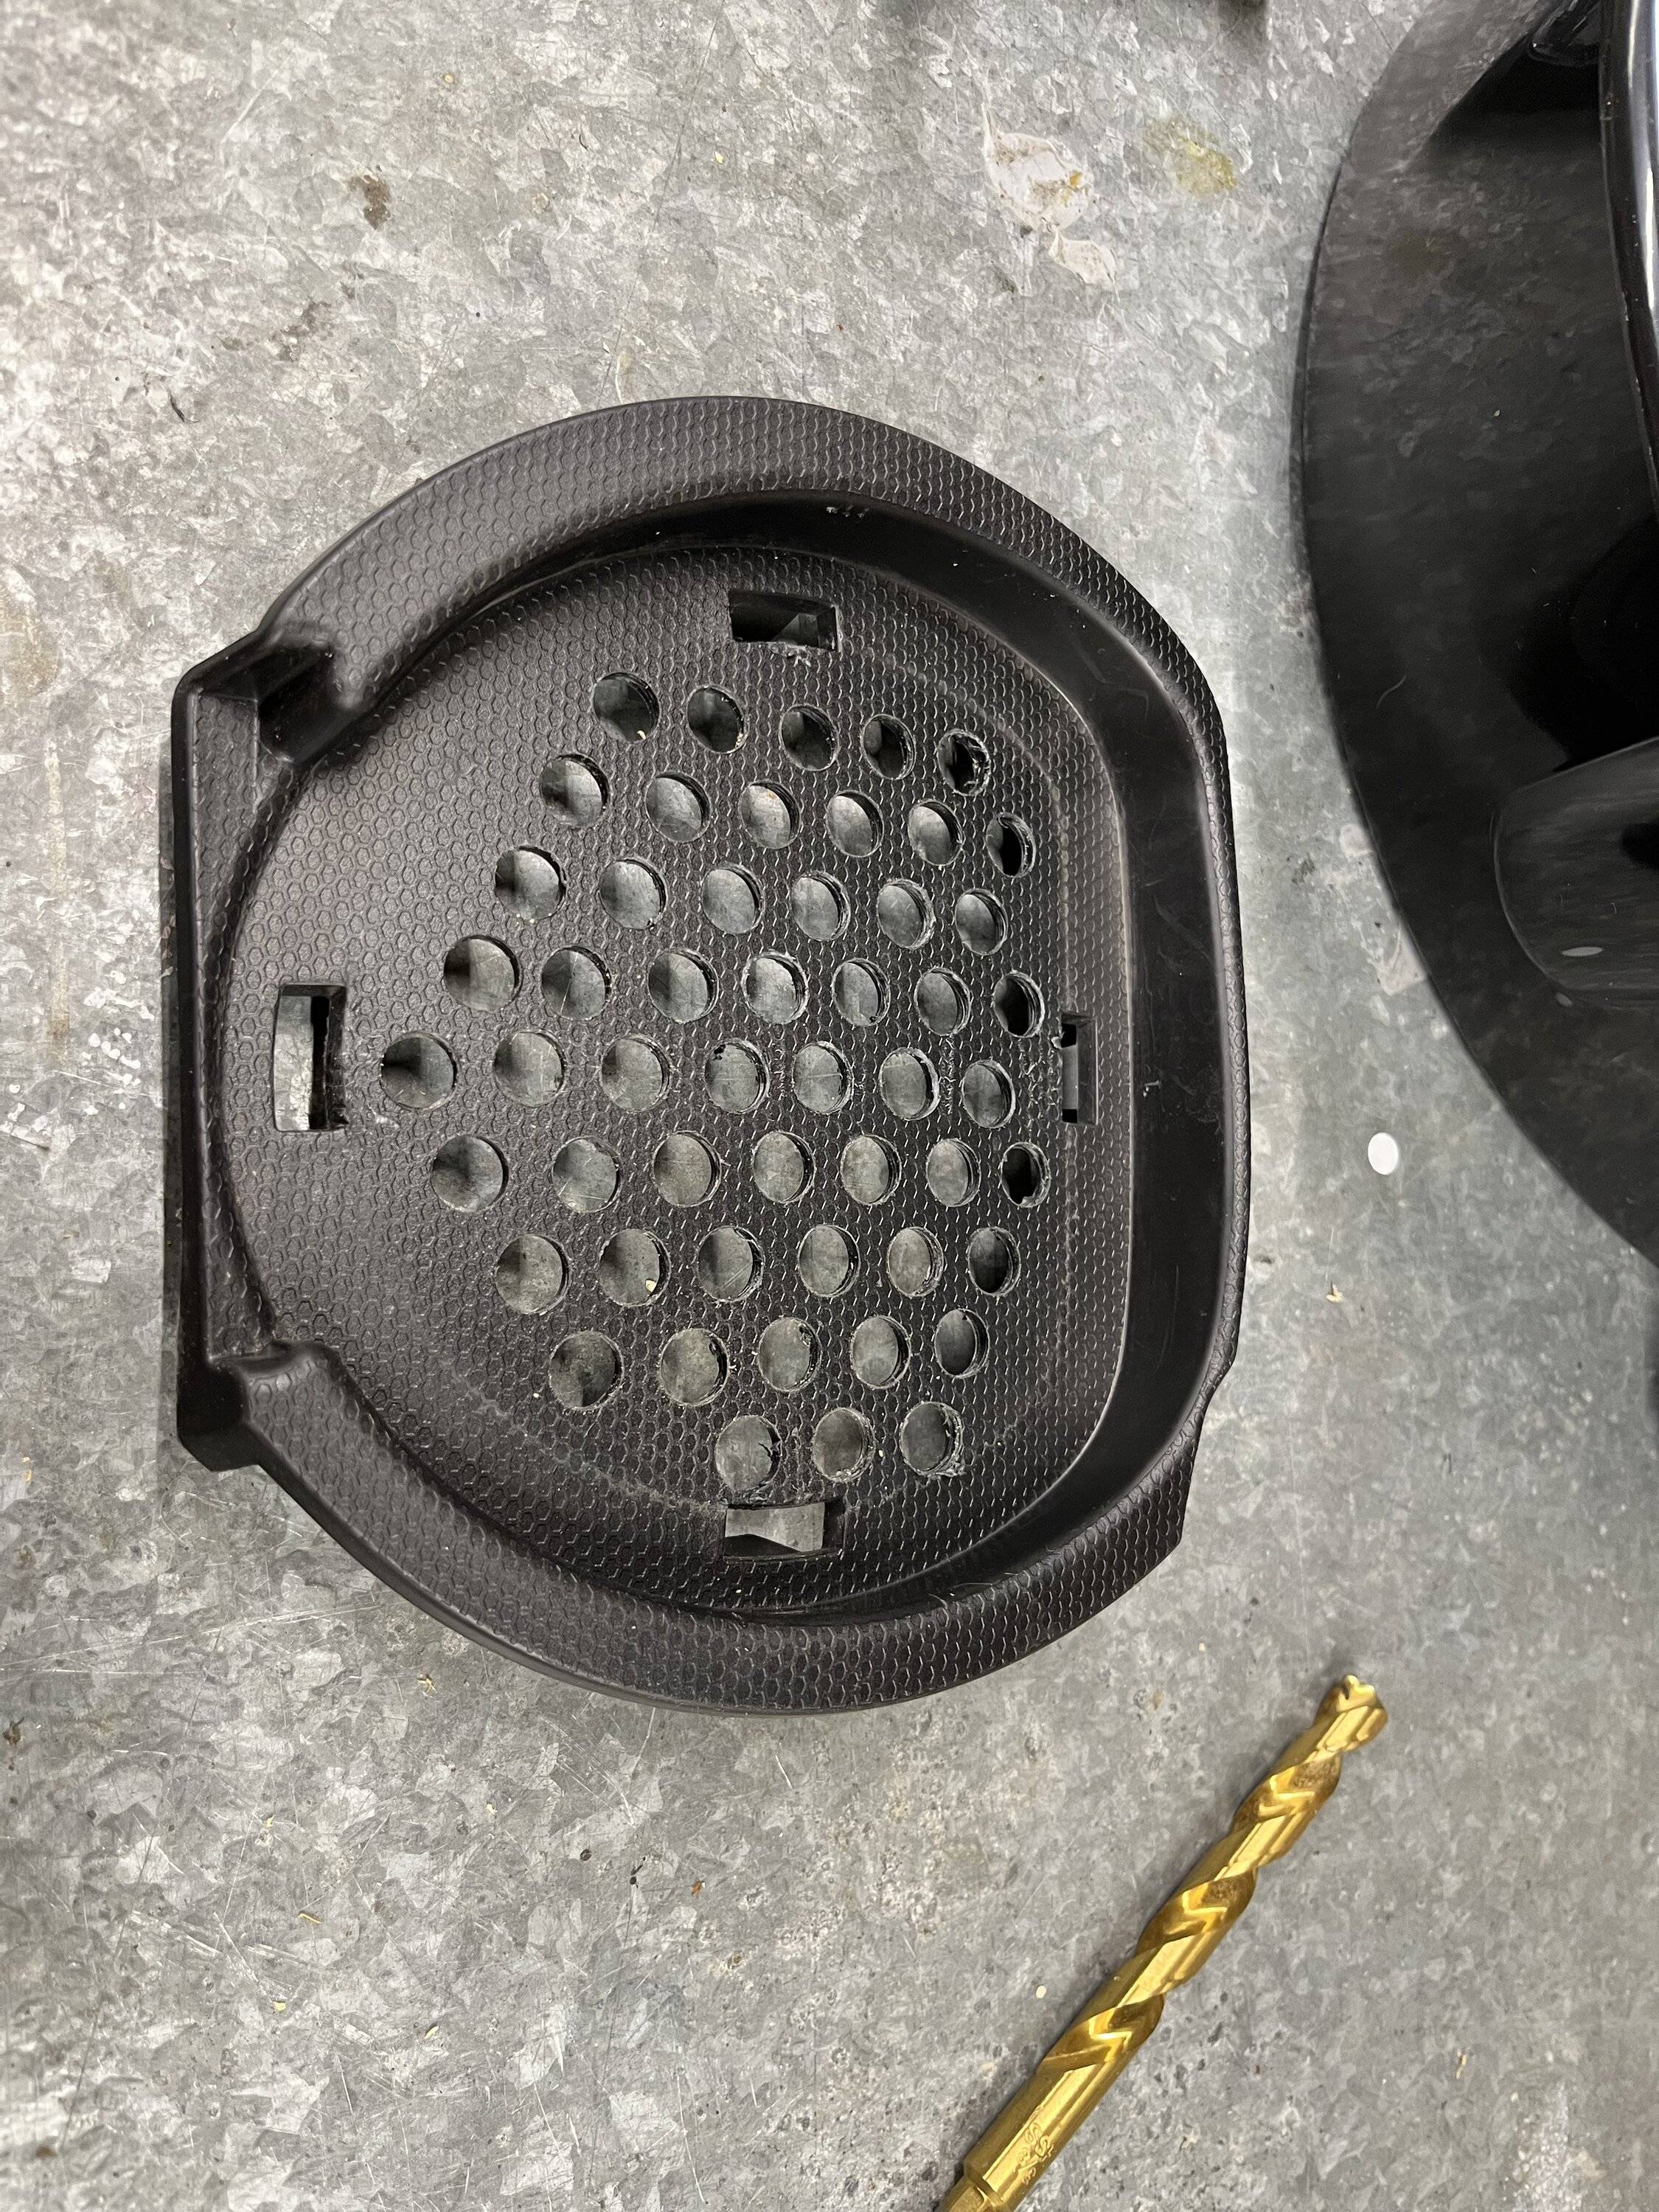
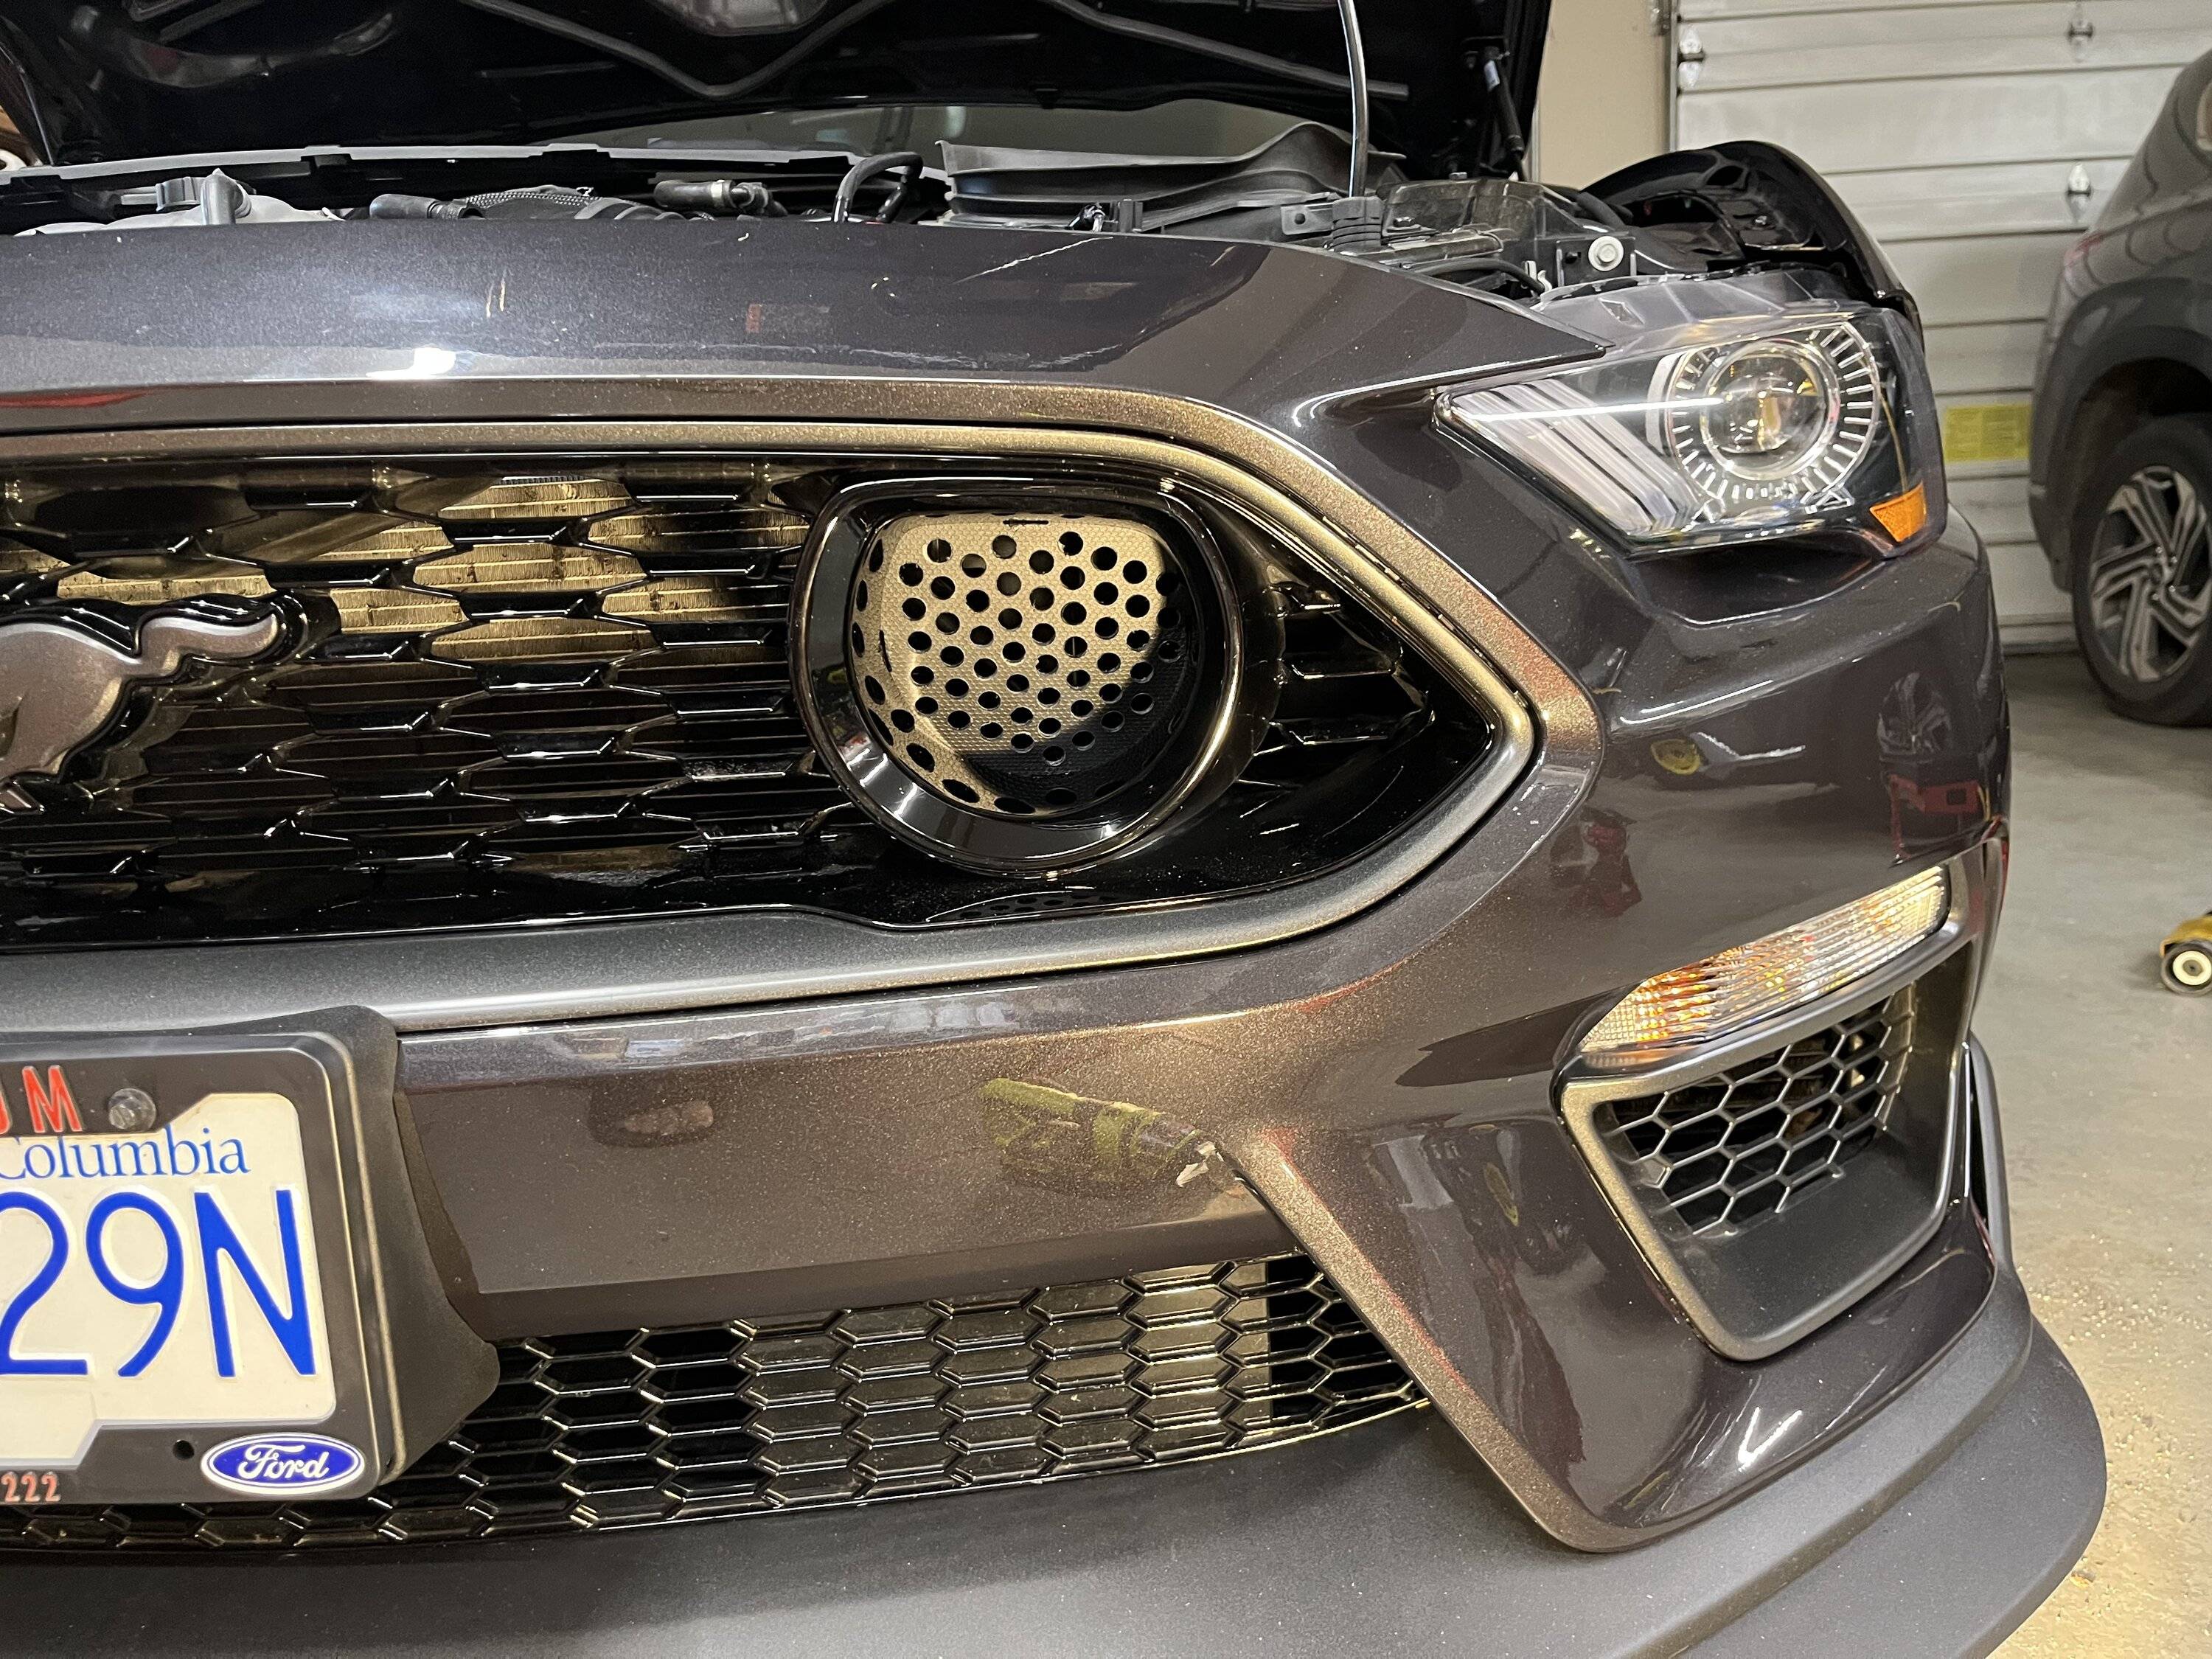
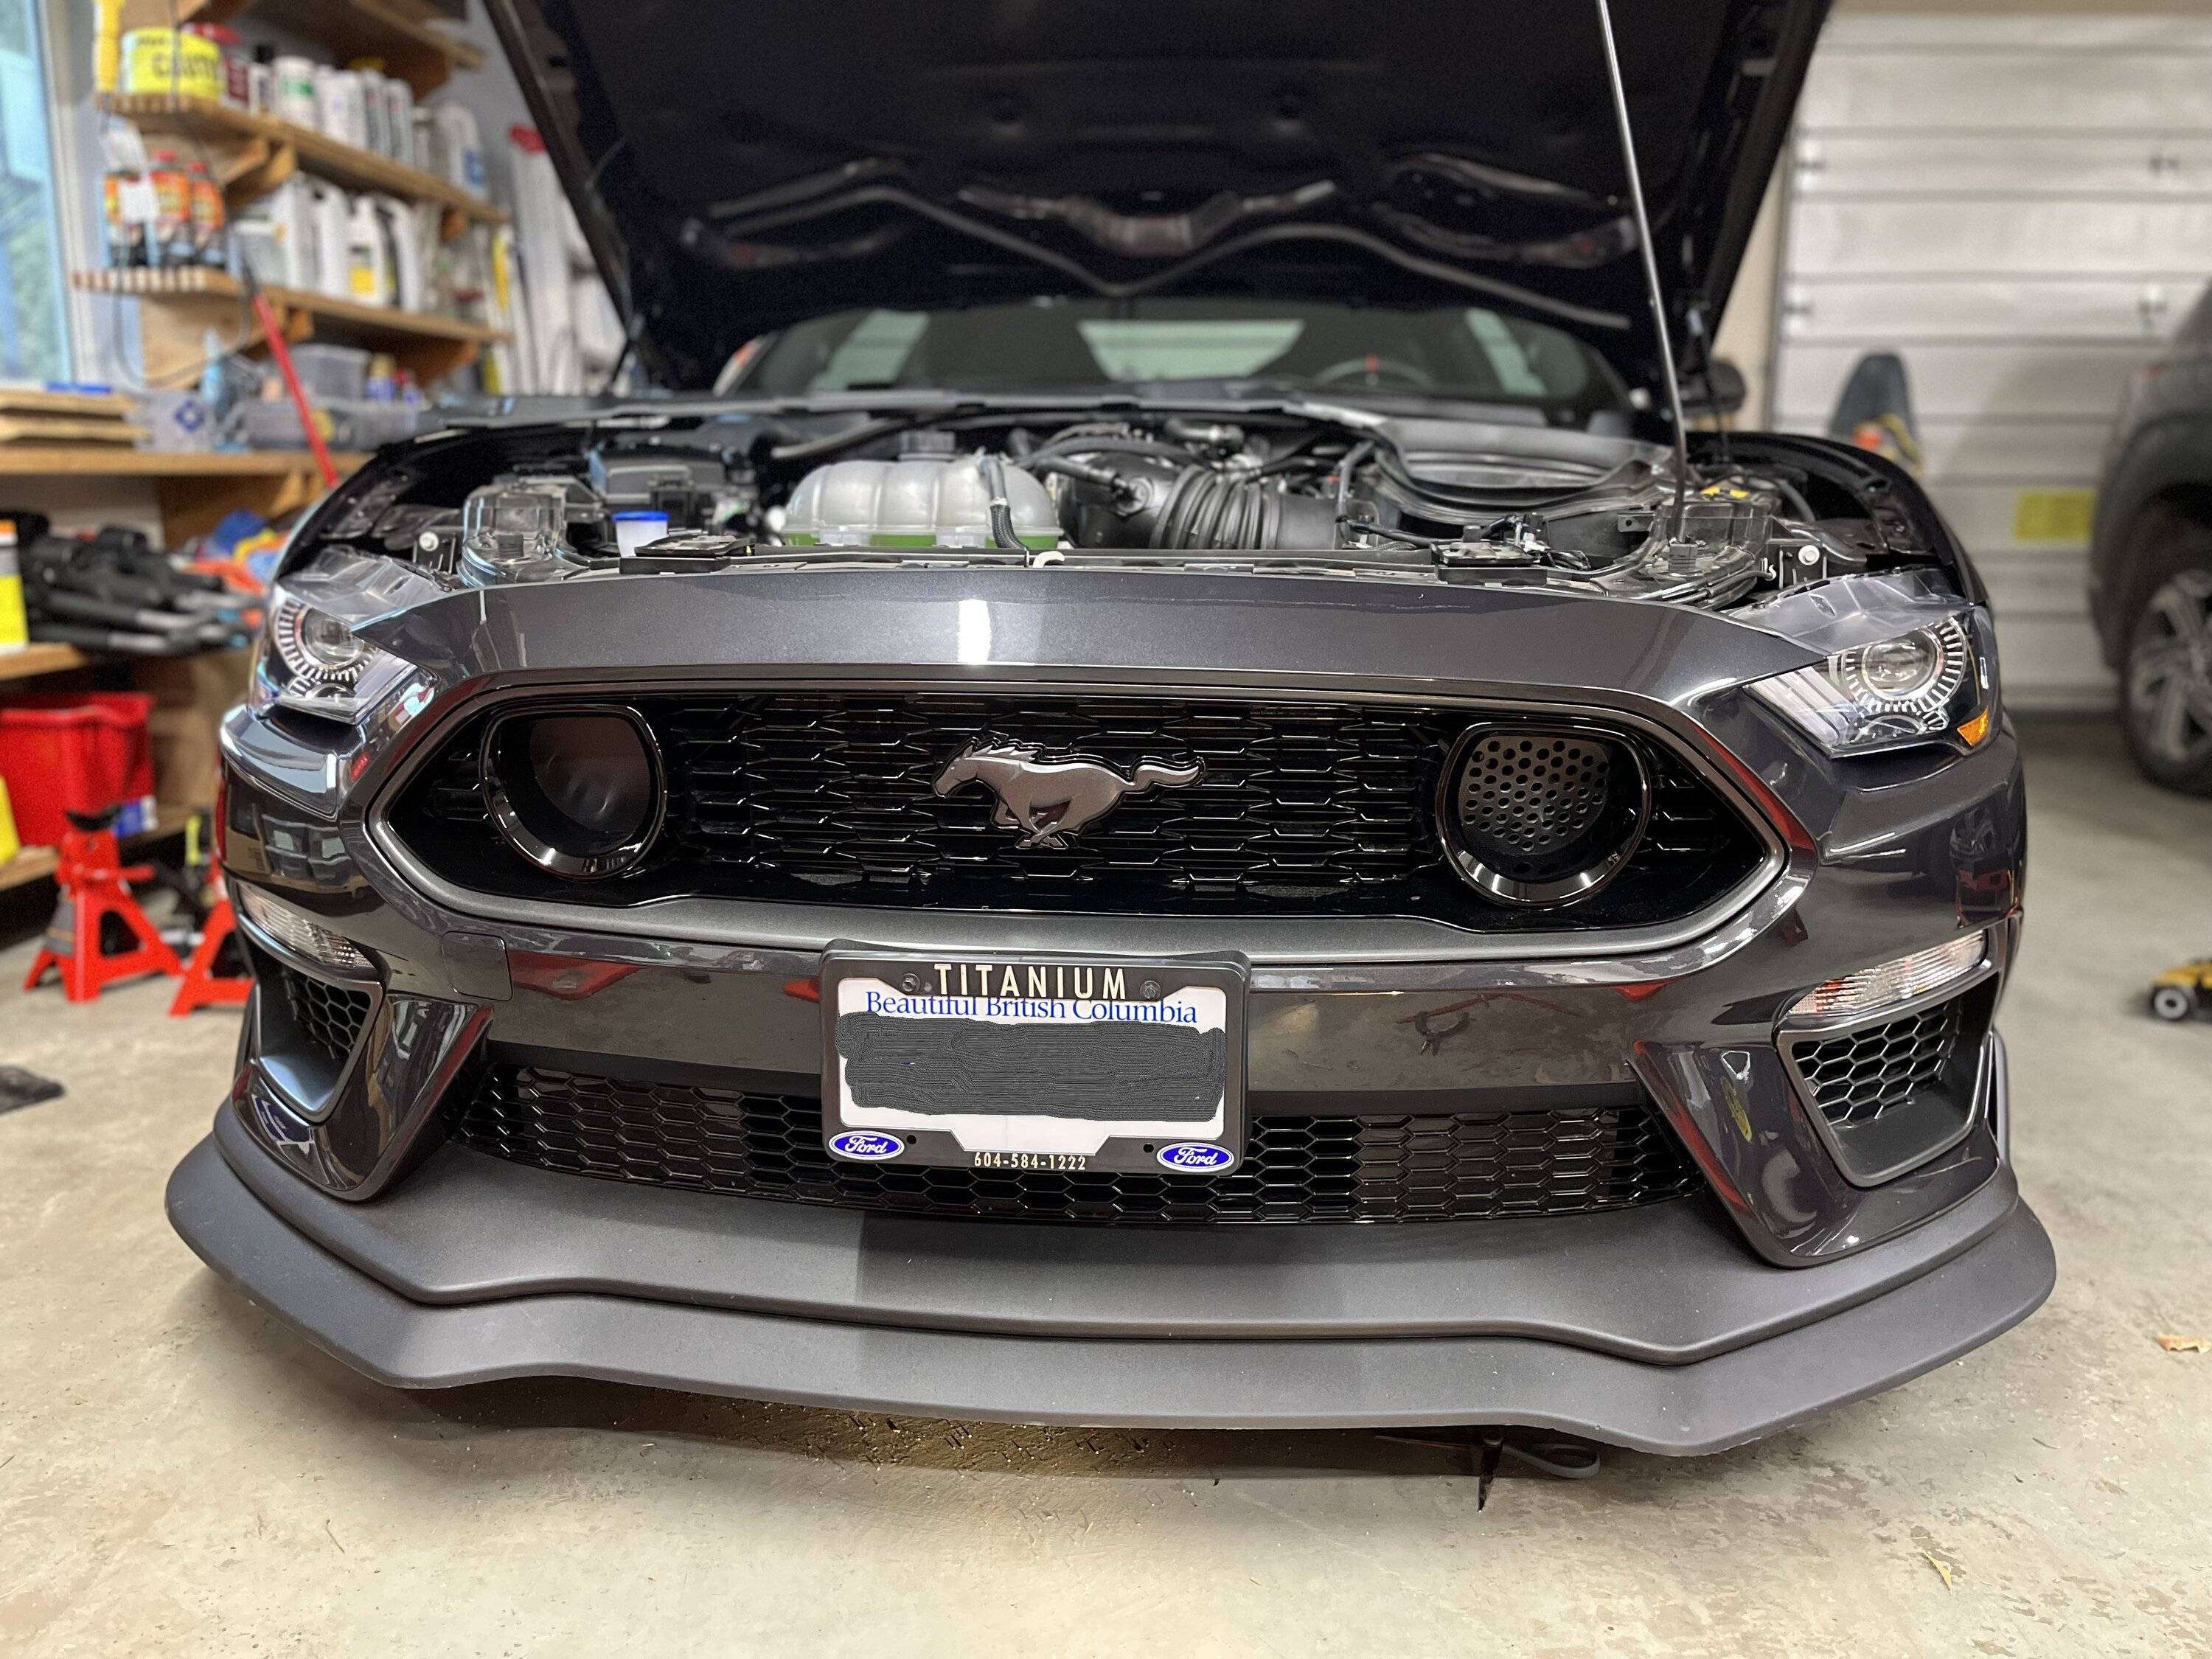
Without removing the bumper. Just finished with the driver side. I managed to remove the fog light delete and found the plastic to be about 3mm thick and not brittle. So I doubt that it needs any reinforce mesh or perf plate to keep it in tact. Printed out a perforated plate temp with 0.375" holes and pilot drilled them followed by the correct size drill. I presumed that I could reverse the process and put the now drilled fog light delete back and use the drilled holes to put a strong bent wire through (I used a wire coat hanger) and pull and snap the lug mounts back in place. My presumption was right. Now to tackle the passenger side. I think that one will be a bit more difficult.


Sponsored
Last edited: