TeamGomez
Well-Known Member
- Joined
- Apr 2, 2022
- Threads
- 23
- Messages
- 185
- Reaction score
- 332
- Location
- San Diego
- Website
- www.centripetalsolutions.com
- First Name
- John
- Vehicle(s)
- '18 350, 996 GT-3, E46 M3, SQ5, Tundra
- Thread starter
- #1
The bug for sound upgrade finally bit me hard enough to inject the venom that relinquishes the grip on the American Express.
Primary Objective: Add some much needed bump while not falling into the upgrade rabbit hole.
Background: Got spoiled by two 12” Alpines in the back of a 280ZX back in the (ahem) 80’s. I’ve done about 9 cars since and never strayed far from JL components. Not an audiophile inasmuch as an addict of good sound and I do my best to get there without melting said AmEx.
My '17 Tundra has a center speaker that I battled with a full JL upgrade. Factory head unit was not happy after disconnecting the center speaker and doing so essentially ruined my ability to go hands-free with the phone. Did not want to replicate said PITA so keeping the ‘front half’ of the Ford factory system was my going-in (factory H/U, Amp, door/pillar speakers for now).
I replaced the center speaker with the Dayton Audio PS 95-8 3.5” 8 ohm center speaker. Keeping ohm value the same is an important part of the DSP equation in this man’s opinion but I could be wrong (just don’t tell my Mrs pls). Our system is no Bowers and Wilkins, but the stereo soundstage is pretty damned good comparatively speaking. Add to this the DSP that changes said stage depending on ‘Occupancy Mode: Driver or Passenger’ (found in settings pg 2 after balance/fade). And the center channel is part/parcel of this equation so I chose staging over whatever clarity might be gained after disconnected the center. I don’t want to hear music solely from the sides.
So the rear deck and sub were targeted with the following components/supplier:
-JL 12W1V3-2 2 ohm sub (Crutchfield)
-Skar Stealth Box (Skar eBay seller store)
-JL XD500/3V2 amp (Crutchfield)
-JL RBC-1 Remote Bass Control (Crutchfield)
-LC2i Pro2 output line converter (eBay)
-Focal ACX165 6.5” 4 ohm speakers (Crutchfield)
-Dayton Audio PS 95-8 3.5” 8 ohm center speaker (eBay)
-Metra 82-5605 adapter rings for speakers (Crutchfield)
-Metra 72-5602 wiring harness (Crutchfield)
Consumables/supplies:
-1/2” MDF for amp rack
-Noico 80 mil Butyl Soundmat
-3’ RCA to RCA cables x 2
-Outdoor carpet for rack
-M8 1.25 x 40mm bolts x4 plus 3/4” spacers to move rear seat latches fwd to create air gap to trunk
-VCELINK Speaker Banana Plugs for sub
-GS Power 12” Bar Grille (did not use due to poor fitment/weight)
-Amp wiring kit (4AWG gauge wire and 17’ won’t do it if you hide the wire…you’ll need 19')
-Misc heat-shrink butt connectors
-Coroplast cloth electrical tape
-5/16 punch to open up rear deck carpet above speakers
-Contact cement (spray)
-Velcro for amp rack/carpet over mobility kit
-Zip ties with screw down hole
Special tools:
-Right angle phillips head screwdriver for attaching speaker grills
-90 deg drill
-1/4” drive 7mm socket + ratchet + 1/4” hex adapter (this makes removing aft 7mm deck speaker screw easier)
-Table/jig/circular saws makes amp rack fab cleaner
Job plan: PULL NEGATIVE CABLE OFF BATTERY FIRST AND FOREMOST
This install took me 18 hours before powering up for test. I’ll hit the high points below.
Amp Power Wiring
I scribed a thread to clear up some ‘misguidance’ I read on the www and you can see that one here. Be sure to remove fuse from the power lead until you are done and ready to test!

Remote power: The often spoke of blue-wh wire in the back deck near the RR speaker is for the rear camera and is only powered up when eng is on. So you can’t listen to your tunes w/o eng running if you use this source. There are multiple sources in the passenger footwell panel and I tapped into the 10A window fuse slot with one of these. They’re super handy and don’t jack with factory wiring.
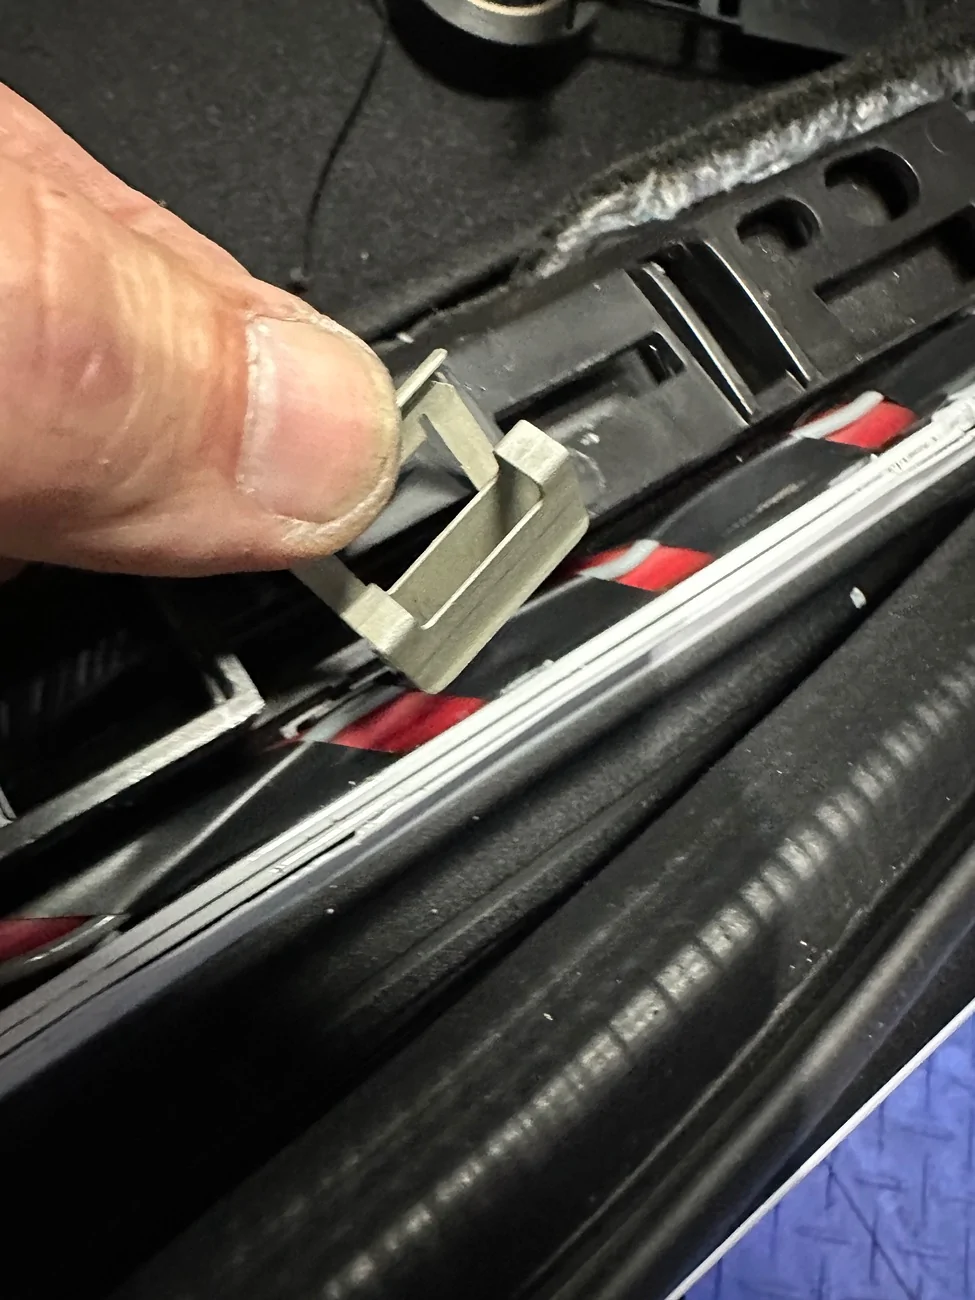
One catch to running the power wire beneath the door sill is that you must remove the two metal clips in the sill trim in order to get the trim to fully snap down without endangering the power wires. I couldn’t see any other way around this.

The elbow console seemed to be the best bang for the buck for the bass remote wire (easy to reach/accessible location). I unbolted the two nuts holding down the tray beneath the console arm rest and was able to lift the rear up about 1/2” to snake the remote wire under the center of the carpet piece where it mates with rear seat bottom. The USB/Cig lighter panel in the front of the console bin snaps out and this is where a 90 deg drill comes in handy to punch a hole a couple inches below USB port to bring the wire in to the remote knob. Attached knob with 3M double stick.
Rear Deck Speakers
There is an actual latch at the center of each rear seat bottom section that is just aft of the bottom of the seat where it meets the carpet. I got waylaid by a couple fabric latches before I watched a video that shows how damned easy it is. There are two ‘wings’ to the latch that you simply push aft and the seat bottom pops right out.
Each rear seat side panel has plenty of clips plus 2 white circular plastic ones near the door that will likely snap in half so get some if you wish to replace them (had some…broke 3 of the 4).
Rear deck carpet (aka 'saddle blanket’ the Ford EE bubbas thought would be a great idea to lay down over the deck speakers…smh) has a couple pins to pull and it slides forward and is easily removed after the side panels have been removed. Be sure to put a towel down beneath the seat backs when you set them forward b/c you’ll be spending some time wriggling around on them.
Here’s where the 5/16” punch comes in. Turn the carpet over and there are holes pre-punched for the board support, but not the carpet itself. I punched all of them out over the speaker on top of wood (would have been more efficient if the wood was direct to concrete and not RaceDeck). I could probably have gotten away with not doing every hole over the speakers. Be sure to consider speaker size and how large you want the ‘breathing space’ to be. Punching the holes removes some support so I decided to install the speaker grills to keep the carpet off the cones (more on that shortly).
Removal of the factory speakers is space limited. Not so much for the two forward screws, but the back one will have to be done by feel and best if you have a 1/4” drive 72 tooth gear ratchet (it’ll just take longer if you don’t). And here is where the 1/4” hex adapter comes in handy after you break the screw free; the ratchet won’t click and you won’t be able to get your fingers around the 7mm socket by itself but you will have something to twist if you put the adapter in. It’s a two finger twist (fore/middle) and not fore/thumb so be patient and don’t scratch your window tint.
As I was pondering the Focal install and how I was going to shield the speaker from the subwoofer, my gaze crossed paths with a bowl I had for misc chems/parts during eng work. I grabbed it and wouldn’t ya know, it fit PERFECTLY in the spacer ring being oversized just enough that the screw extrusions keep it pinched in just enough. Ran in the house when the wife wasn’t looking and stole another one. I then cut up a ‘Grade B’ 530 gram MF towel and glued it into the bowl for a touch of baffling. Submitted sound engineering specifications to Blachford Acoustics Laboratory for analysis…YMMV. Hot glued them on after soldering on a power/ground lead, punching a 1/4” hole to pass it thru, and called ‘er done.
For install purposes, note the two 7mm screw holes that you can see in the adapter ring above. The one on the left goes in the back of the deck, and the one on the right has an extrusion that is mirrored on the 3rd hole on the other side of the bowl. These two holes with the extrusion go fwd towards seats. This is good to know for orienting speaker in the adapter ring to your liking b/f installing.
Once I felt comfortable with the speaker + adapter ring + baffle construction, I turned to figuring out how to install it with the grills attached. Normally, the grill adapter ring would mount beneath the speaker lip but this isn’t possible with adapter rings. So it must mount on top but you can’t do it b/f installing b/c the grill ring impedes screw attachment to the rear deck. So the Speaker grill adapter ring must be mounted after you mount the speakers in the deck and this is where you must have a right angle screwdriver. I only used two opposing side self-tapping screws to secure the grill ring then snapped the grills in so the carpet/horse blanket wouldn’t sag into the speakers.

Note that the LOC gets fed by the factory signal from the rear speakers. Both rear speakers feed the LOC, the LOC feeds the amp, and the amp feeds the new speakers. So the Metra wiring harness plugs into the factory speaker connector, gets connected to wire with heat shrink butt connecters, runs to the LOC, and a new speaker wire comes from the amp to the new speakers. And even though I double checked every polarity, I still managed to goof one that I discovered during initial test...
Time for the latch mod. There is mention in another thread stating M8 1.25 x 60mm so I figured there must be recessed nutserts or something. Turns out you don’t need 60mm…40mm is plenty. I also used 3/4” steel spacers and this worked out just fine by mounting the latch plate on top of the deck carpet with the spacers vice behind it. The 3/4” spacer gives me one pointer finger width of space where top of seat back meets carpet and this turned out to be the ’Niagara Falls’ of bass wave exuberance :-)
Amp Rack
Some amps can handle inverted install and JL is not one of them. While there’s room beneath the rear deck to surface mount it, direct mounting of an amp to metal is highly discouraged due to ground interference (think giving the Shelby keys to your 16 year old so he can take his buds to batting practice). So the spare tire area being the standard go-to and I selected 1/2” MDF cut around the mobility kit (I cut the ‘Y’ wings off the mobility kit) since I only have the line converter and a rather compact amp. Keeping the mobility kit in place also supports the trunk floor piece.
Safe dimension is 27”Wx26”L for initial cut on the MDF. Then get out some string to make the wheel arch from the 9/12/3 positions and slightly tapered from 5” to aft bulkhead. I made one 1” spacer mounted underneath in the middle btwn LOC/Amp and two others at the trailing edge of the rack. Added a couple blocks to keep my tire kit/spare oil (hey…it’s a 350…) from sliding forward into the electronics.
Once rack was fabricated, I laid the components out then marked holes for cables. Be sure to add some extra distance for RCA plug length. Shot some contact cement on it, let it sit for 5 min, then stuck the carpet down using a plastic trim tool to press the carpet in tightly to the corners of the blocks. I cut one slit for each hole and fed the cables thru. They are all tied down on the backside with screw hole zip ties.
Sound deadening. It’s kind of an important consideration given the Coors can metal used in the floor of the trunk. Didn’t take pix of what Ford does, but lift up your trunk carpet and you’ll see bands of ribbed material about 4” wide by 8-14” long. This is their answer to sound deadening. It works but to a point that I wanted to move a bit farther towards ‘right’. The downside of butyl sound deadening is weight…which is the downside (read: anathema) of speed. But since I dropped 40 lbs of unsprung weight with the Apex wheels, this equates to roughly 200 lbs of sprung (i.e. interior) weight so I don’t feel so bad dropping in some equipment. But I had to draw the line at making my trunk a solar reflector out of 25 sqft of reflective sound deadening. The dirty little secret to sound deadening is you don’t have to go wall to wall to reduce propagated sound waves. Once a wave hits the material, it's basically done for. But this doesn’t mean you’ve soundproofed it by going piecemeal; sound can still pass thru the metal if it doesn’t encounter butyl. So I placed about 2.5 sqft beneath the rack, and ran a strip around the perimeter where the amp rack touches the wheel well. I also put some on the deck just aft of the rear seats, and on both sides/middle of the rear deck. This doesn't sound proof it, but I’m happy just knowing nothing is being transmitted along the bare metal around the Ford ribbed bands.
I didn’t want wires running up the sides of the amp rack and I wanted to keep speaker wires separated from any power wires to shield from interference. So speaker wires run on the left side while power/remote wires run on the right. It takes about 18.5’ of power wire to go the battery to do it this way (a 17’ kit won’t do it). Remote turns on the LOC, and ‘Remote out’ on the LOC turns on the amp (could use the auto-on features, but using hardwire-on is dead nuts ‘on’). I have a 12v piggyback on the 4AWG Amp in running over to for LOC constant on (doesn’t draw power when remote is off). All wiring was loomed in Coroplast cloth tape and secured with adhesive zip tie anchors on metal or with the screw down hole zip ties beneath the amp rack.
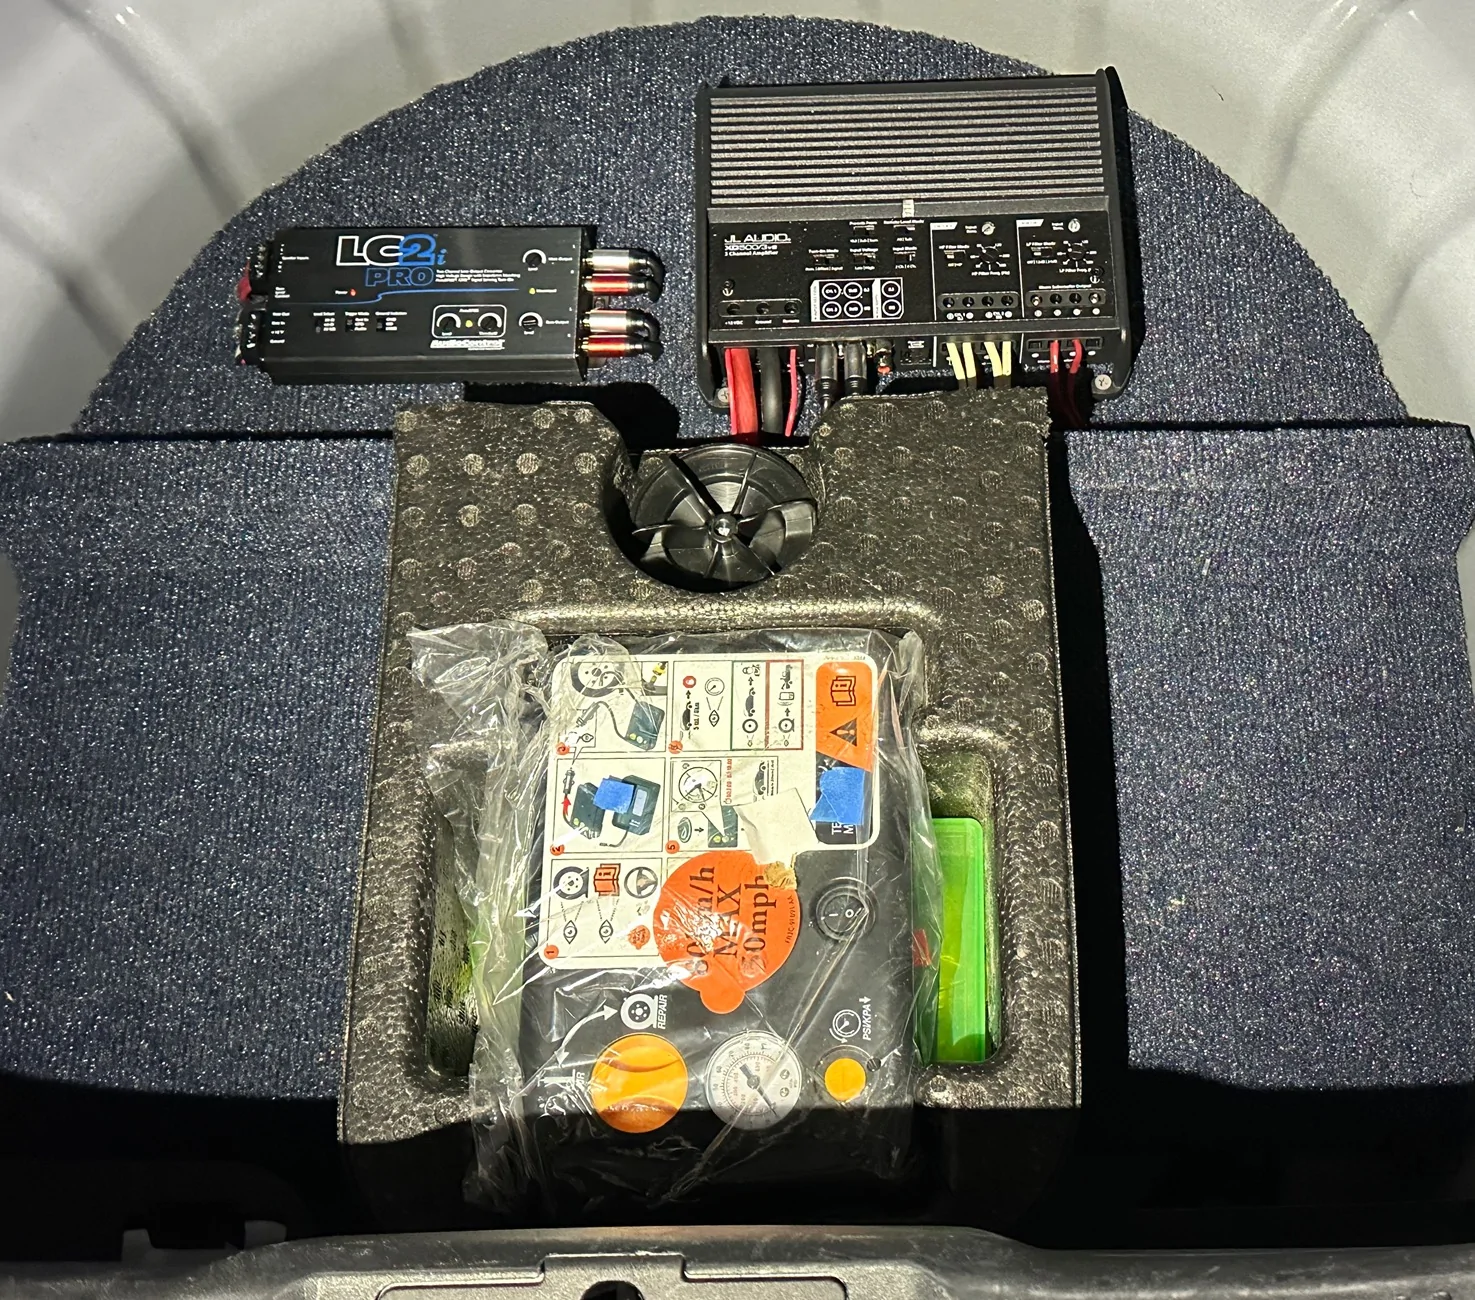
There’s a handy firewall ground just left of centerline on the aft bulkhead behind the rear trunk liner and this is where the amp/LOC were grounded.
The JL sub fit nicely in the Skar box. I can’t say enough about this box. Fit/finish is spectacular. It came pre-stuffed with poly. It has banana pin wire receivers instead of cheap plastic lever slots for bare wire. It is a $150 no-brainer. I already had a Shelby trunk carpet that is made for no subwoofer and I tried sliding the Skar on top of it. You could probably get away with it, but it raises the box up about 1/4” and misaligns the push-pin hole where the sub attaches to the pinhole the side trunk liner uses. I (begrudgingly) decided to cut mine so there’s about 1” of carpet going in beneath the sub. I used a flame to singe the edge but it is a rubber bottomed carpet and should not unravel.
Soooo 18 hours later, it was finally time to light it off.

First Test
I’m still shaking my head…and my ears are still ringing lol. This simple sub setup moves some serious air and dare I say….too much!
I initially set up the LOC with ACCU Bass off and gains at 12 o’clock. The amp x-over set at 80hz with 24db roll off. CH 1&2 gain at 9, sub at 12 with all H/U EQ flat. Absolutely stunning. Jumped across a few genres of test tunes and went to bed very, very happy.
Next Day’s Tests
If it was so damned good, could it possibly get any better? Well, it really can’t/didn’t. Ran into a few issues:
1. I tried enabling the AccuBass on the LOC and it produced some nasty pops whenever volume was adjusted. Ended up just turning it off and left AudioControl a VM for some troubleshooting advice on that one.
2. Set gains on LOC Main/Bass output just shy of ‘Maximized’ light illumin. Performed AC voltage out tests on amp @ 50/1000hz that resulted with the rear deck speakers drowning out the soundstage. Reduced deck speaker (ch 1&2) output back to 9 o’clock.
3. I got the LC2iPro for the remote controller thinking it would operate like the remote for my other JL amps…it does not. I called Crutchfield on this one and they said this can be an issue if the gain matching is out of sync with the polarity magnification of the JL inverse sine wave attenuator…or something like that. Bottom line is that a remote for the JL is now on order.
4. Too much sound wave pressure. I have never experienced a ’thump’ or ‘bump’ that changed the internal pressure in my ear. Felt like cockpit pressure surging at 40k’ in a single seat twin tailed afterburning former mistress of mine. Sure, I could just dial down the gains, but where’s the fun in that? I’m going to reverse the seat latch mod to see if I can reduce the inner ear pressure delta yet retain the defibrillator aspect of musical massage.
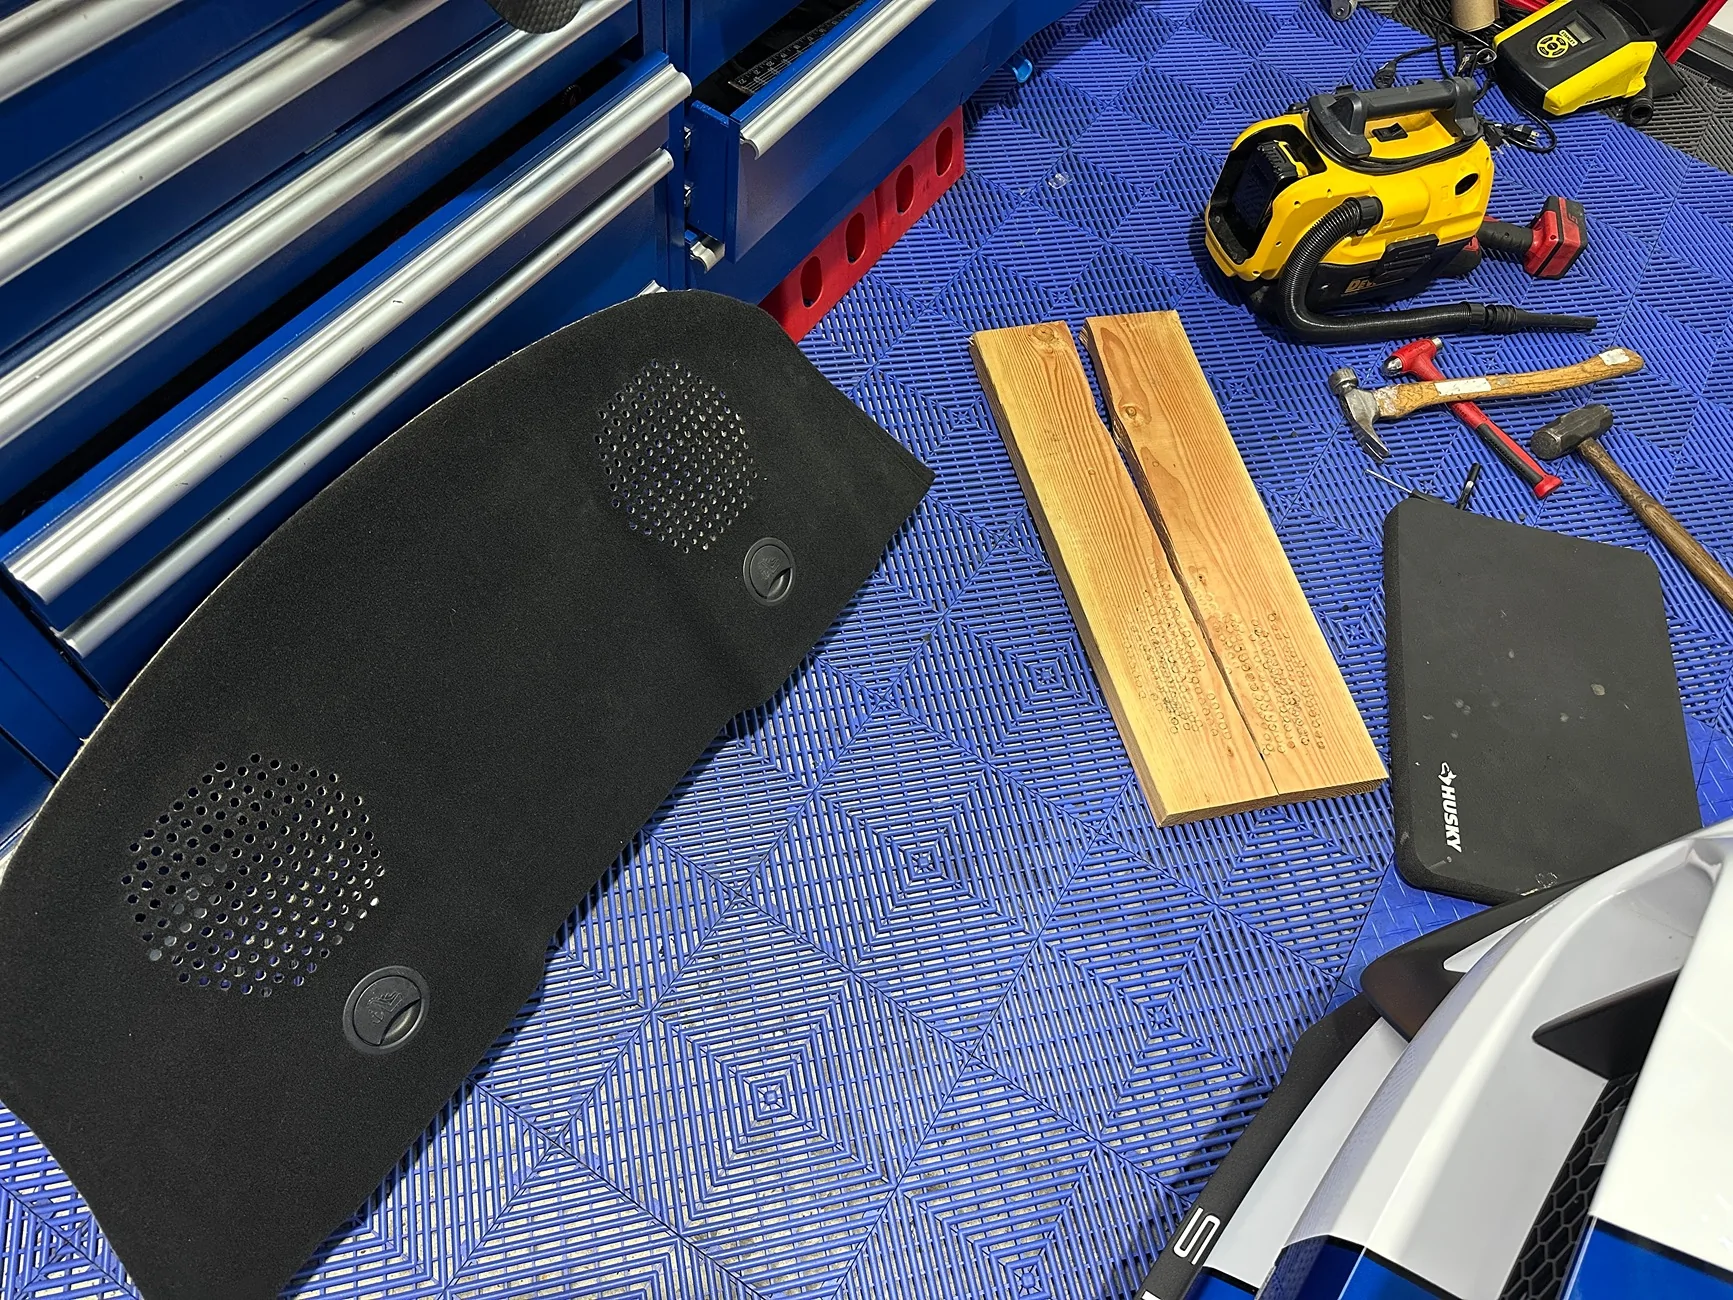
5. That mobility kit looks like arse. So I put carpet over it.
That about wraps it up. Like I said in the power lead thread, I have been graciously blessed by having both the sound of the FPC and now ZZ Top to create a grin worthy of a double date memory with both Ginger and MaryAnn.
No law against a 2-fer, right?
Primary Objective: Add some much needed bump while not falling into the upgrade rabbit hole.
Background: Got spoiled by two 12” Alpines in the back of a 280ZX back in the (ahem) 80’s. I’ve done about 9 cars since and never strayed far from JL components. Not an audiophile inasmuch as an addict of good sound and I do my best to get there without melting said AmEx.
My '17 Tundra has a center speaker that I battled with a full JL upgrade. Factory head unit was not happy after disconnecting the center speaker and doing so essentially ruined my ability to go hands-free with the phone. Did not want to replicate said PITA so keeping the ‘front half’ of the Ford factory system was my going-in (factory H/U, Amp, door/pillar speakers for now).
I replaced the center speaker with the Dayton Audio PS 95-8 3.5” 8 ohm center speaker. Keeping ohm value the same is an important part of the DSP equation in this man’s opinion but I could be wrong (just don’t tell my Mrs pls). Our system is no Bowers and Wilkins, but the stereo soundstage is pretty damned good comparatively speaking. Add to this the DSP that changes said stage depending on ‘Occupancy Mode: Driver or Passenger’ (found in settings pg 2 after balance/fade). And the center channel is part/parcel of this equation so I chose staging over whatever clarity might be gained after disconnected the center. I don’t want to hear music solely from the sides.
So the rear deck and sub were targeted with the following components/supplier:
-JL 12W1V3-2 2 ohm sub (Crutchfield)
-Skar Stealth Box (Skar eBay seller store)
-JL XD500/3V2 amp (Crutchfield)
-JL RBC-1 Remote Bass Control (Crutchfield)
-LC2i Pro2 output line converter (eBay)
-Focal ACX165 6.5” 4 ohm speakers (Crutchfield)
-Dayton Audio PS 95-8 3.5” 8 ohm center speaker (eBay)
-Metra 82-5605 adapter rings for speakers (Crutchfield)
-Metra 72-5602 wiring harness (Crutchfield)
Consumables/supplies:
-1/2” MDF for amp rack
-Noico 80 mil Butyl Soundmat
-3’ RCA to RCA cables x 2
-Outdoor carpet for rack
-M8 1.25 x 40mm bolts x4 plus 3/4” spacers to move rear seat latches fwd to create air gap to trunk
-VCELINK Speaker Banana Plugs for sub
-GS Power 12” Bar Grille (did not use due to poor fitment/weight)
-Amp wiring kit (4AWG gauge wire and 17’ won’t do it if you hide the wire…you’ll need 19')
-Misc heat-shrink butt connectors
-Coroplast cloth electrical tape
-5/16 punch to open up rear deck carpet above speakers
-Contact cement (spray)
-Velcro for amp rack/carpet over mobility kit
-Zip ties with screw down hole
Special tools:
-Right angle phillips head screwdriver for attaching speaker grills
-90 deg drill
-1/4” drive 7mm socket + ratchet + 1/4” hex adapter (this makes removing aft 7mm deck speaker screw easier)
-Table/jig/circular saws makes amp rack fab cleaner
Job plan: PULL NEGATIVE CABLE OFF BATTERY FIRST AND FOREMOST
| Pull wires | Power (amp, remote) |
| Sand batt cnxn | |
| Console amp remote | |
| Deck speaker wiring (to/from) | |
| Install Deck Spkrs | Pull Seat/trim |
| Remove spkrs | |
| Install Focals | |
| Perform latch mod | |
| Punch holes in deck cover | |
| Reassemble | |
| Assemble Amp Rack | Pull wires to each device |
| Fabricate rack and mark/drill holes | |
| Add dividers | |
| Attach carpet | |
| Attach/wire devices | |
| Install Metra harness | |
| Install Subwoofer | Trim Shelby carpet |
| Tune Amps | 50/1k Hz voltages |
This install took me 18 hours before powering up for test. I’ll hit the high points below.
Amp Power Wiring
I scribed a thread to clear up some ‘misguidance’ I read on the www and you can see that one here. Be sure to remove fuse from the power lead until you are done and ready to test!

Remote power: The often spoke of blue-wh wire in the back deck near the RR speaker is for the rear camera and is only powered up when eng is on. So you can’t listen to your tunes w/o eng running if you use this source. There are multiple sources in the passenger footwell panel and I tapped into the 10A window fuse slot with one of these. They’re super handy and don’t jack with factory wiring.
One catch to running the power wire beneath the door sill is that you must remove the two metal clips in the sill trim in order to get the trim to fully snap down without endangering the power wires. I couldn’t see any other way around this.
The elbow console seemed to be the best bang for the buck for the bass remote wire (easy to reach/accessible location). I unbolted the two nuts holding down the tray beneath the console arm rest and was able to lift the rear up about 1/2” to snake the remote wire under the center of the carpet piece where it mates with rear seat bottom. The USB/Cig lighter panel in the front of the console bin snaps out and this is where a 90 deg drill comes in handy to punch a hole a couple inches below USB port to bring the wire in to the remote knob. Attached knob with 3M double stick.
Rear Deck Speakers
There is an actual latch at the center of each rear seat bottom section that is just aft of the bottom of the seat where it meets the carpet. I got waylaid by a couple fabric latches before I watched a video that shows how damned easy it is. There are two ‘wings’ to the latch that you simply push aft and the seat bottom pops right out.
Each rear seat side panel has plenty of clips plus 2 white circular plastic ones near the door that will likely snap in half so get some if you wish to replace them (had some…broke 3 of the 4).
Rear deck carpet (aka 'saddle blanket’ the Ford EE bubbas thought would be a great idea to lay down over the deck speakers…smh) has a couple pins to pull and it slides forward and is easily removed after the side panels have been removed. Be sure to put a towel down beneath the seat backs when you set them forward b/c you’ll be spending some time wriggling around on them.
Here’s where the 5/16” punch comes in. Turn the carpet over and there are holes pre-punched for the board support, but not the carpet itself. I punched all of them out over the speaker on top of wood (would have been more efficient if the wood was direct to concrete and not RaceDeck). I could probably have gotten away with not doing every hole over the speakers. Be sure to consider speaker size and how large you want the ‘breathing space’ to be. Punching the holes removes some support so I decided to install the speaker grills to keep the carpet off the cones (more on that shortly).
Removal of the factory speakers is space limited. Not so much for the two forward screws, but the back one will have to be done by feel and best if you have a 1/4” drive 72 tooth gear ratchet (it’ll just take longer if you don’t). And here is where the 1/4” hex adapter comes in handy after you break the screw free; the ratchet won’t click and you won’t be able to get your fingers around the 7mm socket by itself but you will have something to twist if you put the adapter in. It’s a two finger twist (fore/middle) and not fore/thumb so be patient and don’t scratch your window tint.
As I was pondering the Focal install and how I was going to shield the speaker from the subwoofer, my gaze crossed paths with a bowl I had for misc chems/parts during eng work. I grabbed it and wouldn’t ya know, it fit PERFECTLY in the spacer ring being oversized just enough that the screw extrusions keep it pinched in just enough. Ran in the house when the wife wasn’t looking and stole another one. I then cut up a ‘Grade B’ 530 gram MF towel and glued it into the bowl for a touch of baffling. Submitted sound engineering specifications to Blachford Acoustics Laboratory for analysis…YMMV. Hot glued them on after soldering on a power/ground lead, punching a 1/4” hole to pass it thru, and called ‘er done.


For install purposes, note the two 7mm screw holes that you can see in the adapter ring above. The one on the left goes in the back of the deck, and the one on the right has an extrusion that is mirrored on the 3rd hole on the other side of the bowl. These two holes with the extrusion go fwd towards seats. This is good to know for orienting speaker in the adapter ring to your liking b/f installing.
Once I felt comfortable with the speaker + adapter ring + baffle construction, I turned to figuring out how to install it with the grills attached. Normally, the grill adapter ring would mount beneath the speaker lip but this isn’t possible with adapter rings. So it must mount on top but you can’t do it b/f installing b/c the grill ring impedes screw attachment to the rear deck. So the Speaker grill adapter ring must be mounted after you mount the speakers in the deck and this is where you must have a right angle screwdriver. I only used two opposing side self-tapping screws to secure the grill ring then snapped the grills in so the carpet/horse blanket wouldn’t sag into the speakers.


Note that the LOC gets fed by the factory signal from the rear speakers. Both rear speakers feed the LOC, the LOC feeds the amp, and the amp feeds the new speakers. So the Metra wiring harness plugs into the factory speaker connector, gets connected to wire with heat shrink butt connecters, runs to the LOC, and a new speaker wire comes from the amp to the new speakers. And even though I double checked every polarity, I still managed to goof one that I discovered during initial test...
Time for the latch mod. There is mention in another thread stating M8 1.25 x 60mm so I figured there must be recessed nutserts or something. Turns out you don’t need 60mm…40mm is plenty. I also used 3/4” steel spacers and this worked out just fine by mounting the latch plate on top of the deck carpet with the spacers vice behind it. The 3/4” spacer gives me one pointer finger width of space where top of seat back meets carpet and this turned out to be the ’Niagara Falls’ of bass wave exuberance :-)
Amp Rack
Some amps can handle inverted install and JL is not one of them. While there’s room beneath the rear deck to surface mount it, direct mounting of an amp to metal is highly discouraged due to ground interference (think giving the Shelby keys to your 16 year old so he can take his buds to batting practice). So the spare tire area being the standard go-to and I selected 1/2” MDF cut around the mobility kit (I cut the ‘Y’ wings off the mobility kit) since I only have the line converter and a rather compact amp. Keeping the mobility kit in place also supports the trunk floor piece.
Safe dimension is 27”Wx26”L for initial cut on the MDF. Then get out some string to make the wheel arch from the 9/12/3 positions and slightly tapered from 5” to aft bulkhead. I made one 1” spacer mounted underneath in the middle btwn LOC/Amp and two others at the trailing edge of the rack. Added a couple blocks to keep my tire kit/spare oil (hey…it’s a 350…) from sliding forward into the electronics.

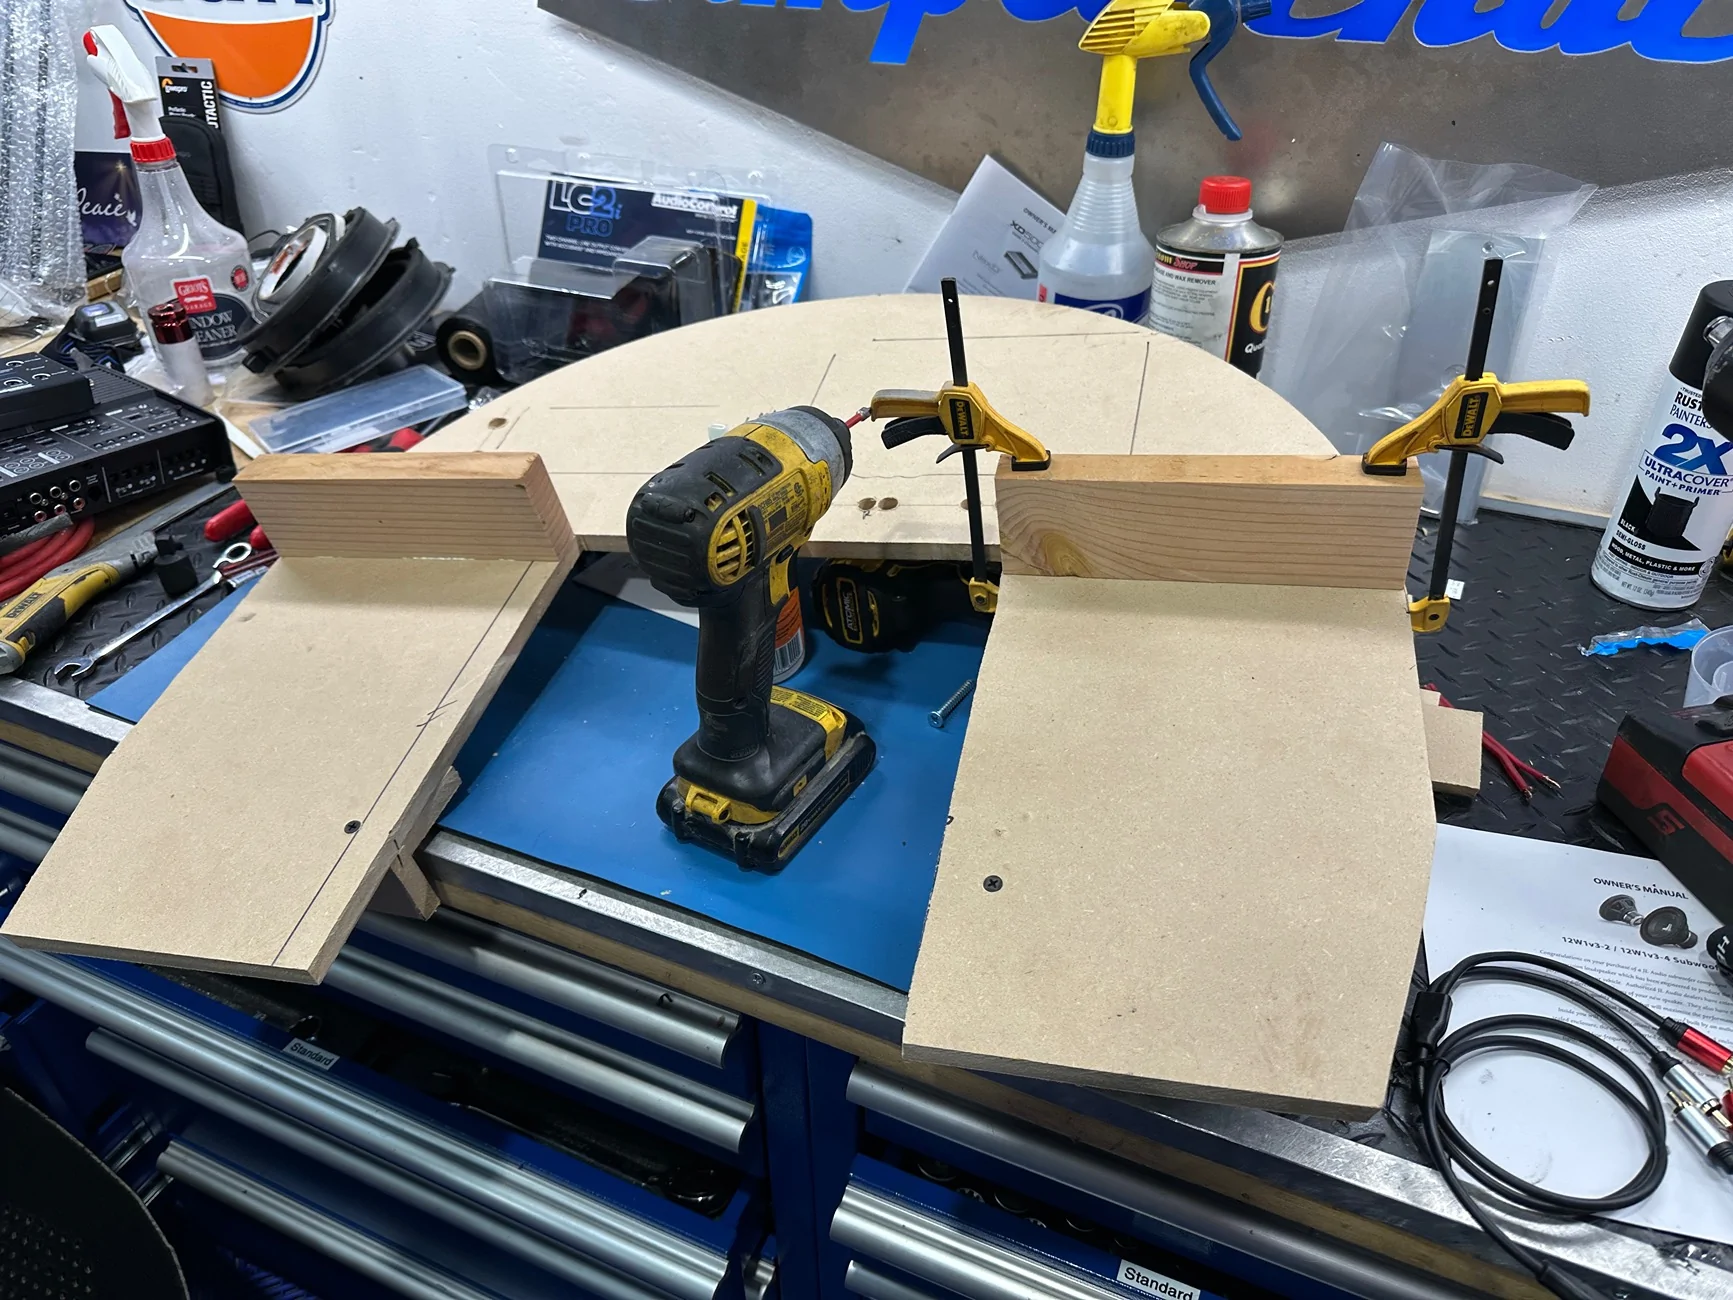
Once rack was fabricated, I laid the components out then marked holes for cables. Be sure to add some extra distance for RCA plug length. Shot some contact cement on it, let it sit for 5 min, then stuck the carpet down using a plastic trim tool to press the carpet in tightly to the corners of the blocks. I cut one slit for each hole and fed the cables thru. They are all tied down on the backside with screw hole zip ties.
Sound deadening. It’s kind of an important consideration given the Coors can metal used in the floor of the trunk. Didn’t take pix of what Ford does, but lift up your trunk carpet and you’ll see bands of ribbed material about 4” wide by 8-14” long. This is their answer to sound deadening. It works but to a point that I wanted to move a bit farther towards ‘right’. The downside of butyl sound deadening is weight…which is the downside (read: anathema) of speed. But since I dropped 40 lbs of unsprung weight with the Apex wheels, this equates to roughly 200 lbs of sprung (i.e. interior) weight so I don’t feel so bad dropping in some equipment. But I had to draw the line at making my trunk a solar reflector out of 25 sqft of reflective sound deadening. The dirty little secret to sound deadening is you don’t have to go wall to wall to reduce propagated sound waves. Once a wave hits the material, it's basically done for. But this doesn’t mean you’ve soundproofed it by going piecemeal; sound can still pass thru the metal if it doesn’t encounter butyl. So I placed about 2.5 sqft beneath the rack, and ran a strip around the perimeter where the amp rack touches the wheel well. I also put some on the deck just aft of the rear seats, and on both sides/middle of the rear deck. This doesn't sound proof it, but I’m happy just knowing nothing is being transmitted along the bare metal around the Ford ribbed bands.
I didn’t want wires running up the sides of the amp rack and I wanted to keep speaker wires separated from any power wires to shield from interference. So speaker wires run on the left side while power/remote wires run on the right. It takes about 18.5’ of power wire to go the battery to do it this way (a 17’ kit won’t do it). Remote turns on the LOC, and ‘Remote out’ on the LOC turns on the amp (could use the auto-on features, but using hardwire-on is dead nuts ‘on’). I have a 12v piggyback on the 4AWG Amp in running over to for LOC constant on (doesn’t draw power when remote is off). All wiring was loomed in Coroplast cloth tape and secured with adhesive zip tie anchors on metal or with the screw down hole zip ties beneath the amp rack.
There’s a handy firewall ground just left of centerline on the aft bulkhead behind the rear trunk liner and this is where the amp/LOC were grounded.
The JL sub fit nicely in the Skar box. I can’t say enough about this box. Fit/finish is spectacular. It came pre-stuffed with poly. It has banana pin wire receivers instead of cheap plastic lever slots for bare wire. It is a $150 no-brainer. I already had a Shelby trunk carpet that is made for no subwoofer and I tried sliding the Skar on top of it. You could probably get away with it, but it raises the box up about 1/4” and misaligns the push-pin hole where the sub attaches to the pinhole the side trunk liner uses. I (begrudgingly) decided to cut mine so there’s about 1” of carpet going in beneath the sub. I used a flame to singe the edge but it is a rubber bottomed carpet and should not unravel.

Soooo 18 hours later, it was finally time to light it off.
First Test
I’m still shaking my head…and my ears are still ringing lol. This simple sub setup moves some serious air and dare I say….too much!
I initially set up the LOC with ACCU Bass off and gains at 12 o’clock. The amp x-over set at 80hz with 24db roll off. CH 1&2 gain at 9, sub at 12 with all H/U EQ flat. Absolutely stunning. Jumped across a few genres of test tunes and went to bed very, very happy.
Next Day’s Tests
If it was so damned good, could it possibly get any better? Well, it really can’t/didn’t. Ran into a few issues:
1. I tried enabling the AccuBass on the LOC and it produced some nasty pops whenever volume was adjusted. Ended up just turning it off and left AudioControl a VM for some troubleshooting advice on that one.
2. Set gains on LOC Main/Bass output just shy of ‘Maximized’ light illumin. Performed AC voltage out tests on amp @ 50/1000hz that resulted with the rear deck speakers drowning out the soundstage. Reduced deck speaker (ch 1&2) output back to 9 o’clock.
3. I got the LC2iPro for the remote controller thinking it would operate like the remote for my other JL amps…it does not. I called Crutchfield on this one and they said this can be an issue if the gain matching is out of sync with the polarity magnification of the JL inverse sine wave attenuator…or something like that. Bottom line is that a remote for the JL is now on order.
4. Too much sound wave pressure. I have never experienced a ’thump’ or ‘bump’ that changed the internal pressure in my ear. Felt like cockpit pressure surging at 40k’ in a single seat twin tailed afterburning former mistress of mine. Sure, I could just dial down the gains, but where’s the fun in that? I’m going to reverse the seat latch mod to see if I can reduce the inner ear pressure delta yet retain the defibrillator aspect of musical massage.
5. That mobility kit looks like arse. So I put carpet over it.
That about wraps it up. Like I said in the power lead thread, I have been graciously blessed by having both the sound of the FPC and now ZZ Top to create a grin worthy of a double date memory with both Ginger and MaryAnn.
No law against a 2-fer, right?
Sponsored
Last edited:
