Sponsored

My Diff Cooler Build

OP
OP
GTP

GTP

Deutsche Pony
Joined
May 27, 2015
Threads
260
Messages
5,973
Reaction score
3,847
Location
Indy
Website
www.BambergAudio.com
First Name
Philip
Vehicle(s)
2019 GT PP1 A10 Outrageous Orange HPDE mods
Actually it's the other end. Use the bent tip of the zip tie to check for oil while the zip tie is pushed in level.

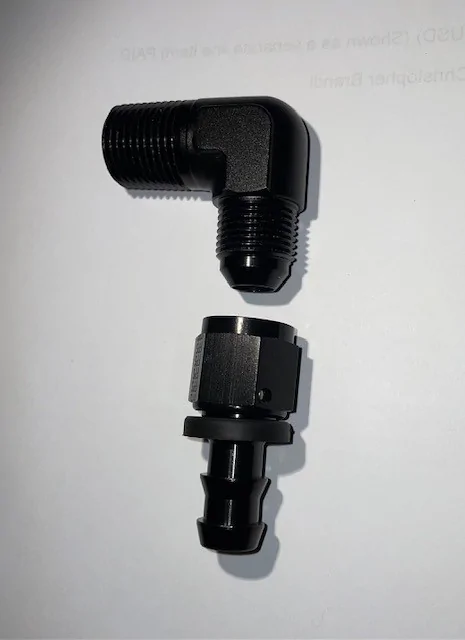
This was handy because I glued in the 1/2NPT-6AN adapters with pipe sealer. So I didn't plan to remove them again. The upper one doesn't leave enough space for the spout. And I no longer could stick my pinky in there to check for oil. So the zip tie method had to do.
Sponsored


Bossdog

Well-Known Member
Joined
Feb 6, 2016
Threads
29
Messages
321
Reaction score
161
Location
SE Michigan
Vehicle(s)
2019 GT PP2
I too intend not to add a 3rd opening in the diff cover.
So what do you think of this idea?
when I go to install my diff cooler, I;
1) Put car on lift (4-post for storage)
2)Open top fill port
3) install 90 degree 1/2" NPT to 8AN fitting
4) use slider jack to lift front of car until diff fluid starts to trickle out
5) Use iphone to measure the angle of the body of the car

I can now use that angle when I change and refill the diff fluid. I can use a flexible hose to run up through the 90 degree fitting, pump new/clean diff fluid into the diff housing until it runs out ( like most diffs).
My understanding is the S550 is to be filled to slightly less than flowing out but that will be difficult to determine with the 90 degree fitting installed. I too, like you, don't want to remove the 90 degree fitting each time I service the diff fluid.
My assertion is that this method will allow me to use the simple "pump fluid in till it comes out" method with the 90 degree fitting in place and still achieve the desired "not quite full" (when car is level) fluid level.

Please feel free to poke holes in my proposed diff fluid change method for 2-hole, diff cooler installed fluid service method.

Do you intend to try and get the diff fluid out of the cooling radiator during a service? Seems we should if the cooler is doubling the fluid capacity, otherwise a change is just 50 or 60% of the fluid, leaving 40 or 50% of the old fluid in the system, relegating you to never really having fresh fluid.
 
Last edited:
OP
OP
GTP

GTP

Deutsche Pony
Joined
May 27, 2015
Threads
260
Messages
5,973
Reaction score
3,847
Location
Indy
Website
www.BambergAudio.com
First Name
Philip
Vehicle(s)
2019 GT PP1 A10 Outrageous Orange HPDE mods
While I applaud in depth analysis, I think you are overthinking this.

IIRC the spec is to fill within 1cm of the hole. To me this is the minimum level. Obviously you can't overfill because the oil will run out of the open port. To me, this also means it is acceptable to fill right up to the bottom edge of the hole.

In my implementation I used a straight adapter at the port and a AN hose fitting on that. So when I remove the upper hose I have a straight hole and not a 90degree. So it is easy to use a zip tie as a dipstick there.

As for draining, I disconnect the lower port hose, which obviously will drain the diff. The check valve prevents the cooler from draining. But I can run the pump which will force flow out of the cooler and lines.

To refill, I provide fresh fluid to the disconnected lower hose via (temporary) AN-to-barb adapter and clear vinyl tubing to a vessel of oil. The upper hose is temporarily connected to the lower port. I stop the pump when oil starts to come out of the open upper port. Then I quickly reconnect the upper and lower hoses to their (un swapped) ports.

This is confusing at first and will require a couple of readings.
 

Bossdog

Well-Known Member
Joined
Feb 6, 2016
Threads
29
Messages
321
Reaction score
161
Location
SE Michigan
Vehicle(s)
2019 GT PP2
"Tomster" from this forum says:

"The key here is replace the exact amount of fluid that you took out (assuming it was filled from the factory). Just like JAJ said, it always (and should be) 56 oz. If you fill it to the fill hole, a high G turn will spew fluid out of the vent all over your strut. If the diff has been serviced before, most likely the tech just filled it to the fill hole, and that is overfilled."

The other reason I thinking to be a bit more precise on the fill is that when I add the 1/2"NPT fitting, I am actually making the fill hole smaller by a small bit, increasing the level further till it spills out on its own as you pump it in. Of course with an after market cooling system the quantity will be different but measuring what you took out is always a good idea.
Its easy enough process form me as I am already on a lift with a slider jack. For now its all theory, I wont be changing the diff fluid till next spring. It may be a bit of "overkill" but I don't want to be spitting Diff fluid on the track.
 

Sponsored

Bossdog

Well-Known Member
Joined
Feb 6, 2016
Threads
29
Messages
321
Reaction score
161
Location
SE Michigan
Vehicle(s)
2019 GT PP2
I was giving thought to the best way to change diff fluid when you have a 2-hole diff cover with a cooler attached. I wanted to avoid removing the fitting affixed to the cover itself, so not to mess with the pipe dope removal and reapplication.
First I tried to run a fill hose up through the 90° connection but I couldn't get the hose to navigate through the 90. I searched 8-AN fittings and found a fitting with a barbed hose fitting end.

diff fluid connections.webp


Now I can leave the 90 in place on the fill, remove the cooler "in" line, attach the barbed hose fitting and pump the fluid up into the Diff, disconnect the barbed hose fitting and let the excess drain out. The drain line is simple, the out hose can be disconnected without removing the fitting that connects to the Diff cover.

Simple solution, but I was not aware of the barbed hose fitting till I started looking around, thought I'd share.

My Kenny Brown Cooler works great, it turns on some time during the 20 - 25 min track session and runs for about 5 min after I'm back in the paddock, turns off when the stock temp sensor is around 170°F. I leave the car running so not to tax the battery unnecessarily.
 
OP
OP
GTP

GTP

Deutsche Pony
Joined
May 27, 2015
Threads
260
Messages
5,973
Reaction score
3,847
Location
Indy
Website
www.BambergAudio.com
First Name
Philip
Vehicle(s)
2019 GT PP1 A10 Outrageous Orange HPDE mods
I do something similar.

I connect the return hose to the lower outlet connector.
I disconnect the lower outlet hose and screw on a barb adapter with vinyl tube.
Then I suck the oil into the vinyl tube which is in a stainless bowl of oil.
I run the pump by jumpering out the thermal switch.
I stop when oil comes out of the upper fitting.

But I like your idea of another adapter and tube at the upper connector to be less messy.
 

GJarrett

Well-Known Member
Joined
Jan 30, 2016
Threads
76
Messages
765
Reaction score
459
Location
Bradenton, FL
First Name
Gerald
Vehicle(s)
2017 EcoBoost Premium
...But I finally got the Axle Overtemp warning at the 32 minute mark during an open track day. So I decided to design a fan-less diff cooler...
Great project. I'm sure I've seen it somewhere but cannot remember... at what temp does the axle overtemp warning kick on?

EDIT: never mind, found it. 293 degrees
 

Douglas CC

New Member
Joined
Dec 16, 2021
Threads
1
Messages
2
Reaction score
0
Location
Jupiter
First Name
Doug
Vehicle(s)
2016 Shelby GT 350 Tech Pkg, 1968 Camaro RS/SS 396
These are all great and informative posts, I thank all.
But not the information I was looking for.
I have purchased a used factory diff cooler and circulation pump assembly for my 2016 GT350 that didn’t come with one.
Does the Gt350 already have the connector and wiring for the pump? It does have temp sensor in the differential
 

Bossdog

Well-Known Member
Joined
Feb 6, 2016
Threads
29
Messages
321
Reaction score
161
Location
SE Michigan
Vehicle(s)
2019 GT PP2
These are all great and informative posts, I thank all.
But not the information I was looking for.
I have purchased a used factory diff cooler and circulation pump assembly for my 2016 GT350 that didn’t come with one.
Does the Gt350 already have the connector and wiring for the pump? It does have temp sensor in the differential
the factory diff cooler is passive, no fan. The GT350 should come with. Diff fluid temp sensor installed.
 
OP
OP
GTP

GTP

Deutsche Pony
Joined
May 27, 2015
Threads
260
Messages
5,973
Reaction score
3,847
Location
Indy
Website
www.BambergAudio.com
First Name
Philip
Vehicle(s)
2019 GT PP1 A10 Outrageous Orange HPDE mods
I changed my diff oil yesterday, and improved the procedure.

Note: Oil fittings are screwed on only finger tight for this procedure, and then wrench tight at the upper and lower ports once the system is filled.


Draining the old oil (first video):
  1. Plug the car into a battery maintainer.
  2. Jumper out the thermal switch. (Red jumper clip wire in the videos.)
  3. Disconnect the upper supply line and let it hang over the drain pan.
  4. Switch on the car with the Start button. The pump starts running.
  5. Once the system is empty, switch the car off.

Filling the new oil (second video):
  1. It will take about 2-1/2 Valvoline Flexfill pouches to fill the system. Prepare 3 pouches by removing the seal and cutting off the end, leaving the lower ridge line of the spout intact.
  2. Disconnect the lower return line, and instead connect it to the 6AN to 3/8 barbed adapter with 3/8 clear vinyl tube.
  3. Push the tube onto the spout of the pouch. Position the pouch upside down in a steel mixing bowl. (The bowl holds the pouch/tube and will catch any oil should the tube pop off the spout.)
  4. Connect the upper supply line to the lower diff port.
  5. Connect the drain tube (6AN to 3/8 barb adapter with 3/8 vinyl tube) to the diff upper port.
  6. Switch on the car to fill the system.
  7. The pouch flattens as the pump sucks out the oil.
  8. Once the pouch is empty, reach over to disconnect one end of the jumper clip to stop the pump. Switch out to the next pouch, and continue the procedure.
  9. Once oil starts to enter the drain tube (about halfway through the third pouch, remove the jumper wire.
  10. This step is tricky and has to be performed quickly!
    • Disconnect the return line from the pouch fill adapter and hold it up higher to prevent oil from leaking out.
    • Disconnect the supply line from the lower port and hold it up higher to prevent oil from leaking out.
    • Quickly hold your finger over the port to stop oil from leaking out.
    • Now screw the return line back onto the lower port.
    • Disconnect the drain tube from the upper port.
    • Connect the supply line back onto the upper port.
If Step 10 is performed quickly, there is virtually no oil lost, and I don't even bother to check the level at the upper port via the tie wrap method.

Photo of fill and drain adapters, jumper clip wire, and special wrench for oil fittings:
Diff oil adapters 90.jpg


Drain video:


Fill video:
Sponsored

 
Last edited:


Top