mindys
Well-Known Member
- Joined
- Jul 15, 2015
- Threads
- 40
- Messages
- 466
- Reaction score
- 179
- Location
- Chicago Suburbs/South Nashville
- First Name
- Mindaugas
- Vehicle(s)
- 2020 VW GTI SE
- Thread starter
- #1
Hey guys,
So I finally decided to contribute to this community since it has given me so many tips and ideas for my Mustang! I wanted to write this because I found no info about how to pull off the A-pillar and other trim so I just want to give you my advice :cheers:
Anyways, I decided to get a dashcam. I got this:
http://www.amazon.com/Rexing-Dashbo...UTF8&qid=1462585428&sr=8-1&keywords=rexing+v1
(you need a SD card too: http://www.amazon.com/SanDisk-micro...psc=1&redirect=true&ref_=od_aui_detailpages00 )
To hardwire this in, I got these parts:
Wire kit: http://www.amazon.com/Dash-Camera-V...psc=1&redirect=true&ref_=od_aui_detailpages00
Fuse tap: http://www.amazon.com/Lumision-SHIP...qid=1462585574&sr=1-1&keywords=micro+fuse+tap
Note that I originally ordered the wrong fuse tap (one meant for a mini ATM, when ours are micro ATR I believe) and when I found out that it didn't work, I simply coiled the red cable of the wire kit on one of the fuse legs and stuck it back into the fuse holder in the fuse box. Connection is strong and it should not wobble out in my opinion! I believe that the fuse tap that I linked here should work, but do not trust me 100% :shrug:
Anyways, I also grabbed some zip ties and electrical tape so I could secure everything.
First, start by removing the plastic trim piece by the rocker panel.

The trim piece has 5 clips along the top (see below), so just grab the piece on one side by the floor and lift up slowly. Simply work your way to the other side popping the clips by lifting the piece up and it will come out no problem.

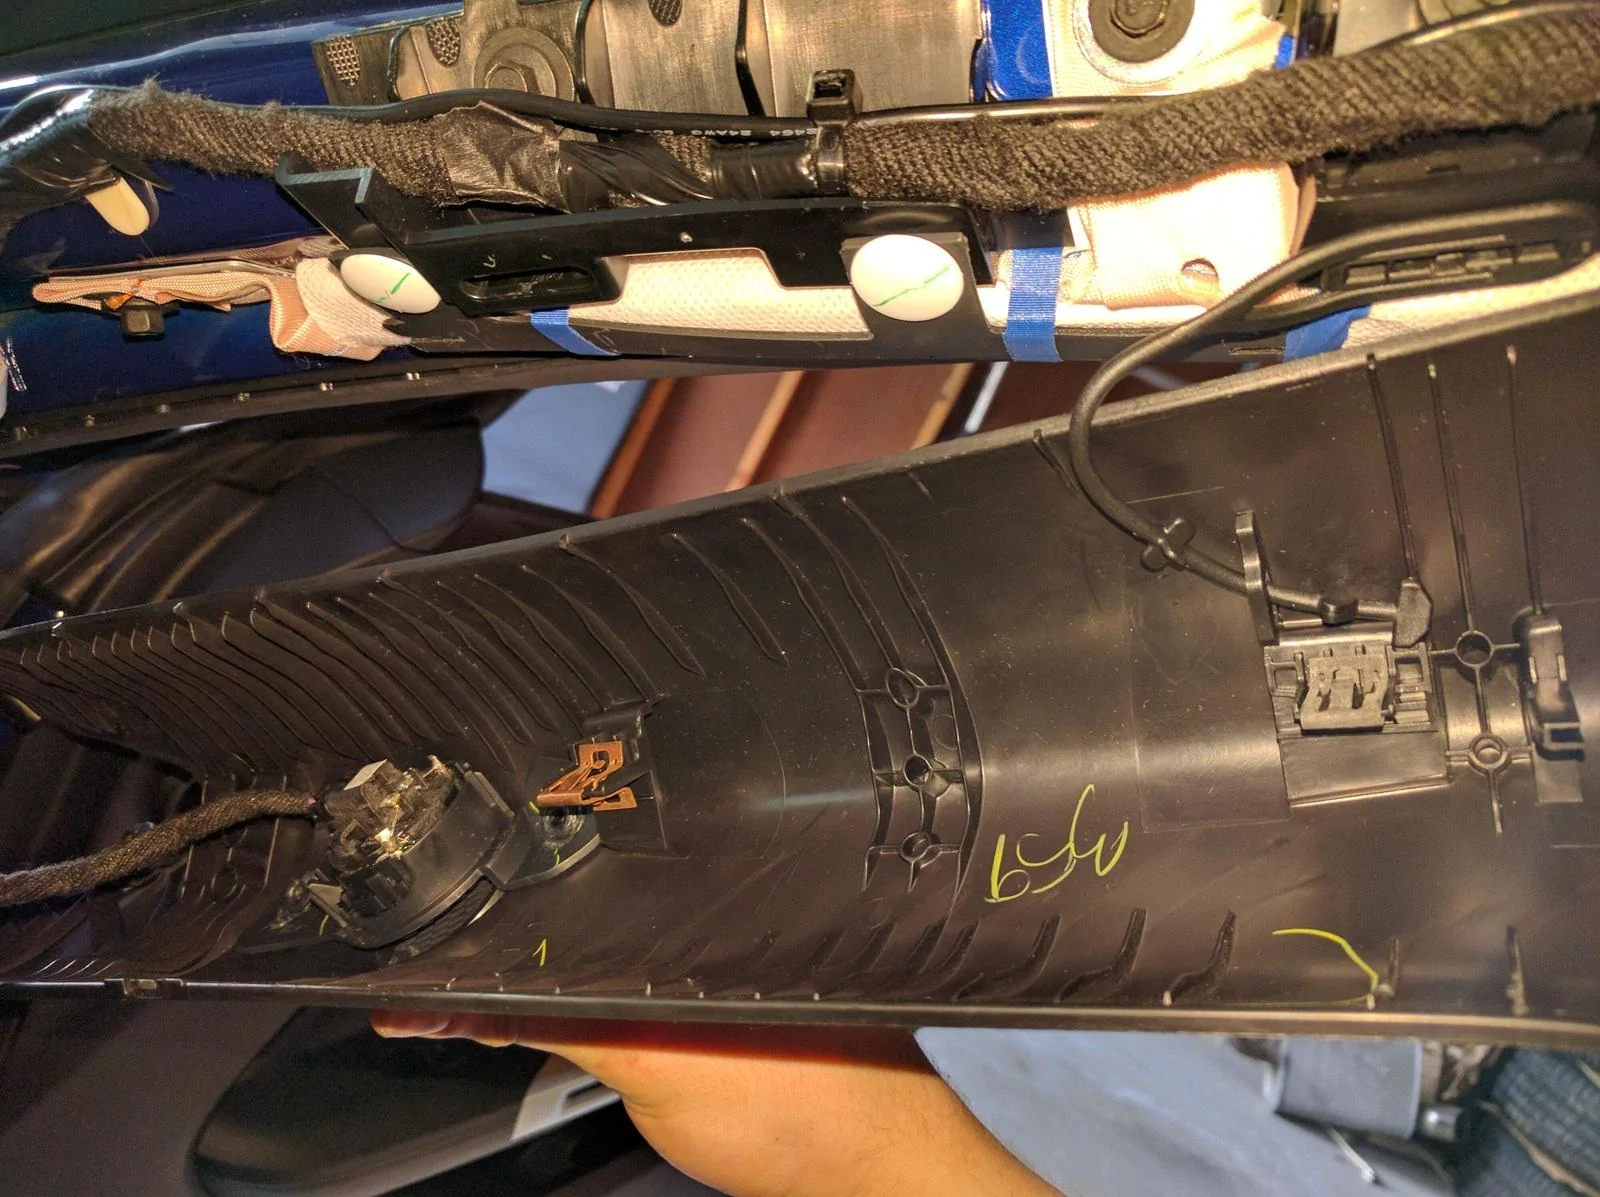
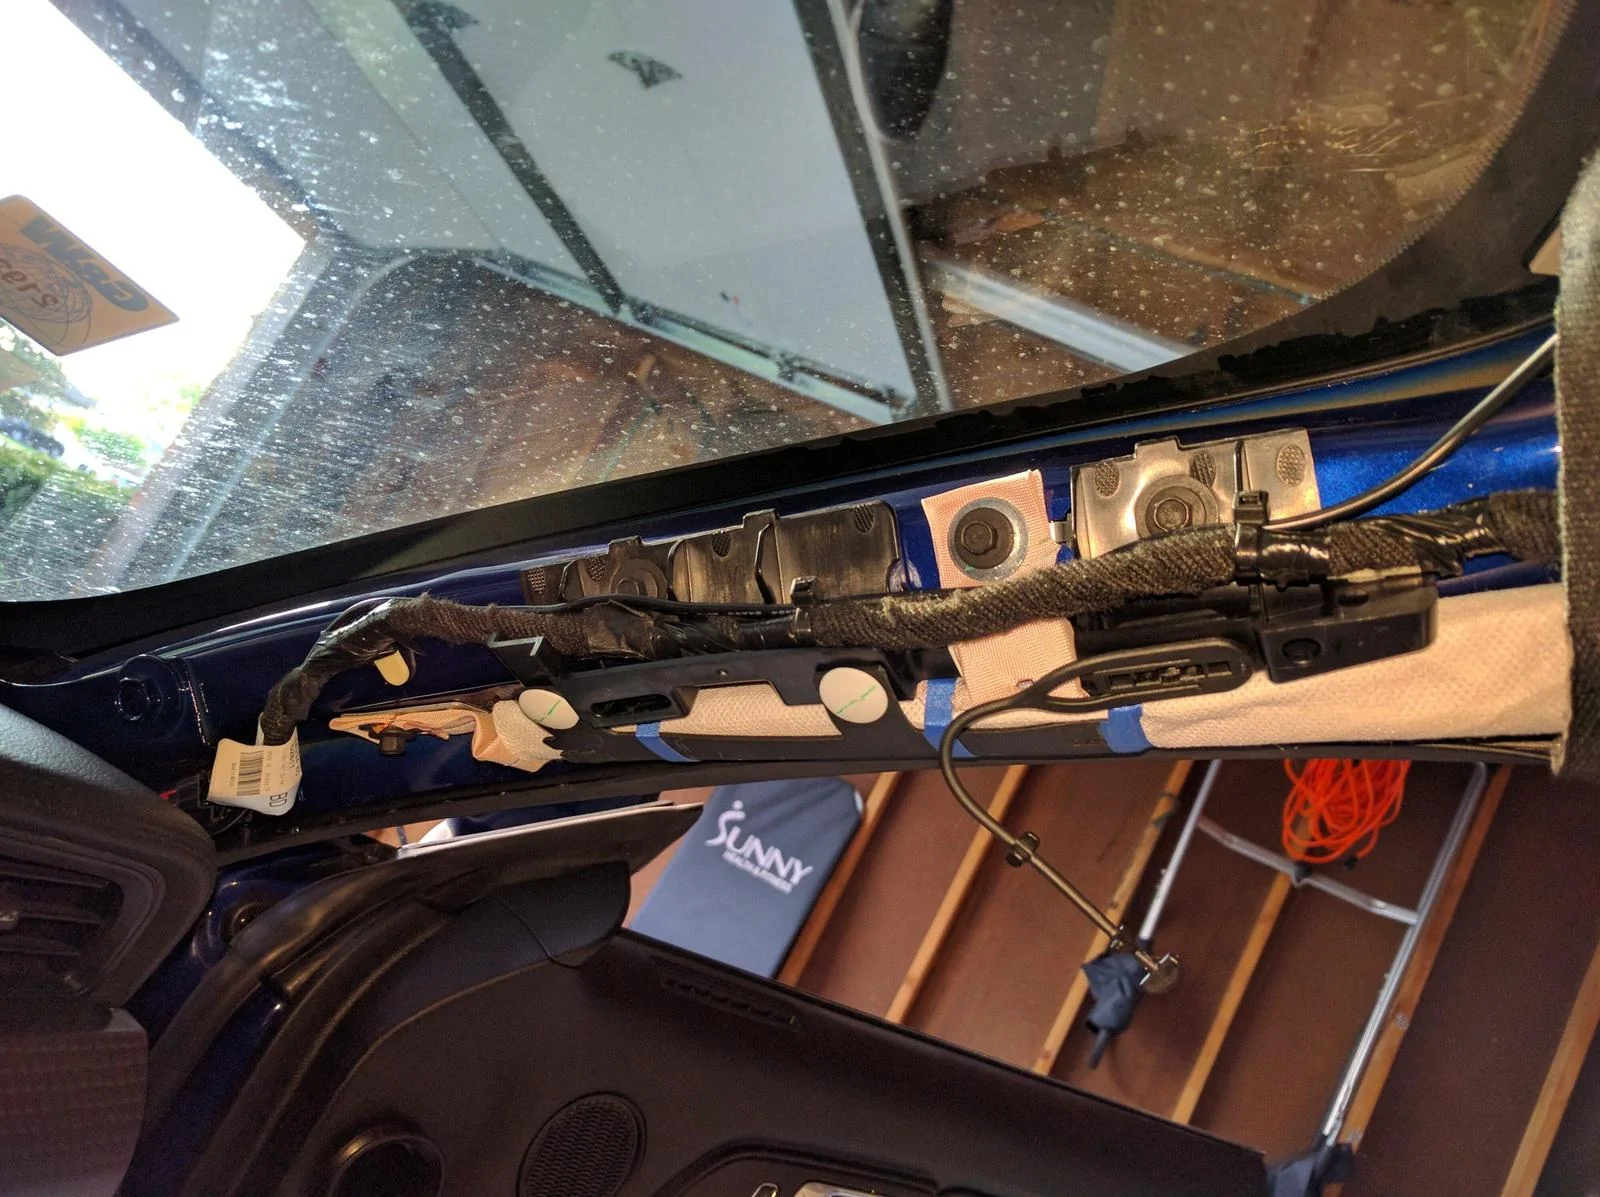
Next, remove the A-pillar trim piece. Grab the piece at the top of the A-pillar by the window and also on the other side under the rubber weather guard, pull it down and slightly towards the interior of the car. I think there are only two clips that hold this piece (based on the picture below, I do not remember). Once those two clips pop out, do not pull the trip piece down further. There is this plastic "cable" thing attached to it and, if you have premium sound, the tweeter cable. Disconnect the plastic "cable" and the speaker cable by pressing down on the clip, and then slide the trim piece towards you since there are two hooks towards the bottom of the piece that attach to the dash.
Now remove the trim piece right of the glove box. This piece has three clips, the top one being the hardest to pull out. Simply open your glove box, grab the part on both sides close to the bottom, and pop the clips from bottom up!
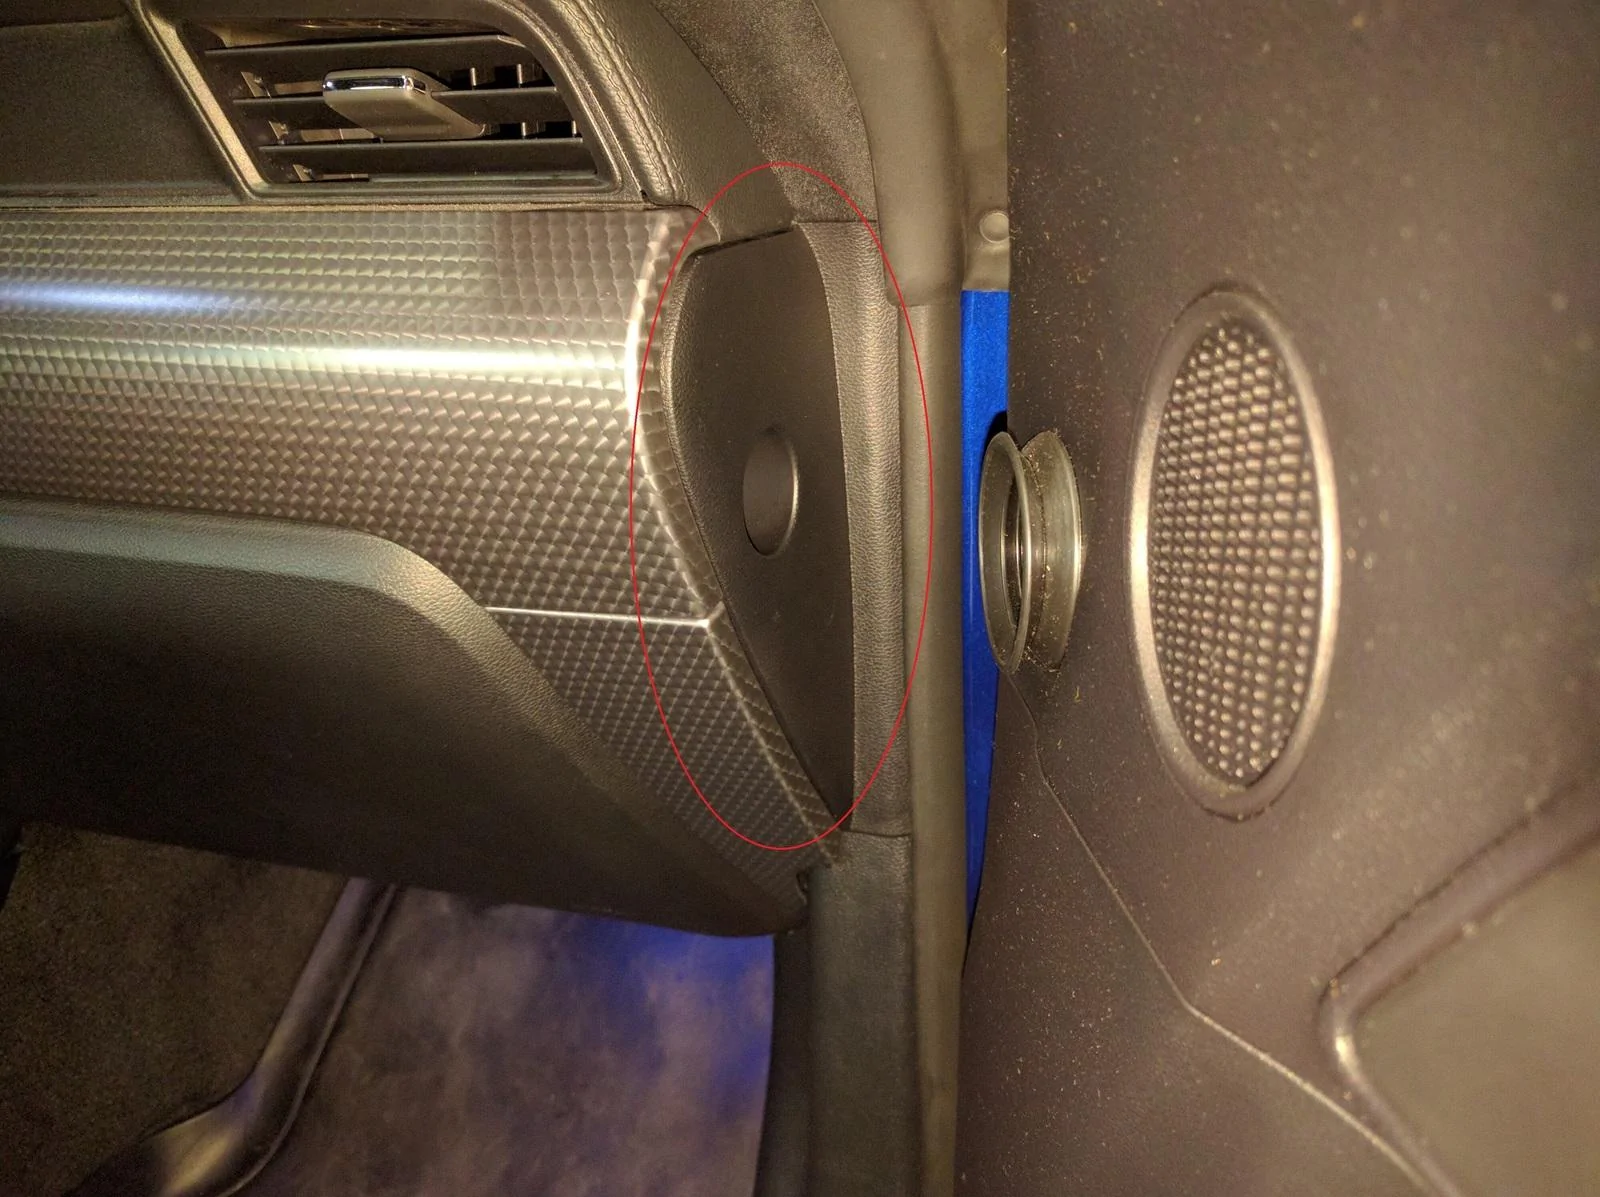
Now remove the piece facing the door (circled in red in the picture below). Simply pull it towards the door, there are 4 clips that hold the piece.
Now, remove the fuse box cover by sticking your finger into the slot, pull out, and once the two clips pop, slide the piece up and out of the kick panel.
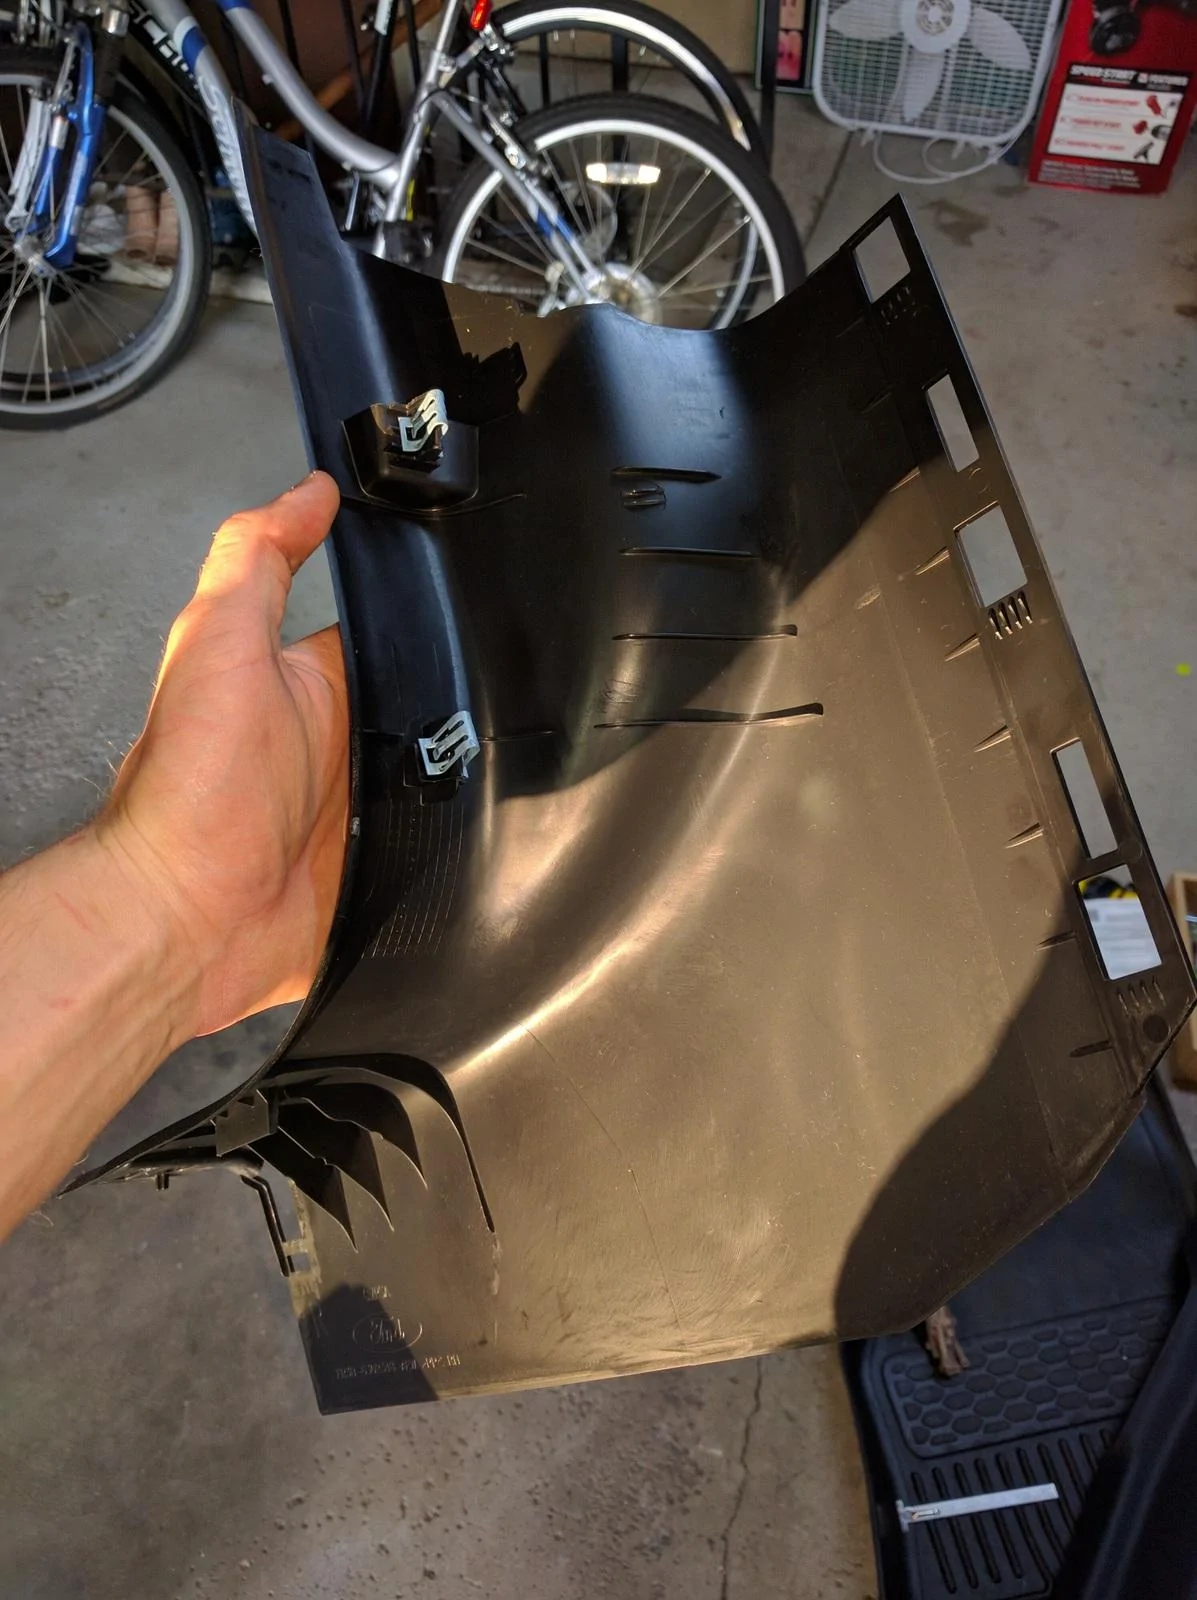
Lastly, remove the kick panel by lifting the bottom section slightly up to clear the tab, and the pull it towards the rear of the car to pop the two clips shown below. Now you have a nice clear way to run the wire.
Note that the order at which you remove the trip pieces is important. The rocker panel trim piece and the side trim piece with the hole cover part of the kick panel, and the A-pillar slightly covers the trim piece with the hole. Just so you know when you put it back together that it is all back together properly
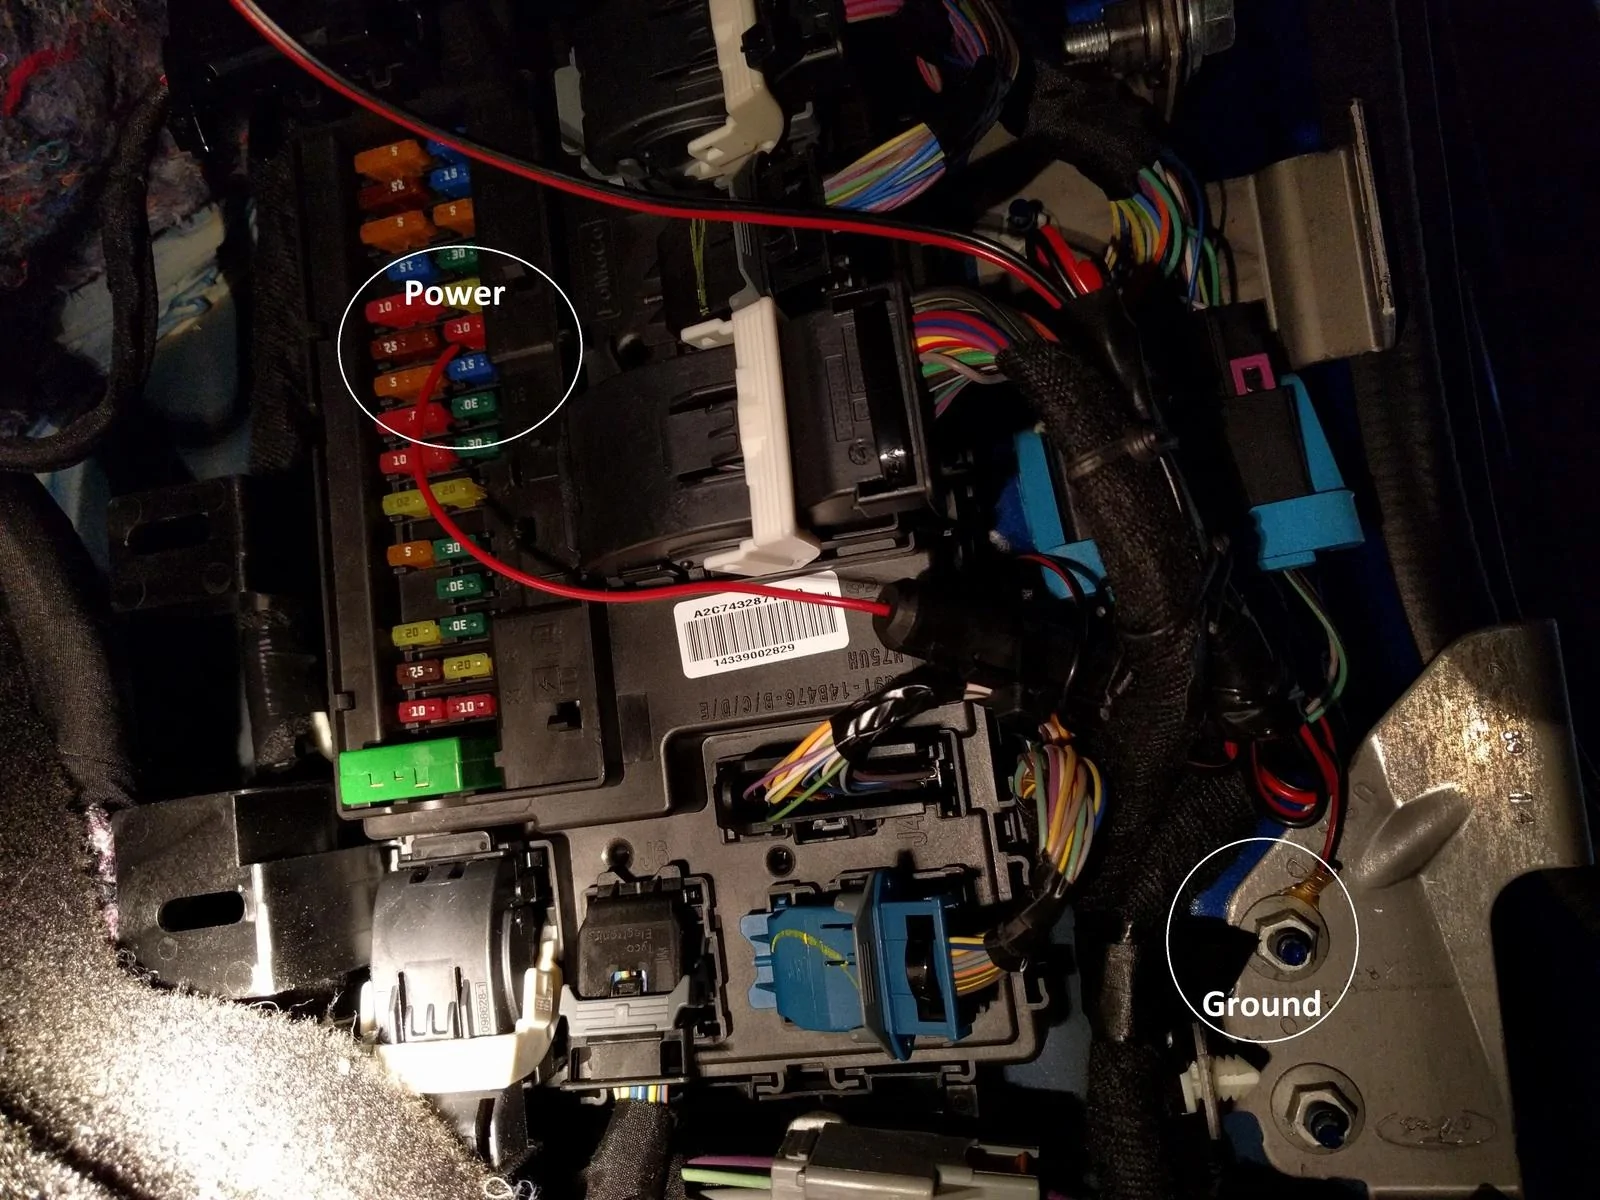
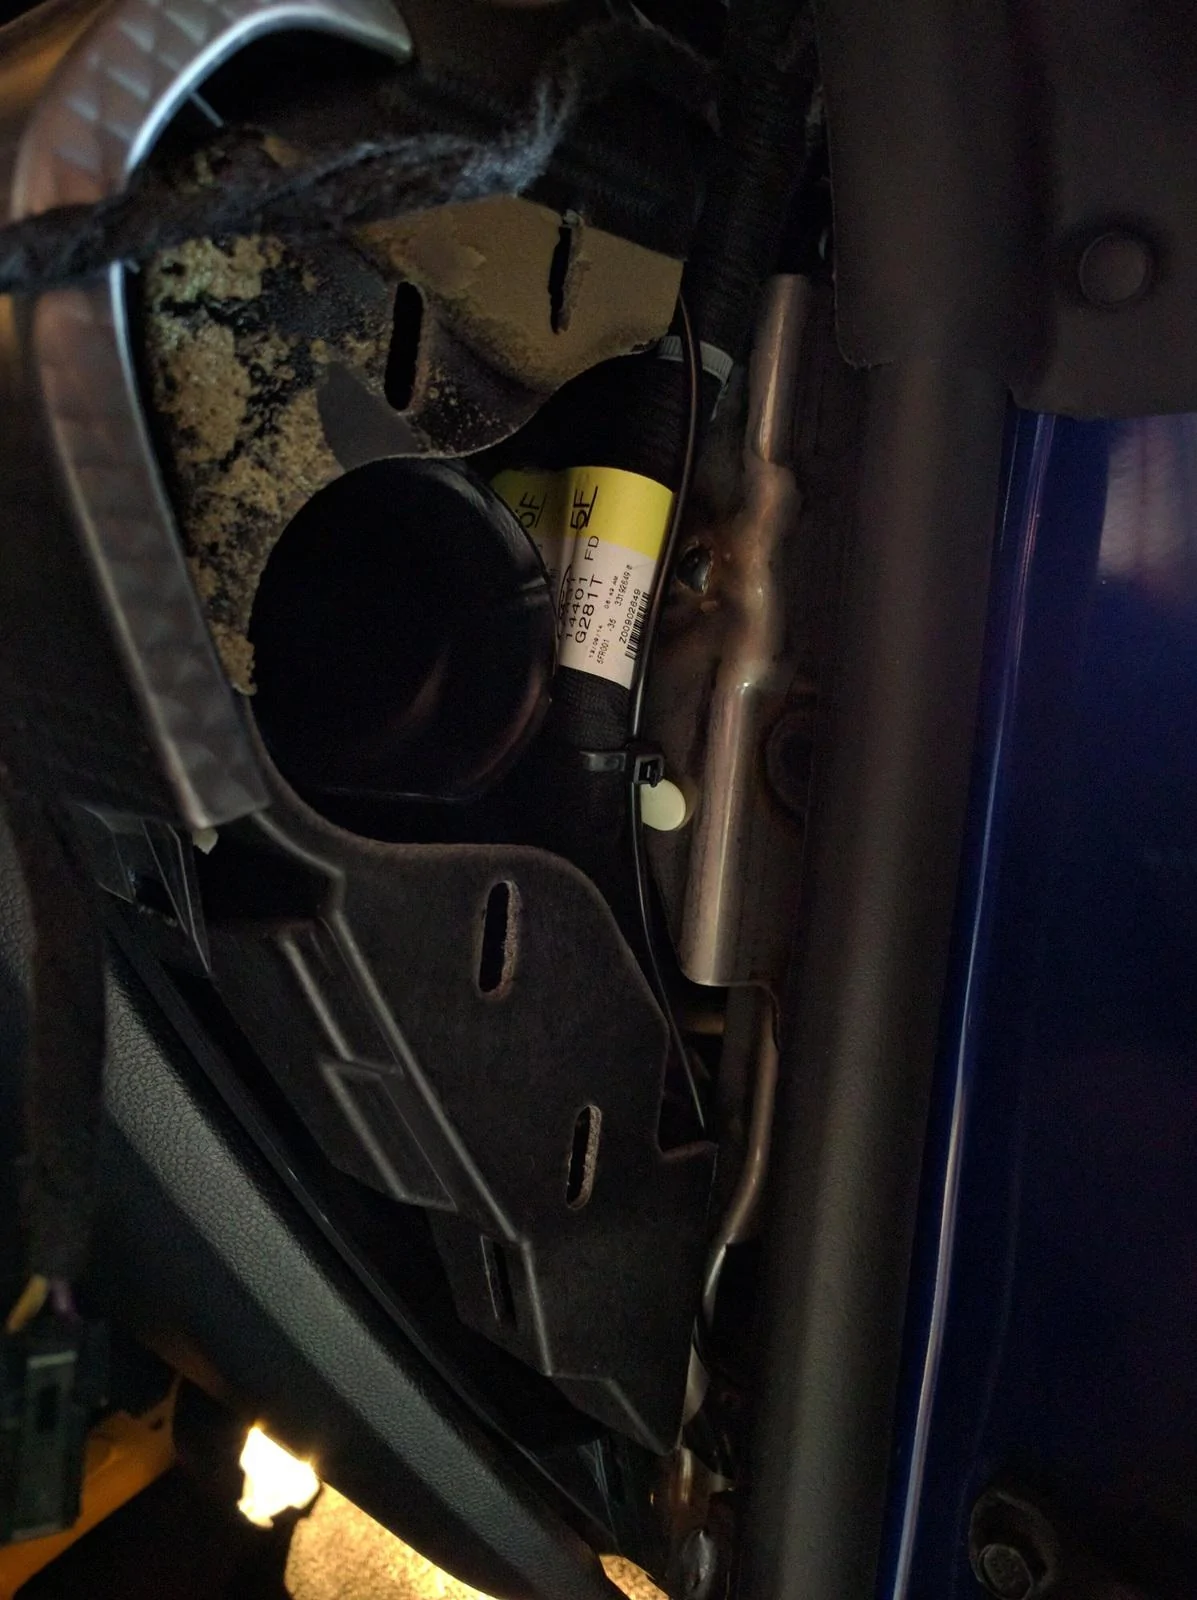
So I simply connected the red cable to fuse 32 (10 amp, check your car's User Manual for fuse designations) which is used for the "Remote keyless entry. Multi-function display. SYNC. Global positioning system module. Gauges". You don't have to use this fuse, or if you think there is a better fuse for this application, please let me know since I am no expert with electronics :headbonk:. I may actually switch fuses because the current fuse keeps the cam running even when the car is off. Otherwise, I grounded the black cable to one of the nuts that holds the bracket shown below. Then I just routed everything nicely with zip ties and electrical tape and put everything back together! The A-pillar was definitely the most annoying, so take your time putting that back on.
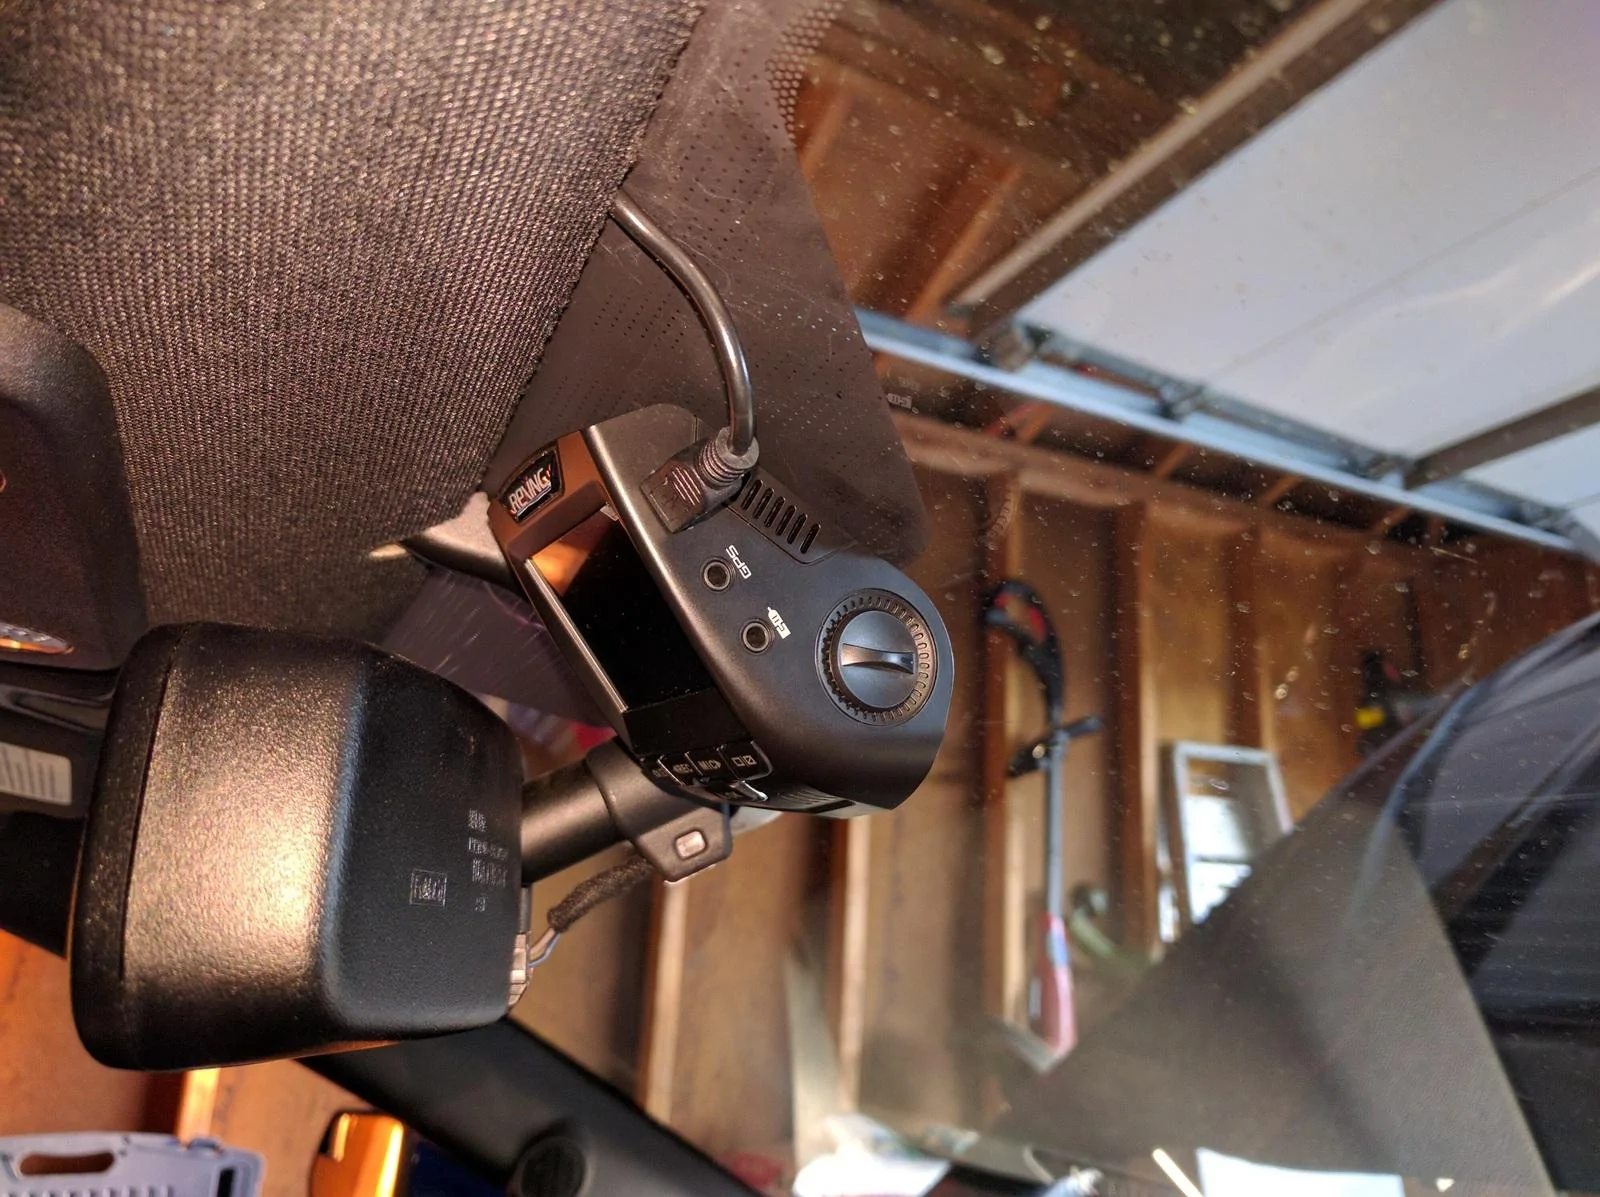
My setup now:

I will have a sample video of the camera footage soon
[ame]
Hope this helps! :cheers: Take your time and be careful, do not break any of those pieces")
So I finally decided to contribute to this community since it has given me so many tips and ideas for my Mustang! I wanted to write this because I found no info about how to pull off the A-pillar and other trim so I just want to give you my advice :cheers:
Anyways, I decided to get a dashcam. I got this:
http://www.amazon.com/Rexing-Dashbo...UTF8&qid=1462585428&sr=8-1&keywords=rexing+v1
(you need a SD card too: http://www.amazon.com/SanDisk-micro...psc=1&redirect=true&ref_=od_aui_detailpages00 )
To hardwire this in, I got these parts:
Wire kit: http://www.amazon.com/Dash-Camera-V...psc=1&redirect=true&ref_=od_aui_detailpages00
Fuse tap: http://www.amazon.com/Lumision-SHIP...qid=1462585574&sr=1-1&keywords=micro+fuse+tap
Note that I originally ordered the wrong fuse tap (one meant for a mini ATM, when ours are micro ATR I believe) and when I found out that it didn't work, I simply coiled the red cable of the wire kit on one of the fuse legs and stuck it back into the fuse holder in the fuse box. Connection is strong and it should not wobble out in my opinion! I believe that the fuse tap that I linked here should work, but do not trust me 100% :shrug:
Anyways, I also grabbed some zip ties and electrical tape so I could secure everything.
First, start by removing the plastic trim piece by the rocker panel.

The trim piece has 5 clips along the top (see below), so just grab the piece on one side by the floor and lift up slowly. Simply work your way to the other side popping the clips by lifting the piece up and it will come out no problem.

Next, remove the A-pillar trim piece. Grab the piece at the top of the A-pillar by the window and also on the other side under the rubber weather guard, pull it down and slightly towards the interior of the car. I think there are only two clips that hold this piece (based on the picture below, I do not remember). Once those two clips pop out, do not pull the trip piece down further. There is this plastic "cable" thing attached to it and, if you have premium sound, the tweeter cable. Disconnect the plastic "cable" and the speaker cable by pressing down on the clip, and then slide the trim piece towards you since there are two hooks towards the bottom of the piece that attach to the dash.
Now remove the trim piece right of the glove box. This piece has three clips, the top one being the hardest to pull out. Simply open your glove box, grab the part on both sides close to the bottom, and pop the clips from bottom up!

Now remove the piece facing the door (circled in red in the picture below). Simply pull it towards the door, there are 4 clips that hold the piece.

Now, remove the fuse box cover by sticking your finger into the slot, pull out, and once the two clips pop, slide the piece up and out of the kick panel.

Lastly, remove the kick panel by lifting the bottom section slightly up to clear the tab, and the pull it towards the rear of the car to pop the two clips shown below. Now you have a nice clear way to run the wire.
Note that the order at which you remove the trip pieces is important. The rocker panel trim piece and the side trim piece with the hole cover part of the kick panel, and the A-pillar slightly covers the trim piece with the hole. Just so you know when you put it back together that it is all back together properly
So I simply connected the red cable to fuse 32 (10 amp, check your car's User Manual for fuse designations) which is used for the "Remote keyless entry. Multi-function display. SYNC. Global positioning system module. Gauges". You don't have to use this fuse, or if you think there is a better fuse for this application, please let me know since I am no expert with electronics :headbonk:. I may actually switch fuses because the current fuse keeps the cam running even when the car is off. Otherwise, I grounded the black cable to one of the nuts that holds the bracket shown below. Then I just routed everything nicely with zip ties and electrical tape and put everything back together! The A-pillar was definitely the most annoying, so take your time putting that back on.
My setup now:
I will have a sample video of the camera footage soon
[ame]
Hope this helps! :cheers: Take your time and be careful, do not break any of those pieces
Sponsored
Last edited: