Sponsored

Nathan's Silver GT

plc268

Well-Known Member
Joined
Jun 2, 2015
Threads
31
Messages
1,853
Reaction score
648
Location
Central Texas
First Name
Patrick
Vehicle(s)
2015 Mustang GT Premium Race Red
I like those. I'll have to add them to the list. I do like the tone, it's very similar to the old exhaust. It does seem a little quieter now, but you're right, when you open it up if get as load as the borla. I was actually going to order just the axel back but someone wanted to buy my borla as a kit so it made sense to order and switch out everything. I like the build of the Ford X pipe a little more. Seem a little better built.
Here's the link to them at levittown:

http://www.levittownfordsupercenter.com/ford-mustang-splash-guard-rear-p-4651.html

Also if you feel like spending more money, there's also the underbody shield that goes with the valance. It's a bit expensive (as are the mud flaps), but may be worth having:

http://www.levittownfordsupercenter.com/ford-mustang-gt350-close-panel-diffuser-p-4944.html
Sponsored

 
OP
OP
Nathanbrummer@SCS

Nathanbrummer@SCS

Well-Known Member
Gold Sponsor
Joined
Apr 11, 2015
Threads
14
Messages
952
Reaction score
1,134
Location
602
Vehicle(s)
2015 silver GT
Here's the link to them at levittown:

http://www.levittownfordsupercenter.com/ford-mustang-splash-guard-rear-p-4651.html

Also if you feel like spending more money, there's also the underbody shield that goes with the valance. It's a bit expensive (as are the mud flaps), but may be worth having:

http://www.levittownfordsupercenter.com/ford-mustang-gt350-close-panel-diffuser-p-4944.html
Thank for the link. I like that close out pannel too. I thought about ordering that at the same time I ordered the valance but I didn't maybe next month.
 

Voo Doo

Well-Known Member
Joined
Apr 18, 2015
Threads
128
Messages
2,603
Reaction score
1,857
Location
Surrey BC
First Name
Ric
Vehicle(s)
2019 BULLITT DHG
Very nicely done Nathan! Well thought out and executed! I agree...you now definitely "Must Have" the rear underbelly pan!! !
 
OP
OP
Nathanbrummer@SCS

Nathanbrummer@SCS

Well-Known Member
Gold Sponsor
Joined
Apr 11, 2015
Threads
14
Messages
952
Reaction score
1,134
Location
602
Vehicle(s)
2015 silver GT
The gift card swag from [MENTION=9987]Diode Dynamics[/MENTION] arrived a few days ago. Going to install everything this weekend.


Sponsored

P51DNA

Well-Known Member
Joined
Oct 18, 2015
Threads
11
Messages
194
Reaction score
40
Location
PA
Vehicle(s)
Mustang
Maybe slightly smoother. Not enough to totally recommend this upgrade if you don't need it. I'd say wait until the normal fluid change timing and do it then. It was a super easy swap, aside from making a slight mess in refilling the system. From reading pervious generation reviews colder weather guys might see a bigger difference.
With the Steeda Shifter and the Trans bushing things were already pretty dialed so I wasn't expecting a ton. I think a nice weighted shift knob will totally complete the package.
I did the BG fluid swap about a month ago. Found it much cheaper on ebay. Along with mgw race spec and Trans bushing insert I was still experiencing notchy shifts, especially when cold. Fluid made shifting feel much smoother and quicker. But I still have some nontchyness in the 3-4 shift. I too am hoping a weighted ball will complete the package. I'm also thinking aluminum driveshaft shaft as possibly my next mod.
 
OP
OP
Nathanbrummer@SCS

Nathanbrummer@SCS

Well-Known Member
Gold Sponsor
Joined
Apr 11, 2015
Threads
14
Messages
952
Reaction score
1,134
Location
602
Vehicle(s)
2015 silver GT


Thanks to Jay at Hypermotive for the help!!!
So, I took the plunge and picked up an Airlift Digital V2 Kit. I got a great deal on it that I really couldn’t pass up. Let me first start out by saying I did a ton of research on this kit and it really seemed like the best option for my longer term goals.
The Steeda Fascia, although not super aggressive started presenting me problems with ground clearance on steep driveways. I also wanted something that would still be a performance orientated set up and allow me to still look dope at the meet ups. Air seemed to be the best solution in addressing all these qualifications.

Here are some great videos that I used during the install of my kit


The install starts with removing the lower rear seat and folding down the upper seat back.


28092440695_1f56774425_c.jpg


From there, I began prepping the tank for the install on the rear trunk shelf. I had hoped to mount all of this stuff in the rear tire spare area, but sadly the tank was too large to fit in there. The tank mounting holes are to wide for the rear shelf so an additional hole was drilled out.


Here is a look at how I installed my fittings. the top fitting gets plugged, the middle fitting on the side will go to the water catch can, and the second fitting is the secondary fill/drain line.


Here’s the other side of the tank. The middle hole gets plugged and the other open hole will be the compressor fill.


Here is a look at the mounting holes that were drilled in the rear shelf. There are two more that match on the passenger side.

27477936254_c3f0eee3a0_c.jpg


There is the prepped tank and mounting hardware ready to install.


The tank fully installed and the water catch can mounted.


Time to mount the compressor. I had hoped to follow the steps CJ pony parts had used, and put the compressor in the spare tire area, unfortunately the kit does not include the needed supplies to do this, so I followed LMR’s lead and mounted on the rear shelf. You can see the four holes that had to be drilled. I did have to remove the rear fender liner to fasten the hardware, and to also make sure I didn’t drill into the fuel filler neck.

27477935894_efa154fc97_c.jpg


To keep cabin noise down, I did dynamat that area.


Here is the compressor mounted and ready to be wired up.


Next, I moved on to installing the distribution block and ran the harness. I tried to keep everything as hidden as possible. You can also see the compressor line coming though a hole I made in the trunk liner carpet.


I then moved on to the front install. Here I followed CJ Pony parts install and ran the airlines through the cabin under the trim and through the front wire grommet on the firewall. The line then runs behind the fender liner.


Here is a close up look at the strut and a comparison with the stock strut and the prokit spring.

27477935414_dacf8673e2_c.jpg


The kit also includes new front sway bar end links.


Here’s a look at the front strut in place.

27477935494_9121e46b8d_c.jpg


Now on to the back.

27477935334_28a905dd52_c.jpg


And the rear installed. Sorry not really any great angles for photos here.


After that it’s really about buttoning everything back up. I still have a few things to clean up. I need to run that secondary fill line up and behind the trunk liner. I also need to come up with a good location for the controller.

27477934934_fe04324e0d_c.jpg


Sorry I didn’t take and pictures of the wiring. I followed LMR’s lead with the electrical. They outline everything pretty well.
Here is a direct link to that portion of the video.


Overall, the kit is very well made and the install was pretty straight forward. I would say if you have done a spring swap you’d have no problem with this. That being said, it did take me about 14 hours total to install start to finish. It was hella hot and I took tons of breaks so that didn’t help the time. So far I very impressed with the kit. I actually set my ride height at the same as I was with my prokit setup. But I also set a secondary preset for around the stock height to deal with those speed bumps and steep driveways. But best of all is the completely dumped setting.


27477732843_d4f8f3847f_c.jpg


27477935124_a218d1b700_c.jpg
 
Last edited:

OZDAZ5.0

GT-Superpower
Joined
Jul 26, 2015
Threads
25
Messages
1,419
Reaction score
894
Location
Perth Australia
First Name
Darryn
Vehicle(s)
2017 GT Mustang
:headbang::cheers:D
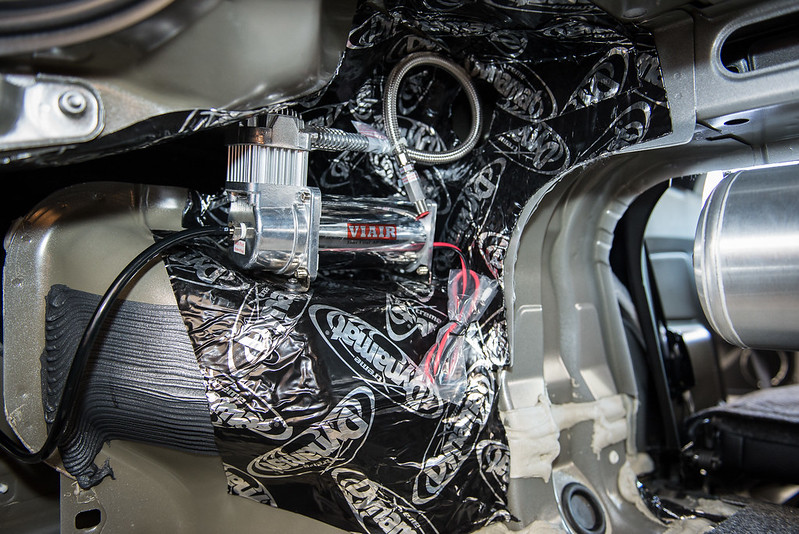
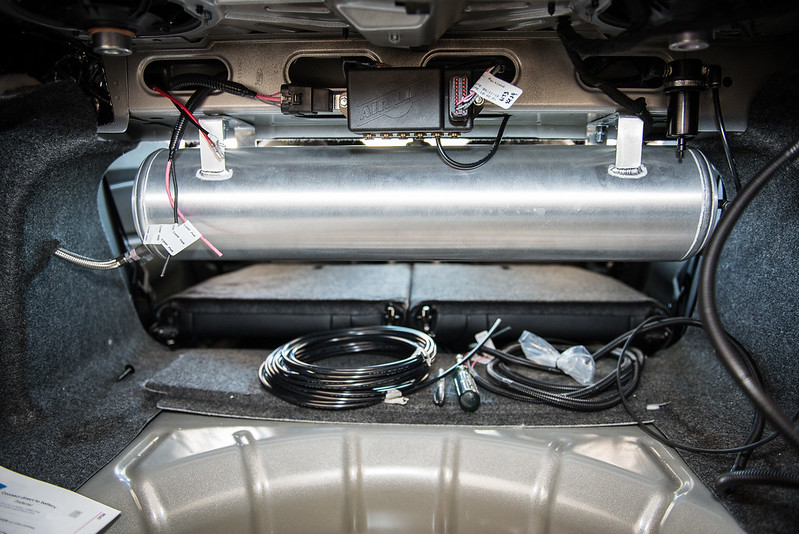
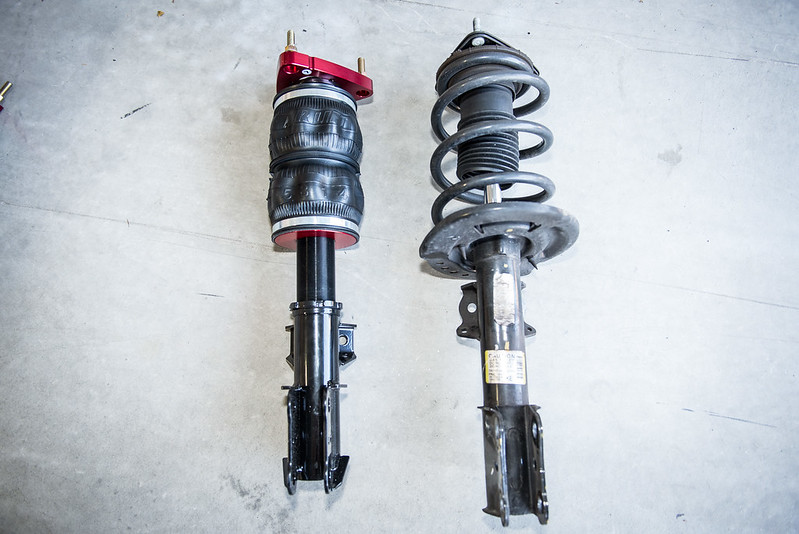
ead Sexy........dammnnnnnn.
 

Sponsored

Todd15Fastback

Well-Known Member
Joined
Dec 10, 2013
Threads
80
Messages
10,527
Reaction score
3,875
Location
Atlanta, GA
First Name
Todd
Vehicle(s)
2015 Mustang GT PP Fastback
Damn Nathan! Had no idea you went with bags. Been too busy to keep up with the chat lately :(.

Great job on the install. Car looks sooooo good. Very impressed :)


Top