JohnVallo
1 5 4 8 3 7 2 6
- Joined
- Feb 9, 2015
- Threads
- 49
- Messages
- 382
- Reaction score
- 632
- Location
- Venice, FL
- Website
- racersreunion.com
- First Name
- John
- Vehicle(s)
- '16 GT350, Shadow Black, Whipple Supercharged
- Thread starter
- #1
In 2015 Ford Introduced a newly designed 8.8” Rear-End they called the “Super 8.8”
It replaced the older 8.8” rear that had been in production for some 25 years, and parts from these two do not interchange.
The newer “Super 8.8” comes in 2 flavors
1. A solid axle model designed for the 2015+ F-150 light duty pickup.
2. An Independent Rear Suspension (IRS) model designed for the 2015 + S550 Mustangs.
A Little History:
This new design change possibly all began with the Pinion Bearings.
The beefier front/outer & rear/inner pinion bearings in the Super 8.8 were carried over from the previous 9.75” Ford rear-end.
The pinion bearings, crush sleeve, pinion seal, and pinion nut all came from the earlier 9.75” model (i.e. 2012 Ford Expedition, Lincoln Navigator).
A newly designed ring and pinion was also introduced for the Super 8.8, along with new 34 spline axles/differentials.
The new OEM Super 8.8 Rear-Ends are built at Fords Sterling Axle Plant, Sterling Heights, MI
Compatibility:
The F-150 pickup model and the Mustang model share the following compatibility:
Most all internal parts inside the carriers do interchange, -Except the differential itself-
The F-150 uses c-clips holding the axles in the diff, which is different than the Mustang IRS diff. which uses a spring snap-in design for the (half-shaft) axle clips.
*While using vastly different rear covers, the 12-bolt pattern for the (rear cover to housing) is exactly the same on both.*
The S550 Super 8.8
Housings/Carriers:
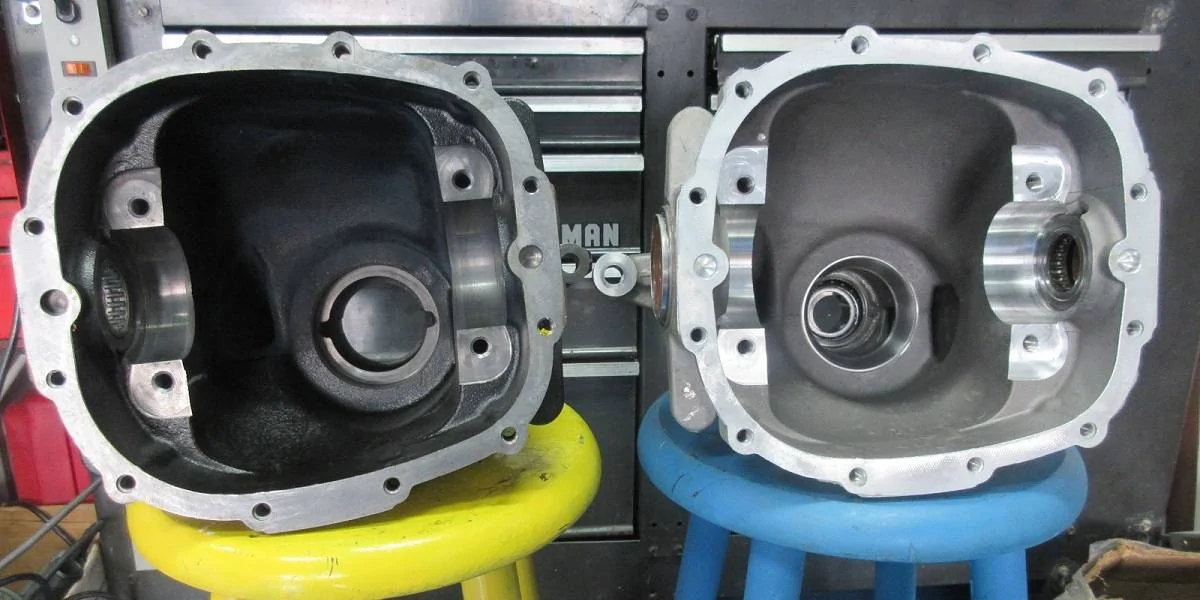
The Super 8.8 in the Mustang came with two different housings, Aluminum and Iron. Originally, the Aluminum housings were placed in the Automatic Transmission cars, while the Iron housings were used in the Manual Transmission cars.
The bare Iron housing on the Left is about 20 lbs. heavier than the Aluminum bare housing on the right
This Iron housing is going to receive all new bearings

Differentials:
The Ford Traction-Lok differential would be standard on the S550 cars with the Torsen as a specific option.
Only with the Iron housing you could get a Torsen differential (with the 3.73 axle ratio). Starting in 2018 Ford also made the Torsen available (with the 3.55 axle ratio). The Torsen T2R differential isn’t manufactured by Ford, it is a registered trademark and made by a company named ‘JTEKT’. And by-the-way, the KOYO bearings in the OEM Super 8.8, they are also made by ‘JTEKT’.
The Torsen (Differential) on the Left is quite a bit beefier than the Traction-Loc (Differential on the Right. The Differentials themselves weigh-in at: Torsen=26 lbs, Traction-Loc=18 lbs.

Here is a T2R Torsen Differential taken apart. I have had several of these apart and every time upon inspection they still look like new.
Every Torsen Differential also has a unique Identifying Serial Number stamped into its housing
Gear Ratios:
Factory OEM gear ratios for the S550 consisted of: 3.15, 3.31, 3.55, 3.73.
The 3.15 gear ratio used a different differential. (The flange offset for the ring gear was different to accommodate the larger pinion head diameter of the 3.15). The 3.31 and-up ratios are all interchangeable with their differentials.
US Gear also makes (For Ford) a 3.73, 3.90, and a 4.09 ratio. Other aftermarket gear ratios available are: 4.11, 4.56, and 4.88
The Differential on the Left is a 3.15 Axle Ratio (Ring and Pinion), Notice the difference in position between it and the Differential on the Right (4.11 Axle Ratio)
The ring gear bolts and the diff flange are closer to the left housing cap on the 3.15

US Gear also sells a Polished Version of their Ring and Pinion Sets (Using an ISF process to obtain a mirror-like finish on the surface)
Here is a 4.11 Lightning Series Ring and Pinion from US Gear

For a Ford Parts List/Breakdown see the attached "Super 8.8 parts" .pdf file attached
(at the end of this post)
Ford Performance: M-4851-M8A pinion flange kit.
This kit was provided to allow a conversion to a 110mm (Measured from Inside land to opposite inside land), from a 113mm diameter Pinion Flange. The 113mm Flanges were used on 2015-2017 Mustang Manual Transmission models, and the 110mm Flanges fit all 2015-Up Automatic transmission models as well as all Shelby GT350 >500 models.
In 2018 Ford changed all models to use the 110mm Flanges.

For those who are just wanting to use the kit above to replace the Pinion Flange,
I'd like to make a couple of comments concerning my experience with the Collapsible Spacer (Crush Sleeve):
The crush sleeve on the Super 8.8 cannot be removed/replaced from the front.
What I mean by that is, if you remove the pinion flange, pinion seal, oil slinger, and front bearing cone, the crush sleeve will not clear the front pinion bearing cup and come out from the front.
In order to use a new crush sleeve you will need to remove the rear cover, remove the differential, and remove the pinion shaft from the housing (from the rear), to get the crush sleeve off the pinion shaft.
A little more about the Collapsible Spacer (Crush Sleeve)
The best Crush Sleeve, Racers say is -NO Crush Sleeve: (i.e. Solid Spacer), The reason the OEM's use a Crush Sleeve is to save assembly time, and cost. You can complete the final assembly the first time with a Crush Sleeve. But with a Solid Spacer w/Shims, its more expensive to manufacture, and it usually takes a couple of dis-assemblies to get the correct preload set. But once set, excessive pinion nut torque is really irrelevant.
In my opinion if I'm not frequently racing, the crush sleeve is preferred. Can it get crushed more from excessive launching? Some say yes, I've not seen it. The Main reasons the racers say the Solid Spacer is better for them is, if they break a part (Yoke or Flange), or have to replace a seal quickly, the solid spacer saves time because everything was previously set up and all they have to do is tighten the pinion nut.
I think I've seen & heard all the used Crush Sleeve tricks/secrets around, like (A) using shims with the old one, or (B) under torquing the used one so it doesn't crush any more, or (C) counting threads on the pinion and getting the replaced pinion nut in the same exact position as it was when it was dis-assembled, or (D) pounding or pressing the bulge on the spacer (to make it longer or back to original length. Bottom line is: -If possible- It's best just to use a new Collapsible Spacer.
If you are re-using the old Crush Sleeve on a repair (i.e. -Pinion seal replacement-) here is some advice from experience.
1. Get a feel for the pinion preload, before dis-assembly. Turn the pinion flange by hand several times, to get a feel on how much preload is currently on the pinion bearings. Another better method -if you have the tool-, is to use an inch-pound beam-type torque wrench to actually measure the pinion break-away torque as well as pinion running torque. Myself, I use BOTH methods.
The point here is you want the same exact preload when you are finished, as when you started. If you accomplish this by using your own methods, or (A) - (D) above, you should be good. And also remember: It's best to always use a new Pinion Nut. The new pinion nuts come with thread-sealer applied as well as a Teflon coating on the flange contact side of the nut. Using an old pinion nut may cause galling problems when trying to collapse the Crush Sleeve, as well as leaks from missing thread sealer.
A Deeper Dive:
When removing the Pinion Flange from the S550 you will most certainly need a puller, especially on the 2018 and up Flanges (They fit really tight)
I use this puller set which is widely available (Speed Shops, Internet, Parts outlets)
When removing the Pinion Flange, Never hammer on the Flange.
Also be careful not to drop the Housing or Flange, or you could have a situation like this.
One of the first things I do after removing the Rear Cover is mark the Housing Caps (Left & Right)
The Aluminum Housing Caps are already marked, but on the Iron Housing Caps they are not.
I always use Number Stamps to mark the Caps
When disassembling the S550 carrier I always use a 0-1" micrometer to measure and then mark the Pinion and Differential Shims.
One of the best investments I made recently is a Bench-Top 10 ton hydraulic press
This is a JEGS Model: 81636 (Under 200.00). It works really well for this kind of work.
Here I am pressing off the inner pinion bearing

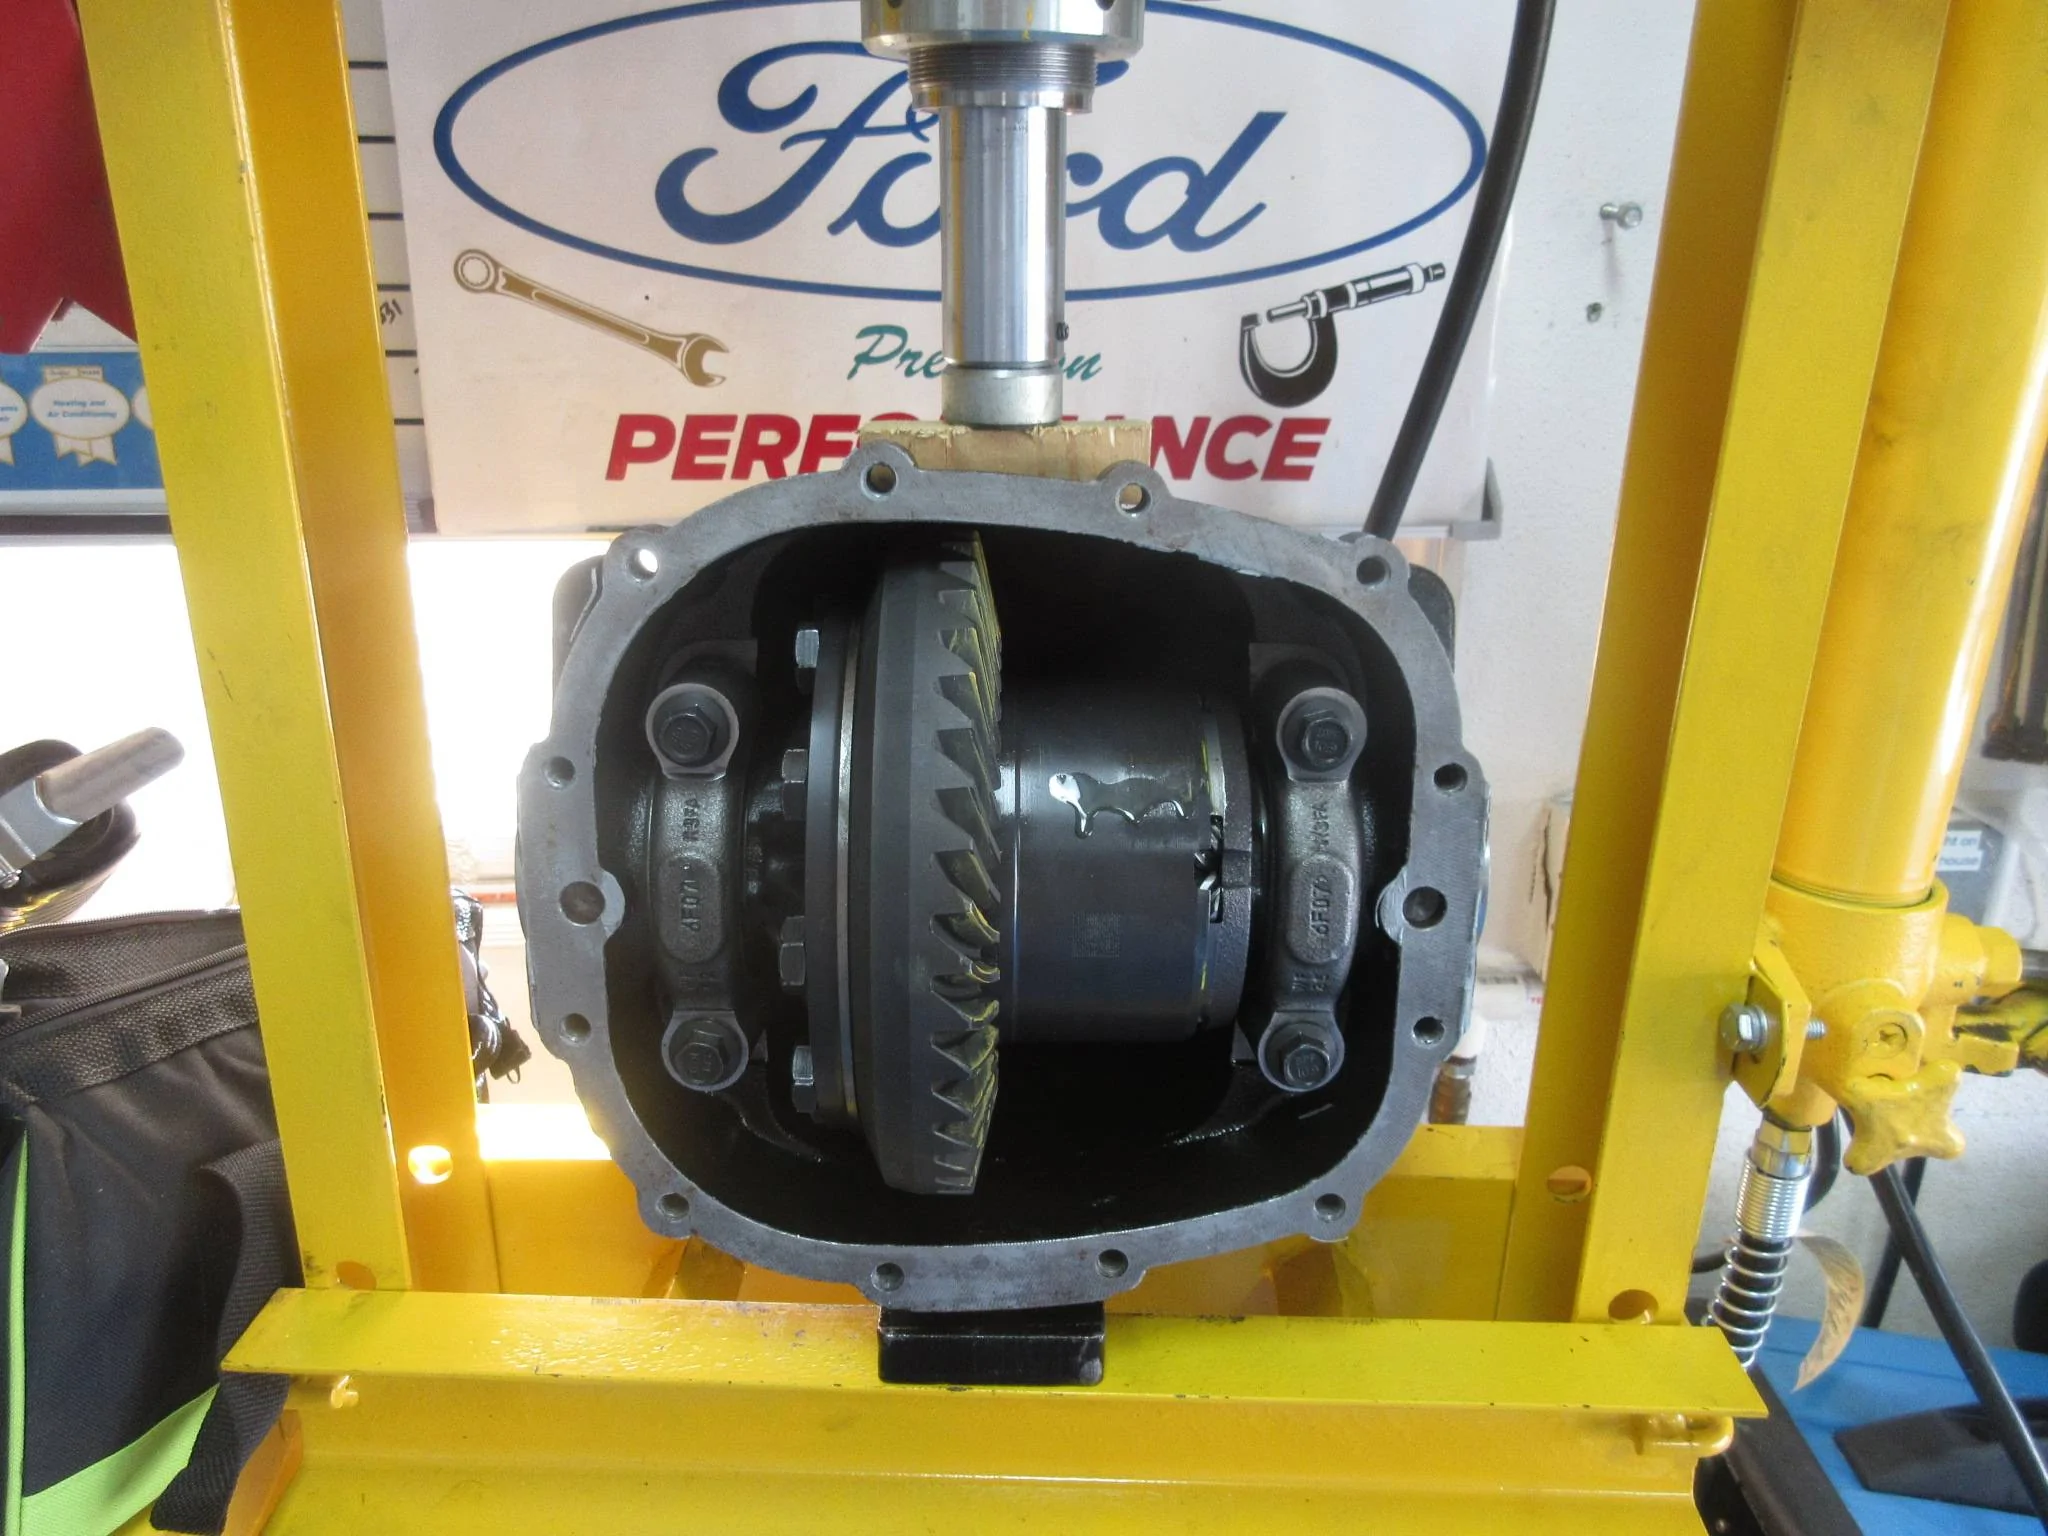
Spreading the Case for Differential Removal
According to the Ford Shop Manual, Ford uses a slightly different method of spreading this case, than what I've seen in the past. (See big C-Clamp picture below)
I have used 2 large pry bars without spreading the case. Prying one from top and one from bottom against the heads of the ring gear bolts, tricky to get diff out, but do-able.

With a shop press, it makes spreading the case even easier.

The Carrier/Housing, Pinion Bearing Cups/Races should always be replaced as a set when replacing the Pinion Bearing Cones/Rollers. (Why ?) I've heard horror stories of replacing a pinion cone & roller with an aftermarket one, (Non Ford), and not also replacing the cup with the same manufacturer. (What happened ?) This presented a mis-match in design of the aftermarket bearing & OEM Ford cup, and it didn't turn out well.
The Cups are pressed in the housing, but can be easily removed with a long drift punch and hammer.
To make the installation of the new cups easier I fabricated my own cup drivers from old pinion bearing cups and 1/2" drive sockets. Some buy/Use the Cup Driver Sets which also work well.
Differential Bearing Removal:
The removal of the differential side bearings can be rather difficult at times
Here are two methods of removing the side bearing Cones/Rollers
If these two methods don't work, you can PM me on a fail-proof third method to remove them

Differential Bearing Installation:
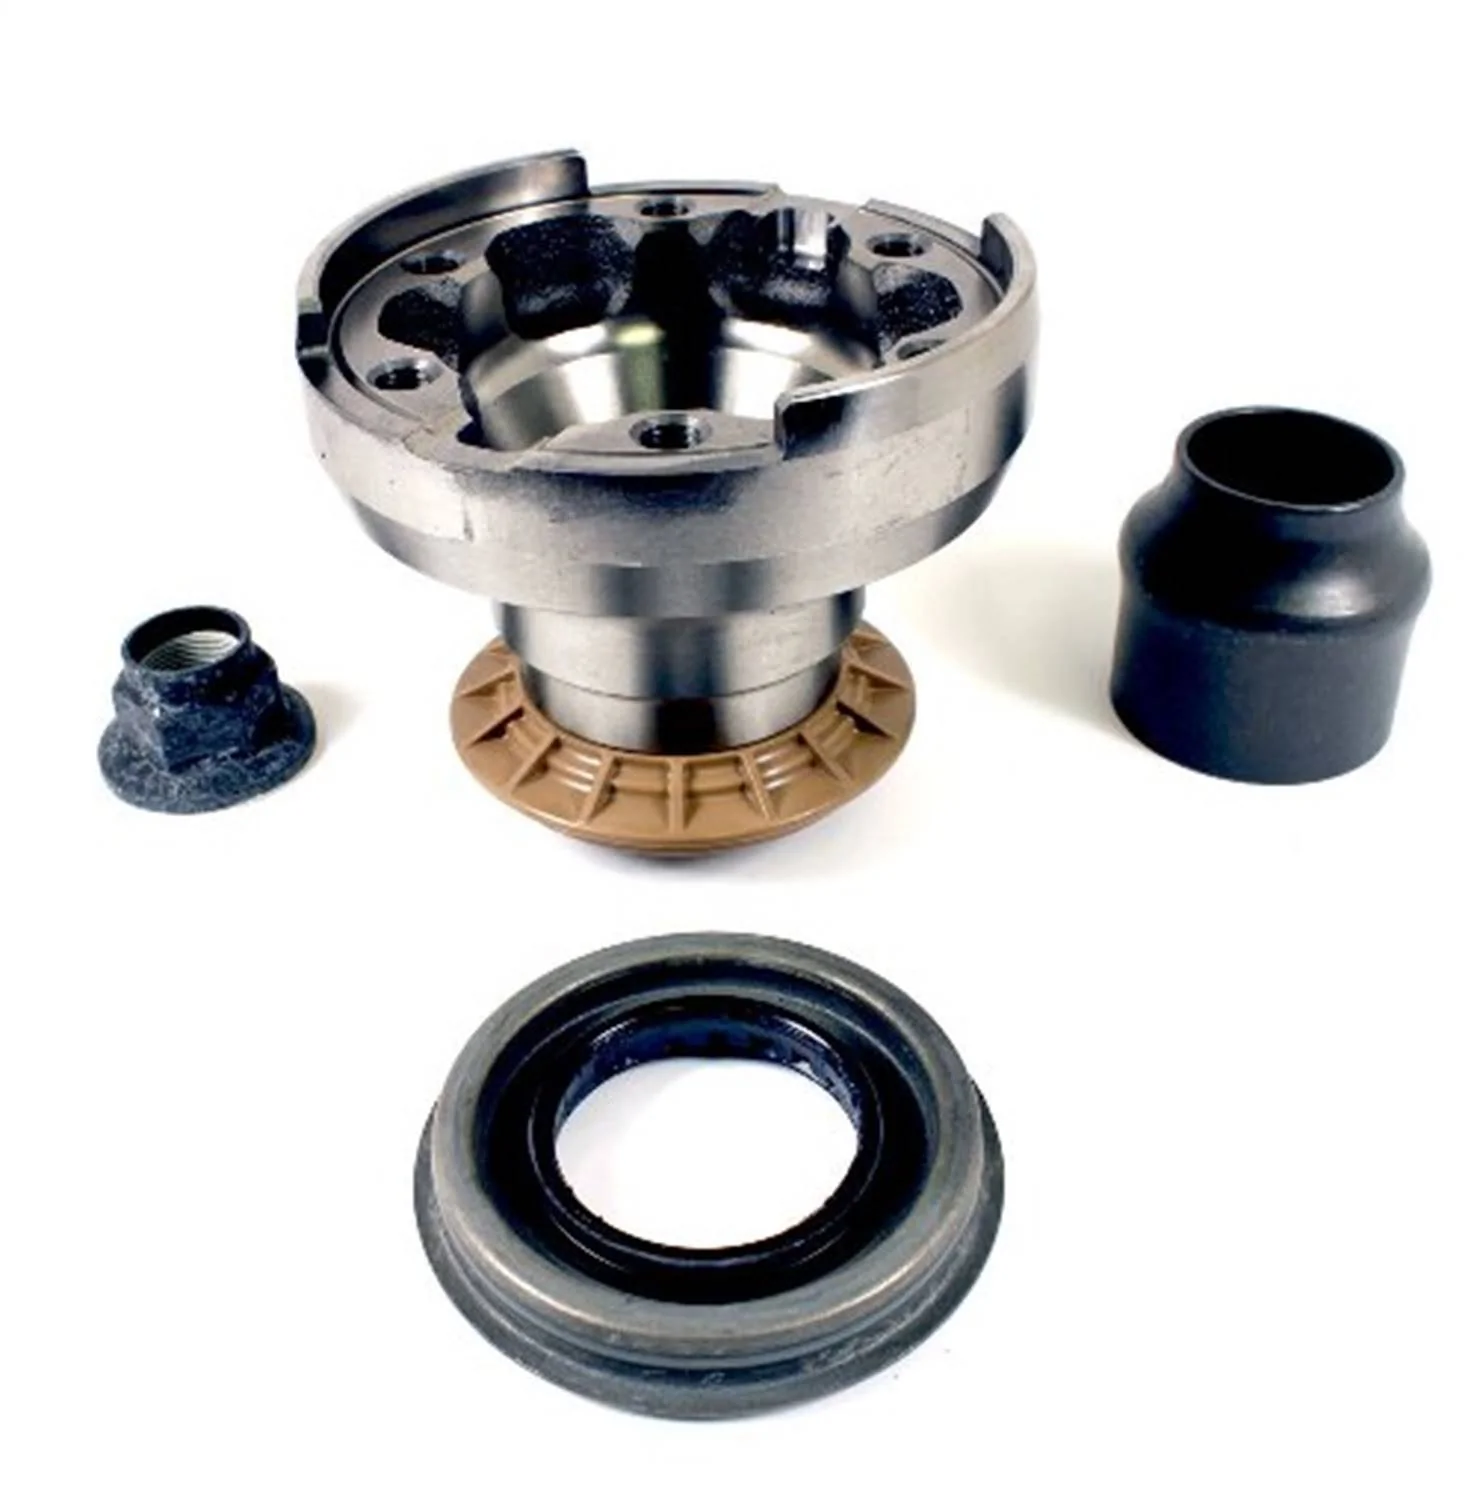
Axle Bearings and Seals:
Axle bearings and seals are easily replaced while the carrier is out of the car.
I always measure the old bearing depth before removing it so I can install the new bearing in exactly the same depth. (Every one I have measured has been 5/8" or 16mm deep)
I use an old Differential Bearing Cup to seat the new Axle Seal, It is a perfect fit and doesn't bend the raised flange of the axle seal.
Painting the Iron Housing:
I definitely believe in painting the Iron housings, black seems to be the best color
GT350's and the PP GT's come painted from the factory.
Without a doubt, the best paint for the housings is the POR 15 caliper paint
Gear Oil and Wear:
If you ask 10 car enthusiasts' what Gear Oil they prefer, you'll probably get 5 or 6 different answers.
Nothing wrong with the Motorcraft Full Synthetic. My favorite is the BG Ultra Guard LS.
They offer it in 75W 90 (PN 751), and 75W 140 (PN 753)
Here in Florida the temperatures' usually range between 60 and 90 degrees, so the 75W 140 works well for me.
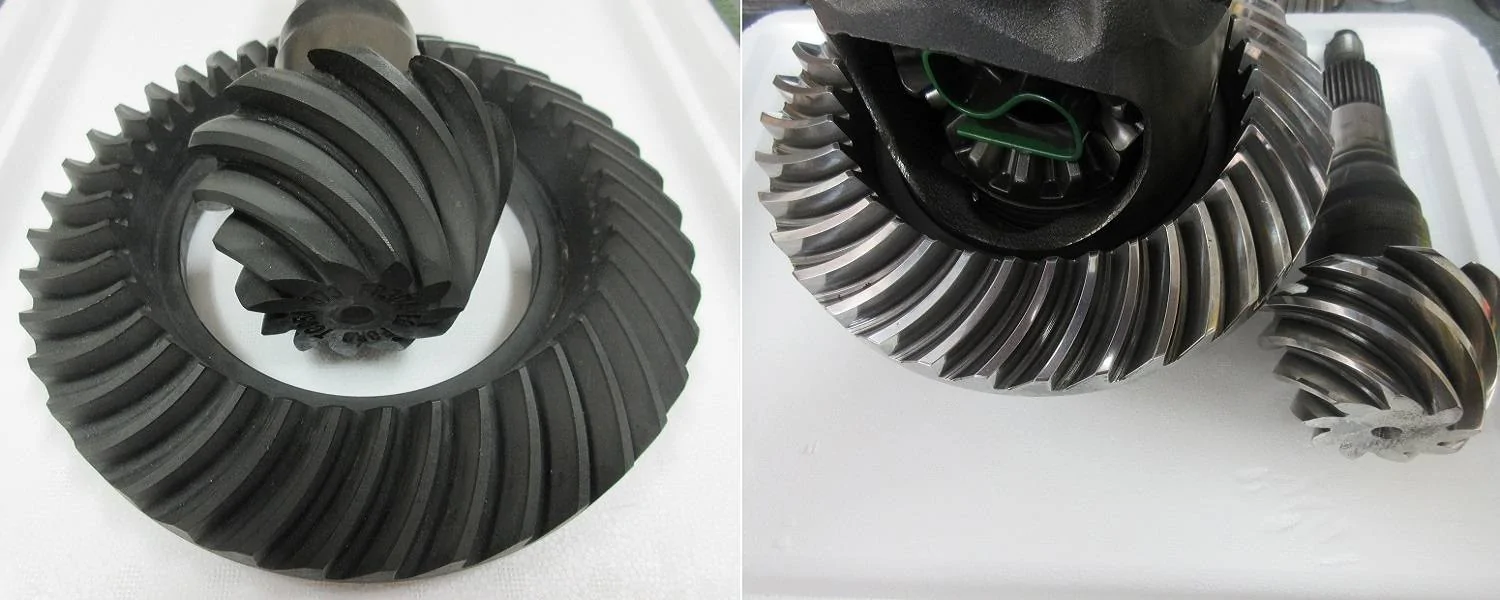
The Ring and Pinion on the Left is a New Ford 3.73 gearset. Notice the Black Oxide finish on the factory OEM Gears.
This black finish wears off slowly upon break-in and leaves a nasty black residue in the gear oil.
That's why I recommend you change your differential gear oil at 5-10k miles, although Ford doesn't see this as causing any problem at all.
Vibration Concerns:
The 2015-2017 S550's used a unique balancing scheme for the Pinion Flange and Driveshaft.
The big yellow paint marks on each needed to be lined up for the best balance.
In 2018 Ford released a new and improved Pinion Flange that was more Zero-Balanced.
I like to mark the Driveshaft and all 6 holes on the Pinion Flange with number stamps.
In case I have a vibration problem I can use the numbers to clock the driveshaft in its best non-vibrating position.
Pictured here is a QA1 Carbon Fiber Driveshaft with the 2018-up Pinion Flange.

After torquing the Carrier cap bolts, I use gear marking compound to ensure I have a good contact pattern for the Ring and Pinion. About all you can buy nowadays is the Yellow marking compound. Once-upon-a-time FoMoCo provided a little lead tube filled with White gear marking compound, with every Ring and Pinion gearset. It contained Titanium Dioxide. After Ford quit supplying the White marking compound, I learned how to make my own white compound using powdered Titanium Dioxide and gear-oil mixed together to get a creamy paste-like consistency. (The White is still the Gear Marking Compound I prefer)

Here is the Rebuilt Carrier Assembly (3.73 w/Torsen) ready to go in.
It has the New Finned Aluminum Rear Cover designed by:
"Ish" owner of the FluiX (Fluid Dynamic Experimentation and Technology) Company in Germany.
I will be testing this rear cover, and recording temperature comparisons with temps taken from a stock OEM cover
References:
Early information announcement links for the Super 8.8:
https://www.fordmuscle.com/tech-sto...ance-super-8-8-inch-ring-and-pinion-for-s550/
https://www.turnology.com/tech-stor...end-build-and-upgrades-with-ford-performance/
2020 Ford Performance Catalog:
https://performanceparts.ford.com/download/PDFS/2020FPPcatalog.pdf
2015 Mustang Rear end Build:
https://www.fordmuscle.com/project-...tang-rearend-build-upgrades-ford-performance/
Discussion on OEM Rear Covers:
https://www.mustang6g.com/forums/threads/rear-diff-cover.146310/page-2#post-3045265
Torsen Info:
https://en.wikipedia.org/wiki/Torsen#:~:text=Torsen Torque-Sensing (full name,manufactured by the Gleason Corporation
My First Gear Change (3.73 to 4.11):
https://www.mustang6g.com/forums/threads/gear-change-from-3-73-rear-gear-to-4-11-in-my-gt350.96590/
My Second Gear Change (4.11 to 4.56):
https://www.mustang6g.com/forums/threads/gear-change-from-4-11-rear-gear-to-4-56-in-my-gt350.104766/
Additional cooling and fluid capacity solution for the S550 Mustang ‘Super 8.8’ rear end:
https://www.mustang6g.com/forums/threads/additional-cooling-and-fluid-capacity-solution-for-the-s550-mustang-‘super-8-8’-rear-end.117720/
The Black Oxide Finishing Process:
https://gearsolutions.com/features/black-oxide-finishing-for-gears/
View attachment Super 88 IRS Rear Parts Info.xls
It replaced the older 8.8” rear that had been in production for some 25 years, and parts from these two do not interchange.
The newer “Super 8.8” comes in 2 flavors
1. A solid axle model designed for the 2015+ F-150 light duty pickup.
2. An Independent Rear Suspension (IRS) model designed for the 2015 + S550 Mustangs.
A Little History:
This new design change possibly all began with the Pinion Bearings.
The beefier front/outer & rear/inner pinion bearings in the Super 8.8 were carried over from the previous 9.75” Ford rear-end.
The pinion bearings, crush sleeve, pinion seal, and pinion nut all came from the earlier 9.75” model (i.e. 2012 Ford Expedition, Lincoln Navigator).
A newly designed ring and pinion was also introduced for the Super 8.8, along with new 34 spline axles/differentials.
The new OEM Super 8.8 Rear-Ends are built at Fords Sterling Axle Plant, Sterling Heights, MI
Compatibility:
The F-150 pickup model and the Mustang model share the following compatibility:
Most all internal parts inside the carriers do interchange, -Except the differential itself-
The F-150 uses c-clips holding the axles in the diff, which is different than the Mustang IRS diff. which uses a spring snap-in design for the (half-shaft) axle clips.
*While using vastly different rear covers, the 12-bolt pattern for the (rear cover to housing) is exactly the same on both.*
The S550 Super 8.8
Housings/Carriers:
The Super 8.8 in the Mustang came with two different housings, Aluminum and Iron. Originally, the Aluminum housings were placed in the Automatic Transmission cars, while the Iron housings were used in the Manual Transmission cars.
The bare Iron housing on the Left is about 20 lbs. heavier than the Aluminum bare housing on the right
This Iron housing is going to receive all new bearings
Differentials:
The Ford Traction-Lok differential would be standard on the S550 cars with the Torsen as a specific option.
Only with the Iron housing you could get a Torsen differential (with the 3.73 axle ratio). Starting in 2018 Ford also made the Torsen available (with the 3.55 axle ratio). The Torsen T2R differential isn’t manufactured by Ford, it is a registered trademark and made by a company named ‘JTEKT’. And by-the-way, the KOYO bearings in the OEM Super 8.8, they are also made by ‘JTEKT’.
The Torsen (Differential) on the Left is quite a bit beefier than the Traction-Loc (Differential on the Right. The Differentials themselves weigh-in at: Torsen=26 lbs, Traction-Loc=18 lbs.

Here is a T2R Torsen Differential taken apart. I have had several of these apart and every time upon inspection they still look like new.
Every Torsen Differential also has a unique Identifying Serial Number stamped into its housing

Gear Ratios:
Factory OEM gear ratios for the S550 consisted of: 3.15, 3.31, 3.55, 3.73.
The 3.15 gear ratio used a different differential. (The flange offset for the ring gear was different to accommodate the larger pinion head diameter of the 3.15). The 3.31 and-up ratios are all interchangeable with their differentials.
US Gear also makes (For Ford) a 3.73, 3.90, and a 4.09 ratio. Other aftermarket gear ratios available are: 4.11, 4.56, and 4.88
The Differential on the Left is a 3.15 Axle Ratio (Ring and Pinion), Notice the difference in position between it and the Differential on the Right (4.11 Axle Ratio)
The ring gear bolts and the diff flange are closer to the left housing cap on the 3.15

US Gear also sells a Polished Version of their Ring and Pinion Sets (Using an ISF process to obtain a mirror-like finish on the surface)
Here is a 4.11 Lightning Series Ring and Pinion from US Gear

For a Ford Parts List/Breakdown see the attached "Super 8.8 parts" .pdf file attached
(at the end of this post)
Ford Performance: M-4851-M8A pinion flange kit.
This kit was provided to allow a conversion to a 110mm (Measured from Inside land to opposite inside land), from a 113mm diameter Pinion Flange. The 113mm Flanges were used on 2015-2017 Mustang Manual Transmission models, and the 110mm Flanges fit all 2015-Up Automatic transmission models as well as all Shelby GT350 >500 models.
In 2018 Ford changed all models to use the 110mm Flanges.
For those who are just wanting to use the kit above to replace the Pinion Flange,
I'd like to make a couple of comments concerning my experience with the Collapsible Spacer (Crush Sleeve):
The crush sleeve on the Super 8.8 cannot be removed/replaced from the front.
What I mean by that is, if you remove the pinion flange, pinion seal, oil slinger, and front bearing cone, the crush sleeve will not clear the front pinion bearing cup and come out from the front.
In order to use a new crush sleeve you will need to remove the rear cover, remove the differential, and remove the pinion shaft from the housing (from the rear), to get the crush sleeve off the pinion shaft.
A little more about the Collapsible Spacer (Crush Sleeve)
The best Crush Sleeve, Racers say is -NO Crush Sleeve: (i.e. Solid Spacer), The reason the OEM's use a Crush Sleeve is to save assembly time, and cost. You can complete the final assembly the first time with a Crush Sleeve. But with a Solid Spacer w/Shims, its more expensive to manufacture, and it usually takes a couple of dis-assemblies to get the correct preload set. But once set, excessive pinion nut torque is really irrelevant.
In my opinion if I'm not frequently racing, the crush sleeve is preferred. Can it get crushed more from excessive launching? Some say yes, I've not seen it. The Main reasons the racers say the Solid Spacer is better for them is, if they break a part (Yoke or Flange), or have to replace a seal quickly, the solid spacer saves time because everything was previously set up and all they have to do is tighten the pinion nut.
I think I've seen & heard all the used Crush Sleeve tricks/secrets around, like (A) using shims with the old one, or (B) under torquing the used one so it doesn't crush any more, or (C) counting threads on the pinion and getting the replaced pinion nut in the same exact position as it was when it was dis-assembled, or (D) pounding or pressing the bulge on the spacer (to make it longer or back to original length. Bottom line is: -If possible- It's best just to use a new Collapsible Spacer.
If you are re-using the old Crush Sleeve on a repair (i.e. -Pinion seal replacement-) here is some advice from experience.
1. Get a feel for the pinion preload, before dis-assembly. Turn the pinion flange by hand several times, to get a feel on how much preload is currently on the pinion bearings. Another better method -if you have the tool-, is to use an inch-pound beam-type torque wrench to actually measure the pinion break-away torque as well as pinion running torque. Myself, I use BOTH methods.
The point here is you want the same exact preload when you are finished, as when you started. If you accomplish this by using your own methods, or (A) - (D) above, you should be good. And also remember: It's best to always use a new Pinion Nut. The new pinion nuts come with thread-sealer applied as well as a Teflon coating on the flange contact side of the nut. Using an old pinion nut may cause galling problems when trying to collapse the Crush Sleeve, as well as leaks from missing thread sealer.
A Deeper Dive:
When removing the Pinion Flange from the S550 you will most certainly need a puller, especially on the 2018 and up Flanges (They fit really tight)
I use this puller set which is widely available (Speed Shops, Internet, Parts outlets)

When removing the Pinion Flange, Never hammer on the Flange.
Also be careful not to drop the Housing or Flange, or you could have a situation like this.

One of the first things I do after removing the Rear Cover is mark the Housing Caps (Left & Right)
The Aluminum Housing Caps are already marked, but on the Iron Housing Caps they are not.
I always use Number Stamps to mark the Caps

When disassembling the S550 carrier I always use a 0-1" micrometer to measure and then mark the Pinion and Differential Shims.

One of the best investments I made recently is a Bench-Top 10 ton hydraulic press
This is a JEGS Model: 81636 (Under 200.00). It works really well for this kind of work.
Here I am pressing off the inner pinion bearing

Spreading the Case for Differential Removal
According to the Ford Shop Manual, Ford uses a slightly different method of spreading this case, than what I've seen in the past. (See big C-Clamp picture below)
I have used 2 large pry bars without spreading the case. Prying one from top and one from bottom against the heads of the ring gear bolts, tricky to get diff out, but do-able.

With a shop press, it makes spreading the case even easier.
The Carrier/Housing, Pinion Bearing Cups/Races should always be replaced as a set when replacing the Pinion Bearing Cones/Rollers. (Why ?) I've heard horror stories of replacing a pinion cone & roller with an aftermarket one, (Non Ford), and not also replacing the cup with the same manufacturer. (What happened ?) This presented a mis-match in design of the aftermarket bearing & OEM Ford cup, and it didn't turn out well.
The Cups are pressed in the housing, but can be easily removed with a long drift punch and hammer.
To make the installation of the new cups easier I fabricated my own cup drivers from old pinion bearing cups and 1/2" drive sockets. Some buy/Use the Cup Driver Sets which also work well.


Differential Bearing Removal:
The removal of the differential side bearings can be rather difficult at times
Here are two methods of removing the side bearing Cones/Rollers
If these two methods don't work, you can PM me on a fail-proof third method to remove them

Differential Bearing Installation:

Axle Bearings and Seals:
Axle bearings and seals are easily replaced while the carrier is out of the car.
I always measure the old bearing depth before removing it so I can install the new bearing in exactly the same depth. (Every one I have measured has been 5/8" or 16mm deep)

I use an old Differential Bearing Cup to seat the new Axle Seal, It is a perfect fit and doesn't bend the raised flange of the axle seal.

Painting the Iron Housing:
I definitely believe in painting the Iron housings, black seems to be the best color
GT350's and the PP GT's come painted from the factory.
Without a doubt, the best paint for the housings is the POR 15 caliper paint

Gear Oil and Wear:
If you ask 10 car enthusiasts' what Gear Oil they prefer, you'll probably get 5 or 6 different answers.
Nothing wrong with the Motorcraft Full Synthetic. My favorite is the BG Ultra Guard LS.
They offer it in 75W 90 (PN 751), and 75W 140 (PN 753)
Here in Florida the temperatures' usually range between 60 and 90 degrees, so the 75W 140 works well for me.
The Ring and Pinion on the Left is a New Ford 3.73 gearset. Notice the Black Oxide finish on the factory OEM Gears.
This black finish wears off slowly upon break-in and leaves a nasty black residue in the gear oil.
That's why I recommend you change your differential gear oil at 5-10k miles, although Ford doesn't see this as causing any problem at all.
Vibration Concerns:
The 2015-2017 S550's used a unique balancing scheme for the Pinion Flange and Driveshaft.
The big yellow paint marks on each needed to be lined up for the best balance.
In 2018 Ford released a new and improved Pinion Flange that was more Zero-Balanced.
I like to mark the Driveshaft and all 6 holes on the Pinion Flange with number stamps.
In case I have a vibration problem I can use the numbers to clock the driveshaft in its best non-vibrating position.
Pictured here is a QA1 Carbon Fiber Driveshaft with the 2018-up Pinion Flange.

After torquing the Carrier cap bolts, I use gear marking compound to ensure I have a good contact pattern for the Ring and Pinion. About all you can buy nowadays is the Yellow marking compound. Once-upon-a-time FoMoCo provided a little lead tube filled with White gear marking compound, with every Ring and Pinion gearset. It contained Titanium Dioxide. After Ford quit supplying the White marking compound, I learned how to make my own white compound using powdered Titanium Dioxide and gear-oil mixed together to get a creamy paste-like consistency. (The White is still the Gear Marking Compound I prefer)


Here is the Rebuilt Carrier Assembly (3.73 w/Torsen) ready to go in.
It has the New Finned Aluminum Rear Cover designed by:
"Ish" owner of the FluiX (Fluid Dynamic Experimentation and Technology) Company in Germany.
I will be testing this rear cover, and recording temperature comparisons with temps taken from a stock OEM cover

References:
Early information announcement links for the Super 8.8:
https://www.fordmuscle.com/tech-sto...ance-super-8-8-inch-ring-and-pinion-for-s550/
https://www.turnology.com/tech-stor...end-build-and-upgrades-with-ford-performance/
2020 Ford Performance Catalog:
https://performanceparts.ford.com/download/PDFS/2020FPPcatalog.pdf
2015 Mustang Rear end Build:
https://www.fordmuscle.com/project-...tang-rearend-build-upgrades-ford-performance/
Discussion on OEM Rear Covers:
https://www.mustang6g.com/forums/threads/rear-diff-cover.146310/page-2#post-3045265
Torsen Info:
https://en.wikipedia.org/wiki/Torsen#:~:text=Torsen Torque-Sensing (full name,manufactured by the Gleason Corporation
My First Gear Change (3.73 to 4.11):
https://www.mustang6g.com/forums/threads/gear-change-from-3-73-rear-gear-to-4-11-in-my-gt350.96590/
My Second Gear Change (4.11 to 4.56):
https://www.mustang6g.com/forums/threads/gear-change-from-4-11-rear-gear-to-4-56-in-my-gt350.104766/
Additional cooling and fluid capacity solution for the S550 Mustang ‘Super 8.8’ rear end:
https://www.mustang6g.com/forums/threads/additional-cooling-and-fluid-capacity-solution-for-the-s550-mustang-‘super-8-8’-rear-end.117720/
The Black Oxide Finishing Process:
https://gearsolutions.com/features/black-oxide-finishing-for-gears/
View attachment Super 88 IRS Rear Parts Info.xls
Sponsored
Last edited:


