Spikertg
Active Member
- Joined
- Jul 29, 2021
- Threads
- 4
- Messages
- 29
- Reaction score
- 41
- Location
- stillwater OK
- First Name
- Tyler
- Vehicle(s)
- 2018 Mustang GT
- Thread starter
- #1

After having this on the car for a few months I thought I would post on the forums what all you need to know and buy To run the new Holleys. Made a YouTube video if your a visual learner-
Parts-
Holley $800
(there are several versions low and High) make sure you get the right one if your not prepared to cut your hood and buy drop mounts or run a cowl and buy a throttle body don’t buy the high like me
VMP twin jet 69mm throttle body $850
(only required for ultra Hi ram)
Also make sure you get one for your correct year if you buy the wrong one and get an adapter lots of people have had problems on cobra jet cars
Juggernaut performance Fuel line kit~$200
Need this for using the billet fuel rails that come with the Holley, make sure if you have an 18+ you order the correct kit for the DI pump
Intake-$?
I had a Pmas already on the car so I just ordered the cobra jet elbow off their website for $75 but most cobra jet intakes will work
X2 3/8 npt fittings for vaccum ~$15 found them at Lowe’s
3/8 vaccum line-$20
Used to extend the brake booster line
Install:
-Disconnect all vaccum lines from the intake manifold and cold air
-remove cold air/MAF sensor
-disconnect the fuel line on drivers side and from DI pump on passenger side valve cover (will need a fuel line tool for DI pump)
-remove four bolts on factory fuel rail and remove with injectors
-remove clips to separate the injectors from the factory rail and place them on new rails. Make sure they are clocked so the plugs are the same way as they were and line the O-rings with some grease
-remove eight bolts holding down factory manifold and pull up and forward to unplug IMRC from the back of the manifold.
PAY ATTENTION HERE THIS IS WHAT THEY DONT TELL YOU!
-Drain some coolant out until you can take the upper heating hose without a mess

-After draining coolant remove the two bolts holding this coolant housing on and clean it
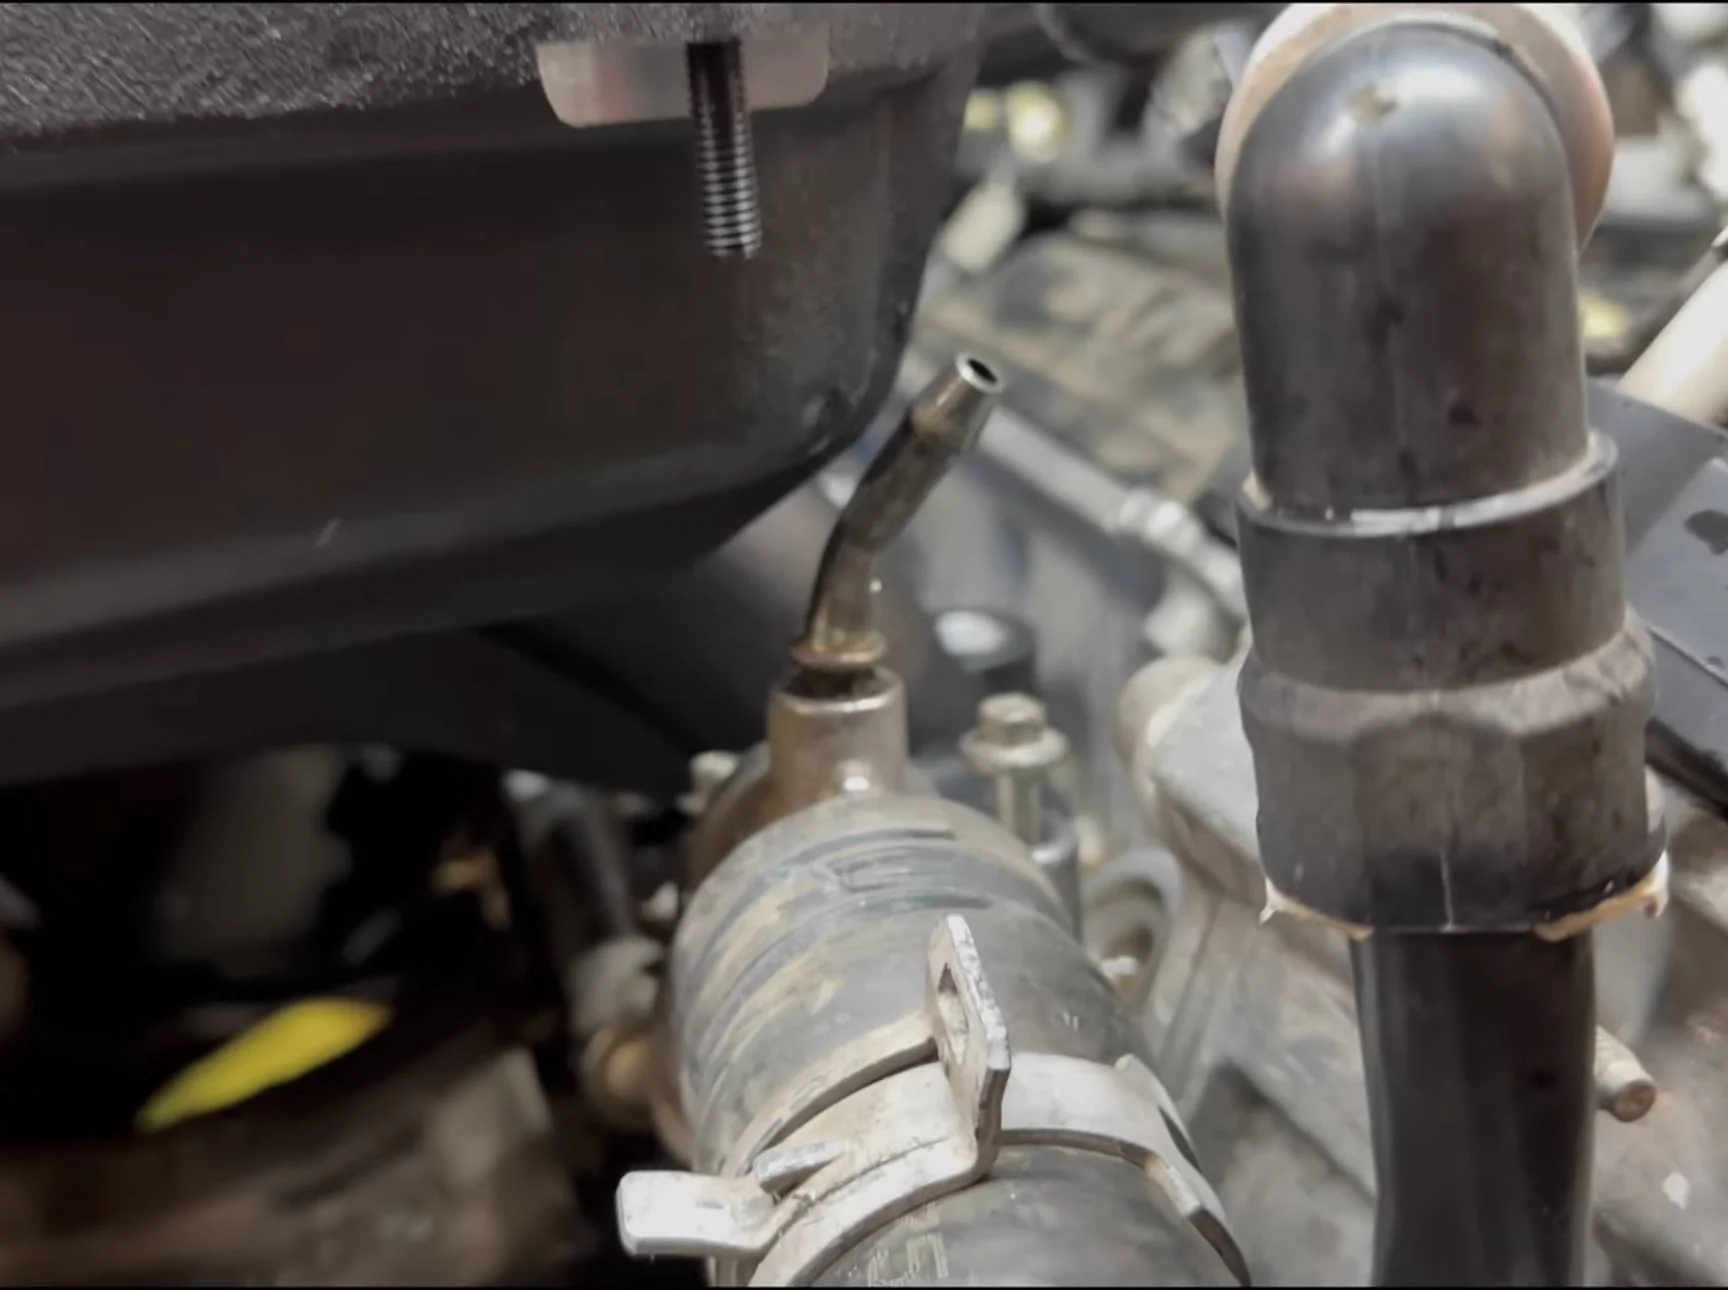
-You will need to Either bend this nipple as shown with a some heat and persuasion like me or order the Holley part for this and drill and tap the core. I decided to go for it and it hasn’t leaked on me so do what you wish.
-After this put it back on and get ready to realize how much heavier this cast manifold is I’d also recommend using some valve cleaner or any degreaser to clean up your intake ports on your heads if you can.
- take the studs provided in the Holley kit and thread them into your Heads were your stock manifold bolts went. Make sure they are in there I used two nuts from the kit on each one to snug them up but don’t go crazy you can strip your threads.
-Time to put the Holley together on the hi ram it comes with a long rubber strip you need to push it in the groove where the lid bolts on and cut it to length, there should be extra to put on the Throttle body mating surface so do that as well.
-after ensuring the rubber is in place succure the lid and throttle body in place using the provided hardware and follow the Holley torque sequence
-slap it on, lower the Holley on to the studs you put in and ensure that you aren’t pinching any wires or lines or wires (also might want to tape up your old imrc connections they are not used) then secure it with the nuts provided.
-now time for the fuel lines/rails First place the block off on the front of the passenger rail, the longer nipple for DI in the middle and one of the two 46 degree fittings on the back side of both rails, the shorter nipple goes in the middle port on the drivers side rail for your fuel pressure sensor and the 180 on the front port.
-The juggernaut kit comes with one AN line this needs to be cut, loosely place the fuel rails into place and cut theline so it can run from one side to the other Behind the Holley, the other portion of the AN line will go on the front fitting on the drivers-side rail to your factory fuel line using a provided adapter in the kit.
-once you have fuel lines connected move to vacuum I used to 3/8 npt fittings and ran my brake booster and evap lines on either side of the manifold. For simplicity I put breathers on my valve covers to eliminate making more vaccum lines or using a T
-next fit up your cold air and ensure your coolant reservoir is out of the way.
-top off coolant you drained (or spilled) earlier
-Before you start the car turn ignition on and CHECK FOR FUEL LEAKS! No one is perfect make sure all the AN fittings and adapters are leak free and make sure your injectors are seated before starting!
-flash your tune and enjoy, if you have a 18+ car make sure your tuner codes out the IMRC codes
- fitting stock hood on s550 (s197 boys are lucky) your going to have to follow the cobra jet method of BMR drop mounts and cutting the inner brace of the hood. You might be able to get away without the drop mounts but I didn’t want to scratch mine or cause any source of false knock.
Sponsored