Sponsored

Boosted and InterChillin'

OP
OP
SH!FT

SH!FT

Well-Known Member
Joined
Jan 1, 2022
Threads
12
Messages
537
Reaction score
478
Location
CT
First Name
Mike
Vehicle(s)
2020 GT premium 6MT VB
I finished installing the Jokerz PWR coolant brick, FI's Blower Spacer Plate kit, & Steeda Engine Mounts on the 3rd. Took the car to work on Friday.

Testing was interrupted by steering assist, drive mode, & advanced trac faults.

Immediate thoughts:
  • What else did the mouse chew through?
  • What module did I piss off by disconnecting the battery for a couple weeks?
  • What did I crush while shuffling and lowering the engine?

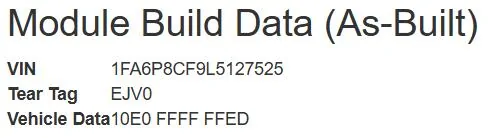
Luckily, the car went into save battery mode while running so I have a clear start point.
  • Inspected alternator and steering assembly (had my hands all over them during the motor mount install).
  • Output voltage from the alternator is 14+.
  • Battery is less than a year old and read 100% on the tester.
  • Battery quickly dropped below 12.5v.. Bingo!
I charged the battery. Reset the BMS and let it rest for 24 hrs. The issue still remains.
BMS reset - no tools required

I had the charger directly on the negative battery terminal. Apparently the BCM don't like that. My trickle charger connector is grounded to the body but max output is only 2 amps.

Video @ 8:20 - Ford BMS Battery Monitoring System: How it Works and How to Properly Charge Your Battery!

I'm charging it properly grounded tonight with a higher amperage charger. I'll try the options below if this isn't the fix.

BCM reset

Current sensor locations/unplug

Cars are pain 🤦‍♂️
Sponsored

 
Last edited:
OP
OP
SH!FT

SH!FT

Well-Known Member
Joined
Jan 1, 2022
Threads
12
Messages
537
Reaction score
478
Location
CT
First Name
Mike
Vehicle(s)
2020 GT premium 6MT VB
I'm an idiot.. Don't put plastic between grounding screws. This post saved me.

Had to move my aftermarket fuse during the motor mount install. I managed to perfectly center the ground prong in the oversized slot on the body when reinstalling it.

1744253394771-pa.jpg


Press fitting washers into the fuse cover fixed the faults.
1744253478267-gj.jpg


A properly grounded 20A charge overnight did fix the battery issue.
 
Last edited:
OP
OP
SH!FT

SH!FT

Well-Known Member
Joined
Jan 1, 2022
Threads
12
Messages
537
Reaction score
478
Location
CT
First Name
Mike
Vehicle(s)
2020 GT premium 6MT VB
RDT PCM flash using a new laptop:

I started a thread during my 1st RDT flash: #9
Most links still work.


I emailed Roush asking if a new PCM calibration was available since my last flash in 2023.
My email included the SC s/n, VIN, and previous voucher.
Received a new voucher code and family same day. The hotline share process was not required this time.
Found my tear tag here: https://www.motorcraftservice.com/AsBuilt
1744596777037-1r.jpg


New laptop should be good to go:

Installed and registered the Rosh Diagnostic Tool:
https://www.roushcleantech.com/pcm-programming-with-rdt/
https://rdt.roush.com/RoushRDT/

Reviewed DT-CALIM instructions: http://cdn.lrsstatic.com/downloads/instructions/Roush-Software-Installation.pdf
***EDIT*** Roush Updated their PCM FLASHING instructions. Starts on page 74 of:
https://www.roushperformance.com/cdn/shop/files/422090-422184_1318-6006IM-BE-Mustang_20230816.pdf?

I'm still using the VXDIAG VCX Nano J2534

Ford IDS/VCI/VX Manager download: https://www.vxdiagshop.com/info/vxdiag-diagnostic-software-download-4048.html
Downloaded VXDIAG Ford V130
1744598266784-zd.jpg


My new (company) laptop has CrowdStrike which blocks the VX Manager install.

My workaround is VirtualBox. This video is super easy to follow:
How to create a Windows 11 virtual machine on VirtualBox 7

Always save the VM state before closing.
1744600402535-me.jpg


Had to enable USB device.
1744601266960-55.jpg
 
Last edited:
OP
OP
SH!FT

SH!FT

Well-Known Member
Joined
Jan 1, 2022
Threads
12
Messages
537
Reaction score
478
Location
CT
First Name
Mike
Vehicle(s)
2020 GT premium 6MT VB
Monday morning was interesting. The IT department was very displeased and locked my network access as soon as my laptop connected. Attempting to install VX Manger 3 times throws 100's of security flags.. whoops!

1744856967844-sv.jpg


VirtualBox works great. The VXDIAG Ford V130 software remains completely isolated on the virtual machine. I did need to increase system resources to 8 processors and 16 GB for RDT to run smoothly. 8 and 8 probably would have been fine.
1744858757005-hi.jpg


Just completed the calibration:
The flash and End of Line Procedure takes me ~45 minutes. I keep a 2 amp battery tender connected.

No issues with this flash, but RDT doesn't seem to be a fan of Windows 11 Pro. "Validating Signature" always takes more than 2 minutes. Took ~5 mins this time. Progress bar never fully fills.
This calibration update feels better than the April 2023 rev. I'll see if Roush will share the changes made.
1744859368816-rf.jpg


End of Line Procedure is quicker if the engine is already at running temperature.

I finally figured out how to not result DTC's during the KOER test!
1744860183175-er.jpg

  • P170A: Must depress the clutch pedal a few times to avoid this code.
  • P1464: Turn off A/C during this test to avoid this code. (interchiller cabin solenoid must remain energized)
  • P1575: Don't touch the gas pedal during this test.
Updated the misfire correction profile. (Added stiffer/shorter motor mounts and replaced the knock sensor harness.)

Skipped ICM and IPC flash.

End of Line Sequence normally fails. 🤷‍♂️
 
Last edited:
OP
OP
SH!FT

SH!FT

Well-Known Member
Joined
Jan 1, 2022
Threads
12
Messages
537
Reaction score
478
Location
CT
First Name
Mike
Vehicle(s)
2020 GT premium 6MT VB
I posted install writeups for the Jokerz PWR coolant brick, FI's Blower Spacer Plate kit, & Steeda Engine Mounts. Also repairing the chewed knock sensors.

I'll continue sharing performance data on the cooling components here:
Installing the PWR (Jokerz) Intercooler Brick and FI Phenolic Spacer Kit on my Roush 2650 Gen3 Coyote
1747792199518-ci.jpg
1747792254801-ln.jpg
1747792152806-3p.jpg


Installed Steeda Motor Mounts - Install Write Up (post #5)
1747791990545-1d.jpg
1747792054969-f3.jpg


The red Steeda motor mount bushings are noticeably firmer than the OEM mounts. I lowered them 1/2".
3/4" lowered will cause the oil pan to rest on the Steeda G-Trak brace.
Gap between pan and G-Trak brace at OEM mount height:
1747794353478-4o.jpg


At 1/2" lowered the Roush blower is more than 1/2" lower and slightly farther from the firewall. With the FI 10 mm blowers spacers installed, I was still able to reduce the thickness of my strut tower spacers to 0.3" and start using nyloc nuts again! The Ford strut tower brace (FR3Z-16A200-A) clears the Roush blower by > 1/4"
1747794747154-39.jpg
1747794779231-0h.jpg
 

Sponsored

OP
OP
SH!FT

SH!FT

Well-Known Member
Joined
Jan 1, 2022
Threads
12
Messages
537
Reaction score
478
Location
CT
First Name
Mike
Vehicle(s)
2020 GT premium 6MT VB
The cover on my VMP-SUC059 Ice Tank for the GT500 has been leaking coolant. I'm not knocking VMP's quality. The leak is due to large pressure/temperature change from the chilled coolant and I plugged the tank vent hole.

The IC coolant ate through the sealant under the cover. Coolant leaking down the tank wall ruined the foam adhesive and gorilla tape.
1747796495447-b3.jpg
1747796525134-xo.jpg


I cleaned the remaining sealant from the tank cover using WD-40 then Simple Green.
1747797281303-kv.jpg

Time will tell.
Permatex 82180 Ultra Black Oil Resistance Gasket Maker
Black Aluminum Foil Tape
 
OP
OP
SH!FT

SH!FT

Well-Known Member
Joined
Jan 1, 2022
Threads
12
Messages
537
Reaction score
478
Location
CT
First Name
Mike
Vehicle(s)
2020 GT premium 6MT VB
The inner tread on my factory Goodyear's are shot after 20k miles.
I want the issue resolved before installing new rubber.


I had an alignment by my local shop in April 2023 (post #116)... No luck.
Rear toe was out of spec and corrected. Rear camber was out as well. Factory camber adjustment is awful. We gave up at -1.7° and -1.9°.

1738461506975-eh-jpg.jpg


I have a Steeda Rear Camber Adjustment Kit ready to install. I'll be trying my luck with a QuickTrick alignment kit instead of paying for another alignment on cooked tires. I will get a pro alignment on the new tires.

Factory alignment specs: here
Factory adjustment points: here
Steeda install instruction: here
QuickTrick Instructions:
View or Print – Instructions, Components, assembly
Full DIY Videos – Caster Camber Toe and Stringing
Digital Dual Axis Level Box 0.01° Resolution

Next issue: I needed a way to access the adjustment points at ride height. âś”
1748493342466-bt.jpg
Sponsored


Top