Sponsored

Whipple instal questions and problems.

OP
OP
Roh92cp

Roh92cp

Well-Known Member
Joined
Jun 27, 2015
Threads
79
Messages
2,896
Reaction score
1,174
Location
Fort Kent Maine
First Name
Shawn
Vehicle(s)
OW GTPP Whipple
Yes he did, but thanks just the same. The instruction don't have the new air box update, so I was flying blind. It seems straight forward though, but of course given a 50/50 chance I'll get it wrong everytime...LOL. The other thing that through me on the air box was the small black screws, they all look the same but look closer and 4 are just a little smaller and used for the metal plate. The others 7 are used for the plastic air box cover.
Sponsored
 

ORANG50

Well-Known Member
Joined
Mar 7, 2015
Threads
19
Messages
280
Reaction score
40
Location
Emerald City
Vehicle(s)
665rwhp 531rwtq
Yeah, I was a little miffed at the lack of direction for the new air box, too. Staring at it a while, I got it figured out. I also had some small inter cooler system leaking issues with the hoses to the filler neck because they interfered with other components that put undesigned stress on them. I had to trim them a little bit ~1/2-1inch to get them to fit properly without added stress and not leak. I also don't think I got all the hardware that was designed for the airbox, particularly for the cover, but it was good enough to make it work.
 
OP
OP
Roh92cp

Roh92cp

Well-Known Member
Joined
Jun 27, 2015
Threads
79
Messages
2,896
Reaction score
1,174
Location
Fort Kent Maine
First Name
Shawn
Vehicle(s)
OW GTPP Whipple
Yeah, I was a little miffed at the lack of direction for the new air box, too. Staring at it a while, I got it figured out. I also had some small inter cooler system leaking issues with the hoses to the filler neck because they interfered with other components that put undesigned stress on them. I had to trim them a little bit ~1/2-1inch to get them to fit properly without added stress and not leak. I also don't think I got all the hardware that was designed for the airbox, particularly for the cover, but it was good enough to make it work.
I talk with the tech department before tackling the air box and asked them to send me the instal instructions. The tech guy apologized and said their we're not at this time. The other part that needed a little more guidance was the routing of the coolant lines from under the air box coming from the pump resivior to the T inline filler neck.
 
OP
OP
Roh92cp

Roh92cp

Well-Known Member
Joined
Jun 27, 2015
Threads
79
Messages
2,896
Reaction score
1,174
Location
Fort Kent Maine
First Name
Shawn
Vehicle(s)
OW GTPP Whipple
Wanted to update some more on my instal, some things to be aware of and problems that can arise.

When removing the front bumper cover after removing all the screws on top and the 2 small hidden 7mm screws inside the wheel well and the wheel well liner as well as the bottom cover. The first step is to pull out on the sides of the bumper cover, this has a friction clip system, so you just pull out. well it doesn't always work out as you can see here, one side cracked the fender cover. It's just bad luck on my part, and maybe becuase it was cold in the garage when I pulled out. I was able to re instal the bumper today with no issue, but it did lube the clips so they would slide in easy.
 

Obsol3te

Well-Known Member
Joined
Jun 13, 2015
Threads
54
Messages
1,037
Reaction score
345
Location
Hope Mills, NC
Vehicle(s)
'15 GT PP
Damn. I'll have to ask what tricks you HAVE or know to prevent that. How long has they install taken you so far?
 

Sponsored

Evo_Rob

Mmm... Boost...
Joined
Sep 21, 2015
Threads
14
Messages
1,180
Reaction score
405
Location
Virginia Beach
First Name
Rob
Vehicle(s)
2016 Mustang GT
Definitely keeping this thread handy when I start my install!
 
OP
OP
Roh92cp

Roh92cp

Well-Known Member
Joined
Jun 27, 2015
Threads
79
Messages
2,896
Reaction score
1,174
Location
Fort Kent Maine
First Name
Shawn
Vehicle(s)
OW GTPP Whipple
Damn. I'll have to ask what tricks you HAVE or know to prevent that. How long has they install taken you so far?
My car is up for winter and I started the disassembly when I placed the order Dec 17. I received the Whipple kit Dec 18 and have been putting in a couple hours a day taking it slowly. The install is almost 100% complete, just need to install belly pan, instal the calibration and start up shakedowns.
 

Evo_Rob

Mmm... Boost...
Joined
Sep 21, 2015
Threads
14
Messages
1,180
Reaction score
405
Location
Virginia Beach
First Name
Rob
Vehicle(s)
2016 Mustang GT
My car is up for winter and I started the disassembly when I placed the order Dec 17. I received the Whipple kit Dec 18 and have been putting in a couple hours a day taking it slowly. The install is almost 100% complete, just need to install belly pan, instal the calibration and start up shakedowns.
Would you say the 10-12 hour install suggestion is accurate?
 
OP
OP
Roh92cp

Roh92cp

Well-Known Member
Joined
Jun 27, 2015
Threads
79
Messages
2,896
Reaction score
1,174
Location
Fort Kent Maine
First Name
Shawn
Vehicle(s)
OW GTPP Whipple
Would you say the 10-12 hour install suggestion is accurate?
No not unless you have done this number of times and even then I don't think so. I would give your self a full weekend working full days.
 

Evo_Rob

Mmm... Boost...
Joined
Sep 21, 2015
Threads
14
Messages
1,180
Reaction score
405
Location
Virginia Beach
First Name
Rob
Vehicle(s)
2016 Mustang GT
No not unless you have done this number of times and even then I don't think so. I would give your self a full weekend working full days.
Right on, I appreciate that. I might have to use some leave days. Is that assuming you're doing it alone?
 

Sponsored
OP
OP
Roh92cp

Roh92cp

Well-Known Member
Joined
Jun 27, 2015
Threads
79
Messages
2,896
Reaction score
1,174
Location
Fort Kent Maine
First Name
Shawn
Vehicle(s)
OW GTPP Whipple
Right on, I appreciate that. I might have to use some leave days. Is that assuming you're doing it alone?
Right I did this by myself.
 
OP
OP
Roh92cp

Roh92cp

Well-Known Member
Joined
Jun 27, 2015
Threads
79
Messages
2,896
Reaction score
1,174
Location
Fort Kent Maine
First Name
Shawn
Vehicle(s)
OW GTPP Whipple
So from the the get go my front bumper cover to hood alignment was off and left large gaps on the sides of the hood. Seems many 15/16 have this same issue. The center can be adjusted with the hood latch adjustment but that still leaves the side of the hood alignment to bumper cover off. Like mine most have the problem of the front hood sides near the head lights are too high leaving a large gap even the the center to front bumper are flush. Picture below show what I'm talking about. Follow Roush front bumper cover instal to remove the fron cover http://www.roushperformance.com/parts/manuals/2015-Mustang-Complete-ROUSH-Front-Fascia-Kit.pdf


My suggestion is do this when it's warm outside my front bumper clip broke on side side as I pulled out to,remove the bumper. You will see what I mean when you read through the the Roush instructions for bumper removal.


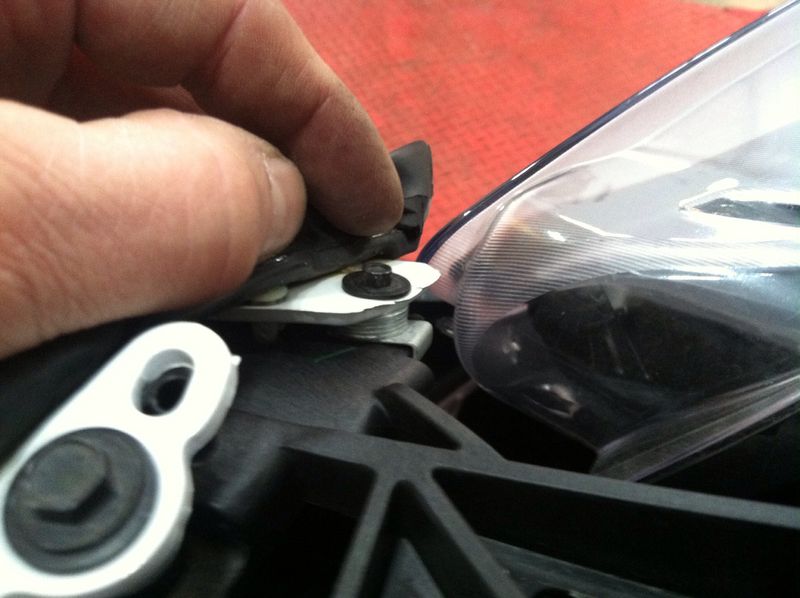
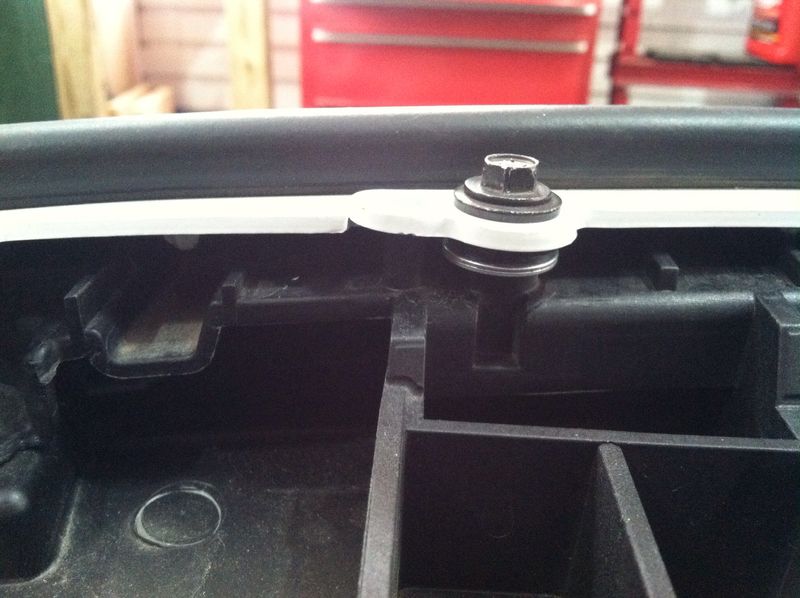
Here is how I shimmed the front bumper cover on the ends to raise it to meet the hood. I used 5 small washers at the ends. This is under the small 5.5mm screw at the very end, also Aslo used 5 washers at the next inner screw to raise that as well. As. Got closer the the center I used less washer and at center none. All the washer were placed under the screws that hold the front cover to the tip of the bumper bracket.


This is the next screw in from the end screw, you can see the shims under neath, you will need to adjust according to your gaps.

 
Last edited:

ORANG50

Well-Known Member
Joined
Mar 7, 2015
Threads
19
Messages
280
Reaction score
40
Location
Emerald City
Vehicle(s)
665rwhp 531rwtq
OP
OP
Roh92cp

Roh92cp

Well-Known Member
Joined
Jun 27, 2015
Threads
79
Messages
2,896
Reaction score
1,174
Location
Fort Kent Maine
First Name
Shawn
Vehicle(s)
OW GTPP Whipple
Today I filled the intercooler system and tried to burp it to get the trapped air out. The system takes 2 gallons total and I was only able to get 1.5 gal in even with blowing in the tank and releasing some trapped air. I talked with Whipple and they said the best method is to pump coolant in so no trapped get in like when you poor it in. The other method they said was to fill then burp it by blowing air into the tank to push trapped air out, then start the vehicle and run the system and eventually it will work out with refills.

What I did today was and glad I did was wired the pump direct to the battery. I unplugged the pigtail at the pump and then ran leads to the battery. First thing I noticed was the pump when powered takes about 5 seconds to come. I ran the pump for about 30 seconds all kind off gurgling took place, then turned it off and refilled. I did this about 7 times running the pump longer each time then topping off. In the end the pump ran smooth with nor more gurglin sounds p, so I know all the trapped air was out. Maybe none of this needed to be done I don't know, I'm sure others just filled and went on there way and topped off later. I was a little paranoid when reading the instruction about how and air pocket could potentially keep the pump from circulating water and I didn't want this to happen. Hope this may help someone I their future instal.
Sponsored


Top