Sponsored

TicTocTach's 2018 EB Premium PP "Build" Thread

OP
OP
TicTocTach

TicTocTach

Well-Known Member
Joined
Mar 15, 2018
Threads
24
Messages
980
Reaction score
994
Location
DFWTX
First Name
Clair
Vehicle(s)
2018 EBPP
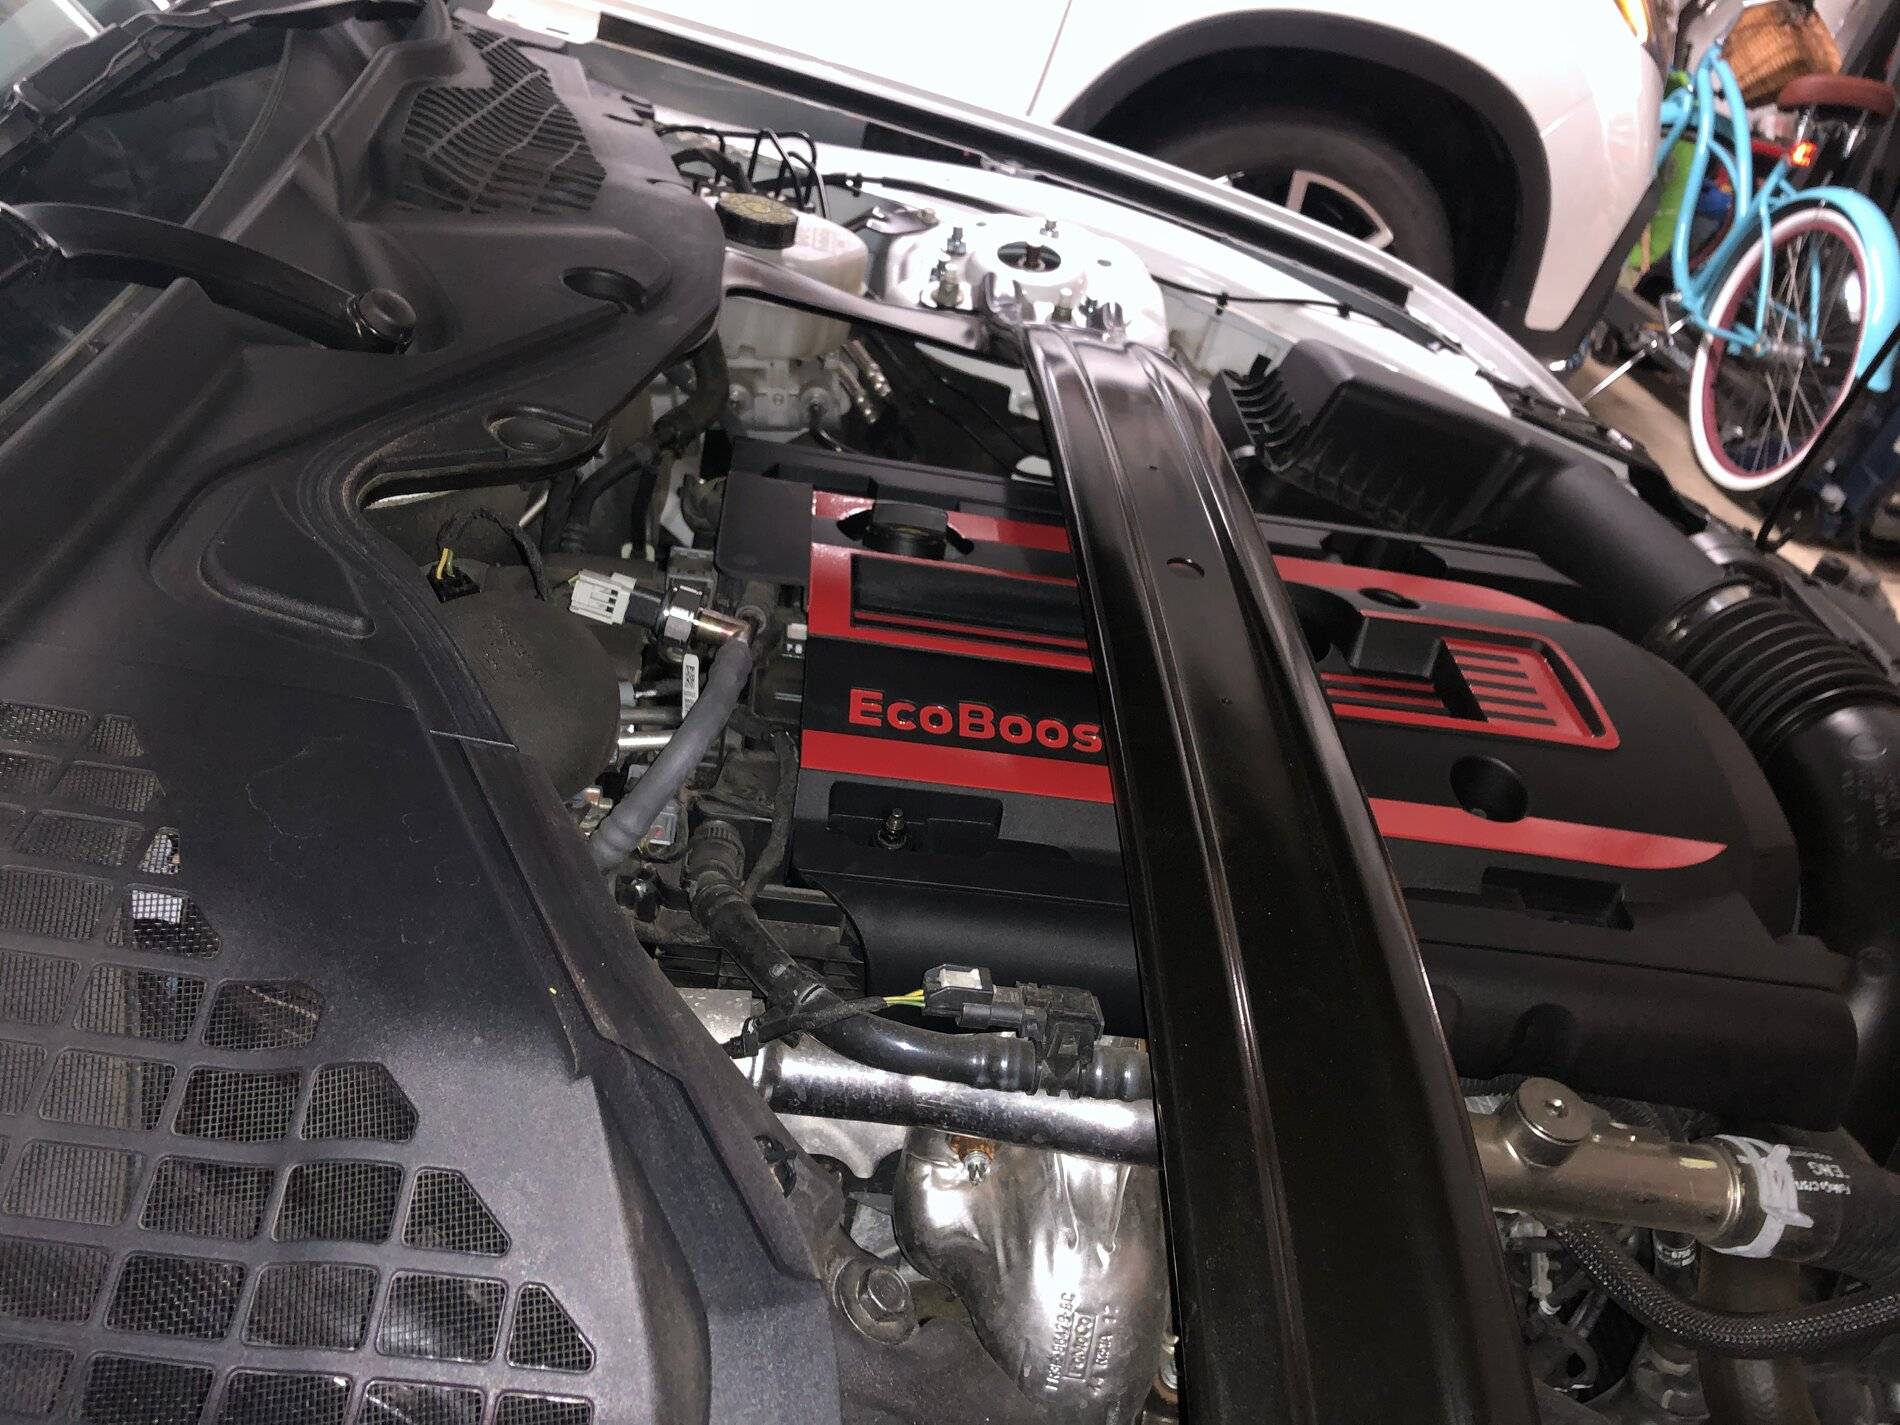
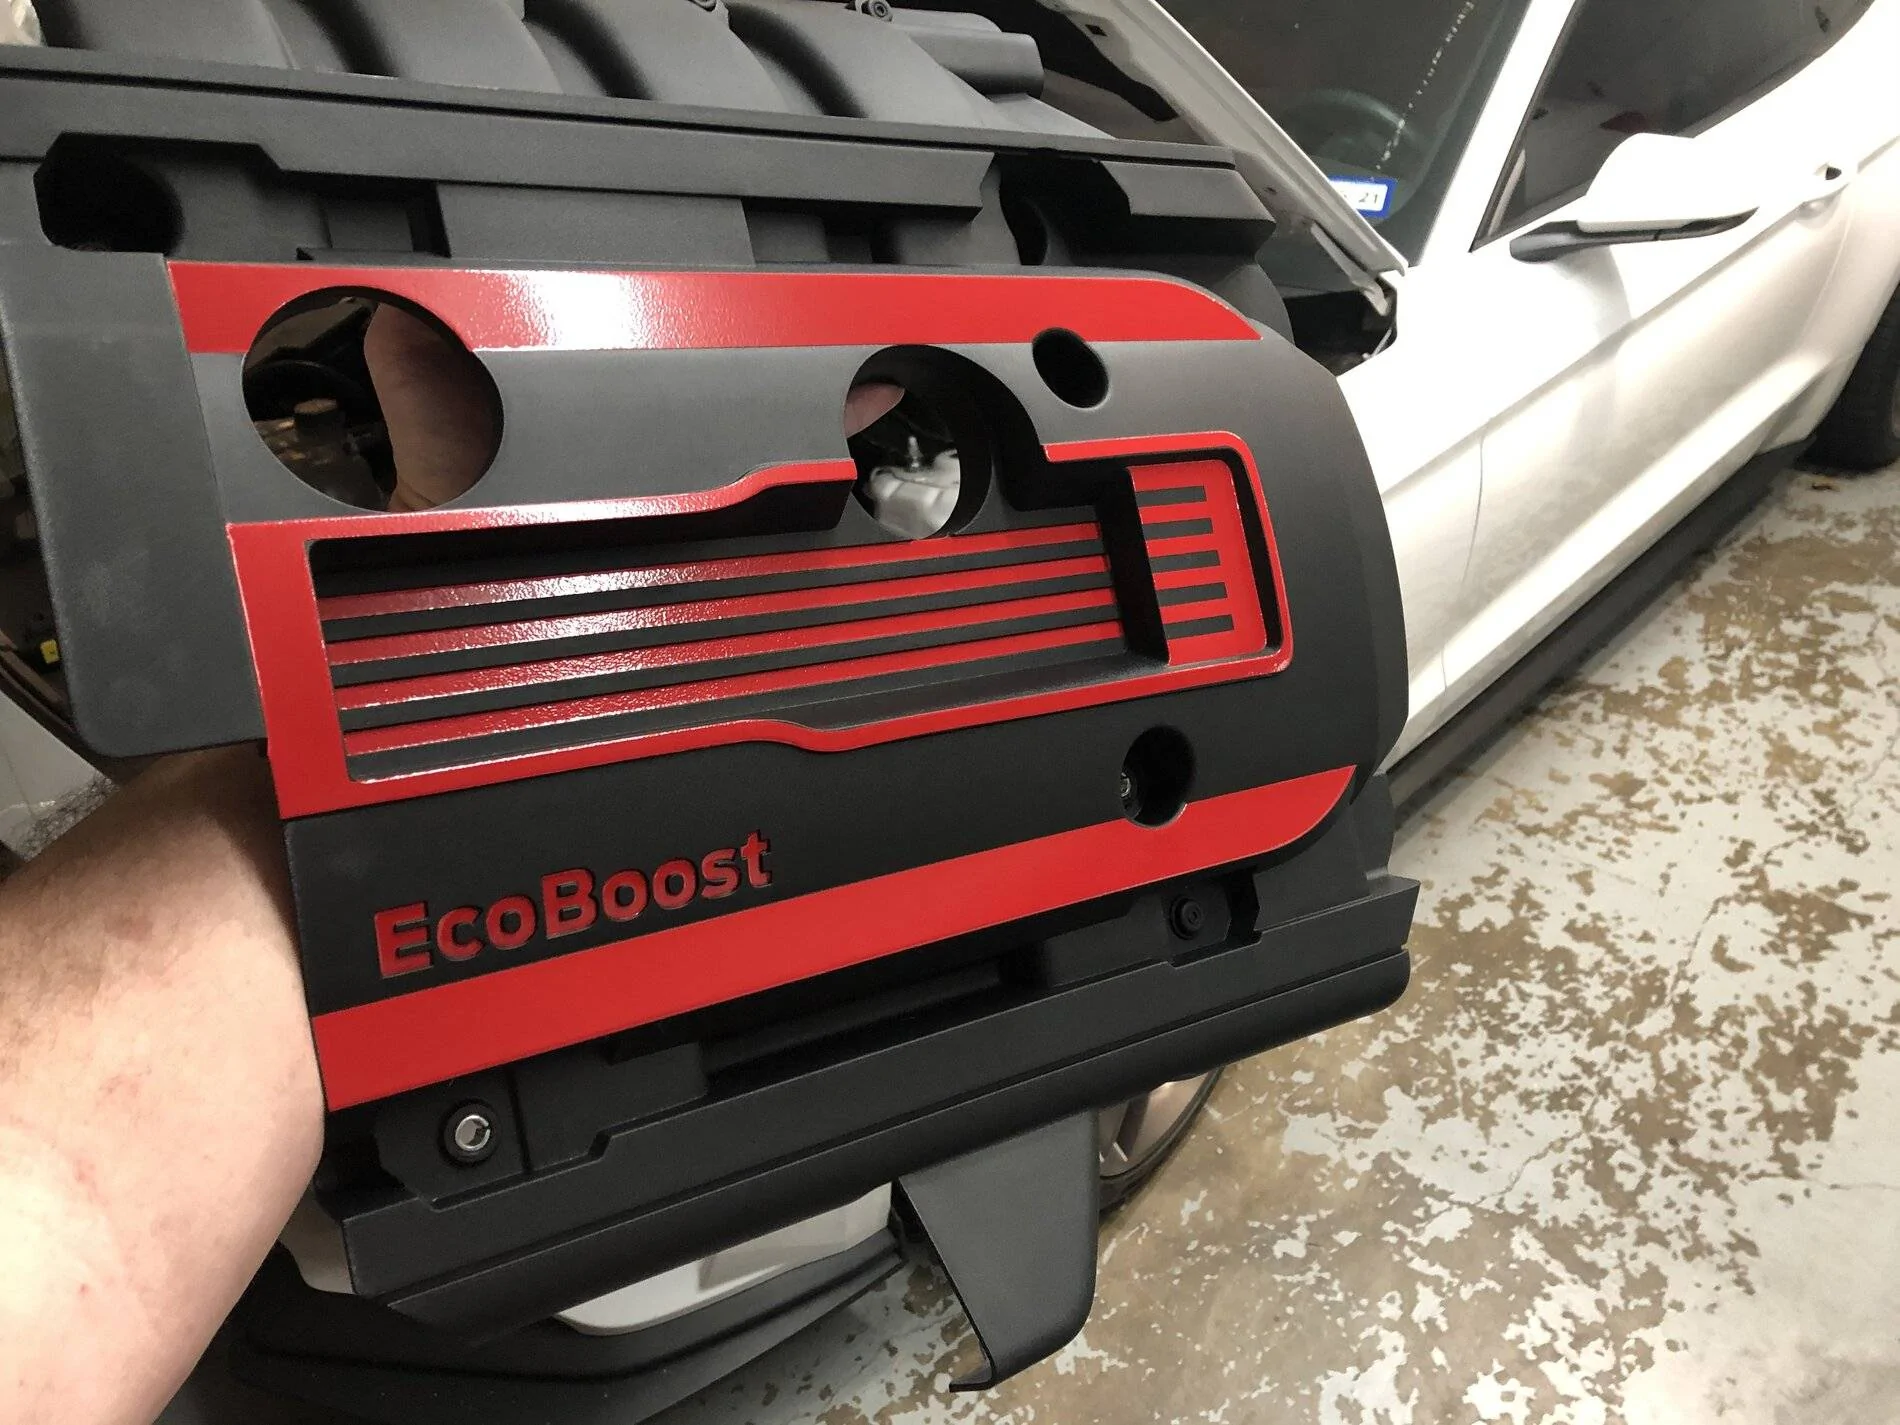
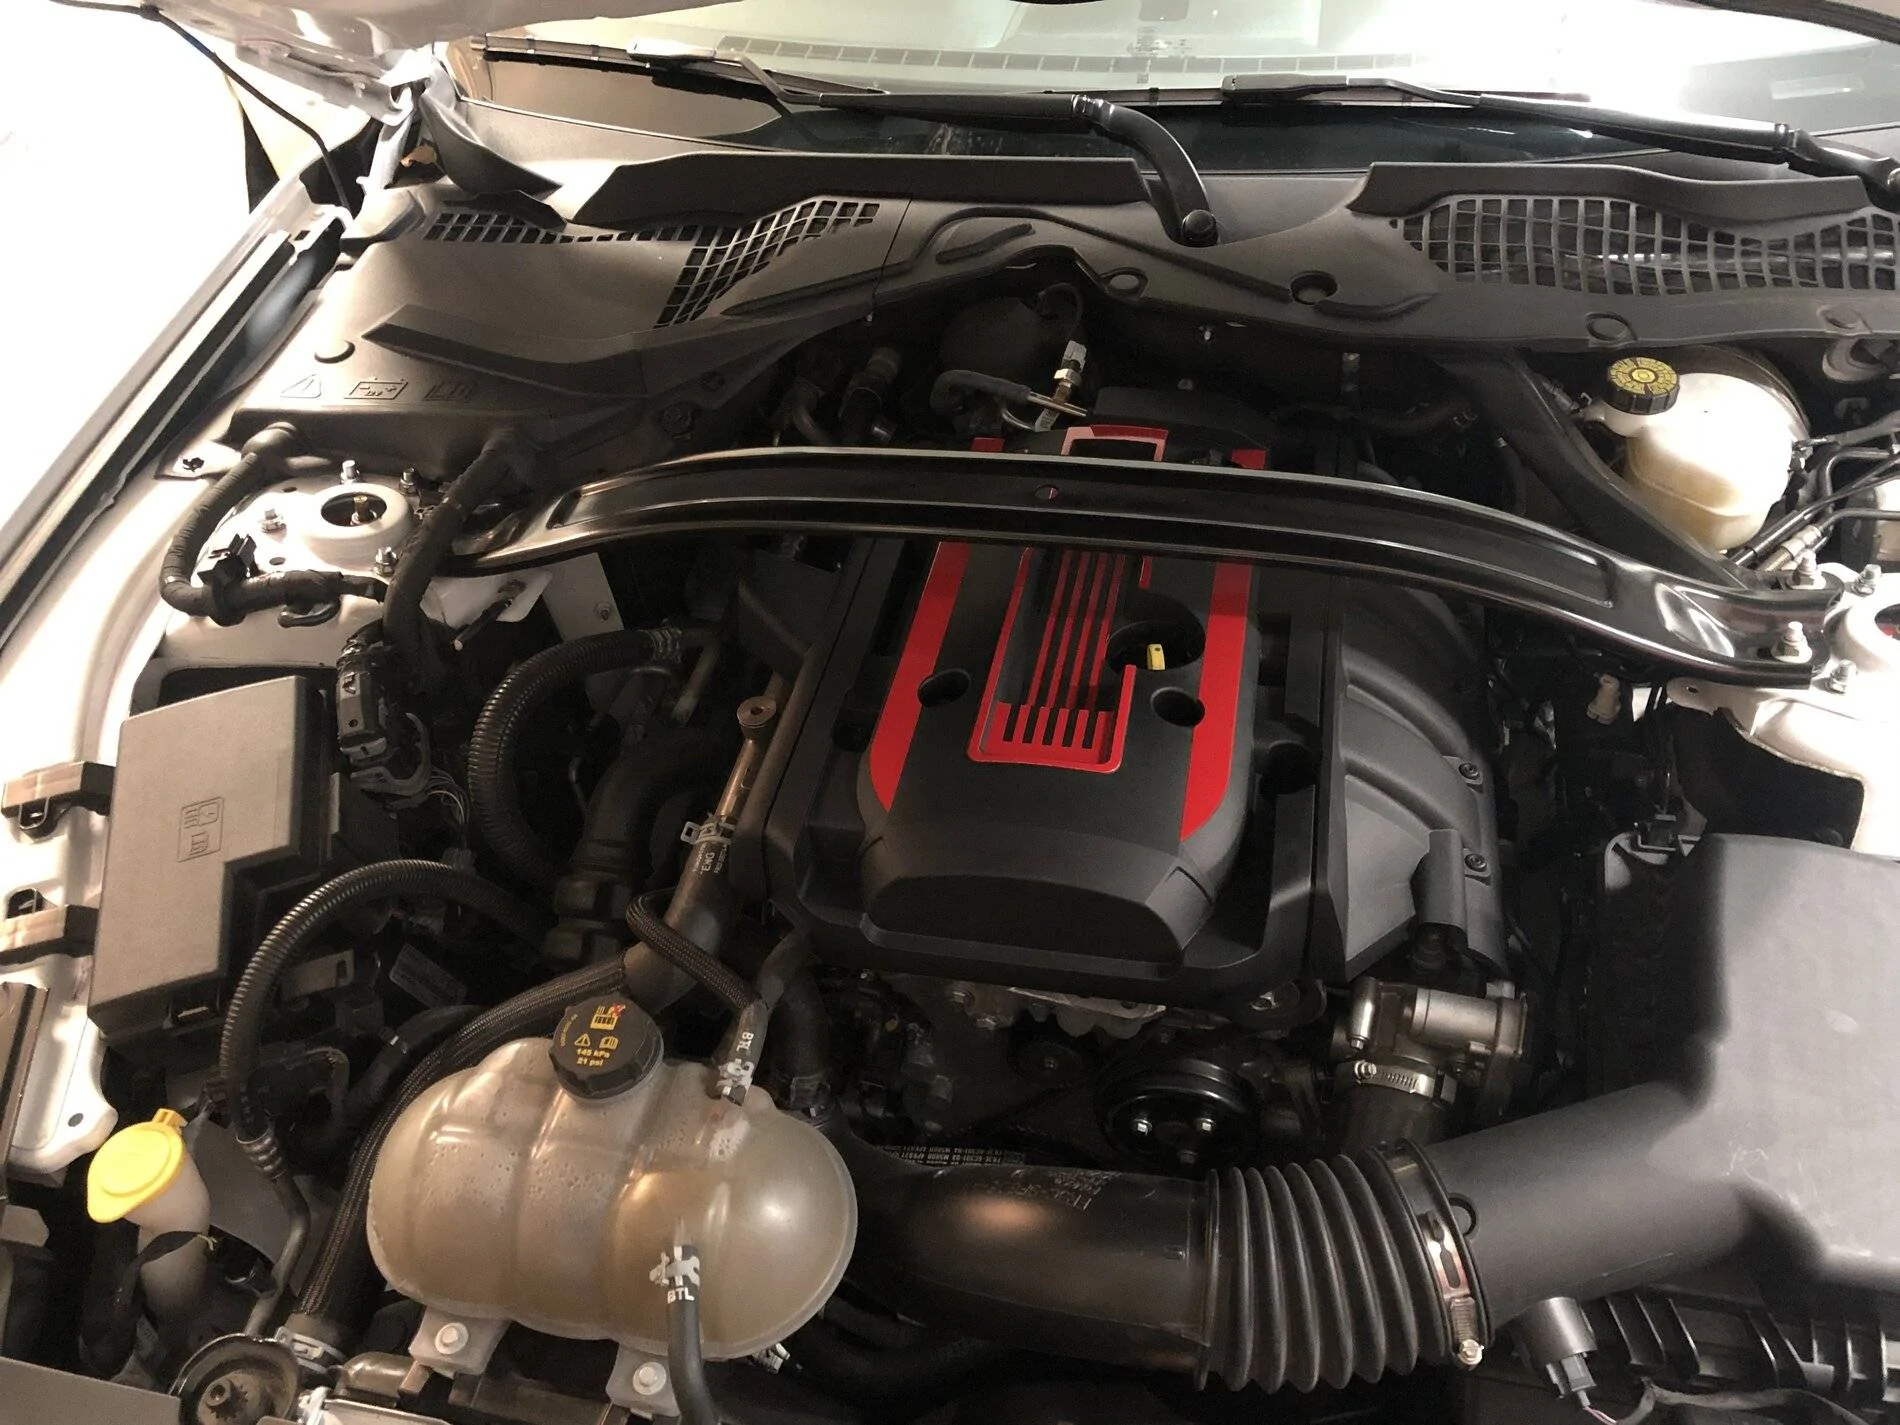
Tonight’s project: a little color under the hood courtesy of a decal kit from http://www.anchor-room.com/. It was like $20, so no harm done if it didn’t work out, but after about an hour I had great results. Watch their video for install tips and take your time.

586F31E3-22DA-48F7-AC05-866375D2C406.jpeg


22165461-0024-44A8-B438-F4AAE7C101F5.jpeg


A155ABBD-8C64-499B-BFB7-F7C04D0D086A.jpeg
Sponsored

 
OP
OP
TicTocTach

TicTocTach

Well-Known Member
Joined
Mar 15, 2018
Threads
24
Messages
980
Reaction score
994
Location
DFWTX
First Name
Clair
Vehicle(s)
2018 EBPP
Holy cats. Hard to believe I haven't updated this since March, but here we are. I guess in fairness, I've been working towards the last (?) big upgrade for this car since April... Brembo's and 15" rotors up front. This is the last piece missing from what I wanted when I bought this car, the PP2 suspension.

I found the GTPP calipers when another forum member was swapping his dark gray calipers for the red Bullitt calipers that he was sourcing through Steeda. There was a problem sourcing one of the rear caliper brackets, so it took until late June or July for him to do the swap. Once he was done, the front and rear calipers from his car were on their way to me, and then they sat in my garage while I sourced all the rest of the bolts, splash shields, rotors, pads, banjo fitting gaskets... a real pile of parts.

And then life started wearing me out like a pit bull's chew toy... way too much family stuff that has been way too serious and taking up most weekends since July. Fortunately, it has been settling into a groove now, so I've had most of a day free for each of the last couple of weekends and I've made some caliper time.

First task was prepping the dark gray GTPP calipers for paint. Initially, I was going to just run with them the way they came as they were great looking (less than 10K miles on them) and having both front and rear sets would have been easy-peasy. Well, his new calipers looked fantastic on his white car, so... I changed my mind. Some G2 Red would do the trick, and I was going to prime everything with high temp primer to get nice even coverage and a nice bright red. Lots of scrubbing and masking ensued. I easily spent more time masking than anything else.

51623774591_5b77925435_c.jpg
Brembo Upgrade by clair_davis, on Flickr
51623998608_4f2bf86ec3_c.jpg
Brembo Upgrade by clair_davis, on Flickr
51623998633_f5357c0c9b_c.jpg
Brembo Upgrade by clair_davis, on Flickr
51623774596_3532ecbe28_c.jpg
Brembo Upgrade by clair_davis, on Flickr

I'll say this now - DON'T USE VHT SP100 VERY HIGH TEMP PRIMER WITH G2 PAINT. I had some adhesion problems while the G2 was drying and I suspect that the primer may make the G2 more likely to chip or peel. So far I've had pretty good luck, but nothing is on the car yet. Not priming would have also saved me a weekend of work and that would have been huge. Oh well, I just hope the G2 sticks like it should.

When it came time to apply the G2, I decided to spray vs. brush. I have HVLP equipment and decided to use it, even though it's one of the lower-end DeVilbiss Finish Line kits. The touch up gun had a 1.0mm tip which was pretty big, but maybe not big enough. It ended up doing a pretty good job, even with the limited experience I have with HVLP - basically some YouTube training - but I have painted a couple cars before.

Last Saturday when the high temps were finally down near 70*F, I masked off a chunk of the garage and hung up all of the caliper parts for paint. It went well, but took 5 hours or so from masking the garage to cleaning out the paint gun.

51623999158_f2a1aec199_c.jpg
Brembo Upgrade by clair_davis, on Flickr
51622945592_2d18a045bc_c.jpg
Brembo Upgrade by clair_davis, on Flickr
51622945487_13b7afdef8_c.jpg
Brembo Upgrade by clair_davis, on Flickr

The G2 continues to smooth out over several hours, so don't panic if it isn't perfect right off the bat. It also stays sort of soft even when you're in the "safe to handle" period, and I ended up getting some finger prints when I removed the masking tape the next day. A couple days later, the G2 was noticeably slicker and smoother, so wait as long as you can stand to mess with the parts. Two days is a lot better than one.

Decals went on yesterday - I put down some low-tack tape to make the boundaries I needed and trimmed the backing on the decals so I could bump them up to the tape and be located properly. The instructions were pretty simple and everything worked great.

51623999058_07a46ff82c_c.jpg
Brembo Upgrade by clair_davis, on Flickr
51623775021_ff83c7ec6a_c.jpg
Brembo Upgrade by clair_davis, on Flickr
51623998993_7d1ee84991_c.jpg
Brembo Upgrade by clair_davis, on Flickr

For decal orientation, it can seem counter-intuitive sometimes, so here are a couple photos from the Ford Performance kit:
Driver Side:
51624634550_33e6013896_c.jpg
Brembo Upgrade by clair_davis, on Flickr
Passenger Side:
51623998698_00d0dcb24a_c.jpg
Brembo Upgrade by clair_davis, on Flickr

Now to find the time to install everything...
 
OP
OP
TicTocTach

TicTocTach

Well-Known Member
Joined
Mar 15, 2018
Threads
24
Messages
980
Reaction score
994
Location
DFWTX
First Name
Clair
Vehicle(s)
2018 EBPP
How do you like to FP tune for daily stop light to stop light driving?
It’s great - as long as you aren’t expecting a transformation into a beast. I haven’t taken her back to the dyno yet, but I will in the next month. I want to be close to marching the weather I had for the pre tune baseline. I’m guessing about 20hp and enough torque to drop 0.5 seconds off of my 0-60. It’s a noticeable improvement, with no real downside to mileage.
 
OP
OP
TicTocTach

TicTocTach

Well-Known Member
Joined
Mar 15, 2018
Threads
24
Messages
980
Reaction score
994
Location
DFWTX
First Name
Clair
Vehicle(s)
2018 EBPP
OP
OP
TicTocTach

TicTocTach

Well-Known Member
Joined
Mar 15, 2018
Threads
24
Messages
980
Reaction score
994
Location
DFWTX
First Name
Clair
Vehicle(s)
2018 EBPP
Thanks. I have it on the radar. Curious about the Dyno:)

I didn't feel the PP was worth it for the extra 300 lb and big standard GT parts can buy for cheap....
Lol, well, Magneride was a must-have and I wanted a pretty good package to start with… thinking I was going to autoX in a stock class to keep my expenses down. I kind of threw that out the window when I decided to not limit myself to stock. Most of these parts are salvage yard or dealer stock parts, so nothing too exotic. Perhaps not the cheapest though.
 

Sponsored

OP
OP
TicTocTach

TicTocTach

Well-Known Member
Joined
Mar 15, 2018
Threads
24
Messages
980
Reaction score
994
Location
DFWTX
First Name
Clair
Vehicle(s)
2018 EBPP
So last weekend I made some time to do this swap. As usual, it took a lot longer than even my generous estimate... started about 1PM Saturday, worked through 8PM, and then a couple more hours on Sunday rechecking torques and putting tools away. I had all the parts waiting and ready, using all new factory parts wherever I could. I did take advantage of some great deals that Optimum Performance Mustang had on the anti-rattle hardware kits, and some aftermarket pads for the front. Price & parts list at the bottom.

Not many glamor shots, I spent most of my time making sure I put everything together right. I put the car up on the Quickjack and started at the back of the car where the work was going to be more complicated:
51660110076_c18b18da0d_c.jpg
Brembo Upgrade by clair_davis, on Flickr

- Remove / disassemble rear calipers, fight with the parking brake cables, ignore how the manual said to do things...
- Plug the brake hoses to minimize lost fluid
- Install new caliper hardware kit from OPM
- Grease sliding surfaces & seals
- Reinstall original brake pads
- Reinstall calipers, torque the mounting bolts and banjo bolts with new washers
- Repeat on the other side
51660341263_39e0dd90c9_c.jpg
Brembo Upgrade by clair_davis, on Flickr

Move to the front - simpler because it's just removing one caliper and dropping the other one on. I did have to install new pads and hardware because the calipers I got were bare. I chose G-LOC pads in their GS-1 street compound. Minimal dust and noise, but good bite and performance. Since I won't likely track this thing before I get back on the AutoX course, these made the most sense and cost was the same or better than the dusty OEM pads. The GTPP rotors also require a different splash shield, so those were installed as well.

Obviously, the front rotors were replaced, too. Hard to see the extra inch of DIA, but it's there. Damn, these are massive rotors. Love it!
51660341268_9702283742_c.jpg
Brembo Upgrade by clair_davis, on Flickr
51659305677_212ebb46f9_c.jpg
Brembo Upgrade by clair_davis, on Flickr

When all the calipers and hoses were installed, it was time to bleed & flush the system. It was due for a flush anyway, so this was a good opportunity to get a batch of fresh DOT4 in the system. I used a Motive Products power bleeder that I also got from OPM with a specific Ford adapter. This still took a while for one person, but was easier than the old loosen-pump-tighten-release-repeat method.

When everything was done, I drove the car around the block, and then I went on a 200 mile road trip. Perfection. The pedal is in fact a bit softer than the EBPP / Base GT brakes that were original to the car - and I really liked those a lot. However, after driving this setup for a week, I'm not sure I need to upgrade the master cylinder to the PP-spec unit. I'll drive a stock GTPP before I decide to make that change. So far, it's great.
51660282533_f77433e870_c.jpg
Clean Car Day by clair_davis, on Flickr
51660282573_543995585d_c.jpg
Clean Car Day by clair_davis, on Flickr
51660930435_4a3eec7429_c.jpg
Clean Car Day by clair_davis, on Flickr
51659426547_69a4984954_c.jpg
Brembo_Upgrade_Expenses by clair_davis, on Flickr

Overall, not the cheapest way to do this swap, but I'm more than happy with how it turned out and performs.
 

TrackMustang

Banned
Banned
Banned
Joined
Nov 24, 2021
Threads
34
Messages
1,205
Reaction score
1,524
Location
SoCal
Vehicle(s)
2021 Mustang GT
First oil change over the weekend, and first oil analysis from Blackstone Labs. Oil is good these days, and the engine looks healthy.
How much was the oil test?
 

TrackMustang

Banned
Banned
Banned
Joined
Nov 24, 2021
Threads
34
Messages
1,205
Reaction score
1,524
Location
SoCal
Vehicle(s)
2021 Mustang GT
On Sunday, I spent a little time on the car, testing how the 11" SVE GT-7 wheels are going to fit next to the strut with the 25mm spacer that is needed to use the same wheel front and rear. This lets me rotate the tires front to rear and get a little more life out of an expensive 305/30-19 tire. It was a pretty simple operation - up on jack stands, pull a wheel, pop the spacer on, and measure the gap between the wheel lip and the strut. Pics:

The GT350R wheel studs are plenty long for the extra 25mm spacer...
50261241846_4efe7da587_c.jpg
Spacer and 11” Wheel Fitment -01 by clair_davis, on Flickr

Hub-centric spacer from Optimum Performance installed:
50260583643_38d0556c1e_c.jpg
Spacer and 11” Wheel Fitment -02 by clair_davis, on Flickr
50260583653_555c8e3627_c.jpg
Spacer and 11” Wheel Fitment -03 by clair_davis, on Flickr

Plenty of clearance:
50261241946_3cb1810ec5_c.jpg
Spacer and 11” Wheel Fitment -04 by clair_davis, on Flickr

How much clearance? 11.69mm... enough that I'm going to order a 20mm spacer and see if that one will also work as well, tucking the tire and wheel under the fender a little bit better.
50261433887_96d8dc3c41_c.jpg
Spacer and 11” Wheel Fitment -05 by clair_davis, on Flickr

At full droop and the suspension unloaded, the wheel is about 3/4 of an inch outside the fender.
50261433837_710363d730_c.jpg
Spacer and 11” Wheel Fitment -07 by clair_davis, on Flickr

It will draw up under the fender a bunch with the full weight on the car, but it will still need a chunk more negative camber. This not only pulls the top of the tire in a bit more, but also gives more lateral grip when cornering, a win-win. I'll document that operation when I get the parts lined up.
I’m considering getting a set up like this myself, I’m wondering what the pros and cons are…? Any risk of the wheel mount being weaker, etc? Any reason you did this instead of wider rims? What spacer did you use? Your tires sling up all kinds of shit on your quarter panels now?
 

Strokerswild

Shallow and Pedantic
Joined
Nov 7, 2014
Threads
74
Messages
6,643
Reaction score
5,468
Location
Southern MN
First Name
Dave
Vehicle(s)
Things With Wheels
Nice work.

I think we need to see more of the 2-door post lurking in the background of some of the pics....
 

Bobn57

Well-Known Member
Joined
Jun 30, 2020
Threads
10
Messages
1,344
Reaction score
3,488
Location
New Jersey
First Name
Bob
Vehicle(s)
1968 Mustang Fastback, 2021 VB, GT/CS
Vehicle Showcase
2
great thread! Car looks nice.
 

Sponsored
OP
OP
TicTocTach

TicTocTach

Well-Known Member
Joined
Mar 15, 2018
Threads
24
Messages
980
Reaction score
994
Location
DFWTX
First Name
Clair
Vehicle(s)
2018 EBPP
OP
OP
TicTocTach

TicTocTach

Well-Known Member
Joined
Mar 15, 2018
Threads
24
Messages
980
Reaction score
994
Location
DFWTX
First Name
Clair
Vehicle(s)
2018 EBPP
I’m considering getting a set up like this myself, I’m wondering what the pros and cons are…? Any risk of the wheel mount being weaker, etc? Any reason you did this instead of wider rims? What spacer did you use? Your tires sling up all kinds of shit on your quarter panels now?
The longer studs are required to fit the 11” wheels with the same offset front and rear. I wanted the same wheel F/R so I could rotate tires. The studs being factory parts should be plenty strong, and those slip-on spacers are used by tons of road racers.

The wheel mount is functionally the same as a wheel with a different offset, and everything is hub-centric. These spacers are from OPMustang and are top notch. Fit is great, and machined from aluminum billets, not cast.

I haven’t really noticed much / any more shit on the quarters than the 285’s or stock wheels with 255’s, so I guess that’s a win…
 
OP
OP
TicTocTach

TicTocTach

Well-Known Member
Joined
Mar 15, 2018
Threads
24
Messages
980
Reaction score
994
Location
DFWTX
First Name
Clair
Vehicle(s)
2018 EBPP
Nice work.

I think we need to see more of the 2-door post lurking in the background of some of the pics....
That’s my baby, Elvira. 1969 Plymouth Valiant 100, with an EFI 340, 4-speed, 3.23’s and set up for autoX. She’s been with me a long time, but hasn’t been on the road for 10+ years now. She’s waiting on an efi update, and maybe she’ll be as fast as the Mustang… she’s a little lighter…
20655E16-A9D4-4204-B899-098EC1830926.jpeg
 

Strokerswild

Shallow and Pedantic
Joined
Nov 7, 2014
Threads
74
Messages
6,643
Reaction score
5,468
Location
Southern MN
First Name
Dave
Vehicle(s)
Things With Wheels
There is an immaculate B5 Blue mate to your car that shows up occasionally at local roll-ins, staggered rubber on steel wheels and dog dish caps but still running the original six. The thing SCREAMS at me to buy it and do a 440 swap, but leaving it alone in appearance.
 

TrackMustang

Banned
Banned
Banned
Joined
Nov 24, 2021
Threads
34
Messages
1,205
Reaction score
1,524
Location
SoCal
Vehicle(s)
2021 Mustang GT
The longer studs are required to fit the 11” wheels with the same offset front and rear. I wanted the same wheel F/R so I could rotate tires. The studs being factory parts should be plenty strong, and those slip-on spacers are used by tons of road racers.

The wheel mount is functionally the same as a wheel with a different offset, and everything is hub-centric. These spacers are from OPMustang and are top notch. Fit is great, and machined from aluminum billets, not cast.

I haven’t really noticed much / any more shit on the quarters than the 285’s or stock wheels with 255’s, so I guess that’s a win…
What made you pick 25mm instead of any of the thousand other size options they have?
Sponsored


Top