Sponsored

Questions on rear differential housing install

Jared_J

Well-Known Member
Joined
Feb 2, 2016
Threads
13
Messages
160
Reaction score
44
Location
San Diego, CA
Vehicle(s)
2015 Mustang V6
Hi Guys,
I'm planning to work on differential swap to a 3.55 differential housing, and has read through the work manual by Ford. I have a few questions on the steps and in need of your expertise:
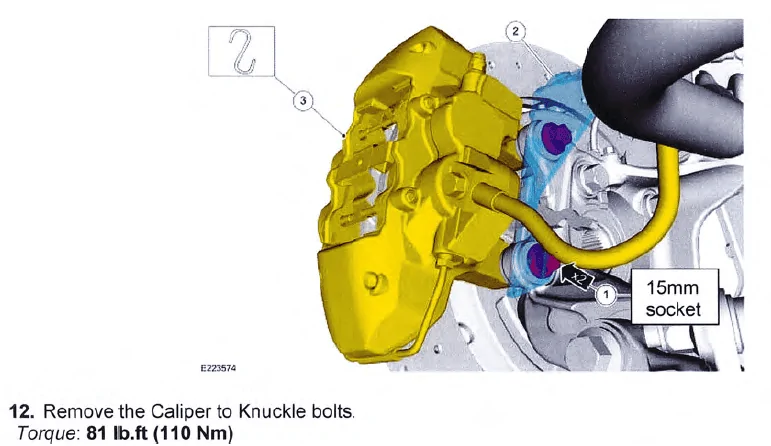
1. What does that reverse "S" sign mean? I saw it a few places in the manual:
picture.png


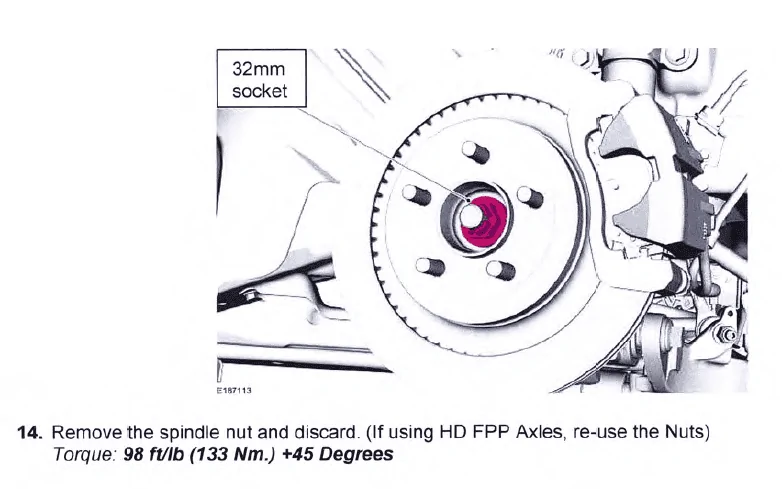
2. My car is a 2015 mustang v6 auto, do I need to buy new spindle nut? Not sure if the axle is an HD FPP one.
picture.png


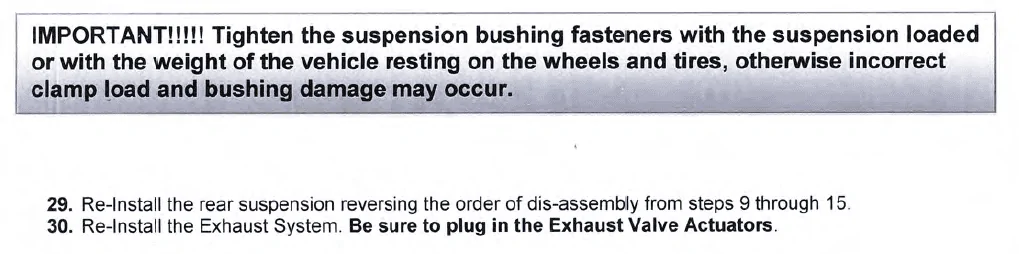
3. How do I tighten the suspension bushing fasteners with the suspension loaded? Once the car is on the ground there is almost no space... Maybe using a Jack to push the wheels when the car is still on the jack stand?
picture.png


The work manual is obtained here:
https://performanceparts.ford.com/download/instructionsheets/FordInstShtM-4000-M8SGT350.pdf

Thank you all!
Sponsored


whatsup62

Well-Known Member
Joined
Sep 16, 2015
Threads
129
Messages
2,046
Reaction score
522
Location
Jupiter
Vehicle(s)
2015 Mustang GT PP (Gone but not forgotten).
Not 100% sure on the reverse S - but my guess would be that part needs supported after removal because it doesn't have to come off just moved out of the way.
You dont have HD FPP half shafts. Throw the nut away and install new ones.
Suspension loaded - buy some car ramps.
 
OP
OP
Jared_J

Jared_J

Well-Known Member
Joined
Feb 2, 2016
Threads
13
Messages
160
Reaction score
44
Location
San Diego, CA
Vehicle(s)
2015 Mustang V6
Not 100% sure on the reverse S - but my guess would be that part needs supported after removal because it doesn't have to come off just moved out of the way.
You dont have HD FPP half shafts. Throw the nut away and install new ones.
Suspension loaded - buy some car ramps.
Thank you for the info!
For the axle nut, somehow there is not a part number on the diagrams I found:
https://parts.levittownfordparts.co...s-engine/rear-suspension-cat/drive-axles-scat
https://www.tascaparts.com/auto-par...s-engine/rear-suspension-cat/drive-axles-scat
But I found two nuts with different part numbers that the websites both say can fit:
1. F3LY-3B477-A
https://www.autozone.com/collision-...-cv-axle-nut/980183_193996_4605?checkfit=true
2. CV6Z-3B477-A
https://parts.lakelandford.com/p/Fo...-DOHC-20-LITER-TURBO/53391930/CV6Z3B477A.html

Do you know which one I should use? Thanks!
 

whatsup62

Well-Known Member
Joined
Sep 16, 2015
Threads
129
Messages
2,046
Reaction score
522
Location
Jupiter
Vehicle(s)
2015 Mustang GT PP (Gone but not forgotten).
Thank you for the info!
For the axle nut, somehow there is not a part number on the diagrams I found:
https://parts.levittownfordparts.co...s-engine/rear-suspension-cat/drive-axles-scat
https://www.tascaparts.com/auto-par...s-engine/rear-suspension-cat/drive-axles-scat
But I found two nuts with different part numbers that the websites both say can fit:
1. F3LY-3B477-A
https://www.autozone.com/collision-...-cv-axle-nut/980183_193996_4605?checkfit=true
2. CV6Z-3B477-A
https://parts.lakelandford.com/p/Fo...-DOHC-20-LITER-TURBO/53391930/CV6Z3B477A.html

Do you know which one I should use? Thanks!
That last one matches the Ford part #so I would go with that.
https://www.fordpartsgiant.com/parts/ford-retainer_ccpz-3b477-f.html

Or go to local Ford dealer and order two from them.
 
OP
OP
Jared_J

Jared_J

Well-Known Member
Joined
Feb 2, 2016
Threads
13
Messages
160
Reaction score
44
Location
San Diego, CA
Vehicle(s)
2015 Mustang V6

Sponsored

Draklia

Well-Known Member
Joined
Jan 2, 2017
Threads
10
Messages
438
Reaction score
145
Location
Dry Land
Vehicle(s)
2017 GT
Yeah, that reverse s is a hook, meaning hang these by something other than the brake lines. For tightening the bushings I was going to go buy a couple of 2x10s and cut enough slats to stack under the wheels. Sounds safe enough right??
 

Mikepol2

Well-Known Member
Joined
Jul 17, 2018
Threads
117
Messages
3,173
Reaction score
5,140
Location
Pittsburgh, PA
First Name
Mike
Vehicle(s)
2021 Mach 1, 2019 Ram 1500
Today I removed the factory differential from my 2018 GT PP1 to have 4.09's installed, and thought I'd post some tips if you plan to do it yourself...the car only has 2500 miles on it and it's not driven in wet weather so no rust to deal with, that might have made things even harder.

1) The link in OP's first post is for the GT350 differential cooler install instructions. I chatted Ford Performance and got them to email me the service manual portion for differential service on my 2018 GT, and it was the same as the link above - so use the link above as your guide, it was 99% accurate. But there are some things that are better done in a different order than shown in the link.

2) At reinstallation, to get the suspension loaded as stated in the directions, I tried to jack up the suspension before putting the wheels on until the center of the half shaft is 15" from the fender so the bolts can be tightened properly. Turns out I couldn't jack the car up high enough to get to the 15" - it came off the jack stands. But it turned out OK anyway.

3) I have BMR jacking rails installed, not necessary but helpful for getting the car up in the air on four jack stands and feeling relatively safe about it.

4) The first thing to do once it's in the air and the wheels are off is remove those damn 32mm axle nuts, because you need to have the emergency brake on TIGHT. I have a 24" long 1/2" drive breaker handle and couldn't budge them. Had to use a floor jack under the end of the handle and it almost lifted the car off the jack stands before those nuts broke loose. Everything you remove will have a gallon of loctite on it, so take the nut almost all the way off before releasing the e-brake and removing the caliper. Then when it's time to remove it completely, I used vice grips on the half shaft.

5) My car had an electrical plug and a vent hose in the differential cover, be sure to pull them off.

6) Removing the drive shaft is a pain because there's only room to remove 2 of the 6 bolts at a time. Car in gear, crawl underneath, remove 2 bolts, crawl out and take car out of gear, crawl back underneath and rotate drive shaft so you can reach 2 more bolts, etc. Also, the directions say use a screwdriver to pry out the drive shaft from the pinion flange. It came partially out pretty easy but there wasn't enough room to completely separate it, I just waited till the differential dropped and it cleared then. I put a short piece of 2 x 4 wood on top of the exhaust and let the drive shaft lay on the 2 x 4, then put a jack stand under the exhaust for more support (although it probably wasn't necessary).

7) The directions say the two caliper mounting bolts are 15mm but mine were 18mm.

8) There are 3 bolts that hold the knuckle to the suspension - 15mm, 18mm and 21mm. Get them all loose before pulling any of them completely out, or the knuckle twists on the bushings as you're fighting through the loctite on the last bolt.

9) Forget using the pry bar to remove the half shafts. I fiddle-farted around with it for a while and got mad because it wouldn't budge. So I went out and pulled a couple times on the end of the half shaft and it popped right out! Tried the same trick on the other side and that worked very easily too.

10) Now the fun part - removing the differential. I just used a floor jack and made a wood platform with a piece of 3/4" thick shelving lumber that was about 10" x 15", and a piece of 2 x 4 screwed across the back end of it to keep the diff somewhat level as it was lowered. The platform rested on top of the floor jack and being very careful I was able to lower the differential out of the car.

11) There are four bolts holding the diff to the car. The rear passenger side one is an SOB to get out because there's no room for a socket - you have to use a box end 18mm wrench. I used a rubber mallet to bang on the end of the wrench to break it loose, then slowly unscrewed it. (I use the rubber mallet method all the time.)

12) Remove the rear passenger and front drivers bolts completely. Then loosen the other two bolts before moving the jack and wood platform under the differential. With the platform there, there's not a lot of room for wrenching. Remove the last two bolts and lower it out and you're done.

Off to my buddy's garage to get the 4.09's installed. If there's anything interesting about reassembly I'll try to add another post. Total time spent was about 5-1/2 hours start to finish.
Sponsored

 
Last edited:


Top