Sponsored

Need instructions for repair

sk47

Well-Known Member
Joined
Nov 12, 2020
Threads
28
Messages
5,057
Reaction score
2,411
Location
North Eastern TN
First Name
Jeff
Vehicle(s)
Chevy Silverado & Nissan Sentra SE
Hello; Do yourself a favor by taking lots of pictures before and during disassembly. In the old days i used tape and a marker to label connections.
Sponsored


fmc_smt

Well-Known Member
Joined
Jun 4, 2018
Threads
38
Messages
1,234
Reaction score
2,268
Location
Cottonwood , Arizona
Vehicle(s)
2015 gt , 2015 Escape , 2015 F250
Vehicle Showcase
1
Here you go if you need left side instructions let me know.

205-142 (T80T-4000-J)
Installer, Differential Bearing Cone
205-153 (T80T-4000-W)
Handle
303-1247
VCT Spark Plug Tube Seal Remover and Installer
TKIT-2006UF-FLM
TKIT-2006UF-ROW
Materials

NameSpecification
Motorcraft® High Performance Engine RTV Silicone
TA-357
WSE-M4G323-A6
Removal

NOTICE: During engine repair procedures, cleanliness is extremely important. Any foreign material, including any material created while cleaning gasket surfaces, that enters the oil passages, coolant passages or the oil pan, can cause engine failure.


  1. Remove the following items:
    1. Intake manifold.
      Refer to: Intake Manifold (303-01B Engine - 5.0L 32V Ti-VCT (359kW/486PS) (WU)/5.0L Ti-VCT V8 (343kW/466PS) (MF), Removal and Installation).
    2. Battery tray.
      Refer to: Battery Tray (414-01 Battery, Mounting and Cables, Removal and Installation).
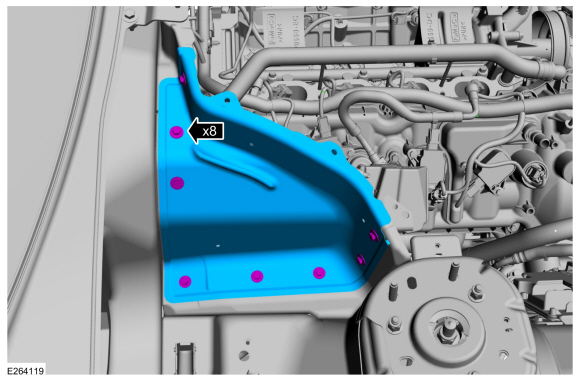
  1. Remove the fasteners and the battery heat shield.
video.gif
Help.jpg
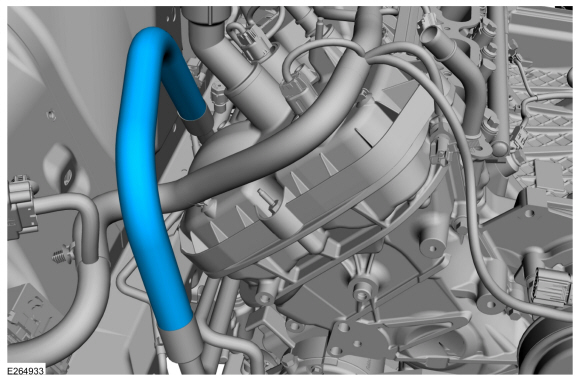
  1. Remove the A/C tube convolute sleeve.
video.gif
Help.jpg
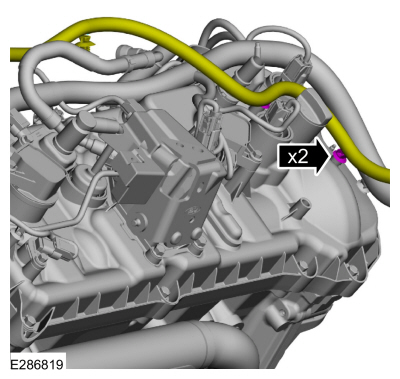
  1. If equipped, detach the wiring harness retainers and position the harness aside.
video.gif
Help.jpg
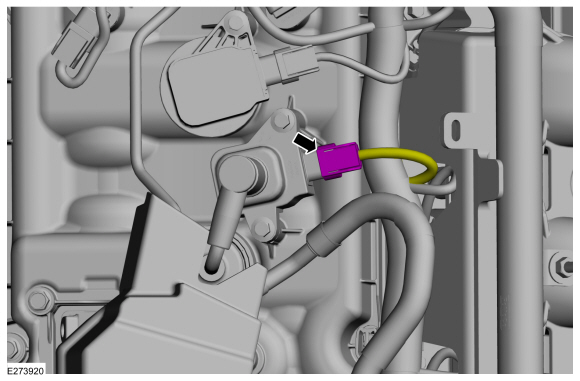
  1. Disconnect the remote mount ignition coil electrical connector.
video.gif
Help.jpg
  1. Remove the following items:
    1. High pressure fuel pump.
      Refer to: High-Pressure Fuel Pump (303-04B Fuel Charging and Controls - 5.0L 32V Ti-VCT (359kW/486PS) (WU)/5.0L Ti-VCT V8 (343kW/466PS) (MF), Removal and Installation).
    2. RH ignition coils.
      Refer to: Ignition Coil-On-Plug (303-07B Engine Ignition - 5.0L 32V Ti-VCT (359kW/486PS) (WU)/5.0L Ti-VCT V8 (343kW/466PS) (MF), Removal and Installation).
    3. Spark plug wire.
      Refer to: Spark Plug Wire (303-07B Engine Ignition - 5.0L 32V Ti-VCT (359kW/486PS) (WU)/5.0L Ti-VCT V8 (343kW/466PS) (MF), Removal and Installation).
    1. Detach the wiring harness retainer.
    1. Remove the nut and the ground wire.
video.gif
Help.jpg
    1. Disconnect the engine wiring harness electrical connectors.
    1. Detach the wiring harness retainers and position the harness aside.
video.gif
Help.jpg
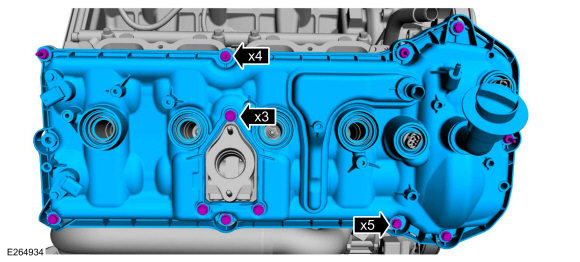
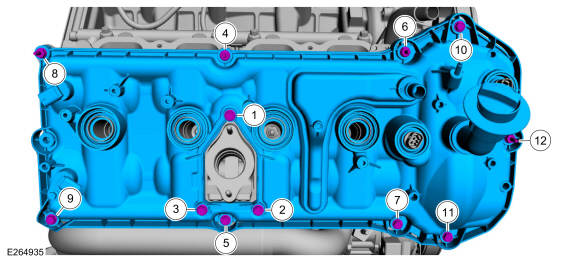
  1. Loosen the bolts and remove the valve cover.
video.gif
Help.jpg
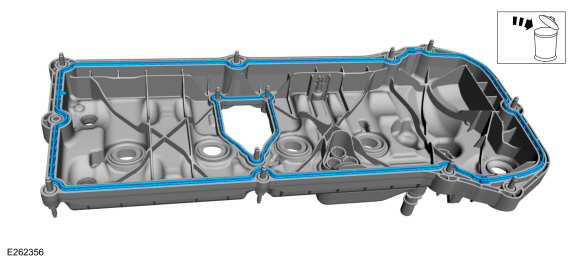
  1. NOTE: Clean the valve cover gasket groove with soap and water or a suitable solvent.
    Remove and discard the gaskets.
video.gif
Help.jpg
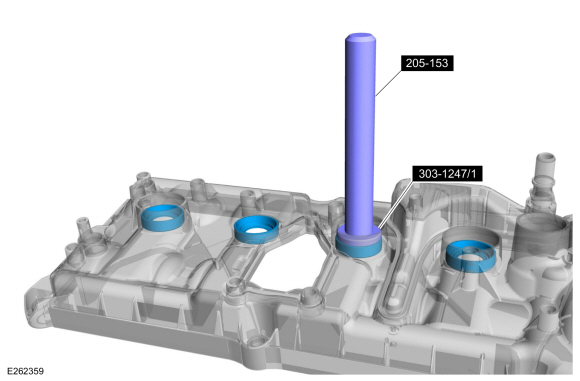
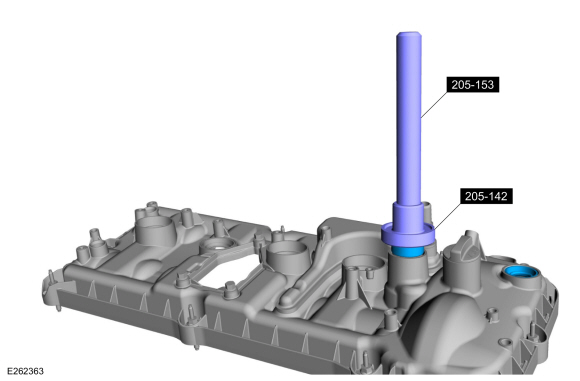
  1. Inspect the VCT variable force solenoid seals. Remove any damaged seals using the special tools.
    Use Special Service Tool: 205-153 (T80T-4000-W) Handle. , 205-142 (T80T-4000-J) Installer, Differential Bearing Cone.
video.gif
Help.jpg
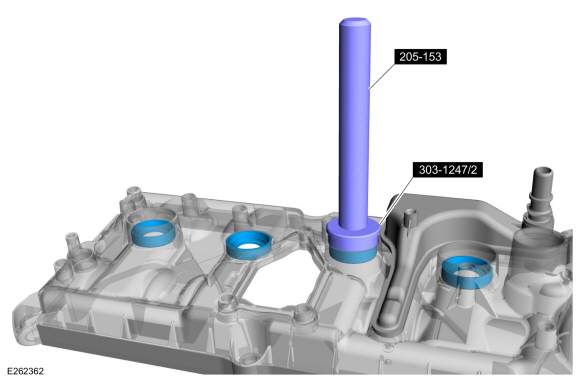
  1. Inspect the spark plug seals. Remove any damaged seals using the special tools.
    Use Special Service Tool: 205-153 (T80T-4000-W) Handle. , 303-1247 VCT Spark Plug Tube Seal Remover and Installer.
video.gif
Help.jpg
  1. Clean and prepare the RTV sealing surface.
    Refer to: RTV Sealing Surface Cleaning and Preparation (303-00 Engine System - General Information, General Procedures).
video.gif
Help.jpg
Installation

  1. NOTE: Installation of new seals is only required if damaged seals were removed.
    Using the special tools, install new spark plug tube seals.
    Use Special Service Tool: 205-153 (T80T-4000-W) Handle. , 303-1247 VCT Spark Plug Tube Seal Remover and Installer.
video.gif
Help.jpg
  1. NOTE: Installation of new seals is only required if damaged seals were removed.
    Using the special tools, install new VCT variable force solenoid seals.
    Use Special Service Tool: 205-153 (T80T-4000-W) Handle. , 205-142 (T80T-4000-J) Installer, Differential Bearing Cone.
video.gif
Help.jpg
  1. Install new gaskets.
video.gif
Help.jpg
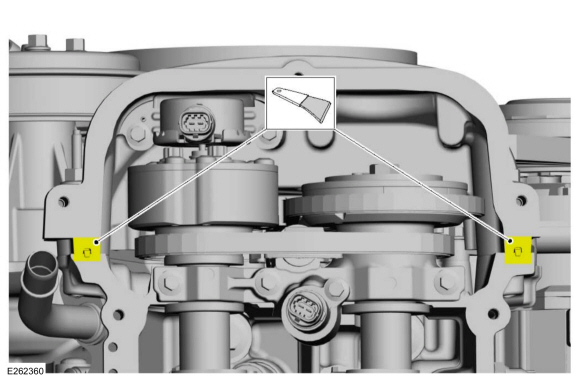
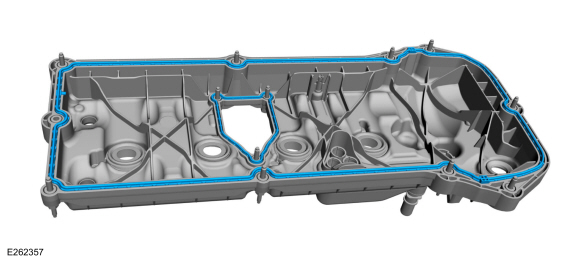
  1. NOTICE: If the valve cover is not installed and the fasteners tightened within 5 minutes, the sealant must be removed and the sealing area cleaned.
    Apply an 12 mm (0.47 in) bead of silicone gasket and sealant to the engine front cover-to-cylinder head joints.
    Material: Motorcraft® High Performance Engine RTV Silicone / TA-357 (WSE-M4G323-A6)
video.gif
Help.jpg
  1. Install the valve cover and tighten the bolts.
    Torque: 89 lb.in (10 Nm)
video.gif
Help.jpg
    1. Position the wiring harness and attach the retainers.
    1. Connect the engine wiring harness electrical connectors.
video.gif
Help.jpg
    1. Install the ground wire. and the nut.
      Torque: 89 lb.in (10 Nm)
    1. Attach the wiring harness retainer.
video.gif
Help.jpg
  1. Install the following items:
    1. Spark plug wire.
      Refer to: Spark Plug Wire (303-07B Engine Ignition - 5.0L 32V Ti-VCT (359kW/486PS) (WU)/5.0L Ti-VCT V8 (343kW/466PS) (MF), Removal and Installation).
    2. RH ignition coils.
      Refer to: Ignition Coil-On-Plug (303-07B Engine Ignition - 5.0L 32V Ti-VCT (359kW/486PS) (WU)/5.0L Ti-VCT V8 (343kW/466PS) (MF), Removal and Installation).
    3. High pressure fuel pump.
      Refer to: High-Pressure Fuel Pump (303-04B Fuel Charging and Controls - 5.0L 32V Ti-VCT (359kW/486PS) (WU)/5.0L Ti-VCT V8 (343kW/466PS) (MF), Removal and Installation).
  1. Connect the remote mount ignition coil electrical connector.
video.gif
Help.jpg
  1. If equipped, position the harness and attach the retainers.
video.gif
Help.jpg
  1. Install the A/C tube convolute sleeve.
video.gif
Help.jpg
  1. Install the battery heat shield and fasteners.
    Torque: 80 lb.in (9 Nm)
video.gif
Help.jpg
  1. Install the following items:
    1. Battery tray.
      Refer to: Battery Tray (414-01 Battery, Mounting and Cables, Removal and Installation).
    2. Intake manifold.
      Refer to: Intake Manifold (303-01B Engine - 5.0L 32V Ti-VCT (359kW/486PS) (WU)/5.0L Ti-VCT V8 (343kW/466PS) (MF), Removal and Installation).
 

fmc_smt

Well-Known Member
Joined
Jun 4, 2018
Threads
38
Messages
1,234
Reaction score
2,268
Location
Cottonwood , Arizona
Vehicle(s)
2015 gt , 2015 Escape , 2015 F250
Vehicle Showcase
1
Here you go if you need left side instructions let me know.

205-142 (T80T-4000-J)
Installer, Differential Bearing Cone
205-153 (T80T-4000-W)
Handle
303-1247
VCT Spark Plug Tube Seal Remover and Installer
TKIT-2006UF-FLM
TKIT-2006UF-ROW
Materials

NameSpecification
Motorcraft® High Performance Engine RTV Silicone
TA-357
WSE-M4G323-A6
Removal

NOTICE: During engine repair procedures, cleanliness is extremely important. Any foreign material, including any material created while cleaning gasket surfaces, that enters the oil passages, coolant passages or the oil pan, can cause engine failure.


  1. Remove the following items:
    1. Intake manifold.
      Refer to: Intake Manifold (303-01B Engine - 5.0L 32V Ti-VCT (359kW/486PS) (WU)/5.0L Ti-VCT V8 (343kW/466PS) (MF), Removal and Installation).
    2. Battery tray.
      Refer to: Battery Tray (414-01 Battery, Mounting and Cables, Removal and Installation).
  2. Remove the fasteners and the battery heat shield.
video.gif
Help.jpg
  1. Remove the A/C tube convolute sleeve.
video.gif
Help.jpg
  1. If equipped, detach the wiring harness retainers and position the harness aside.
video.gif
Help.jpg
  1. Disconnect the remote mount ignition coil electrical connector.
video.gif
Help.jpg
  1. Remove the following items:
    1. High pressure fuel pump.
      Refer to: High-Pressure Fuel Pump (303-04B Fuel Charging and Controls - 5.0L 32V Ti-VCT (359kW/486PS) (WU)/5.0L Ti-VCT V8 (343kW/466PS) (MF), Removal and Installation).
    2. RH ignition coils.
      Refer to: Ignition Coil-On-Plug (303-07B Engine Ignition - 5.0L 32V Ti-VCT (359kW/486PS) (WU)/5.0L Ti-VCT V8 (343kW/466PS) (MF), Removal and Installation).
    3. Spark plug wire.
      Refer to: Spark Plug Wire (303-07B Engine Ignition - 5.0L 32V Ti-VCT (359kW/486PS) (WU)/5.0L Ti-VCT V8 (343kW/466PS) (MF), Removal and Installation).
    1. Detach the wiring harness retainer.
    1. Remove the nut and the ground wire.
video.gif
Help.jpg
    1. Disconnect the engine wiring harness electrical connectors.
    1. Detach the wiring harness retainers and position the harness aside.
video.gif
Help.jpg
  1. Loosen the bolts and remove the valve cover.
video.gif
Help.jpg
  1. NOTE: Clean the valve cover gasket groove with soap and water or a suitable solvent.
    Remove and discard the gaskets.
video.gif
Help.jpg
  1. Inspect the VCT variable force solenoid seals. Remove any damaged seals using the special tools.
    Use Special Service Tool: 205-153 (T80T-4000-W) Handle. , 205-142 (T80T-4000-J) Installer, Differential Bearing Cone.
video.gif
Help.jpg
  1. Inspect the spark plug seals. Remove any damaged seals using the special tools.
    Use Special Service Tool: 205-153 (T80T-4000-W) Handle. , 303-1247 VCT Spark Plug Tube Seal Remover and Installer.
video.gif
Help.jpg
  1. Clean and prepare the RTV sealing surface.
    Refer to: RTV Sealing Surface Cleaning and Preparation (303-00 Engine System - General Information, General Procedures).
video.gif
Help.jpg
Installation

  1. NOTE: Installation of new seals is only required if damaged seals were removed.
    Using the special tools, install new spark plug tube seals.
    Use Special Service Tool: 205-153 (T80T-4000-W) Handle. , 303-1247 VCT Spark Plug Tube Seal Remover and Installer.
video.gif
Help.jpg
  1. NOTE: Installation of new seals is only required if damaged seals were removed.
    Using the special tools, install new VCT variable force solenoid seals.
    Use Special Service Tool: 205-153 (T80T-4000-W) Handle. , 205-142 (T80T-4000-J) Installer, Differential Bearing Cone.
video.gif
Help.jpg
  1. Install new gaskets.
video.gif
Help.jpg
  1. NOTICE: If the valve cover is not installed and the fasteners tightened within 5 minutes, the sealant must be removed and the sealing area cleaned.
    Apply an 12 mm (0.47 in) bead of silicone gasket and sealant to the engine front cover-to-cylinder head joints.
    Material: Motorcraft® High Performance Engine RTV Silicone / TA-357 (WSE-M4G323-A6)
video.gif
Help.jpg
  1. Install the valve cover and tighten the bolts.
    Torque: 89 lb.in (10 Nm)
video.gif
Help.jpg
    1. Position the wiring harness and attach the retainers.
    1. Connect the engine wiring harness electrical connectors.
video.gif
Help.jpg
    1. Install the ground wire. and the nut.
      Torque: 89 lb.in (10 Nm)
    1. Attach the wiring harness retainer.
video.gif
Help.jpg
  1. Install the following items:
    1. Spark plug wire.
      Refer to: Spark Plug Wire (303-07B Engine Ignition - 5.0L 32V Ti-VCT (359kW/486PS) (WU)/5.0L Ti-VCT V8 (343kW/466PS) (MF), Removal and Installation).
    2. RH ignition coils.
      Refer to: Ignition Coil-On-Plug (303-07B Engine Ignition - 5.0L 32V Ti-VCT (359kW/486PS) (WU)/5.0L Ti-VCT V8 (343kW/466PS) (MF), Removal and Installation).
    3. High pressure fuel pump.
      Refer to: High-Pressure Fuel Pump (303-04B Fuel Charging and Controls - 5.0L 32V Ti-VCT (359kW/486PS) (WU)/5.0L Ti-VCT V8 (343kW/466PS) (MF), Removal and Installation).
  2. Connect the remote mount ignition coil electrical connector.
video.gif
Help.jpg
  1. If equipped, position the harness and attach the retainers.
video.gif
Help.jpg
  1. Install the A/C tube convolute sleeve.
video.gif
Help.jpg
  1. Install the battery heat shield and fasteners.
    Torque: 80 lb.in (9 Nm)
video.gif
Help.jpg
  1. Install the following items:
    1. Battery tray.
      Refer to: Battery Tray (414-01 Battery, Mounting and Cables, Removal and Installation).
    2. Intake manifold.
      Refer to: Intake Manifold (303-01B Engine - 5.0L 32V Ti-VCT (359kW/486PS) (WU)/5.0L Ti-VCT V8 (343kW/466PS) (MF), Removal and Installation).
 

Cobra Jet

Well-Known Member
Joined
Feb 12, 2015
Threads
711
Messages
16,304
Reaction score
18,078
Location
NJ
Vehicle(s)
2018 EB Prem. w/PP and 94 Mustang Cobra
After finding out how much Ford is charging for parts and labor for a valve cover gasket ($900) I’m going to do it myself.

Does anyone know where I can find instructions/ step by step on this repair? I found a repair guide on the forum for a 2017 but not sure if it’s the same for a 2018 due to one being a gen 2 vs gen 3.

Here's all you need on that:

Thread containing the valve cover TSB:
https://www.mustang6g.com/forums/threads/valve-cover-leak.131014/#post-2705151

Instructions for L & R valve cover R&R:
https://www.mustang6g.com/forums/attachments/5-0-valve-cover-rh-pdf.401025/

https://www.mustang6g.com/forums/attachments/5-0-valve-cover-lh-pdf.401026/

:)
 

Grizzly44

Member
Joined
Dec 28, 2022
Threads
1
Messages
8
Reaction score
1
Location
Tri-Cities, WA
First Name
Hector
Vehicle(s)
2018 Mustang GT PP1
I hate to revive this from the dead but do you happen to have the manual for removing the driver side VC for a 2018?
Sponsored


Top