- Joined
- Mar 15, 2017
- Threads
- 18
- Messages
- 608
- Reaction score
- 336
- Location
- St. Louis, MO
- First Name
- Sam
- Vehicle(s)
- 2016 GT Premium PP
- Thread starter
- #1
2018 Digital Instrument Cluster Installation Guide
Post #2 contains an FAQ and supplement for 2018+ owners. Please view this before asking any questions!
This guide explains how to successfully swap a 2018 digital instrument cluster into your 2015-2018 Mustang. The steps are slightly different for a 2018 and are not pictured at this time. This works on any 2015-2018. Base Sync, Sync 2 (MFT), and Sync 3. Without Sync 3 you lose the Nav feature and maybe some other basic features.
If you'd like to skip all the parts collecting and programming send me a PM. I sell fully ready to go plug n' play kits for all 15-18 cars. I also sell pre-built files tailored to your car that you can upload right to your cluster. Visit my website www.breeves002.net for more info!
View this thread to find much of the information in this guide and more here: https://www.mustang6g.com/forums/showthread.php?t=74133
Thanks to db252 and p6cl for their pioneering work in this swap. Much of the information posted here was presented by them originally. zackmd1, DanMc85 and others have also had a hand in helping figure different things out. Unless noted the pictures in here were taken either by DB252 or myself.
DISCLAIMERS: Do this at your own risk. I am not responsible for any damage you do to your car. The process is fairly low risk but remember to take your time and be cautious when modifying as built data in FORScan. To comply with federal and/or state laws you must have your new odometer match your old one when you get a new instrument cluster. Some states require a shop to verify the odometer was not changed. (Though it shouldn’t ever be a problem). Lastly, be careful when working with airbags. An unintentional deployment is unlikely but take precautions to be safe.
KNOWN ISSUES:
1. New cluster software seems to have removed the oil temperature gauge. Most likely new cluster orders will not have it. They will have 1 page of custom gauges then the text line gauges.
2. 2015 owners and some 2018+ owners will not have a working differential fluid temp gauge. This is because the 2015 model year does not have a differential temp sensor. Only some 2018's come with a dif temp sensor too. You can code this out so its not an option.
3. There may be more issues we haven't found. As of now there have been 200+ successful swaps and no one seems to have any problems. Let this be your warning that you could be the first to find a new problem!
Before starting this mod or ordering any parts, make sure you or someone you know has an OBD2 adapter that works on both the HS-CAN and secondary can busses (HS-CAN2, HS-CAN3, MS-CAN). The recommended adapter is the OBDLink MX. It can be found on Amazon for around $79.99. https://www.amazon.com/ScanTool-426...TF8&qid=1520994099&sr=1-1&keywords=obdlink+mx
I also recommend the OBDLink EX which is a cheaper, good alternative. It is also on amazon.
https://www.amazon.com/OBDLink-EX-F...d=1&keywords=obdlink+ex&qid=1603306536&sr=8-2
Coupon code "FORSCAN" used to take $15 off the price of the EX. May not work when reading this.
The second option is a chinese clone with switch. Can be found here. They also have wifi variants if you search around.
https://www.amazon.com/dp/B01N18TOFB/ref=psdc_15707381_t2_B06XJL31Z7
Download FORScan from www.forscan.org and sign up on the forums and then generate an extended license: http://forscan.org/forum/extlic.php
Note: There is a chance the cluster may have a newer software then FORScan supports. This seems to be an issue of the past but if that happens you'll get an error. PM me or email FORScan support if you have an issue. This seems to be a non issue now.
More information on how to use FORScan here: https://www.mustang6g.com/forums/showthread.php?t=61773
PM with questions or post below. If you are local to me I am happy to help!
Required tools:
-T20 Torx Screwdriver
-T25 Torx Screwdriver
-7mm socket
-8mm socket
-10mm socket
-24mm socket
-Interior trim removal tools (helpful but not necessary)
-Windows PC with OBD2 adapter that can access all busses
Step 1: Acquire parts
This can take time. Parts can be backordered for a month or more. I ordered all parts through my local Ford dealer except for the instrument cluster. I ordered that from Tasca. When you order give them the VIN of YOUR car and your current mileage. You may want to give them your expected mileage in a week so you can match it. The cluster comes with whatever milage you tell them. They may ask why you are replacing the cluster. Just say you are upgrading your current cluster to the Digital one. That is an acceptable response. If you can find the parts from a wrecked car they will be much less expensive. Do not send your old instrument cluster back as a core. They will not accept it.
Where can I order these parts?
- Your local Ford dealer. Some will price match online stores some will not. You have to pay sales tax but you do not have to pay shipping this way and things usually come a few days faster.
- New Online. I recommend calling Mike R at Autonation Ford White Bear Lake.
- Junkyards - Going to be hard to find but much less expensive then new.
Parts to order:
• Instrument Cluster
• SCCM Housing (not required for 2018+ owners)
• 3 steering wheel switches
• Cluster bezel
Part numbers:
Digital Instrument Cluster
Automatic MPH: JR3Z-10849-JB
Manual MPH: JR3Z-10849-LB
Automatic KPH: JR3Z-10849-KB
Manual KPH: JR3Z-10849-MB
Bullitt MPH Manual: KR3Z-10849-NK
Note: The part you get may have a different number then what you ordered.
Call Autonation Ford White Bear Lake and ask for Mike R. Tell them what cluster you want and they'll get you the latest part number. Alternatively send me a PM and I can get them for you too.
Switch Assembly Left Hand Upper (2015-2017 only)
JR3Z-9C888-AA
Switch Assembly Right Hand Lower
JR3Z-9C888-EA
Switch Assembly Right Hand Upper
JR3Z-9C888-CA
Switch Assembly Left Hand Lower - FOR ADAPTIVE CRUISE 2015-2017 ONLY!!! Non-adaptive cruse need not replace the cruise control switch pack
JR3Z-9C888-FA
Instrument Panel (Bezel)
LHD: JR3Z-63044D70-BA
RHD: JR3Z-63044D70-AA
Steering Column Housing Assembly (SCCM/Clockspring, 15-17 only)
JR3Z-3F791-JA – Variable wipers (most people order this one)
JR3Z-3F791-HA – Variable wipers and heated steering wheel (order if you want to add heated wheel)
JR3Z-3F791-AA – Auto Wipers
JR3Z-3F791-LA – Auto wipers/heated wheel/lane departure
JR3Z-3F791-KA – Auto wipers and lane departure
JR3Z-3F791-DA – Auto wipers/heated wheel/lane departure
There may be newer part numbers for the SCCMs too but Ford will generally supplement the newer ones when necessary.
ORDER the -HA or -LA (auto wipers) SCCM Housing Assembly if you think you will ever want to add a heated wheel.
To add a heated wheel you also need a FCIM out of a 401A 2018+ car and HSWM with all the proper pigtails.
ALL SCCM's work with cars without auto wipers. Some will just have unused pins for the HSW and will have the "A" for auto wipers. Does not effect wiper operation.
The instrument cluster will work with your old switches/sccm but you will not be able to access any of the menu’s to set custom gauges. You’ll only have trip/fuel economy/tire pressure.
Once you have the parts in your hands the fun part begins!
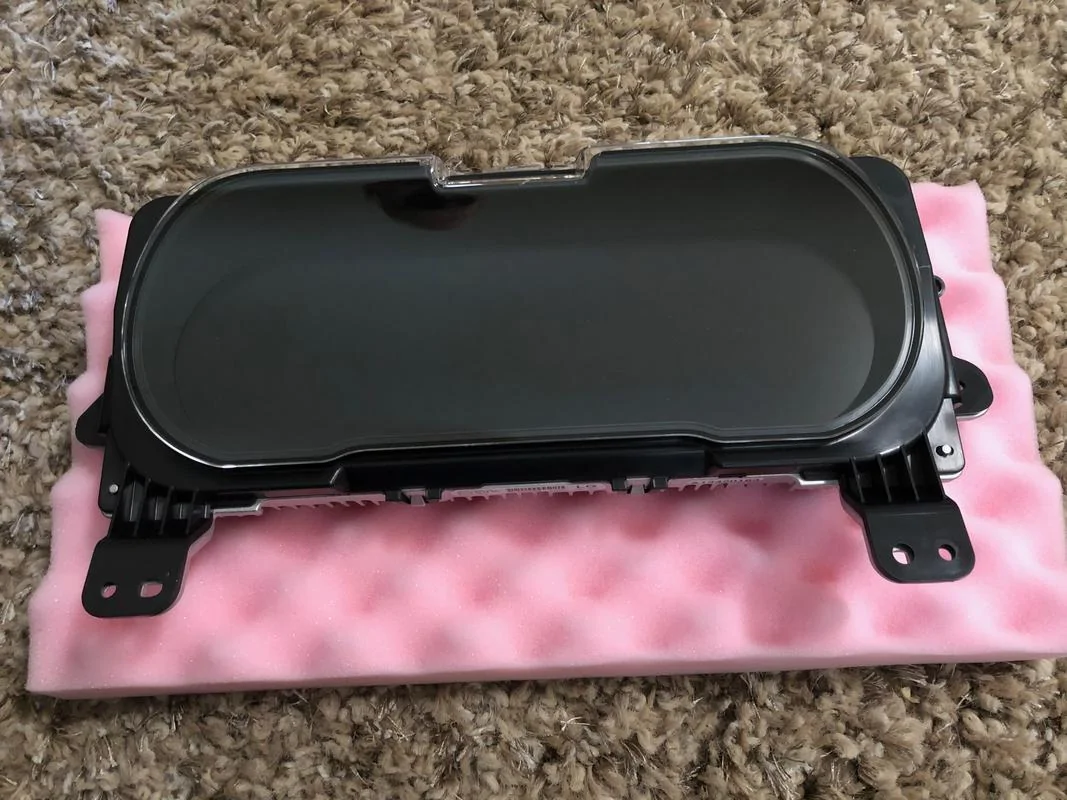
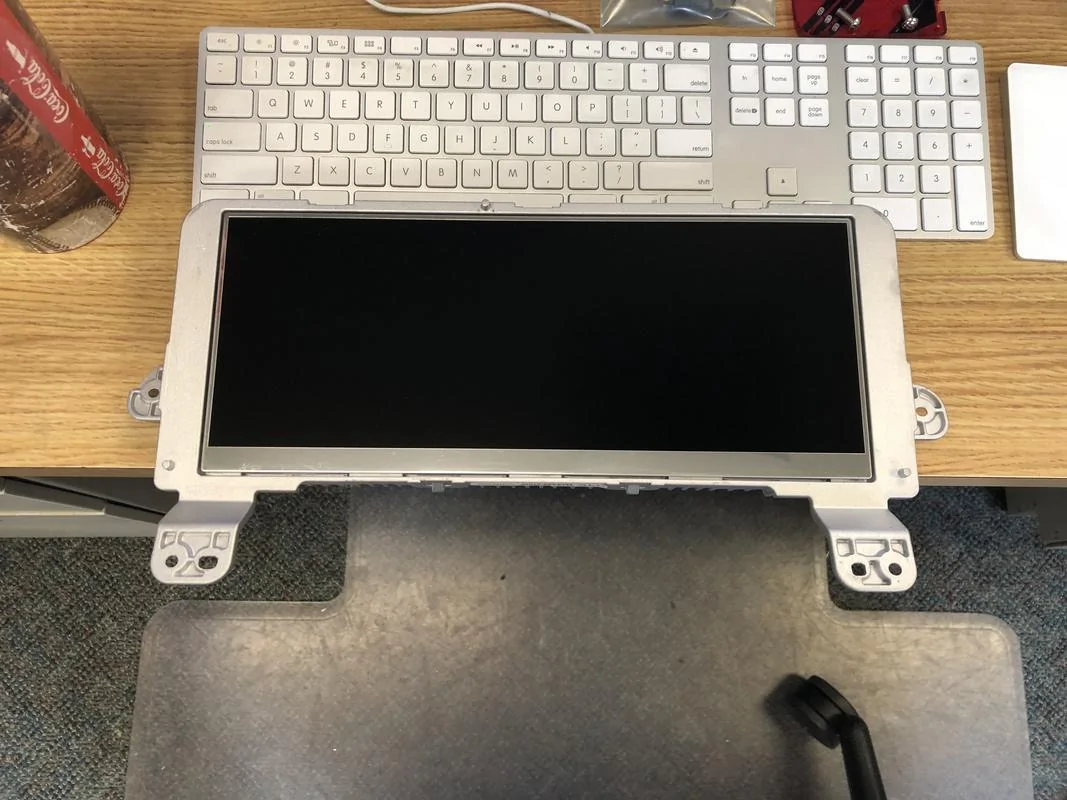
Cluster:

^I had to remove the bezel of the cluster to clean the display off. There were some large particles clinging onto it. Be very careful not to damage the display! I suspected it was actually a square display and this confirmed that.
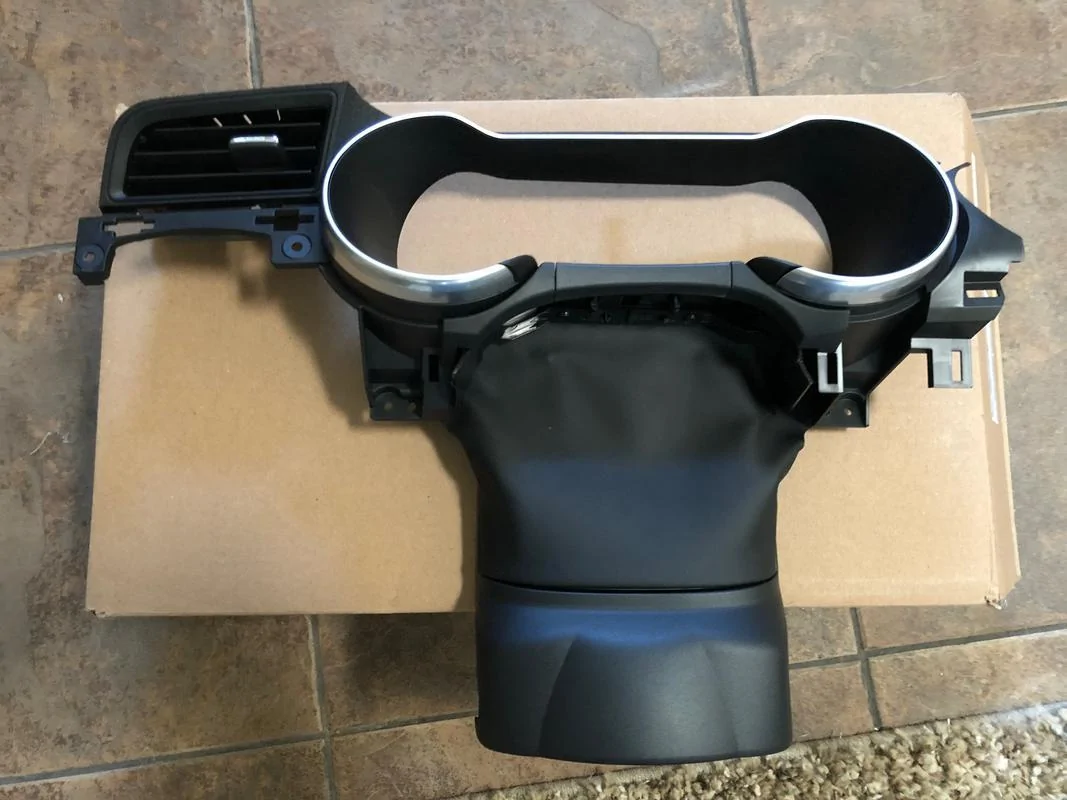
Bezel:
Step 2: Install Parts
According to the Ford service manual it is not required to remove the battery ground to do these installation steps. If you feel more comfortable please feel free to remove the battery ground.
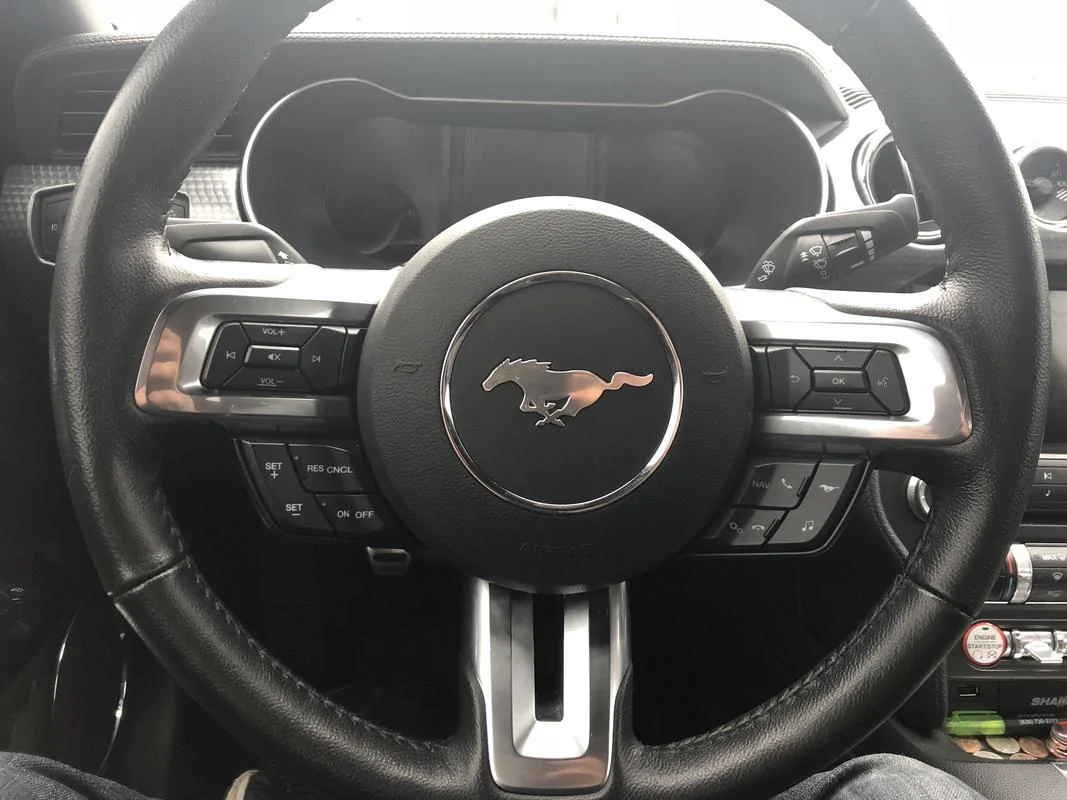
Remove your steering wheel first and replace the switches. This makes it easier to access through to the cluster. 2018 owners DO NOT NEED to remove the wheel entirely. You only need to replace your switches. There’s a great youtube tutorial by CJPonyParts on removing the wheel and replacing switches. That is found here: [ame]
For those of you that don’t wish to watch it here are the basic steering wheel removal steps:
- Remove the airbag with a small flathead screwdriver. On each side of the wheel there is a small hole. Press the screwdriver in until you feel the spring mechanism. Press it in and pull that side of the airbag out at the same time. Repeat with the other side. Unplug the 3 electrical connectors and place the airbag aside.
- Unplug steering wheel to clockspring electrical connector
- Remove the steering wheel with a 24mm socket. (2018 owners may skip full wheel removal)
- Replace steering wheel switches with new ones.

Remove the steering column trim:
- Top trim lifts off. Just pull up.
- Lower trim has a 7mm screw and T20 screw. Remove and pull down hard. Not required to remove lower trim for 2018's.
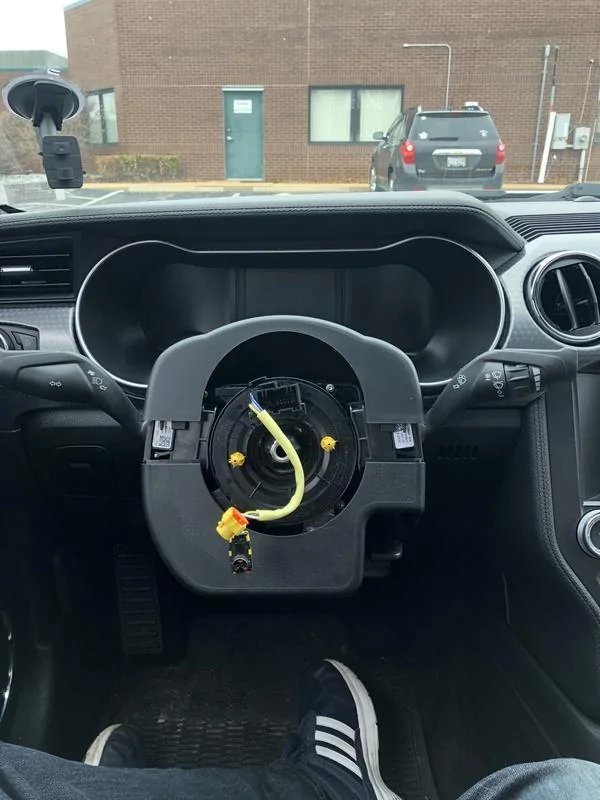
Remove SCCM/clockspring housing:(skip if a 2018)
- Remove two electrical connectors
- Remove two torx screws at the top towards the instrument panel
- Pull on the tab underneath the housing assembly and slide the entire assembly off of the steering column
- Replacement is reverse of removal. Be sure to put the clockspring locking tab in your old clockspring to keep it from getting turned to the incorrect place.
Remove instrument panel trim pieces:
The first half of this video shows cluster removal: [ame]
Text Instructions:
-Start by pulling both bottom corner dash trim pieces off. Carefully pry with your hands towards the bottom and pull these straight out. On the passenger side opening the glovebox makes this easier. It is important to pull straight out so you don't break these. Interior trim removal tools are very helpful for the drivers side.
-Remove the large trim piece that covers the 3 center vents or 2 center vents and gauge pod (for pp cars). Carefully pry with your hands starting at the right side. The clips will pop out. Make sure to work you hand towards the middle to avoid snapping it. If you have a PP car remove the electrical connector on the center gauges before pulling it completely off. This piece has a lot of clips so it sometimes requires a good pull.
-Remove headlight switch trim. There are 2 screws on the left side. Remove them and then pull out. Unplug headlight switch electrical connector and remove. If you left the battery connected you can remove the headlight switch from the trim and plug it back in to keep the speakers from dinging at you.
-Remove trim below headlight switch with sunglasses holder. Remove one screw then carefully pry out. Unplug trunk switch electrical connector.
-Remove the trim to the right of the steering column. Just pull out. This has the little slits in it for the HVAC interior temp sensor.
-Remove the bezel with left HVAC vent and upper steering column cover. Remove the 4 screws. Two on left side and two on either side of the steering wheel. Then pull forcefully but carefully. At this point the top of the steering column trim should be popped out. Lower and extend the steering column completely to make it easier to remove.
-After removing everything make sure none of the retaining clips were left behind in the dash. They are yellow or blue. If they were pull them out carefully and replace them on the trim piece they came off of. It is really easy to lose these in the dash and they're like a dollar or two each from the dealer.
I did not remove my steering wheel because I didn’t get the new SCCM for a week after I got the cluster.
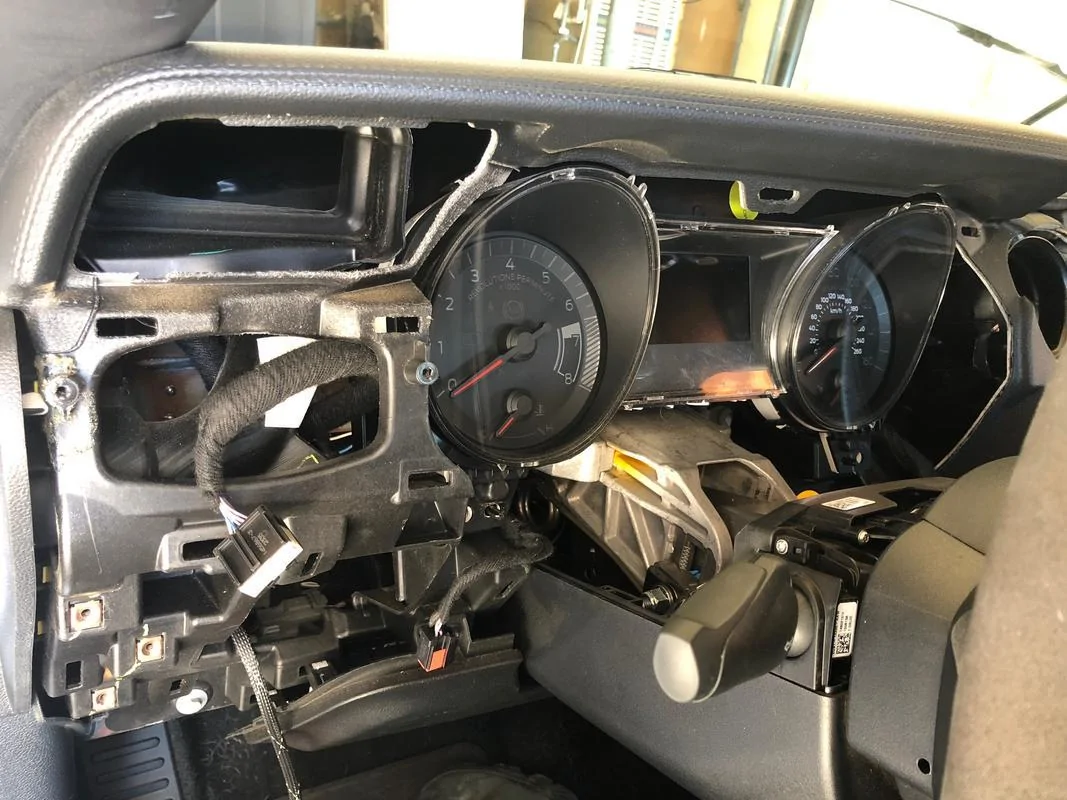
Remove the instrument cluster:
-Remove the two screws in the bottom corners
-Pull to release the clips
-Unplug electrical connector
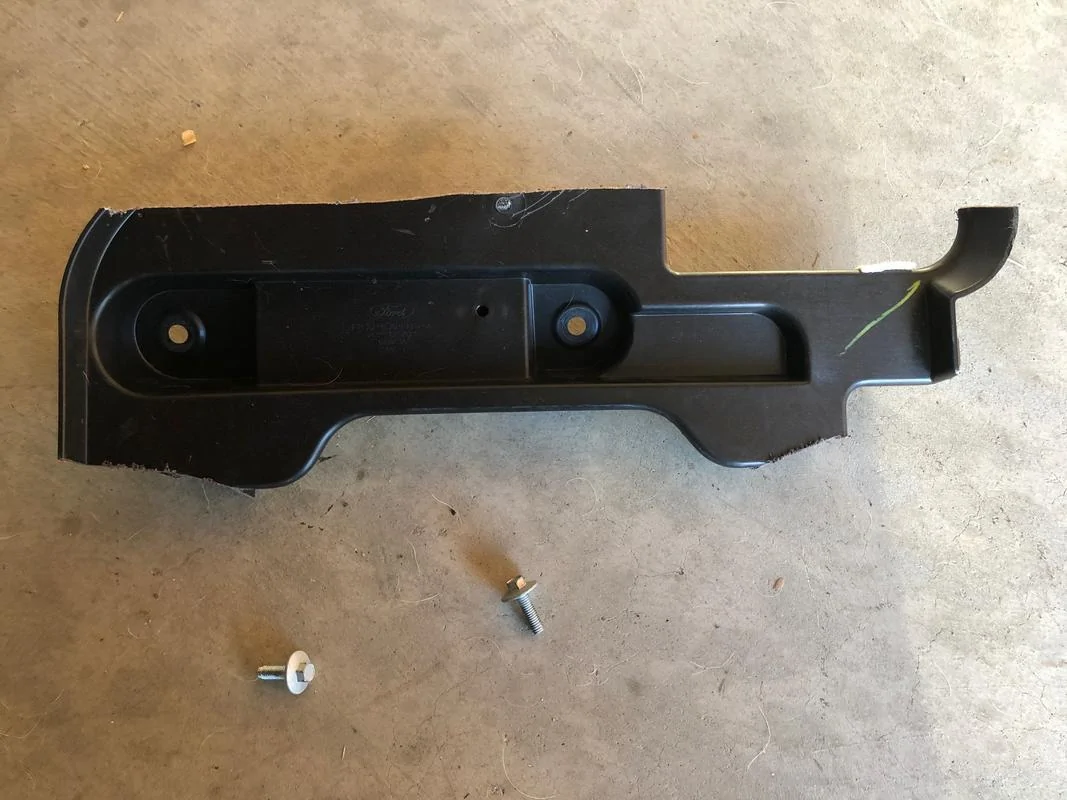
Remove plastic backing:
-Remove two screws
-Cut plastic backplate out. Refer to pictures.
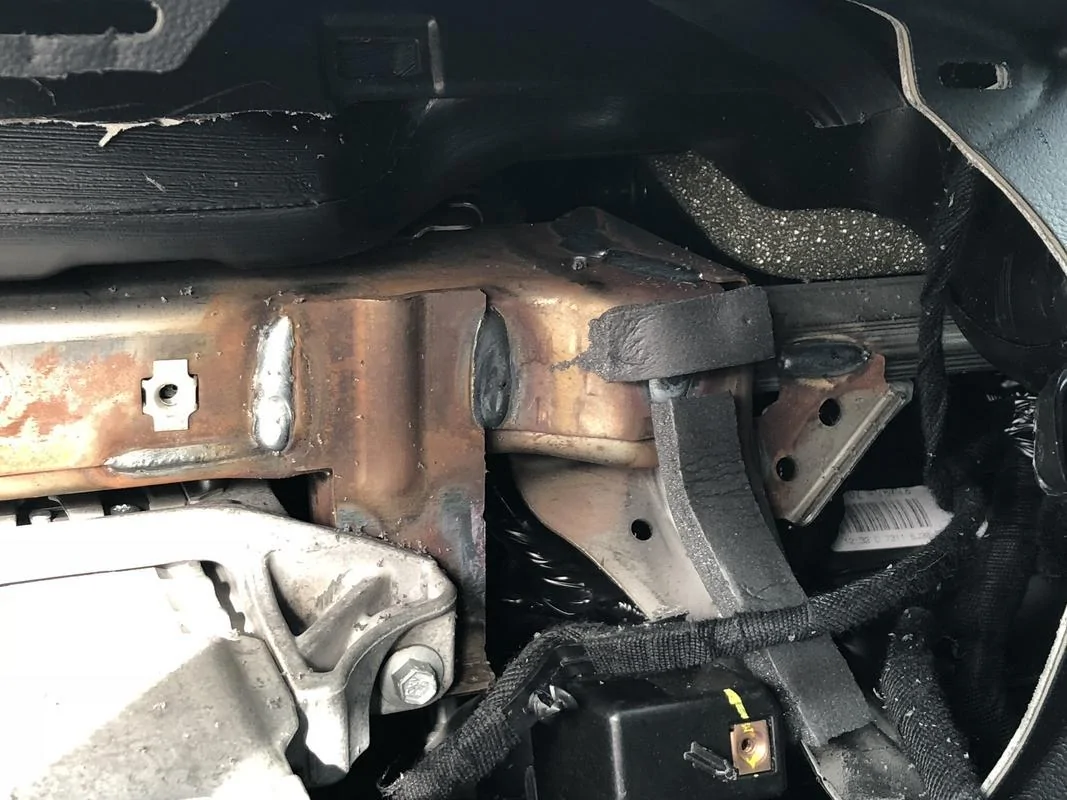
Add foam padding on dashboard brace to keep the instrument cluster from rattling. I also recommend adding a piece of felt or foam on the other side and top.
Install new instrument cluster
-The old clips are not used. Only the two lower screws are used to secure the cluster.
-Don’t forget to plug the electrical connector in
Reinstall the bezel and all dash trim pieces minus steering column trim.
Install new SCCM housing/clockspring(except 2018)
-Reinstall both torx screws
-Plug in both electrical connectors.
-Do not remove the clockspring retaining pin until you are ready to install the wheel.
Install lower and upper steering column trim
Install steering wheel with new switches.
Reinstall airbag.
Connect battery if disconnected.
Feel free to start the car and see what it says! First boot can take 10-20 seconds so be patient. You will probably get many errors. I got a 4x4 error. Weird!
Note: If you chose not to disconnect the battery, the engine may not start immediately. The engine will not run without an instrument cluster so it takes a few minutes for the car to register its ok to start. If you disconnected the battery you shouldn't have this problem.
Step 3: Configure as-built data with FORScan!
I sell ready to go files tailored perfectly to your car. Please send a PM if interested!
Use this spreadsheet for a reference:
The above spreadsheet has a sample IPC and SCCM ABD you can use as a baseline for your modules.
Note: Some clusters have newer software that FORScan may not support in the latest release. If this is the case PM me for a beta build or email the forscan team for a beta build.
You must select your features and adjust the as built data as necessary. Any lines that do not have a feature set use the supplied as built data at the bottom of the page.
You must also adjust the as built data in the SCCM. You can use your old SCCM as built data except for line 724-03-01. Should be set to 1733 xxxx xx without adaptive cruise or 2933 xxxx xx with adaptive cruise.
To avoid a U2100 code in both the SCCM and IPC I recommend changing ALL ABD and then hitting "write all" at the bottom. If you are testing things, start with the baseline ABD and write all then change things one at a time. If you have the U2100 code and need to get rid of it, save your as built, change some as-built in 4+ lines, write all, then load the saved as built and write all again. Clear codes and read codes. Hopefully its gone! If you have other codes that come back after you clear codes there may be a problem with your as built data.
SUPER IMPORTANT NOTE: SAVE SAVE SAVE your as built data! Save your OEM data, save your unconfigured IPC/SCCM data, and save your configured data. Save it all! If you go to the dealer and some idiot tech flashes the IPC or SCCM because it says theres something wrong you don't want to have to sit down and figure out your abd all over again. Its extremely easy just to load the file and write all. Not worth the risk. The OEM is online but I recommend saving it to be safe. I say save your unconfigured data in case flashing the configured data breaks features in the module - its easy to go back to the way it came to you.
Once your as built data is configured you now should have a fully functional instrument cluster! Congrats! Leave me a thanks if this helped you. Another big shout out to everyone that helped pull this together!
Post #2 contains an FAQ and supplement for 2018+ owners. Please view this before asking any questions!
This guide explains how to successfully swap a 2018 digital instrument cluster into your 2015-2018 Mustang. The steps are slightly different for a 2018 and are not pictured at this time. This works on any 2015-2018. Base Sync, Sync 2 (MFT), and Sync 3. Without Sync 3 you lose the Nav feature and maybe some other basic features.
If you'd like to skip all the parts collecting and programming send me a PM. I sell fully ready to go plug n' play kits for all 15-18 cars. I also sell pre-built files tailored to your car that you can upload right to your cluster. Visit my website www.breeves002.net for more info!
View this thread to find much of the information in this guide and more here: https://www.mustang6g.com/forums/showthread.php?t=74133
Thanks to db252 and p6cl for their pioneering work in this swap. Much of the information posted here was presented by them originally. zackmd1, DanMc85 and others have also had a hand in helping figure different things out. Unless noted the pictures in here were taken either by DB252 or myself.
DISCLAIMERS: Do this at your own risk. I am not responsible for any damage you do to your car. The process is fairly low risk but remember to take your time and be cautious when modifying as built data in FORScan. To comply with federal and/or state laws you must have your new odometer match your old one when you get a new instrument cluster. Some states require a shop to verify the odometer was not changed. (Though it shouldn’t ever be a problem). Lastly, be careful when working with airbags. An unintentional deployment is unlikely but take precautions to be safe.
KNOWN ISSUES:
1. New cluster software seems to have removed the oil temperature gauge. Most likely new cluster orders will not have it. They will have 1 page of custom gauges then the text line gauges.
2. 2015 owners and some 2018+ owners will not have a working differential fluid temp gauge. This is because the 2015 model year does not have a differential temp sensor. Only some 2018's come with a dif temp sensor too. You can code this out so its not an option.
3. There may be more issues we haven't found. As of now there have been 200+ successful swaps and no one seems to have any problems. Let this be your warning that you could be the first to find a new problem!
Before starting this mod or ordering any parts, make sure you or someone you know has an OBD2 adapter that works on both the HS-CAN and secondary can busses (HS-CAN2, HS-CAN3, MS-CAN). The recommended adapter is the OBDLink MX. It can be found on Amazon for around $79.99. https://www.amazon.com/ScanTool-426...TF8&qid=1520994099&sr=1-1&keywords=obdlink+mx
I also recommend the OBDLink EX which is a cheaper, good alternative. It is also on amazon.
https://www.amazon.com/OBDLink-EX-F...d=1&keywords=obdlink+ex&qid=1603306536&sr=8-2
Coupon code "FORSCAN" used to take $15 off the price of the EX. May not work when reading this.
The second option is a chinese clone with switch. Can be found here. They also have wifi variants if you search around.
https://www.amazon.com/dp/B01N18TOFB/ref=psdc_15707381_t2_B06XJL31Z7
Download FORScan from www.forscan.org and sign up on the forums and then generate an extended license: http://forscan.org/forum/extlic.php
Note: There is a chance the cluster may have a newer software then FORScan supports. This seems to be an issue of the past but if that happens you'll get an error. PM me or email FORScan support if you have an issue. This seems to be a non issue now.
More information on how to use FORScan here: https://www.mustang6g.com/forums/showthread.php?t=61773
PM with questions or post below. If you are local to me I am happy to help!
Required tools:
-T20 Torx Screwdriver
-T25 Torx Screwdriver
-7mm socket
-8mm socket
-10mm socket
-24mm socket
-Interior trim removal tools (helpful but not necessary)
-Windows PC with OBD2 adapter that can access all busses
Step 1: Acquire parts
This can take time. Parts can be backordered for a month or more. I ordered all parts through my local Ford dealer except for the instrument cluster. I ordered that from Tasca. When you order give them the VIN of YOUR car and your current mileage. You may want to give them your expected mileage in a week so you can match it. The cluster comes with whatever milage you tell them. They may ask why you are replacing the cluster. Just say you are upgrading your current cluster to the Digital one. That is an acceptable response. If you can find the parts from a wrecked car they will be much less expensive. Do not send your old instrument cluster back as a core. They will not accept it.
Where can I order these parts?
- Your local Ford dealer. Some will price match online stores some will not. You have to pay sales tax but you do not have to pay shipping this way and things usually come a few days faster.
- New Online. I recommend calling Mike R at Autonation Ford White Bear Lake.
- Junkyards - Going to be hard to find but much less expensive then new.
Parts to order:
• Instrument Cluster
• SCCM Housing (not required for 2018+ owners)
• 3 steering wheel switches
• Cluster bezel
Part numbers:
Digital Instrument Cluster
Automatic MPH: JR3Z-10849-JB
Manual MPH: JR3Z-10849-LB
Automatic KPH: JR3Z-10849-KB
Manual KPH: JR3Z-10849-MB
Bullitt MPH Manual: KR3Z-10849-NK
Note: The part you get may have a different number then what you ordered.
Call Autonation Ford White Bear Lake and ask for Mike R. Tell them what cluster you want and they'll get you the latest part number. Alternatively send me a PM and I can get them for you too.
Switch Assembly Left Hand Upper (2015-2017 only)
JR3Z-9C888-AA
Switch Assembly Right Hand Lower
JR3Z-9C888-EA
Switch Assembly Right Hand Upper
JR3Z-9C888-CA
Switch Assembly Left Hand Lower - FOR ADAPTIVE CRUISE 2015-2017 ONLY!!! Non-adaptive cruse need not replace the cruise control switch pack
JR3Z-9C888-FA
Instrument Panel (Bezel)
LHD: JR3Z-63044D70-BA
RHD: JR3Z-63044D70-AA
Steering Column Housing Assembly (SCCM/Clockspring, 15-17 only)
JR3Z-3F791-JA – Variable wipers (most people order this one)
JR3Z-3F791-HA – Variable wipers and heated steering wheel (order if you want to add heated wheel)
JR3Z-3F791-AA – Auto Wipers
JR3Z-3F791-LA – Auto wipers/heated wheel/lane departure
JR3Z-3F791-KA – Auto wipers and lane departure
JR3Z-3F791-DA – Auto wipers/heated wheel/lane departure
There may be newer part numbers for the SCCMs too but Ford will generally supplement the newer ones when necessary.
ORDER the -HA or -LA (auto wipers) SCCM Housing Assembly if you think you will ever want to add a heated wheel.
To add a heated wheel you also need a FCIM out of a 401A 2018+ car and HSWM with all the proper pigtails.
ALL SCCM's work with cars without auto wipers. Some will just have unused pins for the HSW and will have the "A" for auto wipers. Does not effect wiper operation.
The instrument cluster will work with your old switches/sccm but you will not be able to access any of the menu’s to set custom gauges. You’ll only have trip/fuel economy/tire pressure.
Once you have the parts in your hands the fun part begins!
Cluster:

^I had to remove the bezel of the cluster to clean the display off. There were some large particles clinging onto it. Be very careful not to damage the display! I suspected it was actually a square display and this confirmed that.
Bezel:
Step 2: Install Parts
According to the Ford service manual it is not required to remove the battery ground to do these installation steps. If you feel more comfortable please feel free to remove the battery ground.
Remove your steering wheel first and replace the switches. This makes it easier to access through to the cluster. 2018 owners DO NOT NEED to remove the wheel entirely. You only need to replace your switches. There’s a great youtube tutorial by CJPonyParts on removing the wheel and replacing switches. That is found here: [ame]
For those of you that don’t wish to watch it here are the basic steering wheel removal steps:
- Remove the airbag with a small flathead screwdriver. On each side of the wheel there is a small hole. Press the screwdriver in until you feel the spring mechanism. Press it in and pull that side of the airbag out at the same time. Repeat with the other side. Unplug the 3 electrical connectors and place the airbag aside.
- Unplug steering wheel to clockspring electrical connector
- Remove the steering wheel with a 24mm socket. (2018 owners may skip full wheel removal)
- Replace steering wheel switches with new ones.
Remove the steering column trim:
- Top trim lifts off. Just pull up.
- Lower trim has a 7mm screw and T20 screw. Remove and pull down hard. Not required to remove lower trim for 2018's.
Remove SCCM/clockspring housing:(skip if a 2018)
- Remove two electrical connectors
- Remove two torx screws at the top towards the instrument panel
- Pull on the tab underneath the housing assembly and slide the entire assembly off of the steering column
- Replacement is reverse of removal. Be sure to put the clockspring locking tab in your old clockspring to keep it from getting turned to the incorrect place.

Remove instrument panel trim pieces:
The first half of this video shows cluster removal: [ame]
Text Instructions:
-Start by pulling both bottom corner dash trim pieces off. Carefully pry with your hands towards the bottom and pull these straight out. On the passenger side opening the glovebox makes this easier. It is important to pull straight out so you don't break these. Interior trim removal tools are very helpful for the drivers side.
-Remove the large trim piece that covers the 3 center vents or 2 center vents and gauge pod (for pp cars). Carefully pry with your hands starting at the right side. The clips will pop out. Make sure to work you hand towards the middle to avoid snapping it. If you have a PP car remove the electrical connector on the center gauges before pulling it completely off. This piece has a lot of clips so it sometimes requires a good pull.
-Remove headlight switch trim. There are 2 screws on the left side. Remove them and then pull out. Unplug headlight switch electrical connector and remove. If you left the battery connected you can remove the headlight switch from the trim and plug it back in to keep the speakers from dinging at you.
-Remove trim below headlight switch with sunglasses holder. Remove one screw then carefully pry out. Unplug trunk switch electrical connector.
-Remove the trim to the right of the steering column. Just pull out. This has the little slits in it for the HVAC interior temp sensor.
-Remove the bezel with left HVAC vent and upper steering column cover. Remove the 4 screws. Two on left side and two on either side of the steering wheel. Then pull forcefully but carefully. At this point the top of the steering column trim should be popped out. Lower and extend the steering column completely to make it easier to remove.
-After removing everything make sure none of the retaining clips were left behind in the dash. They are yellow or blue. If they were pull them out carefully and replace them on the trim piece they came off of. It is really easy to lose these in the dash and they're like a dollar or two each from the dealer.
I did not remove my steering wheel because I didn’t get the new SCCM for a week after I got the cluster.
Remove the instrument cluster:
-Remove the two screws in the bottom corners
-Pull to release the clips
-Unplug electrical connector
Remove plastic backing:
-Remove two screws
-Cut plastic backplate out. Refer to pictures.

Add foam padding on dashboard brace to keep the instrument cluster from rattling. I also recommend adding a piece of felt or foam on the other side and top.
Install new instrument cluster
-The old clips are not used. Only the two lower screws are used to secure the cluster.
-Don’t forget to plug the electrical connector in
Reinstall the bezel and all dash trim pieces minus steering column trim.

Install new SCCM housing/clockspring(except 2018)
-Reinstall both torx screws
-Plug in both electrical connectors.
-Do not remove the clockspring retaining pin until you are ready to install the wheel.
Install lower and upper steering column trim
Install steering wheel with new switches.
Reinstall airbag.
Connect battery if disconnected.
Feel free to start the car and see what it says! First boot can take 10-20 seconds so be patient. You will probably get many errors. I got a 4x4 error. Weird!
Note: If you chose not to disconnect the battery, the engine may not start immediately. The engine will not run without an instrument cluster so it takes a few minutes for the car to register its ok to start. If you disconnected the battery you shouldn't have this problem.
Step 3: Configure as-built data with FORScan!
I sell ready to go files tailored perfectly to your car. Please send a PM if interested!
Use this spreadsheet for a reference:
The above spreadsheet has a sample IPC and SCCM ABD you can use as a baseline for your modules.
Note: Some clusters have newer software that FORScan may not support in the latest release. If this is the case PM me for a beta build or email the forscan team for a beta build.
You must select your features and adjust the as built data as necessary. Any lines that do not have a feature set use the supplied as built data at the bottom of the page.
You must also adjust the as built data in the SCCM. You can use your old SCCM as built data except for line 724-03-01. Should be set to 1733 xxxx xx without adaptive cruise or 2933 xxxx xx with adaptive cruise.
To avoid a U2100 code in both the SCCM and IPC I recommend changing ALL ABD and then hitting "write all" at the bottom. If you are testing things, start with the baseline ABD and write all then change things one at a time. If you have the U2100 code and need to get rid of it, save your as built, change some as-built in 4+ lines, write all, then load the saved as built and write all again. Clear codes and read codes. Hopefully its gone! If you have other codes that come back after you clear codes there may be a problem with your as built data.
SUPER IMPORTANT NOTE: SAVE SAVE SAVE your as built data! Save your OEM data, save your unconfigured IPC/SCCM data, and save your configured data. Save it all! If you go to the dealer and some idiot tech flashes the IPC or SCCM because it says theres something wrong you don't want to have to sit down and figure out your abd all over again. Its extremely easy just to load the file and write all. Not worth the risk. The OEM is online but I recommend saving it to be safe. I say save your unconfigured data in case flashing the configured data breaks features in the module - its easy to go back to the way it came to you.
Once your as built data is configured you now should have a fully functional instrument cluster! Congrats! Leave me a thanks if this helped you. Another big shout out to everyone that helped pull this together!
Sponsored
Last edited:
