Ratpack
Well-Known Member
- Thread starter
- #1
I have started the stereo upgrade in my 2015 GT Vert and will chronicle it here so others may input critiques and ideas and possibly get ideas for their install.
My focus is going to be more from an SQ standpoint than just loud booming bass. This will be an ongoing project for awhile since I don't have time to devote days on top of days to do the install. I like to drive my car so I want to limit the time it is down with things tore apart. The speakers I have to install are a set of Hertz Mille Pro 3 ways for the front that will be fully active and a 12" JL audio W3 for the trunk. My car came with the 12 speaker system, I have removed the sub so I can build everything in the trunk. All cabin speakers will go in the factory location, so that everything looks stock. The rear speakers will remain, but will run off the head unit, which has already been upgraded to a Linkswell "Tesla" style. It will feed the DSP with RCA cables and completely bypass the factory amplifier.
At this point, it is still in the air as to whether I put a front sub in the passenger footwell or possibly 2 8" shallow mount subs in the rear seat footwells since no one rides back there. But that will most likely be decided after the rest is installed to see if they are needed or not. I will plan for them and run the wires while I have everything apart and then IF I add them, it is simply install them and not have to tear the carpet and trim all back out.
The photos attached represent the first month or so of work. It is slow, as I mentioned not having a lot of time to devote to it all at once and as things change when I find they don't work out. I am far from an expert and only using common shop tools.
First step was to start sound deadening the trunk where the sub and amp rack will go. There is more under the carpet as well.

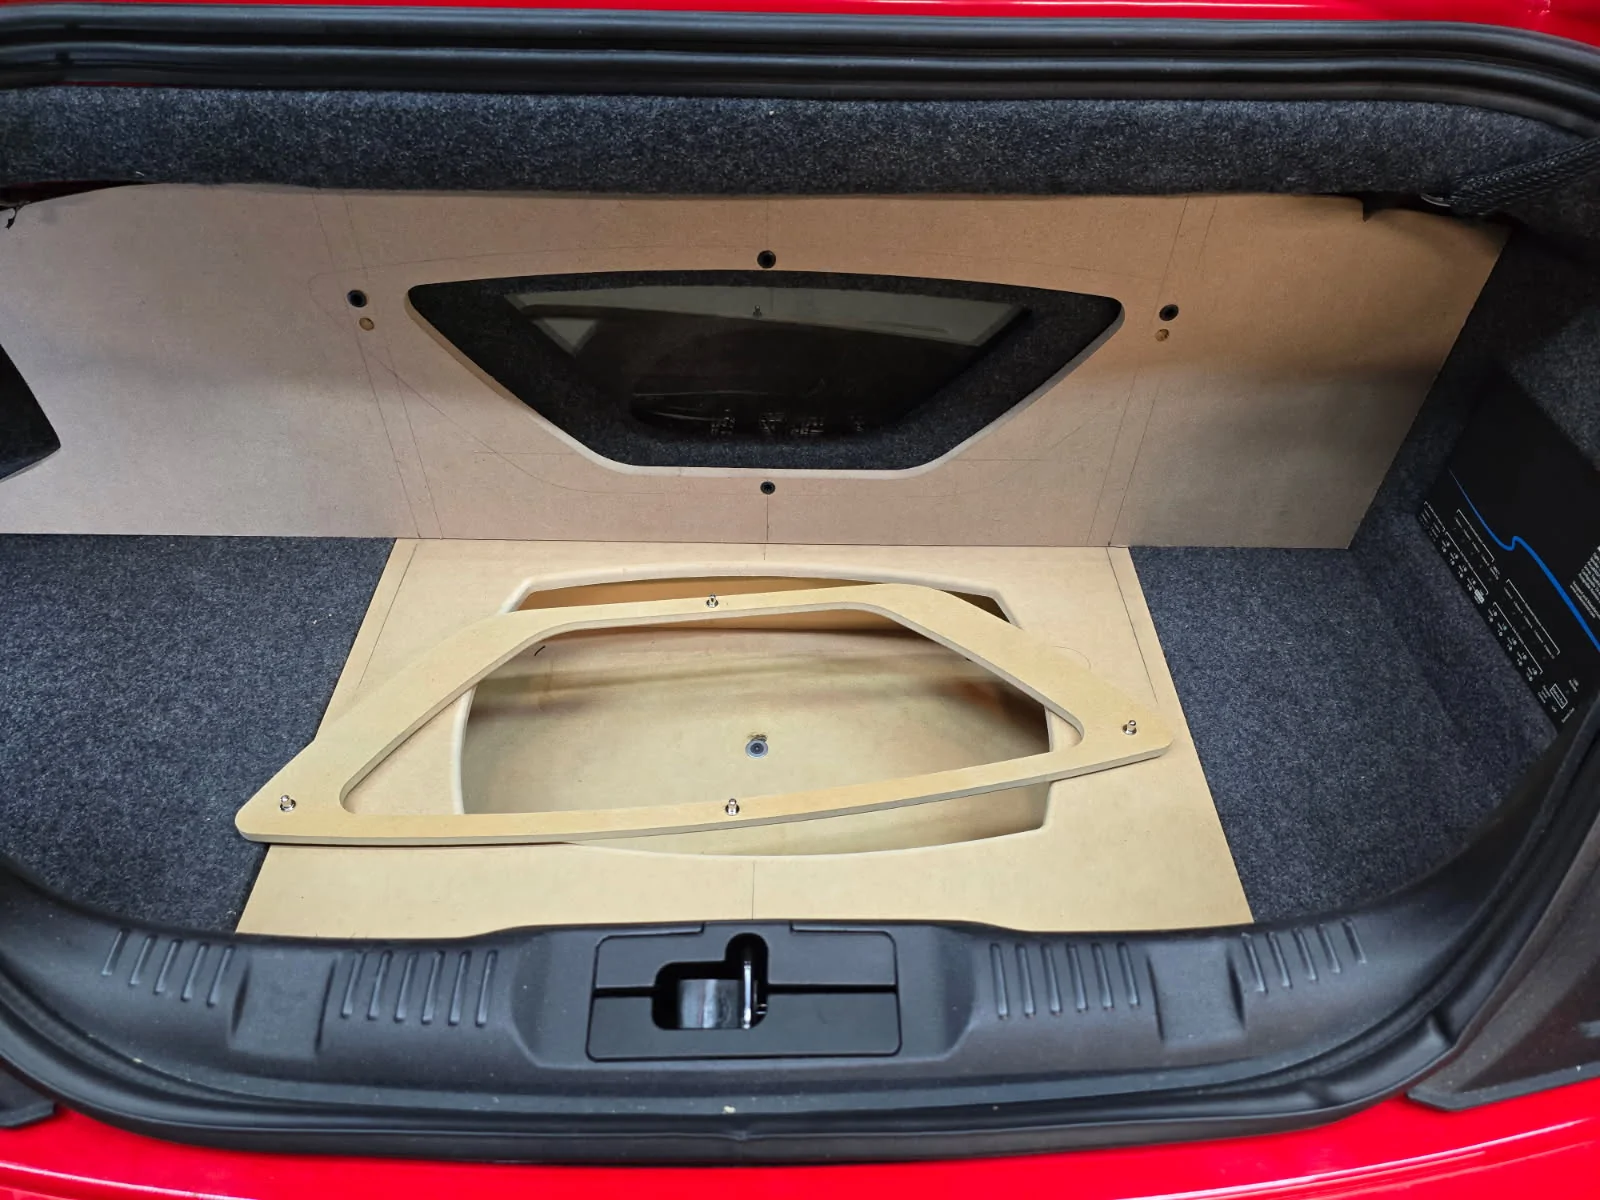
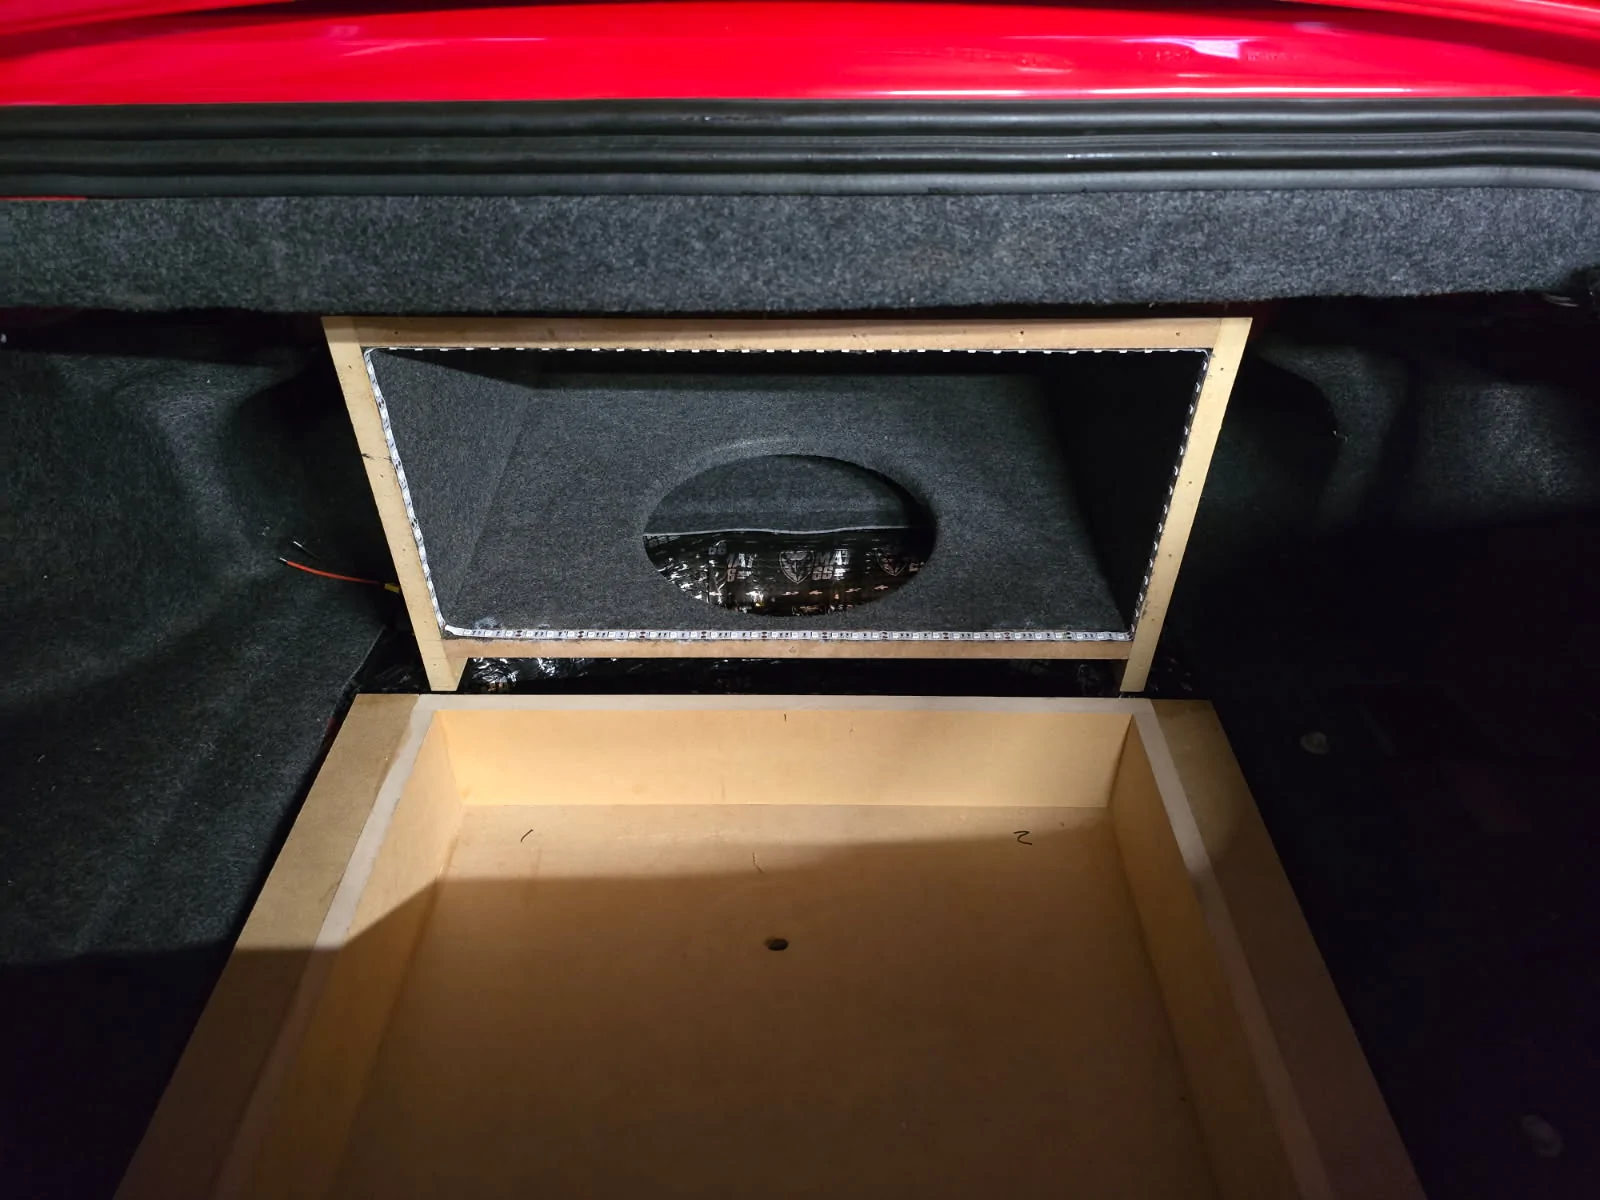
Next is the amp "box" which is bolted to the spare tire mount and the sub box. The sub will be down firing and it is slightly angled towards the cabin. It will have a see through panel and LED lighting in order to see into the box.

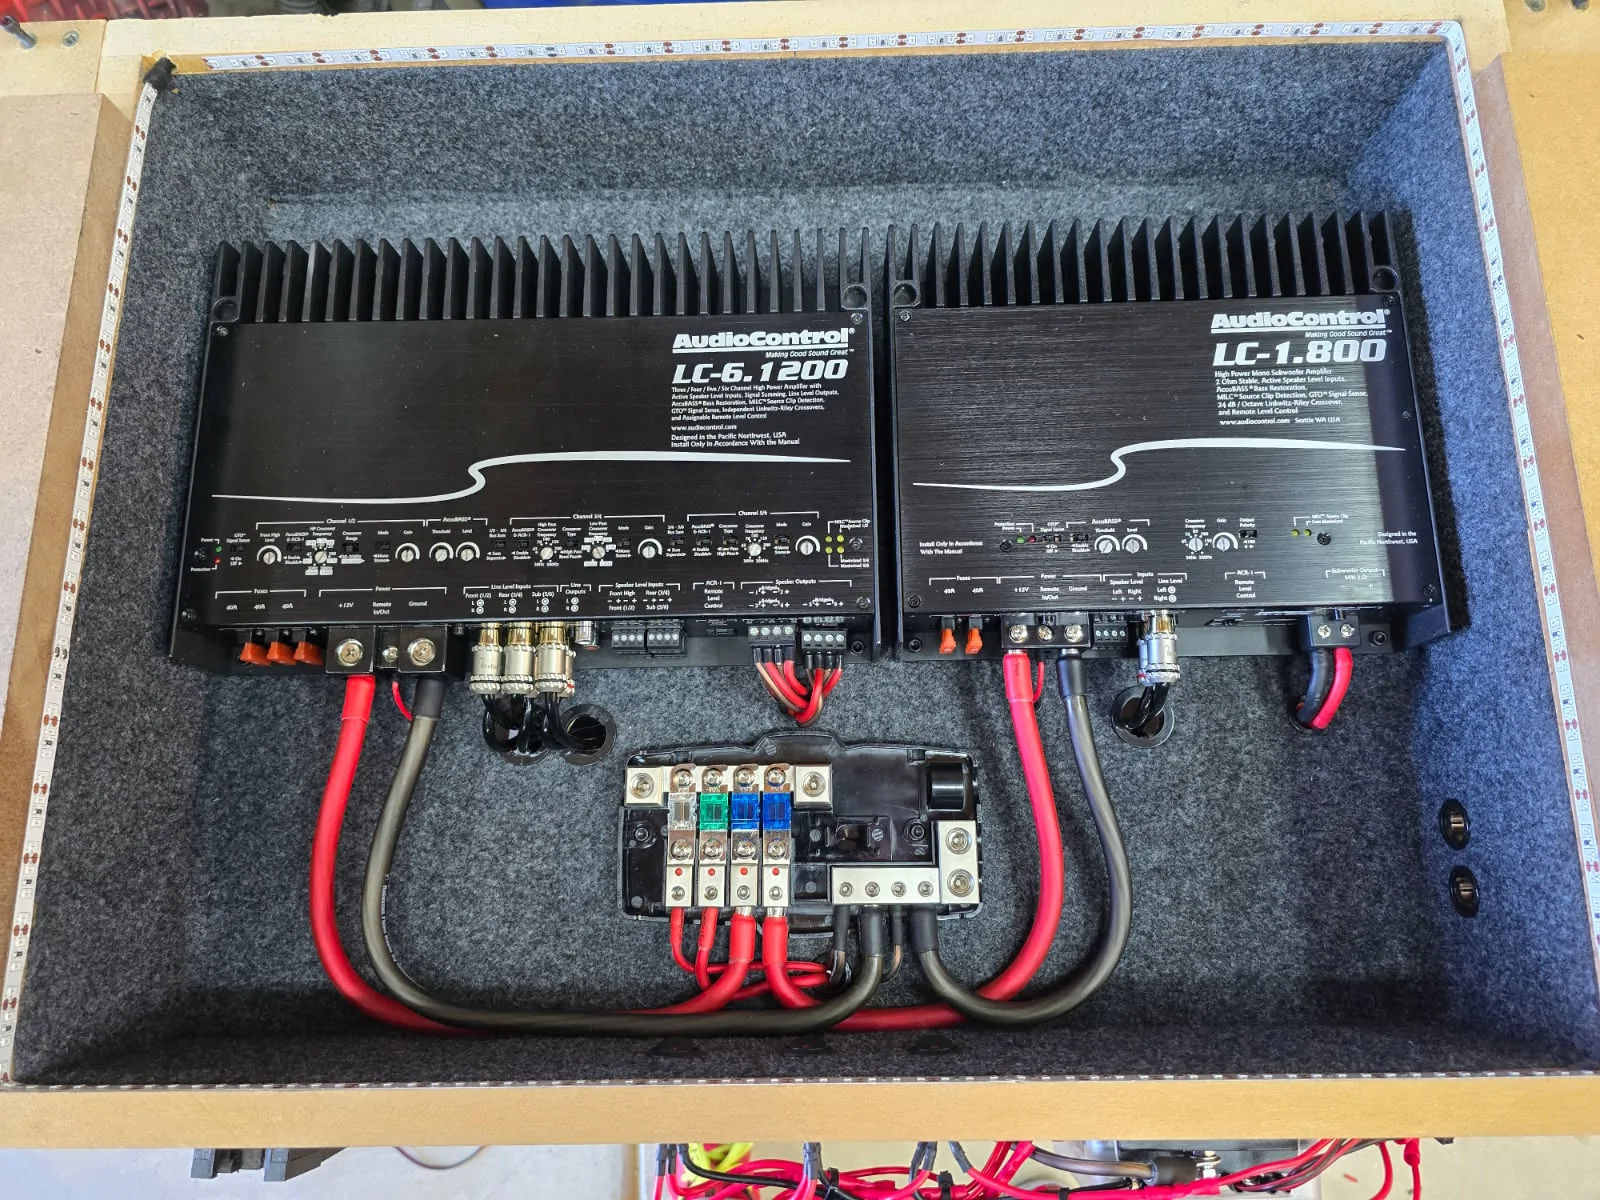
Here is the see through panel on the box, I still have to hook up the LEDs. I plan to hook them into the trunk light so that they come on when the trunk is opened, but do not stay on the whole time. They do generate some heat and I prefer it to not be too hot inside the box. This also shows the DSP location which is now where the factory sub used to be. I have mounted it using the factory sub hardware. My goal is to make this completely removable and be able to go back to stock without a lot of work.

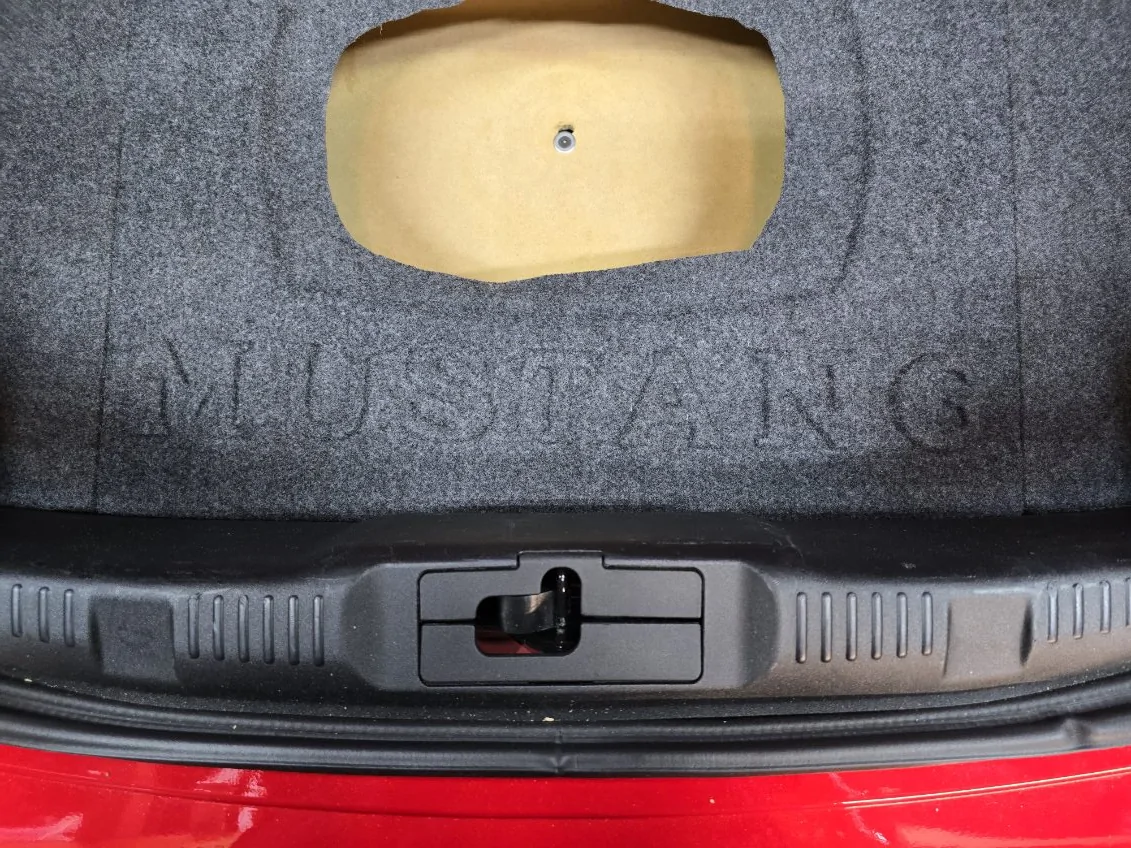
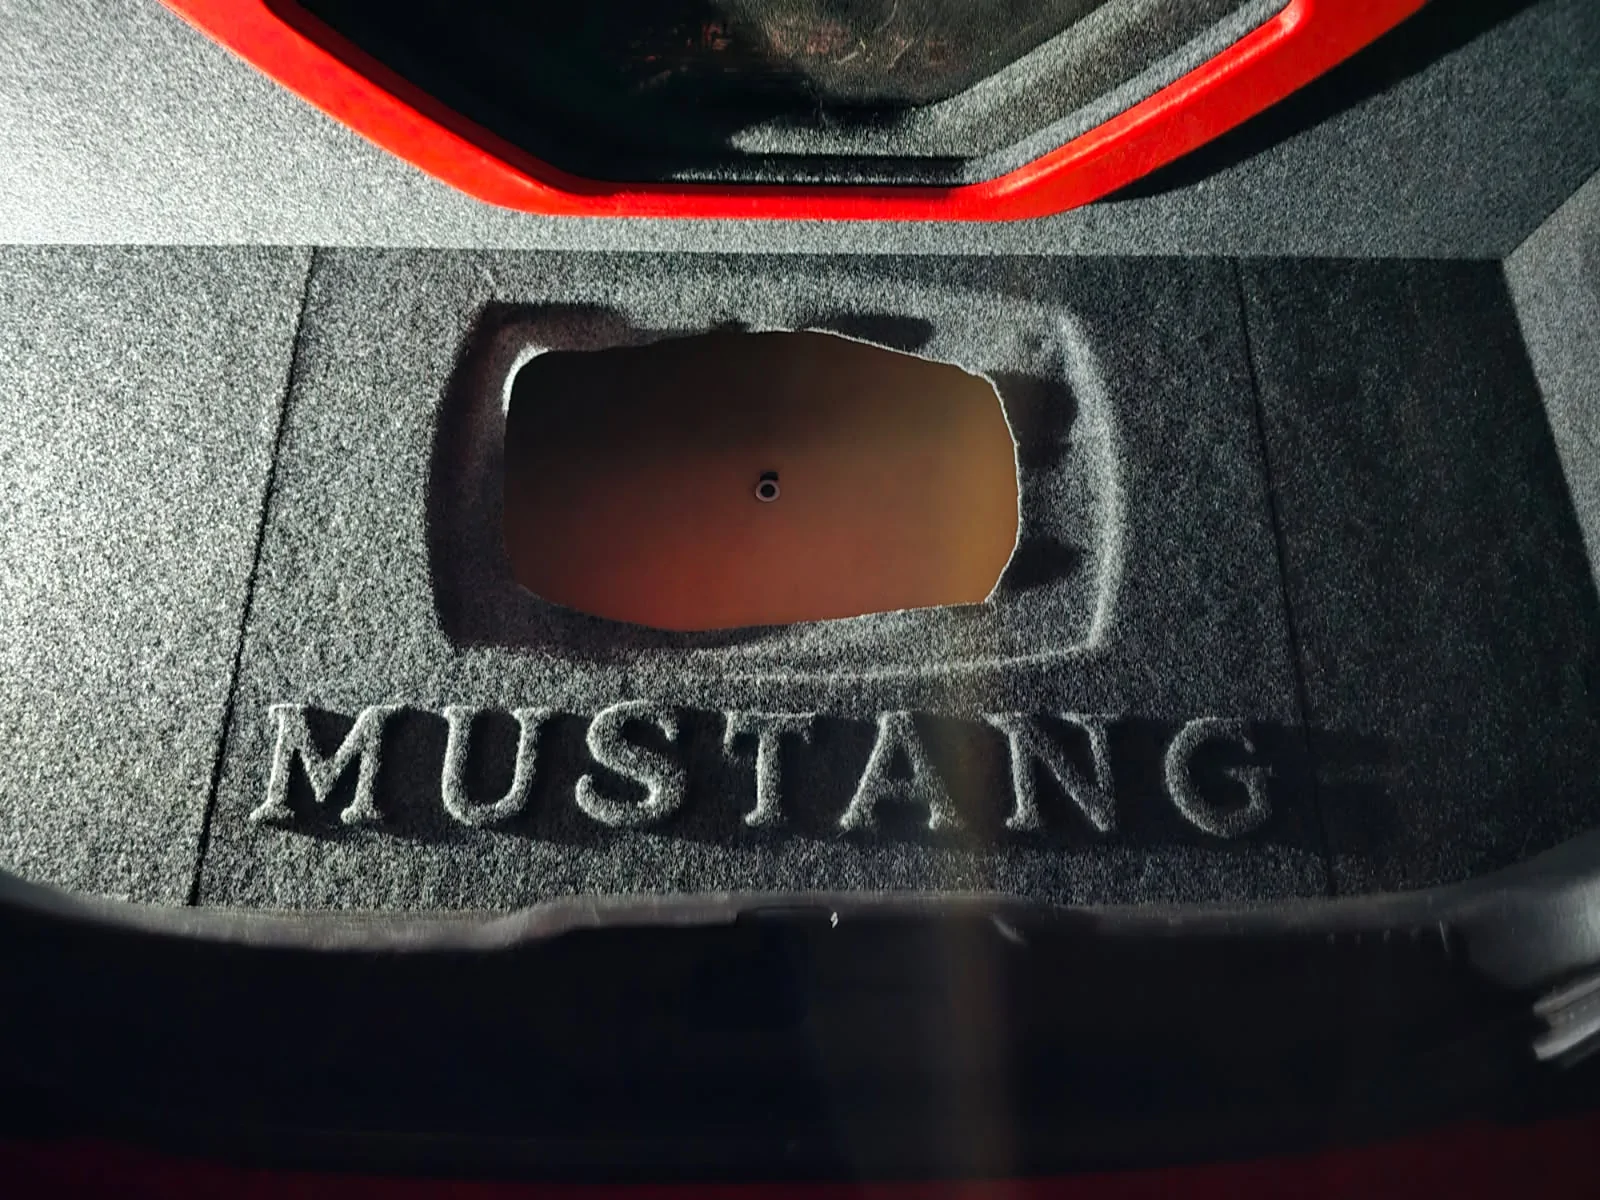
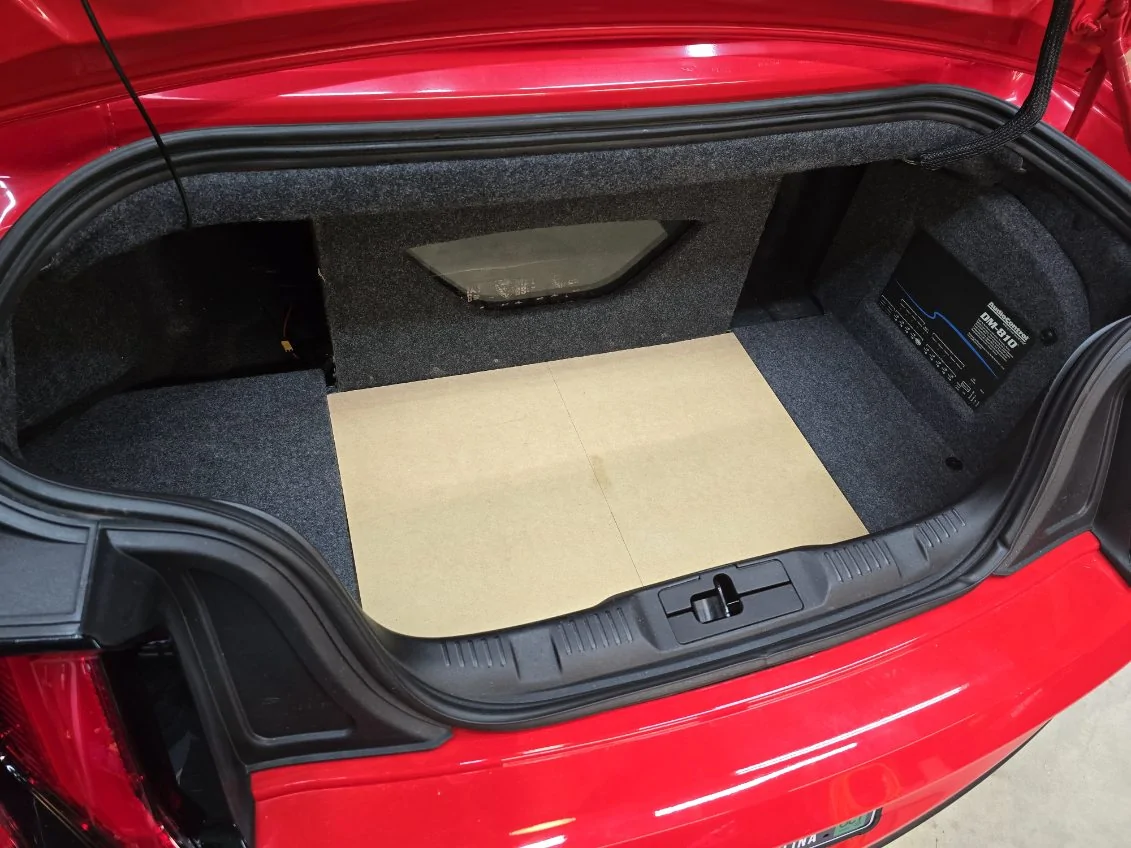
Here I have created the floor of the trunk and mounted the DSP (no wires attached yet), still have to run all the power wires and cables. Center section will have a viewing window in order to see the AMP's and be lit by LED's like the inside of the sub box. That is why it isn't carpeted yet, still have to cut the hole out and get the acrylic window. I also plan to have "MUSTANG" embossed in the carpet under the window.
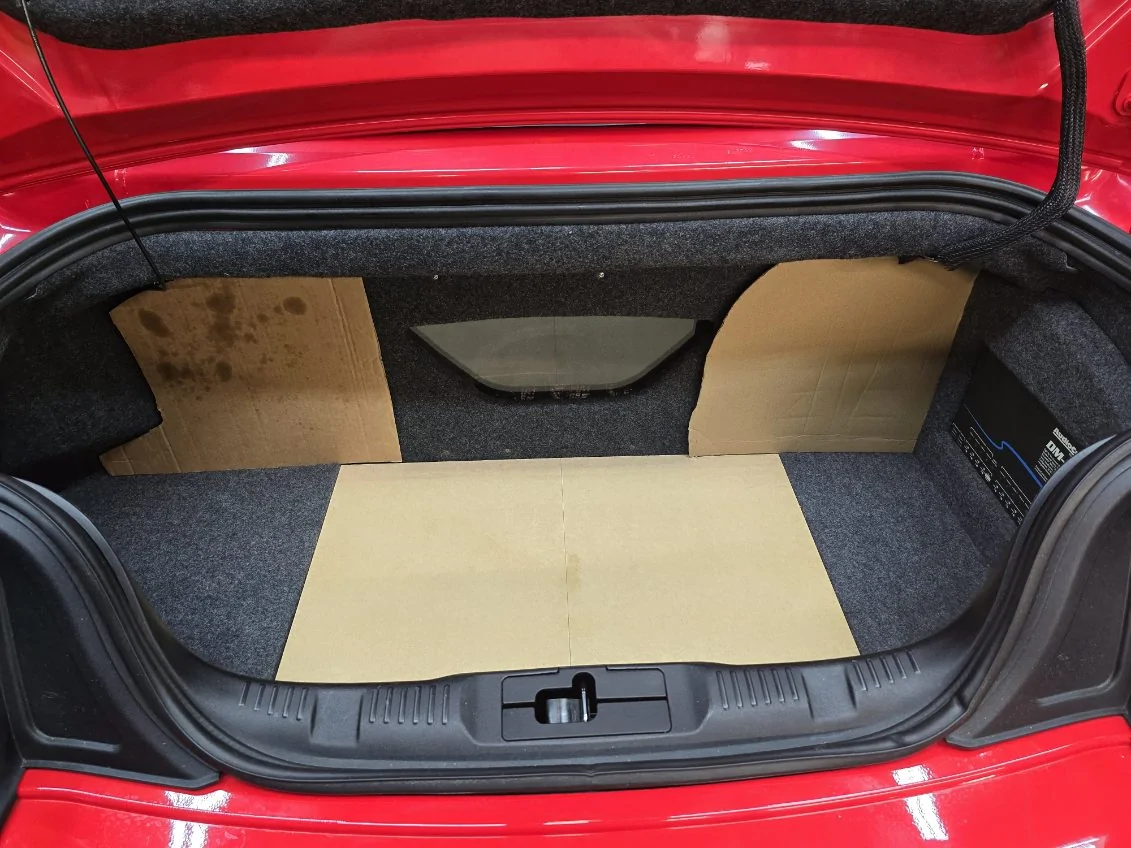
Here I have cut cardboard templates in order to create the "Beauty Panel" that will hide everything behind it and mesh with the factory carpeting. Yes, I used a pizza box from yesterday's lunch. LOL!! Hopefully I will have that cut this evening.
That's it for now. I will continue to update the thread as I make more progress. Please feel free to post advice or thoughts, this project is ever evolving.
My focus is going to be more from an SQ standpoint than just loud booming bass. This will be an ongoing project for awhile since I don't have time to devote days on top of days to do the install. I like to drive my car so I want to limit the time it is down with things tore apart. The speakers I have to install are a set of Hertz Mille Pro 3 ways for the front that will be fully active and a 12" JL audio W3 for the trunk. My car came with the 12 speaker system, I have removed the sub so I can build everything in the trunk. All cabin speakers will go in the factory location, so that everything looks stock. The rear speakers will remain, but will run off the head unit, which has already been upgraded to a Linkswell "Tesla" style. It will feed the DSP with RCA cables and completely bypass the factory amplifier.
At this point, it is still in the air as to whether I put a front sub in the passenger footwell or possibly 2 8" shallow mount subs in the rear seat footwells since no one rides back there. But that will most likely be decided after the rest is installed to see if they are needed or not. I will plan for them and run the wires while I have everything apart and then IF I add them, it is simply install them and not have to tear the carpet and trim all back out.
The photos attached represent the first month or so of work. It is slow, as I mentioned not having a lot of time to devote to it all at once and as things change when I find they don't work out. I am far from an expert and only using common shop tools.
First step was to start sound deadening the trunk where the sub and amp rack will go. There is more under the carpet as well.

Next is the amp "box" which is bolted to the spare tire mount and the sub box. The sub will be down firing and it is slightly angled towards the cabin. It will have a see through panel and LED lighting in order to see into the box.
Here is the see through panel on the box, I still have to hook up the LEDs. I plan to hook them into the trunk light so that they come on when the trunk is opened, but do not stay on the whole time. They do generate some heat and I prefer it to not be too hot inside the box. This also shows the DSP location which is now where the factory sub used to be. I have mounted it using the factory sub hardware. My goal is to make this completely removable and be able to go back to stock without a lot of work.
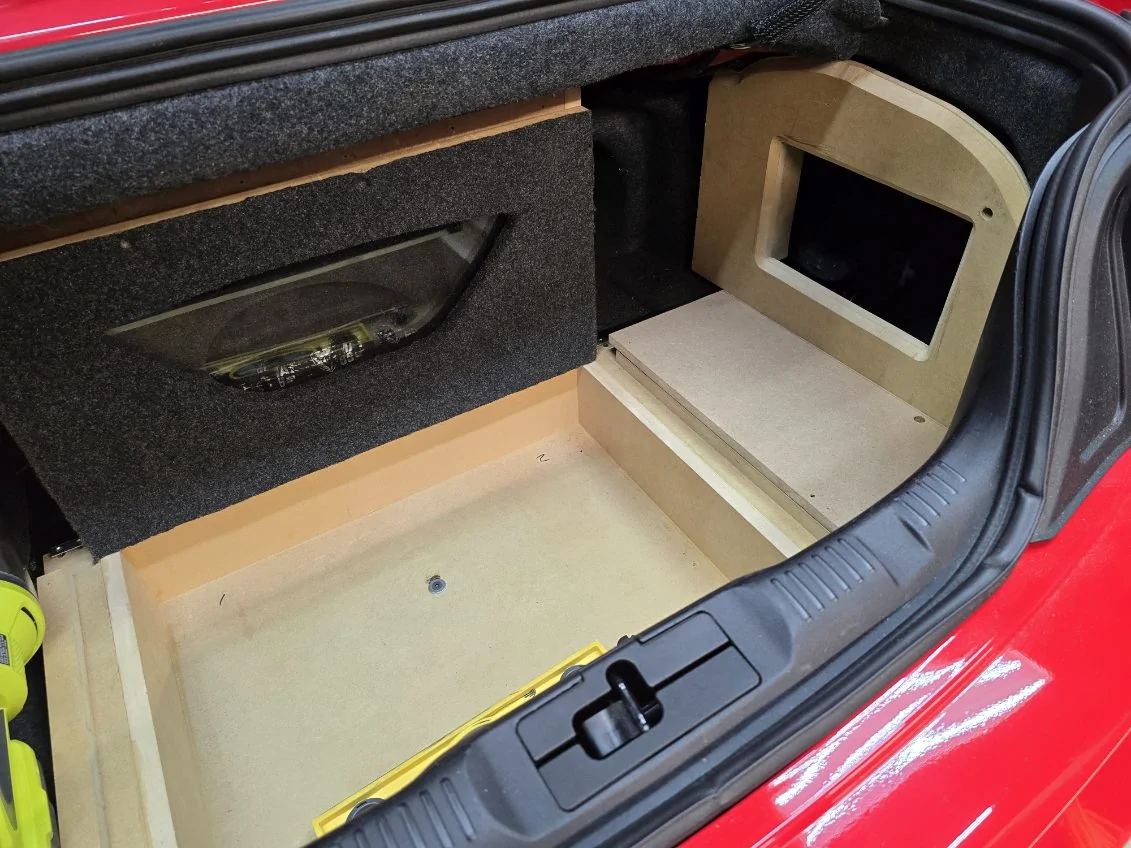
Here I have created the floor of the trunk and mounted the DSP (no wires attached yet), still have to run all the power wires and cables. Center section will have a viewing window in order to see the AMP's and be lit by LED's like the inside of the sub box. That is why it isn't carpeted yet, still have to cut the hole out and get the acrylic window. I also plan to have "MUSTANG" embossed in the carpet under the window.
Here I have cut cardboard templates in order to create the "Beauty Panel" that will hide everything behind it and mesh with the factory carpeting. Yes, I used a pizza box from yesterday's lunch. LOL!! Hopefully I will have that cut this evening.
That's it for now. I will continue to update the thread as I make more progress. Please feel free to post advice or thoughts, this project is ever evolving.
Sponsored