Sponsored
masonhoare9
Well-Known Member
- Joined
- Nov 11, 2025
- Threads
- 1
- Messages
- 51
- Reaction score
- 199
- Location
- united states
- First Name
- mason
- Vehicle(s)
- 2015 mustang gt
Oil cooler is installed doesn’t look great but it works and is secured

Hopefully will have the transmission in this weekend. Waiting on a bunch of vacuum stuff to finish up the turbo install. Hopefully have this thing running in two weeks. I will be taking it somewhere to get wired for the boost controller, transbrake, neutral safety switch and some other small things just because i don’t trust myself with wiring.

Hopefully will have the transmission in this weekend. Waiting on a bunch of vacuum stuff to finish up the turbo install. Hopefully have this thing running in two weeks. I will be taking it somewhere to get wired for the boost controller, transbrake, neutral safety switch and some other small things just because i don’t trust myself with wiring.
OP
OP
NGOT8R
Well-Known Member
- Thread starter
- #378
You’re getting there, shouldn’t bee too much longer until completion for you. I’m really surprised that you didn’t have to cut your driver’s side piping from the IC to the turbo outlet. At least you’re not dealing with some of the issues that I’ve had to deal with. I hope the rest of the install goes smoothly for you.Oil cooler is installed doesn’t look great but it works and is secured
Hopefully will have the transmission in this weekend. Waiting on a bunch of vacuum stuff to finish up the turbo install. Hopefully have this thing running in two weeks. I will be taking it somewhere to get wired for the boost controller, transbrake, neutral safety switch and some other small things just because i don’t trust myself with wiring.
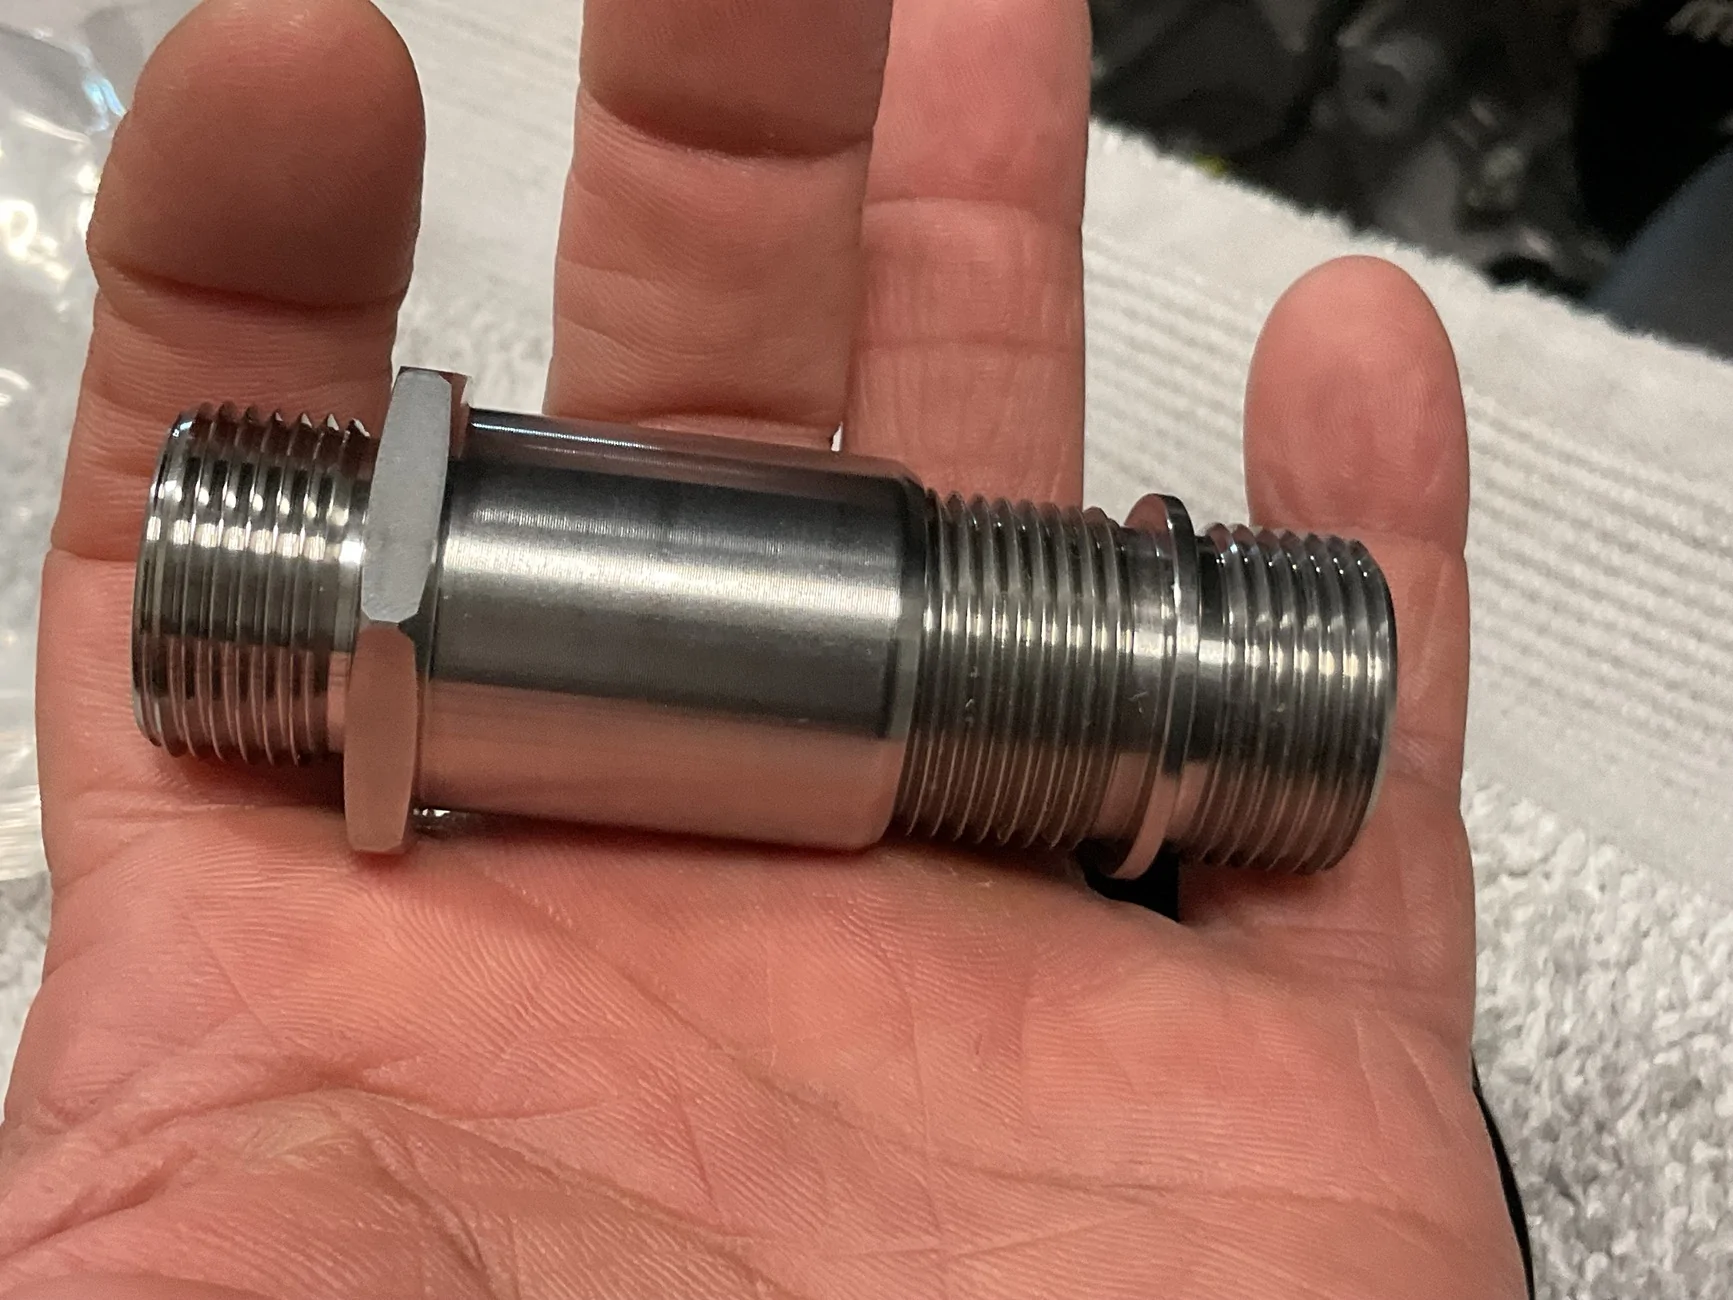
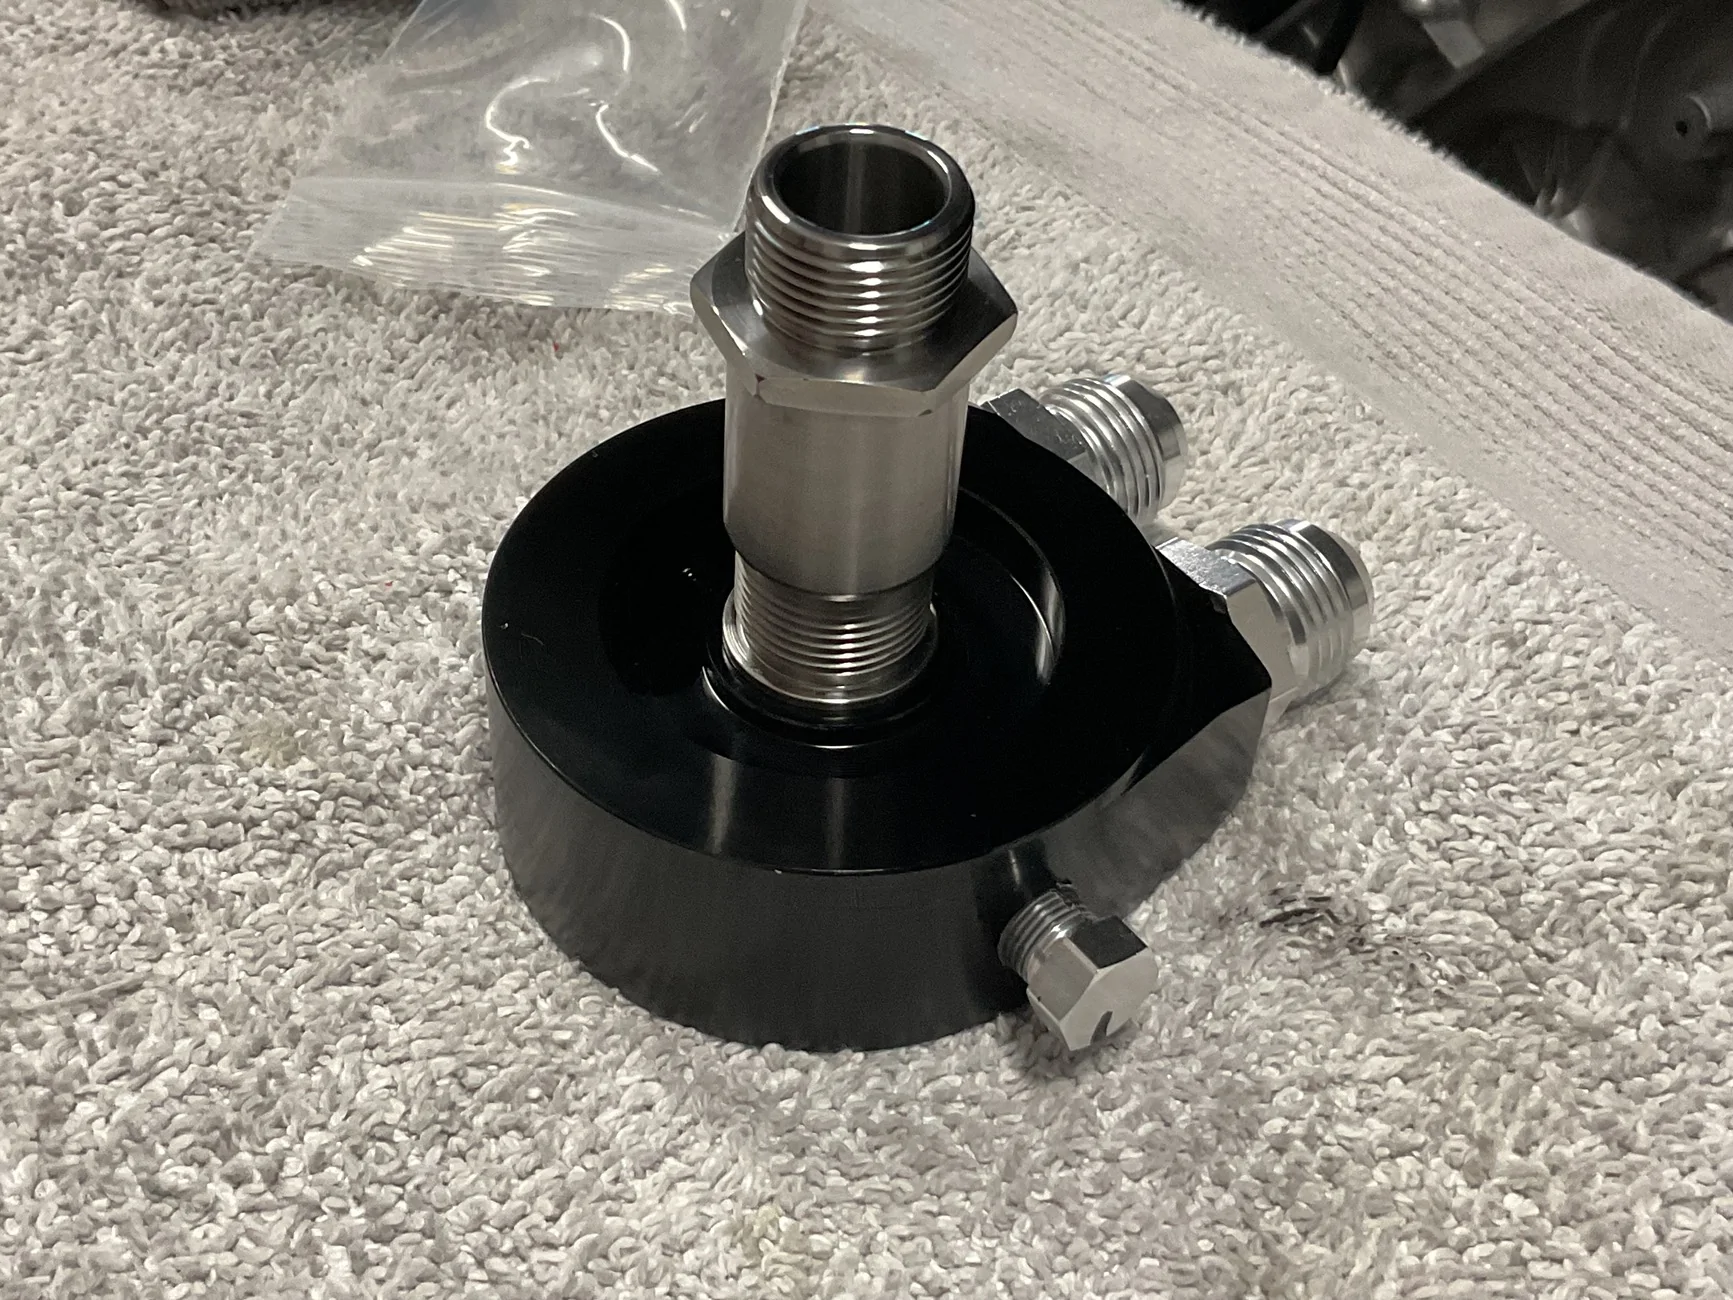
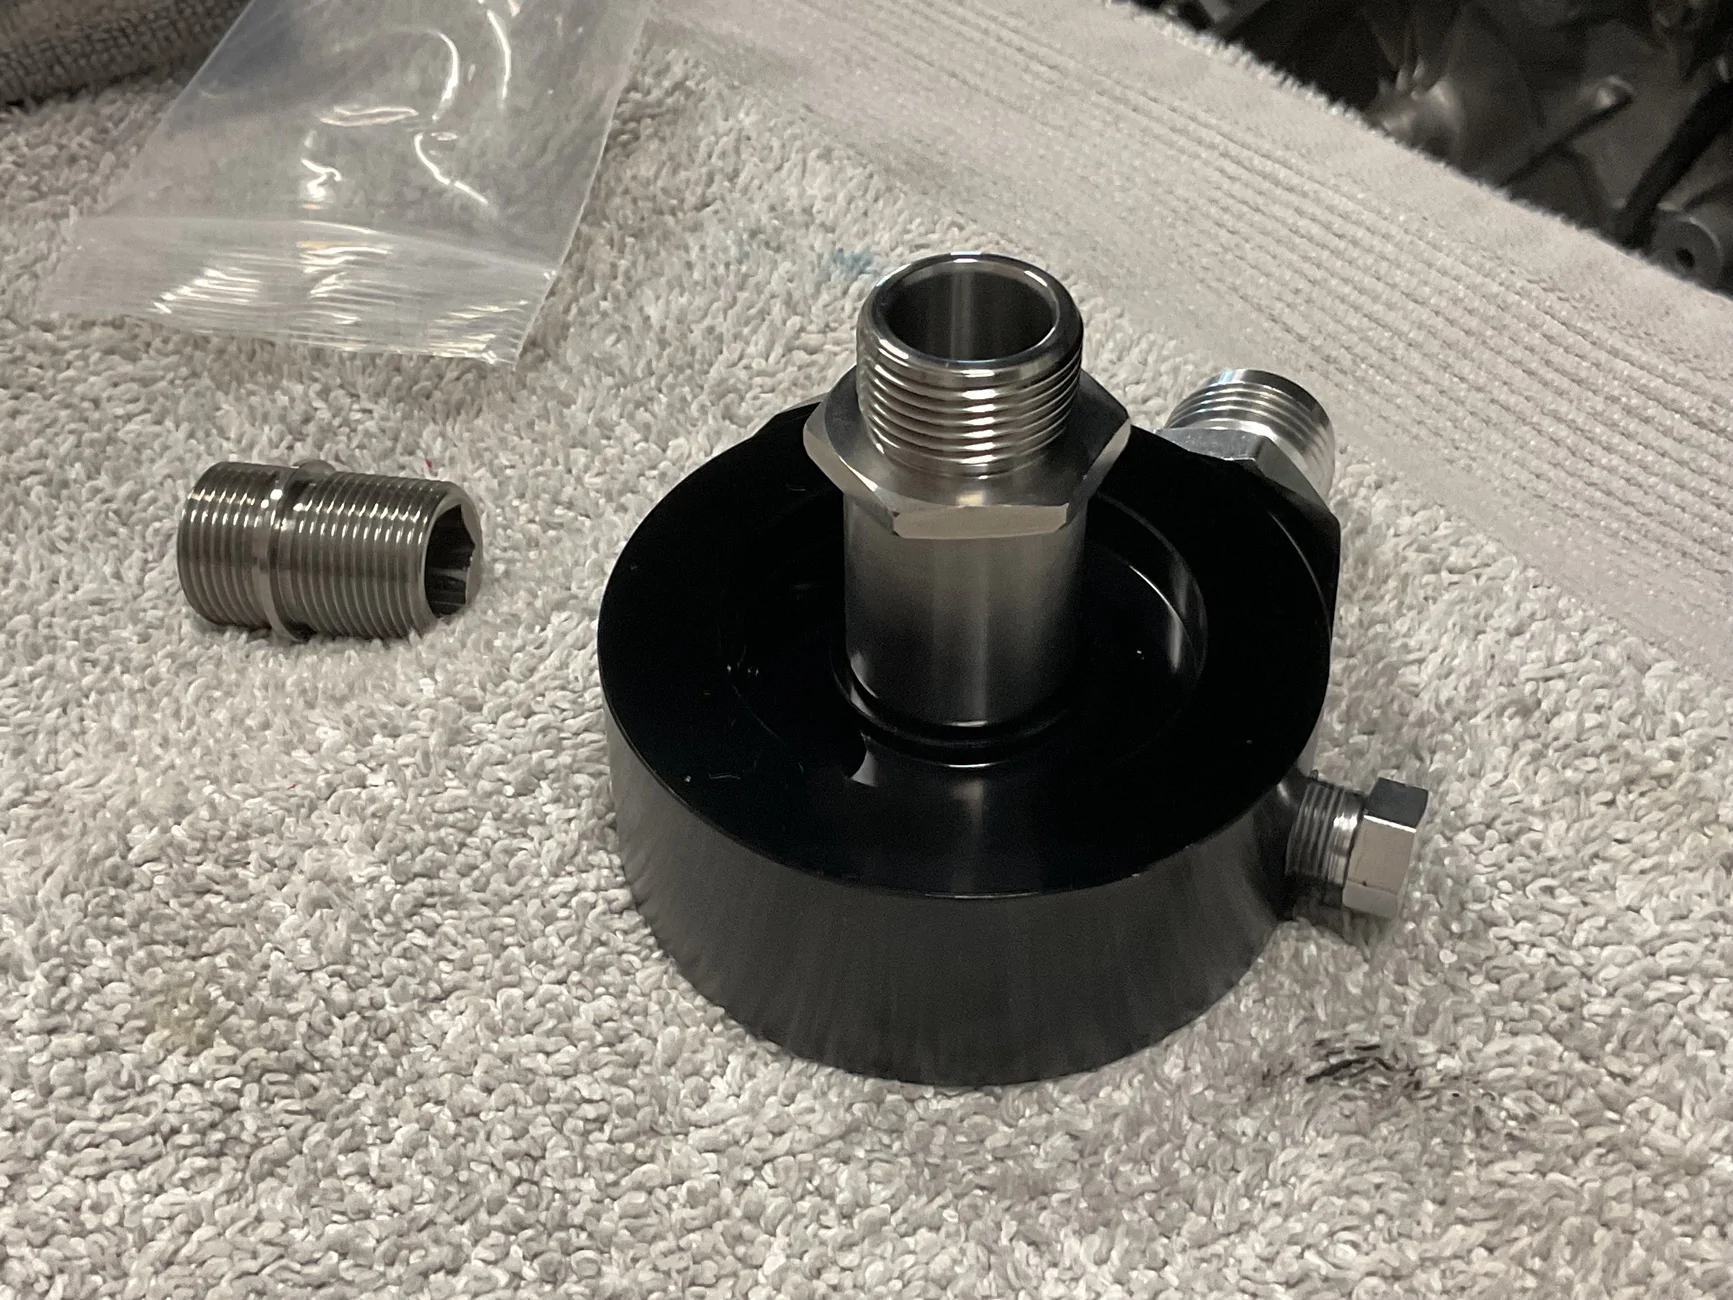
I’m still thinking of mounting solutions for my oil cooler. I bought an M22 X 1.5 adapter for my oil filter mounting plate stud, but unfortunately, the hole in the supplied Evil Energy oil filter mounting plate is too small. I’ll either have to buy a Mishimoto plate or have my factory stud shortened and Tig welded back together and then turned down in a lathe to fit through the hole. See pics.
Do you by chance have any pics of the lines connected to your Mishimoto mounting plat? Are you also taking your turbo oil feed from the plate? Lastly, what did you do for your drain (scavenging pump or drill the oil pan for gravity drain)?


masonhoare9
Well-Known Member
- Joined
- Nov 11, 2025
- Threads
- 1
- Messages
- 51
- Reaction score
- 199
- Location
- united states
- First Name
- mason
- Vehicle(s)
- 2015 mustang gt
I will have some more detailed pictures this weekend or early next week when i button everything up.You’re getting there, shouldn’t bee too much longer until completion for you. I’m really surprised that you didn’t have to cut your driver’s side piping from the IC to the turbo outlet. At least you’re not dealing with some of the issues that I’ve had to deal with. I hope the rest of the install goes smoothly for you.
I’m still thinking of mounting solutions for my oil cooler. I bought an M22 X 1.5 adapter for my oil filter mounting plate stud, but unfortunately, the hole in the supplied Evil Energy oil filter mounting plate is too small. I’ll either have to buy a Mishimoto plate or have my factory stud shortened and Tig welded back together and then turned down in a lathe to fit through the hole. See pics.
Do you by chance have any pics of the lines connected to your Mishimoto mounting plat? Are you also taking your turbo oil feed from the plate? Lastly, what did you do for your drain (scavenging pump or drill the oil pan for gravity drain)?

I am taking feed from the adapter plate and i am draining straight into the oil pan.
Yes i did notice the evil energy adapter hole is a bit smaller. If you go with mishimoto you will also have to get 8an male to 10an male adapters.
OP
OP
NGOT8R
Well-Known Member
- Thread starter
- #380
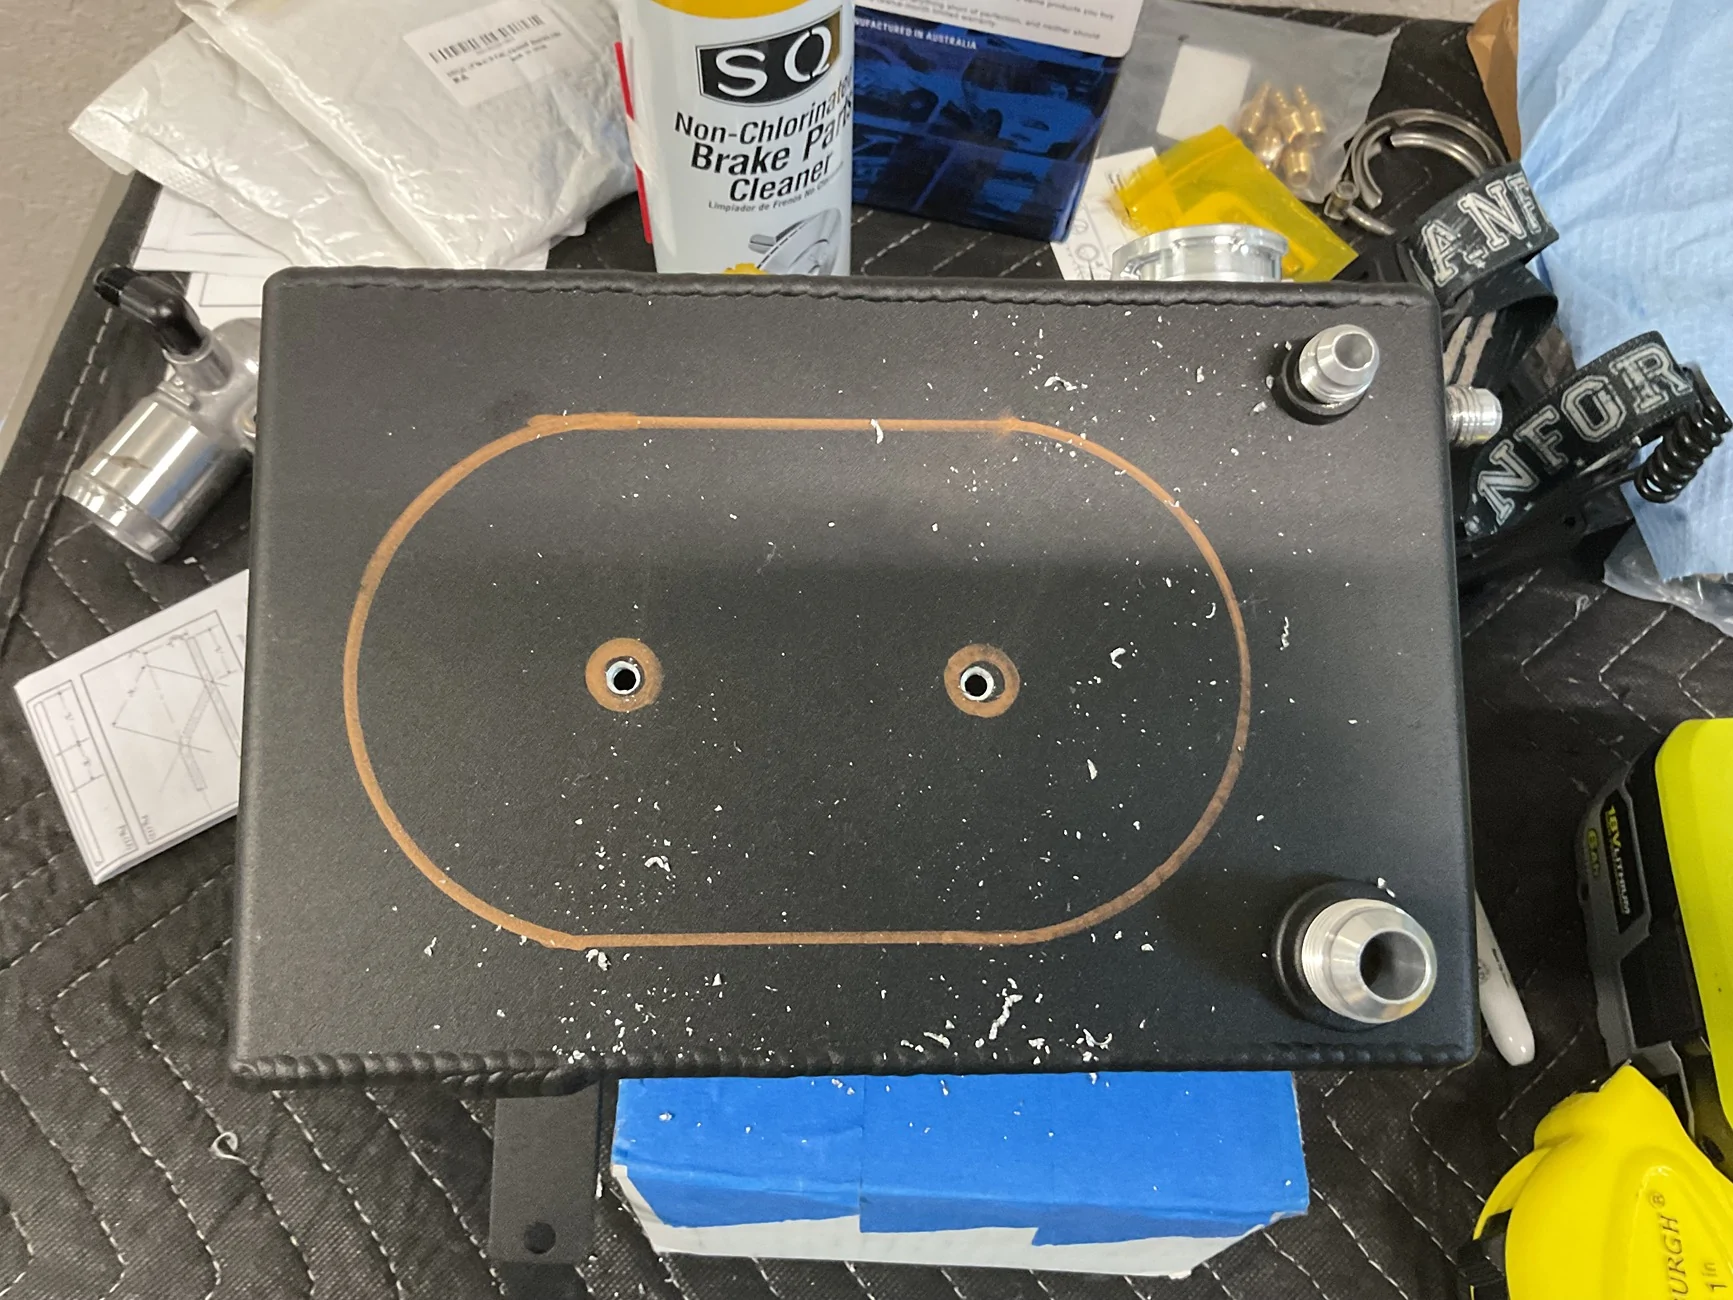
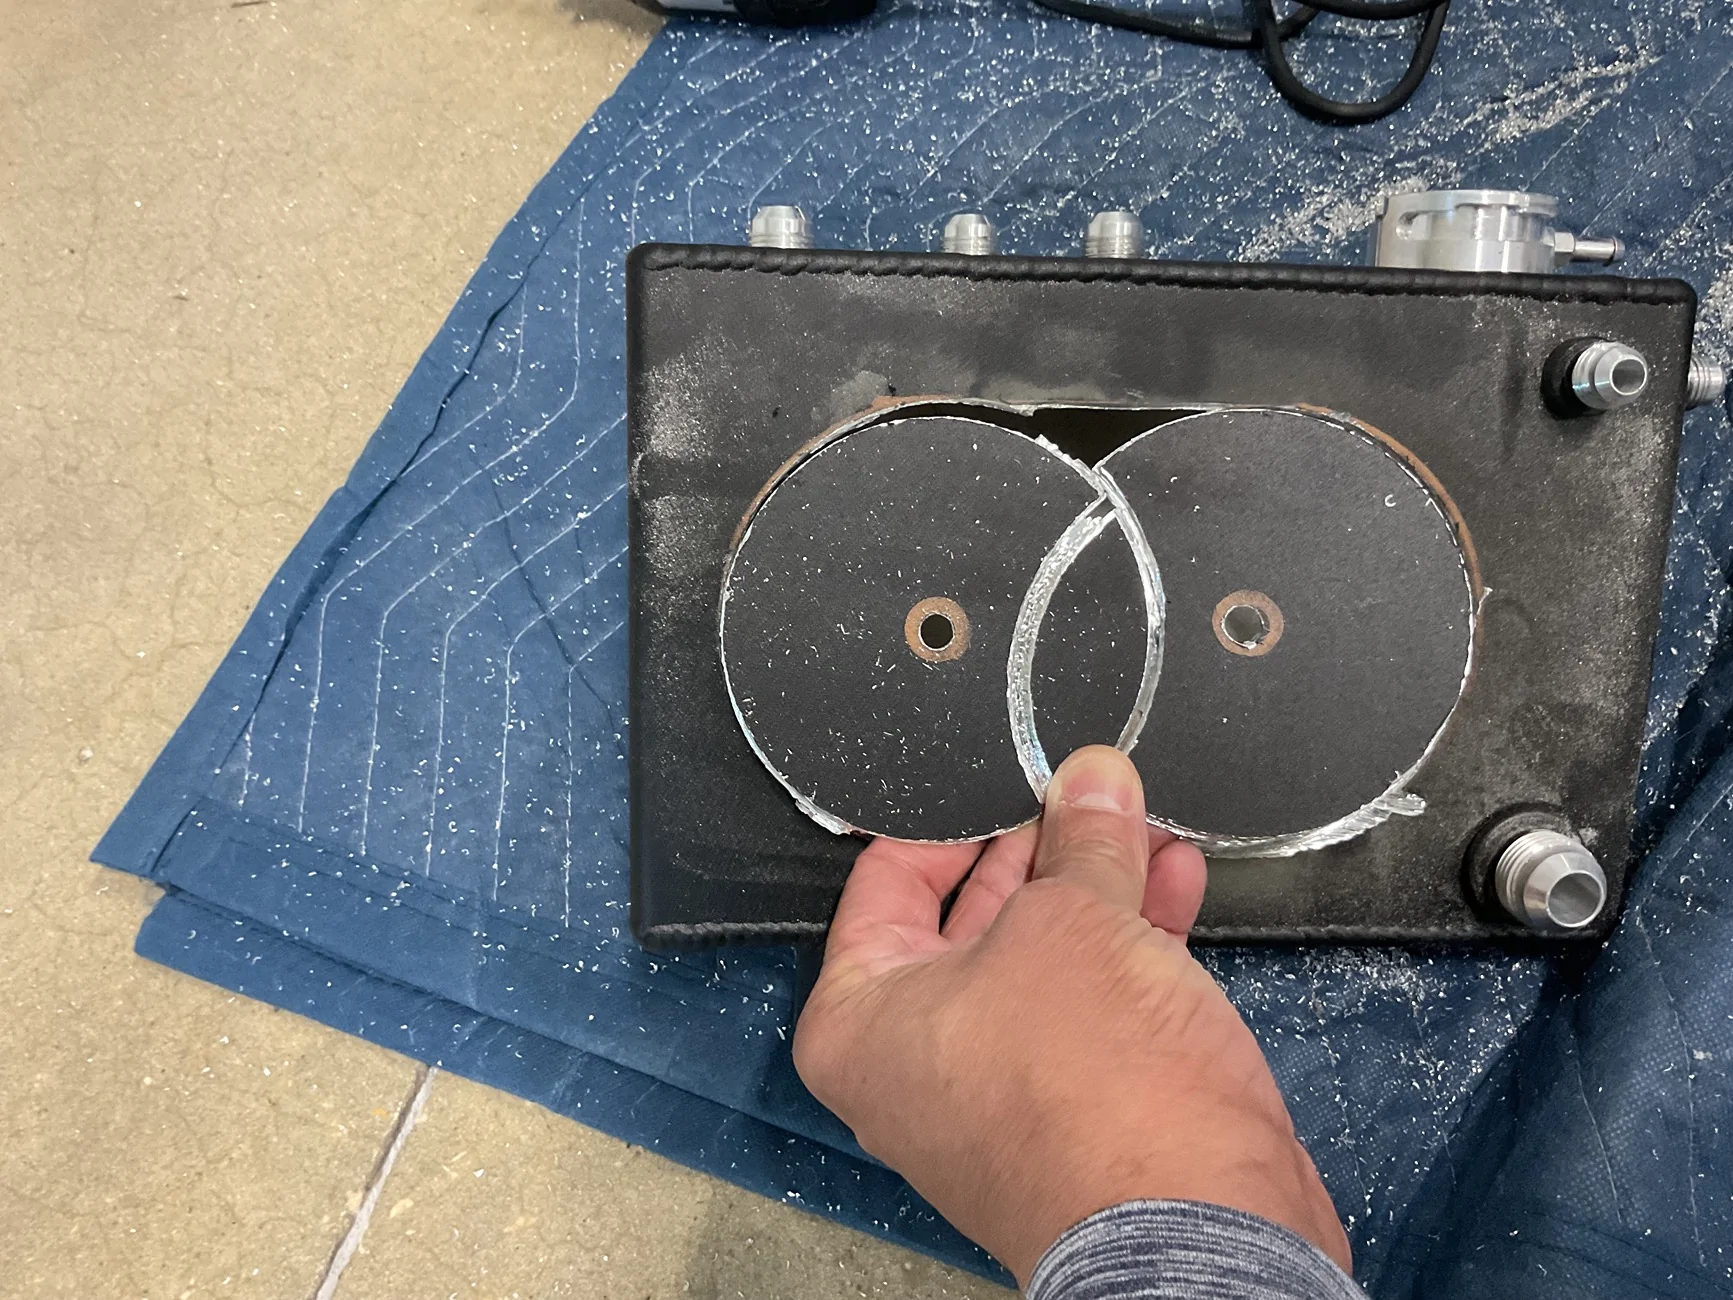
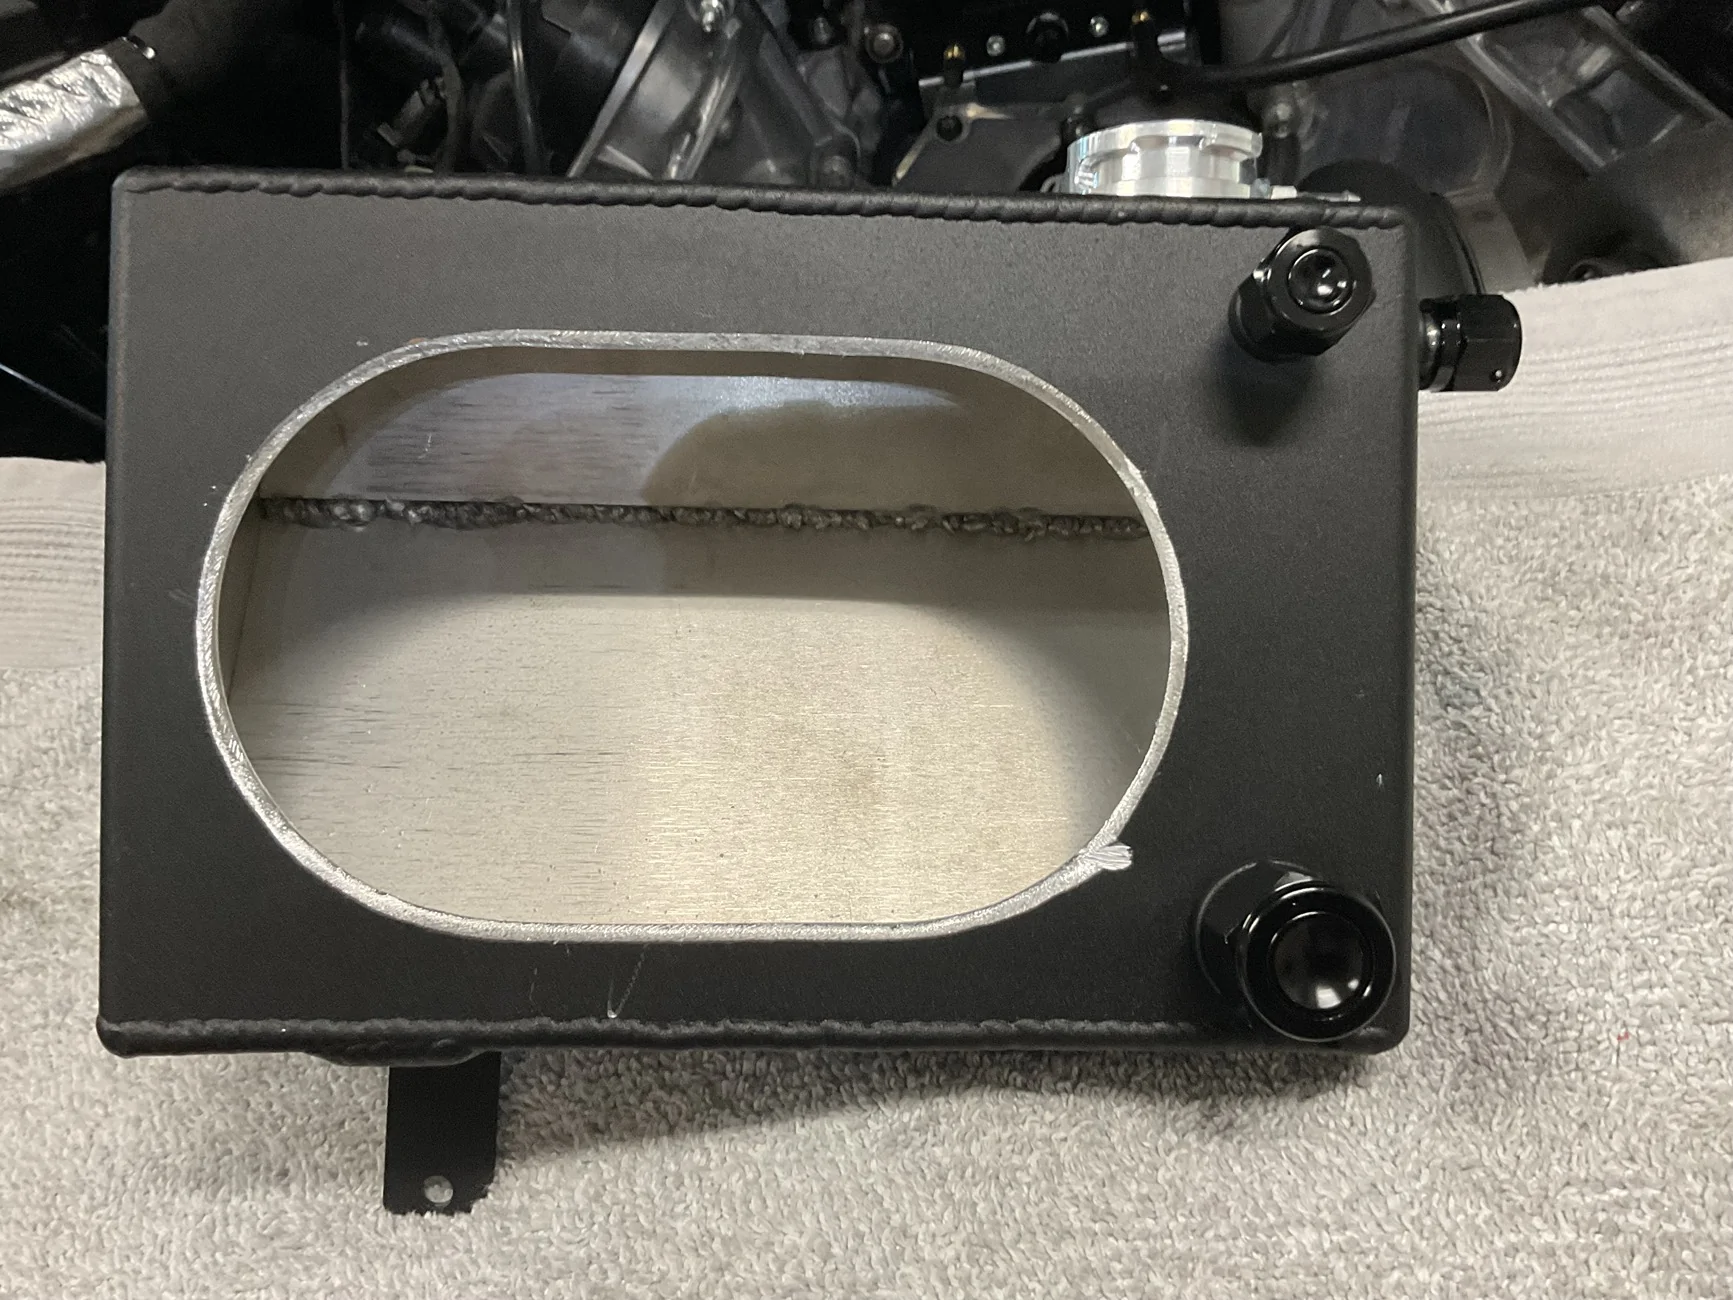
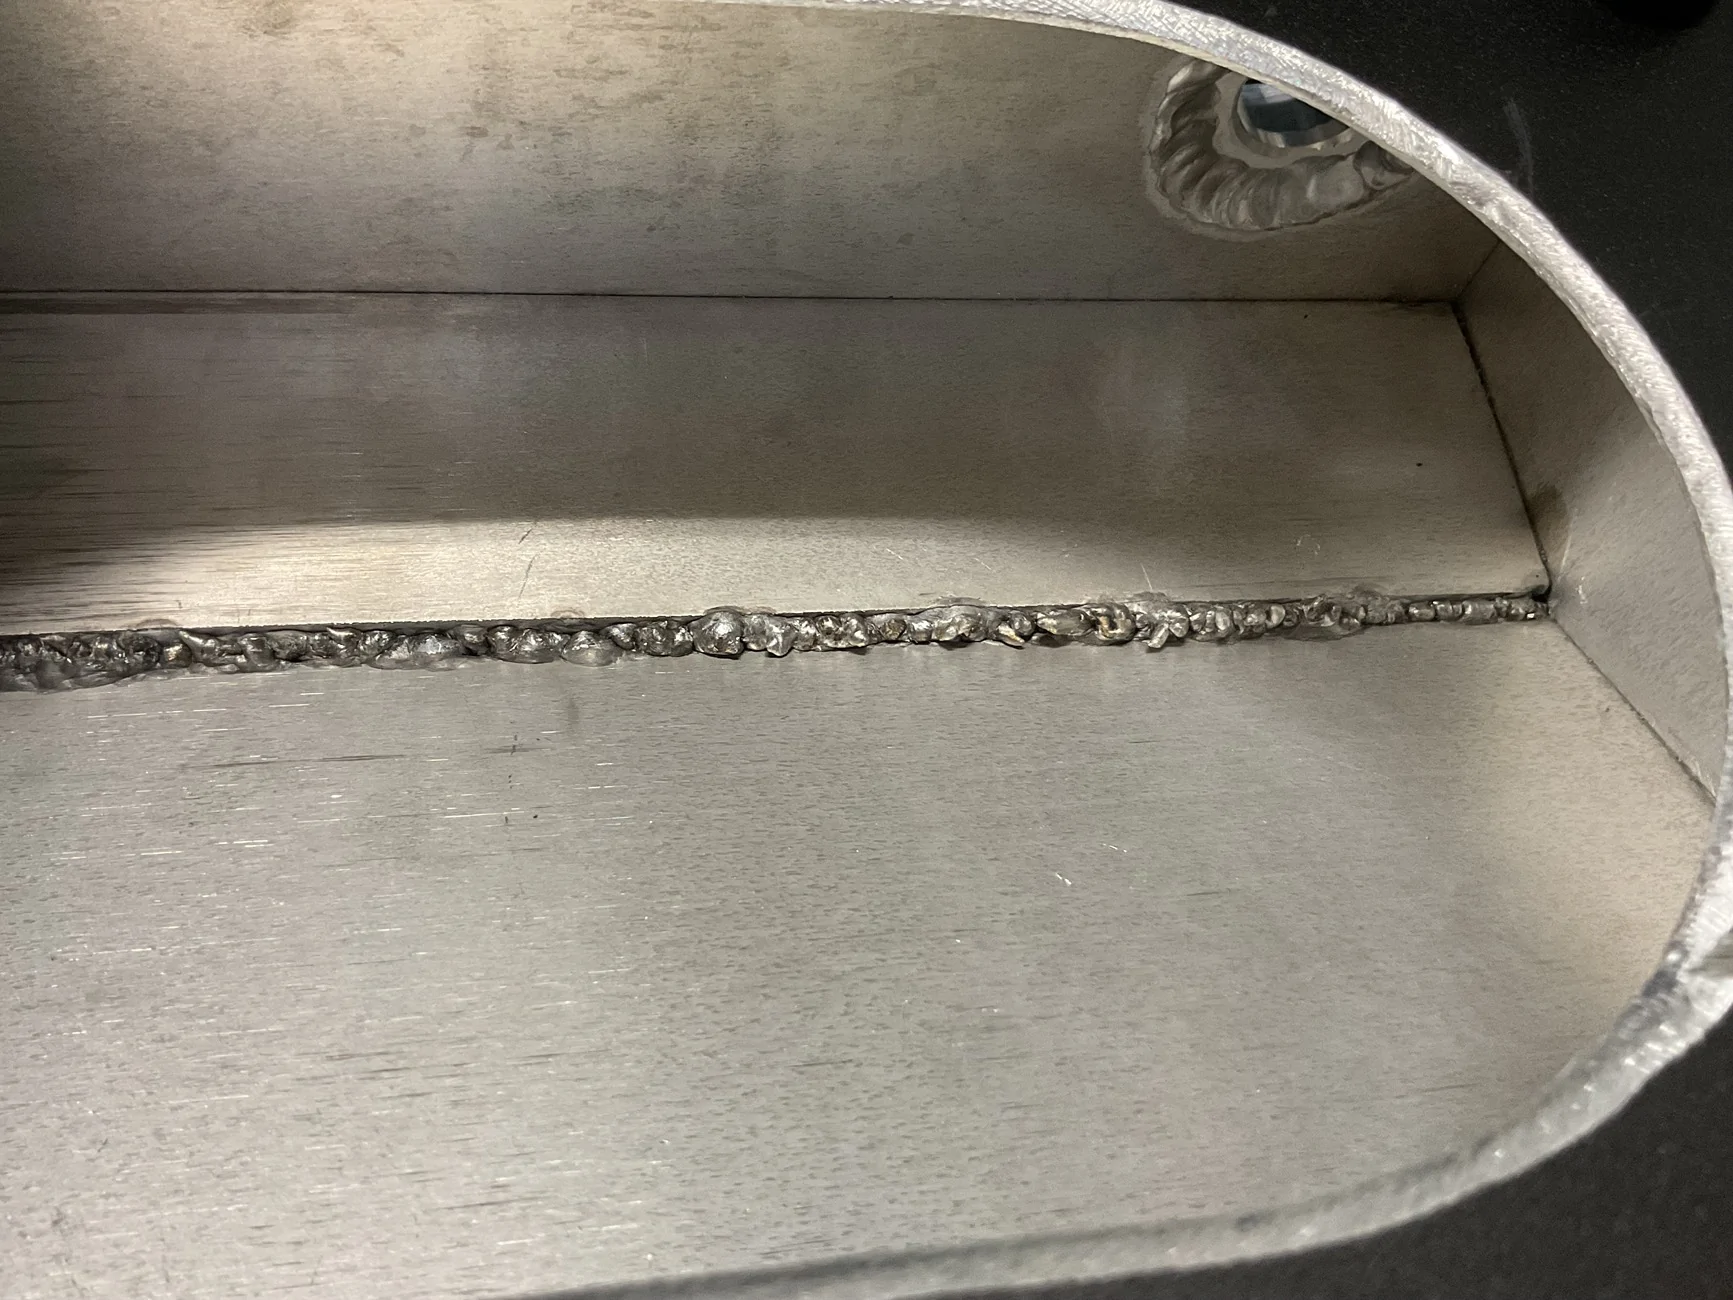
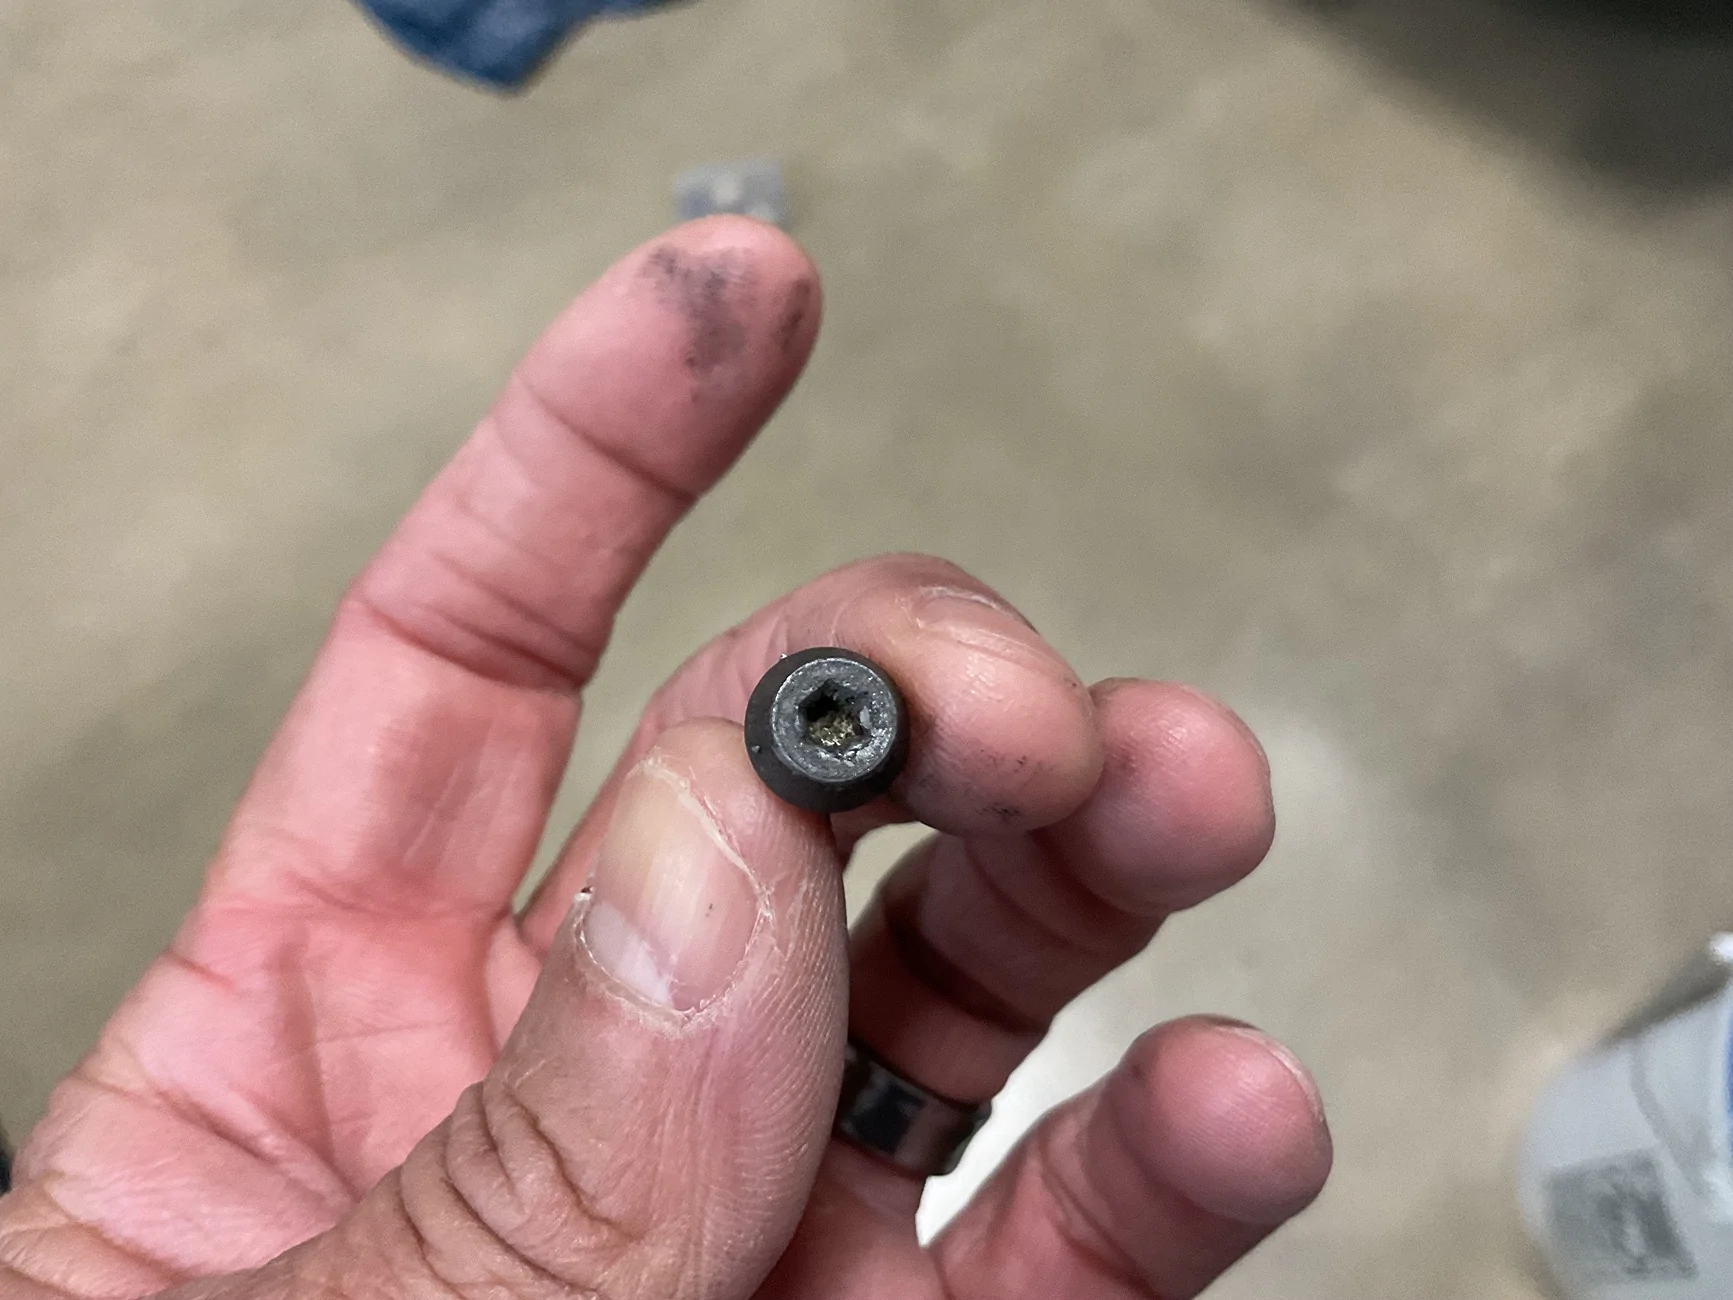
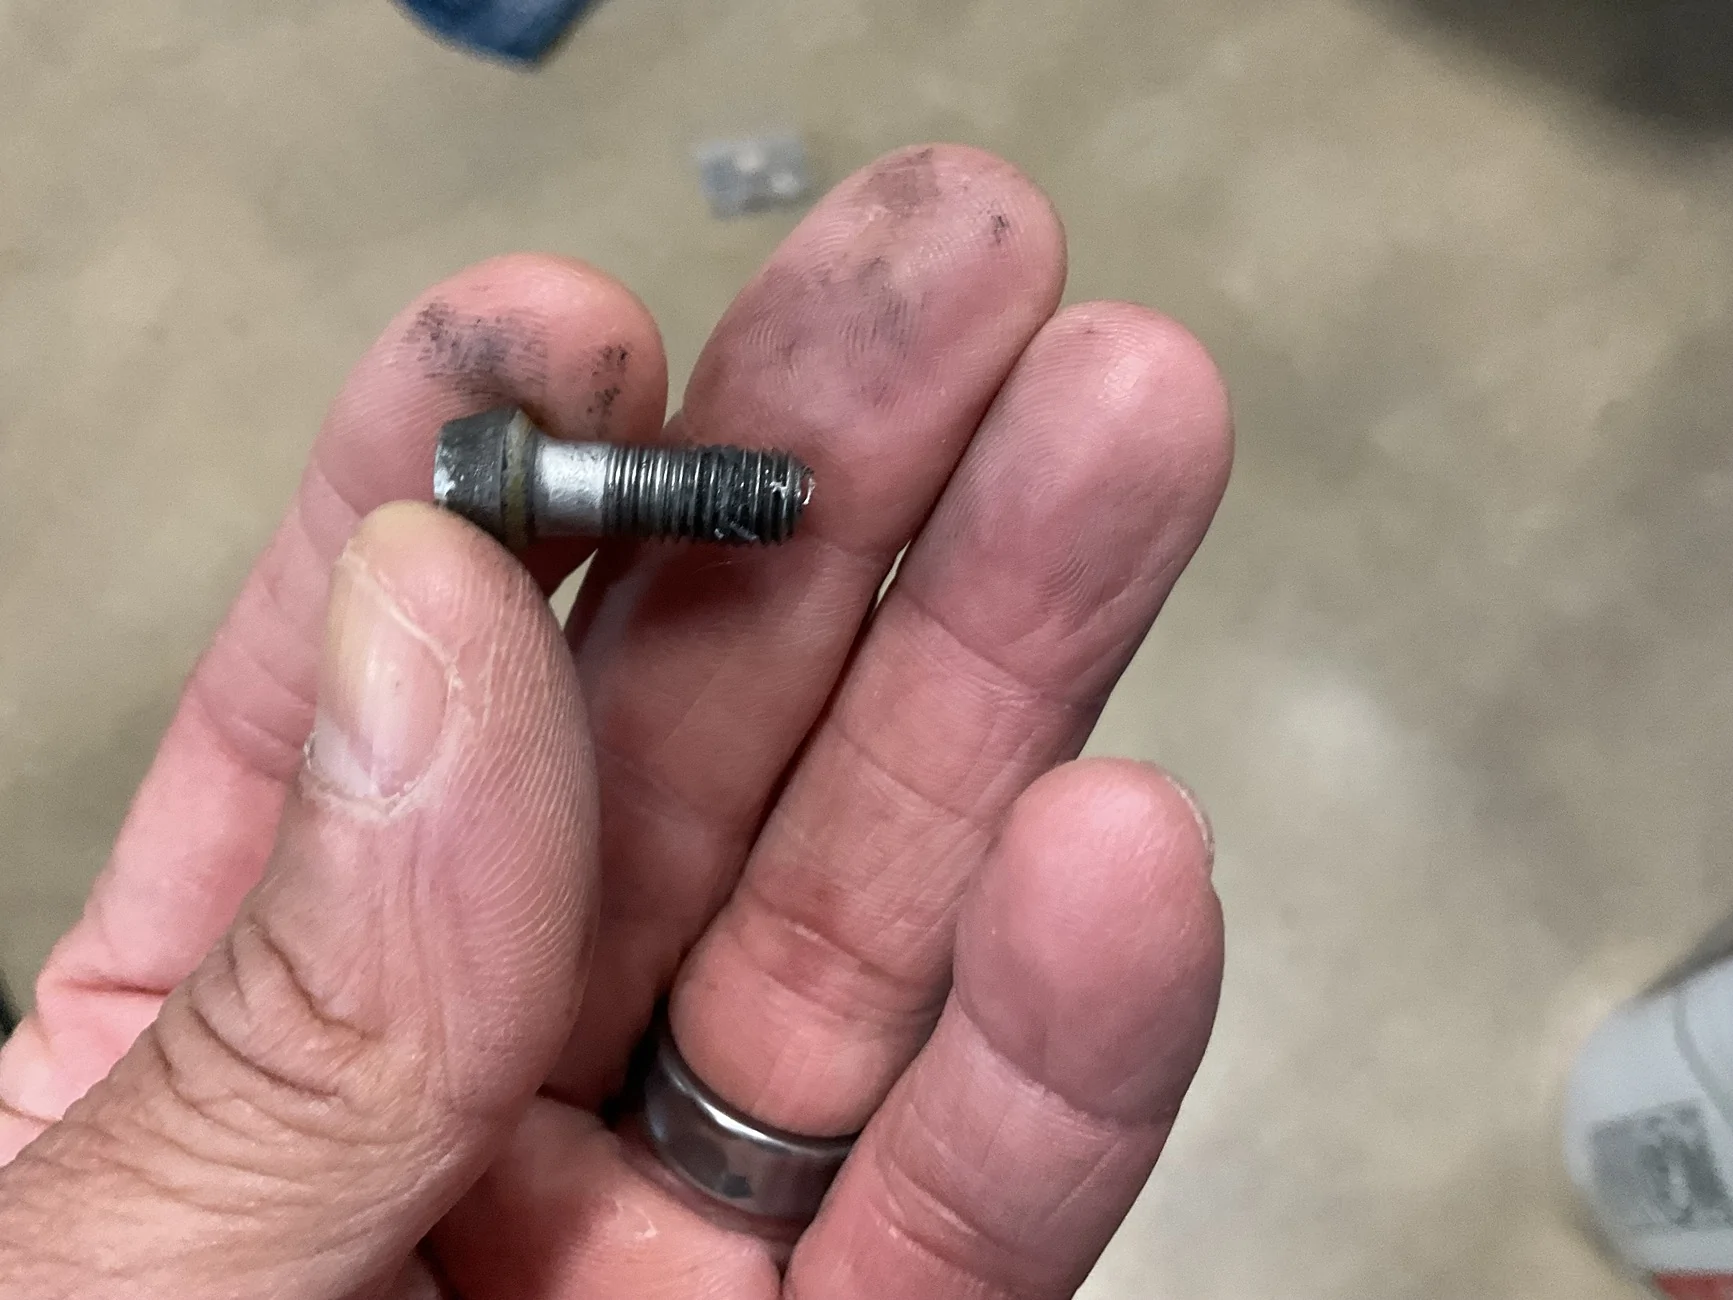
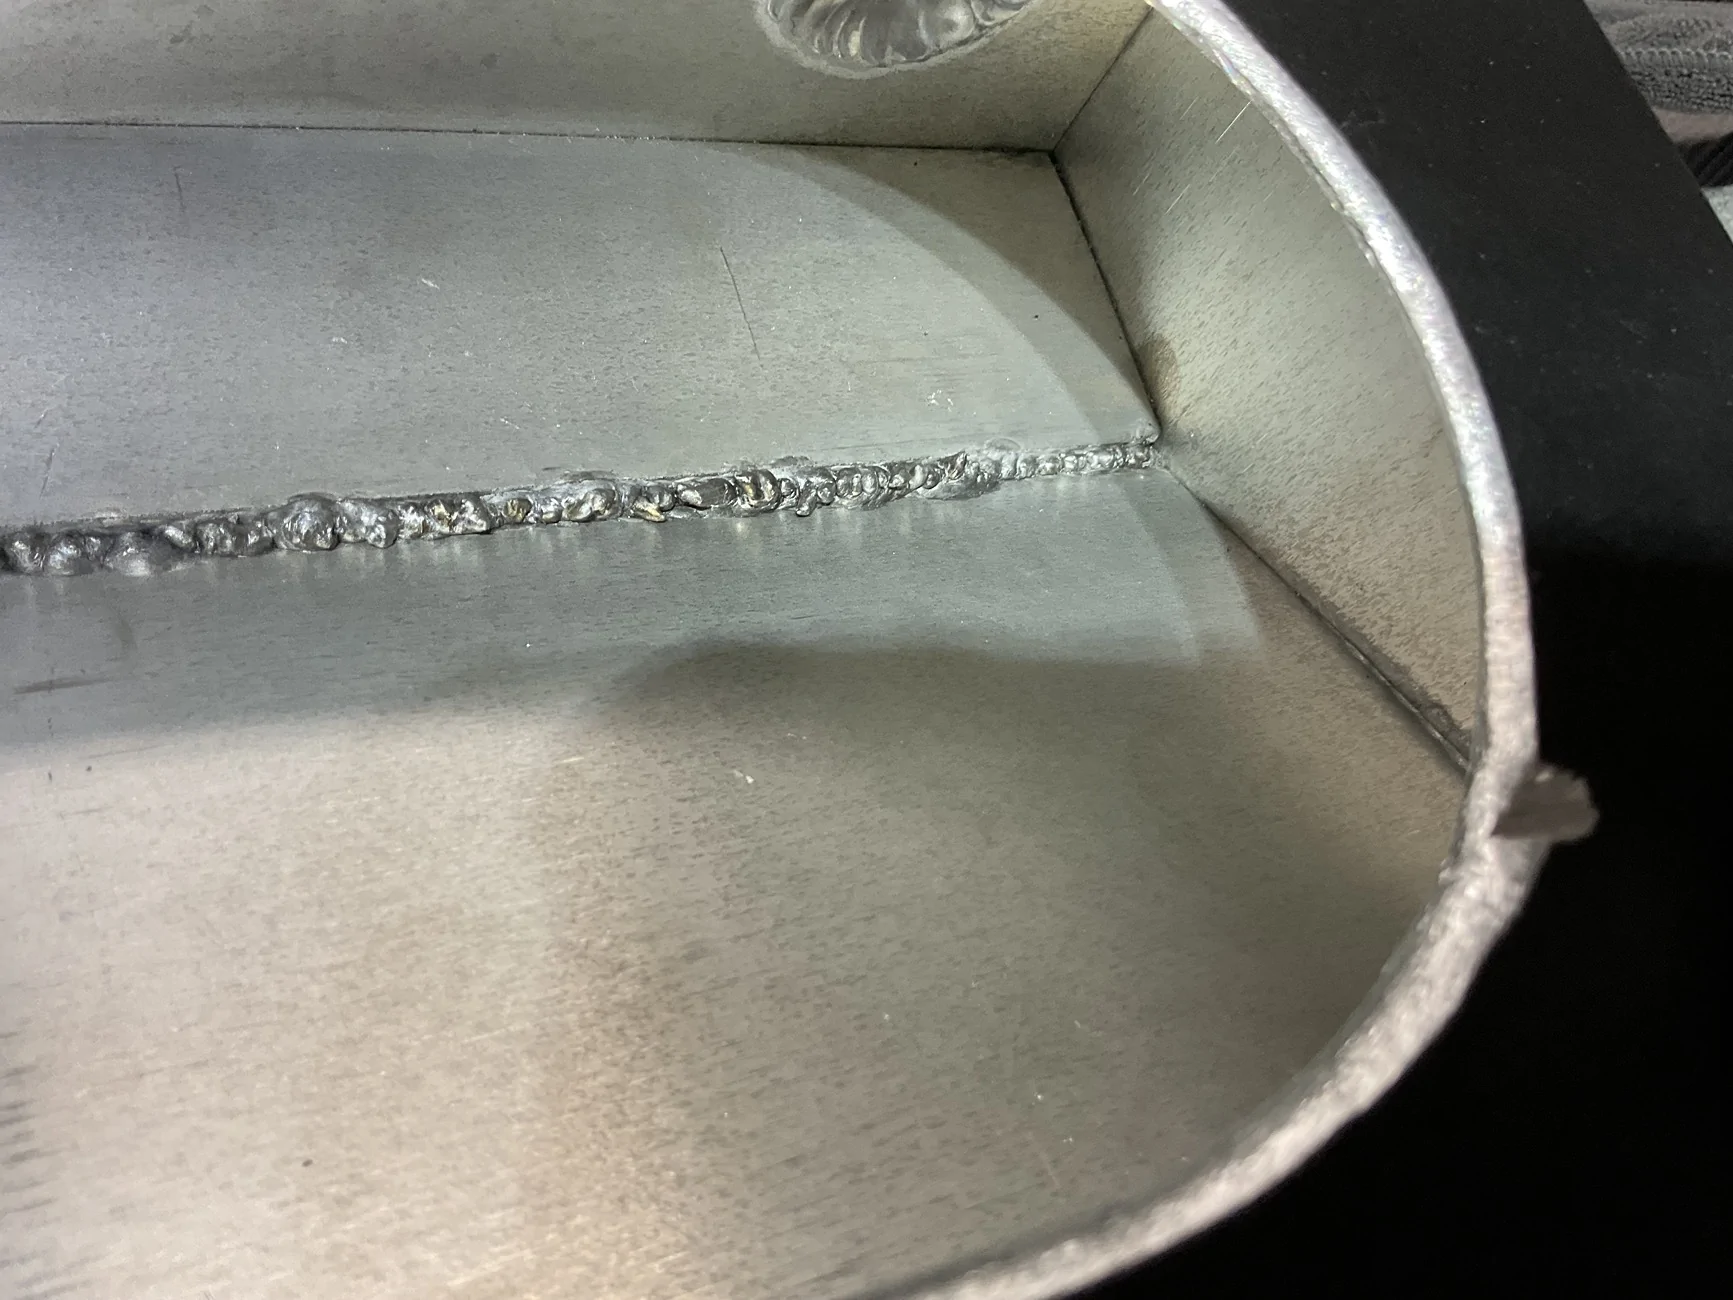
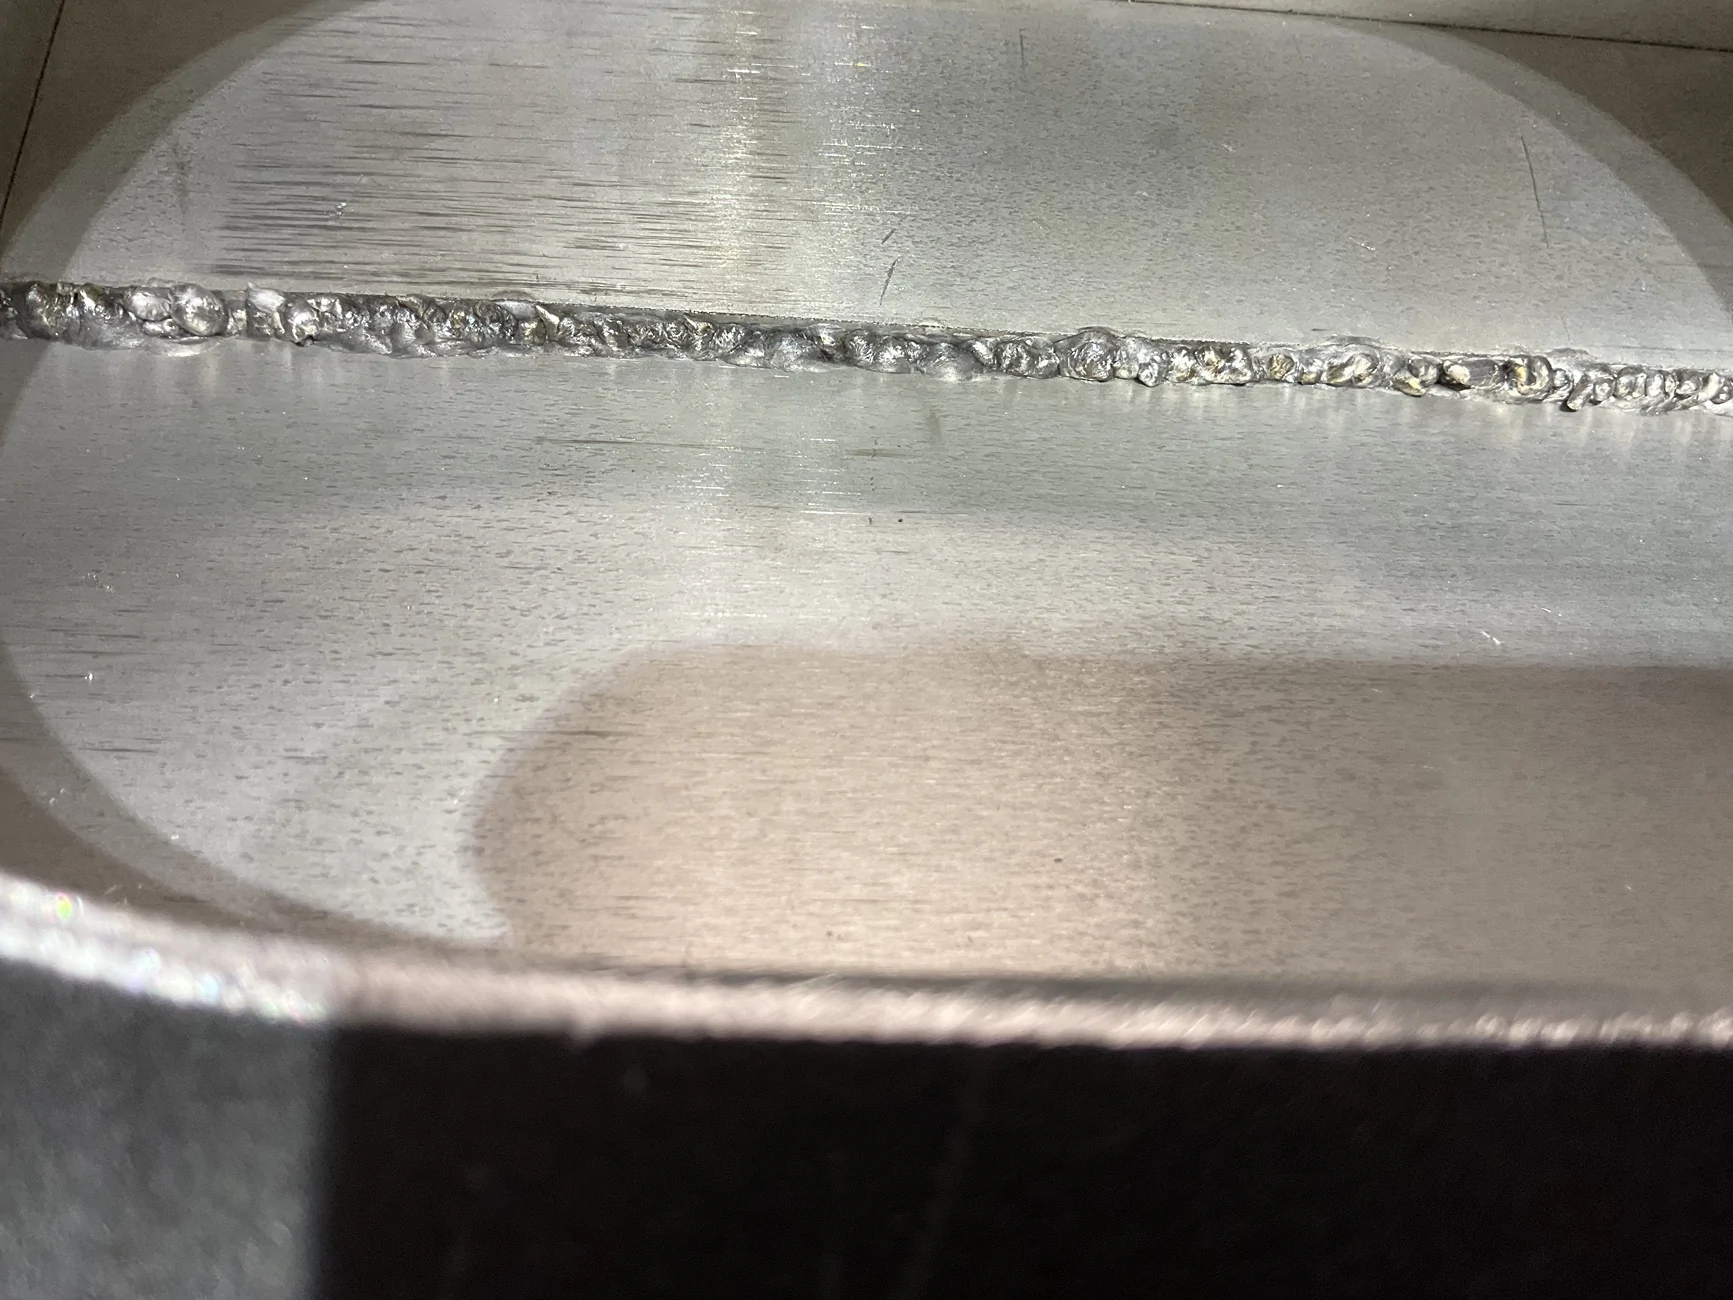
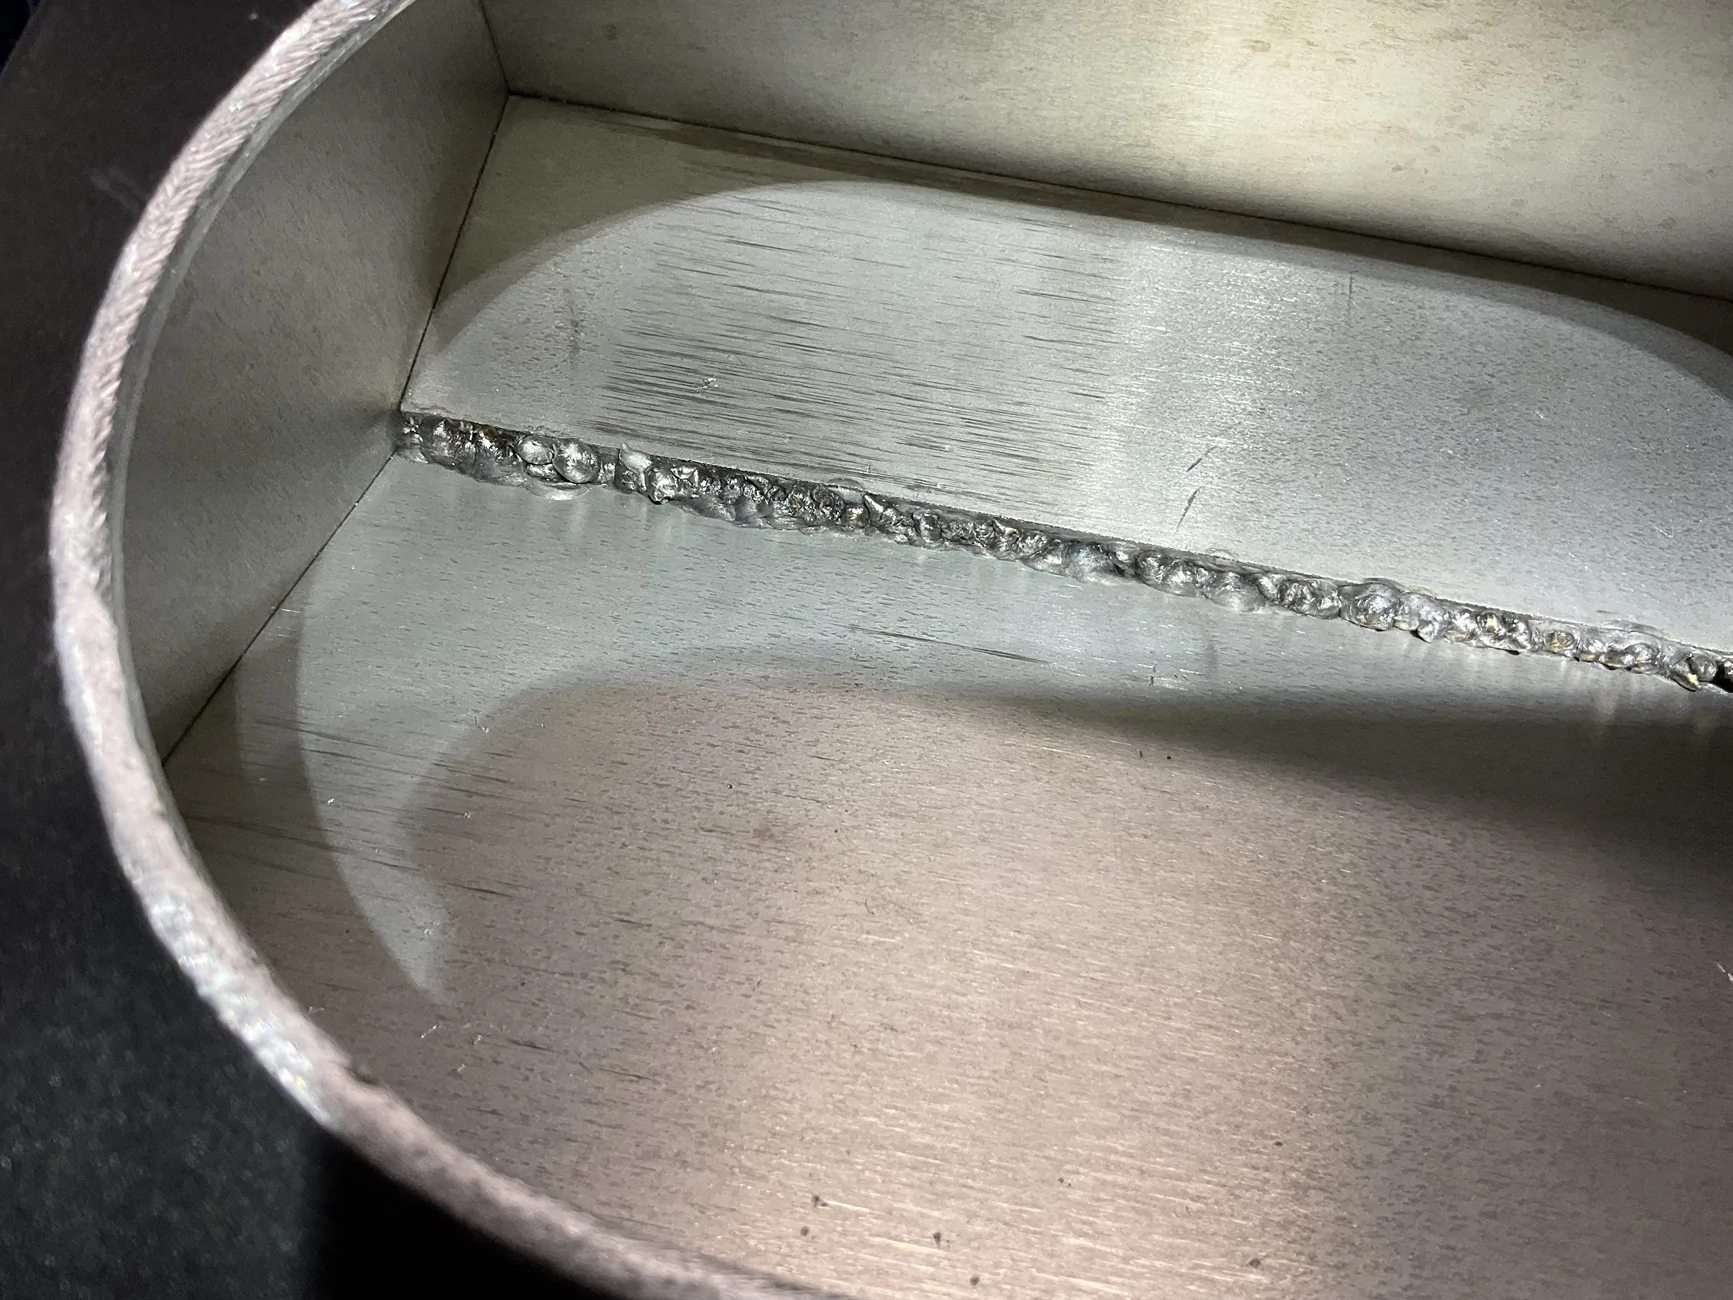
I went ahead and windowed the BL Fab tank today, to see what in the heck was going on inside. To my surprise, I found an old small screw inside. Not a big deal compared to the weld inside. It looks like…I’ll just let you guys judge for yourselves, as to what it looks like. I can clearly see why the coolant side leaked over into the catch can side.
Furthermore, with heat and pressure fluctuations, perhaps one or more of the weld pebbles/slag could have dislodged over time and clogged up my coolant system.
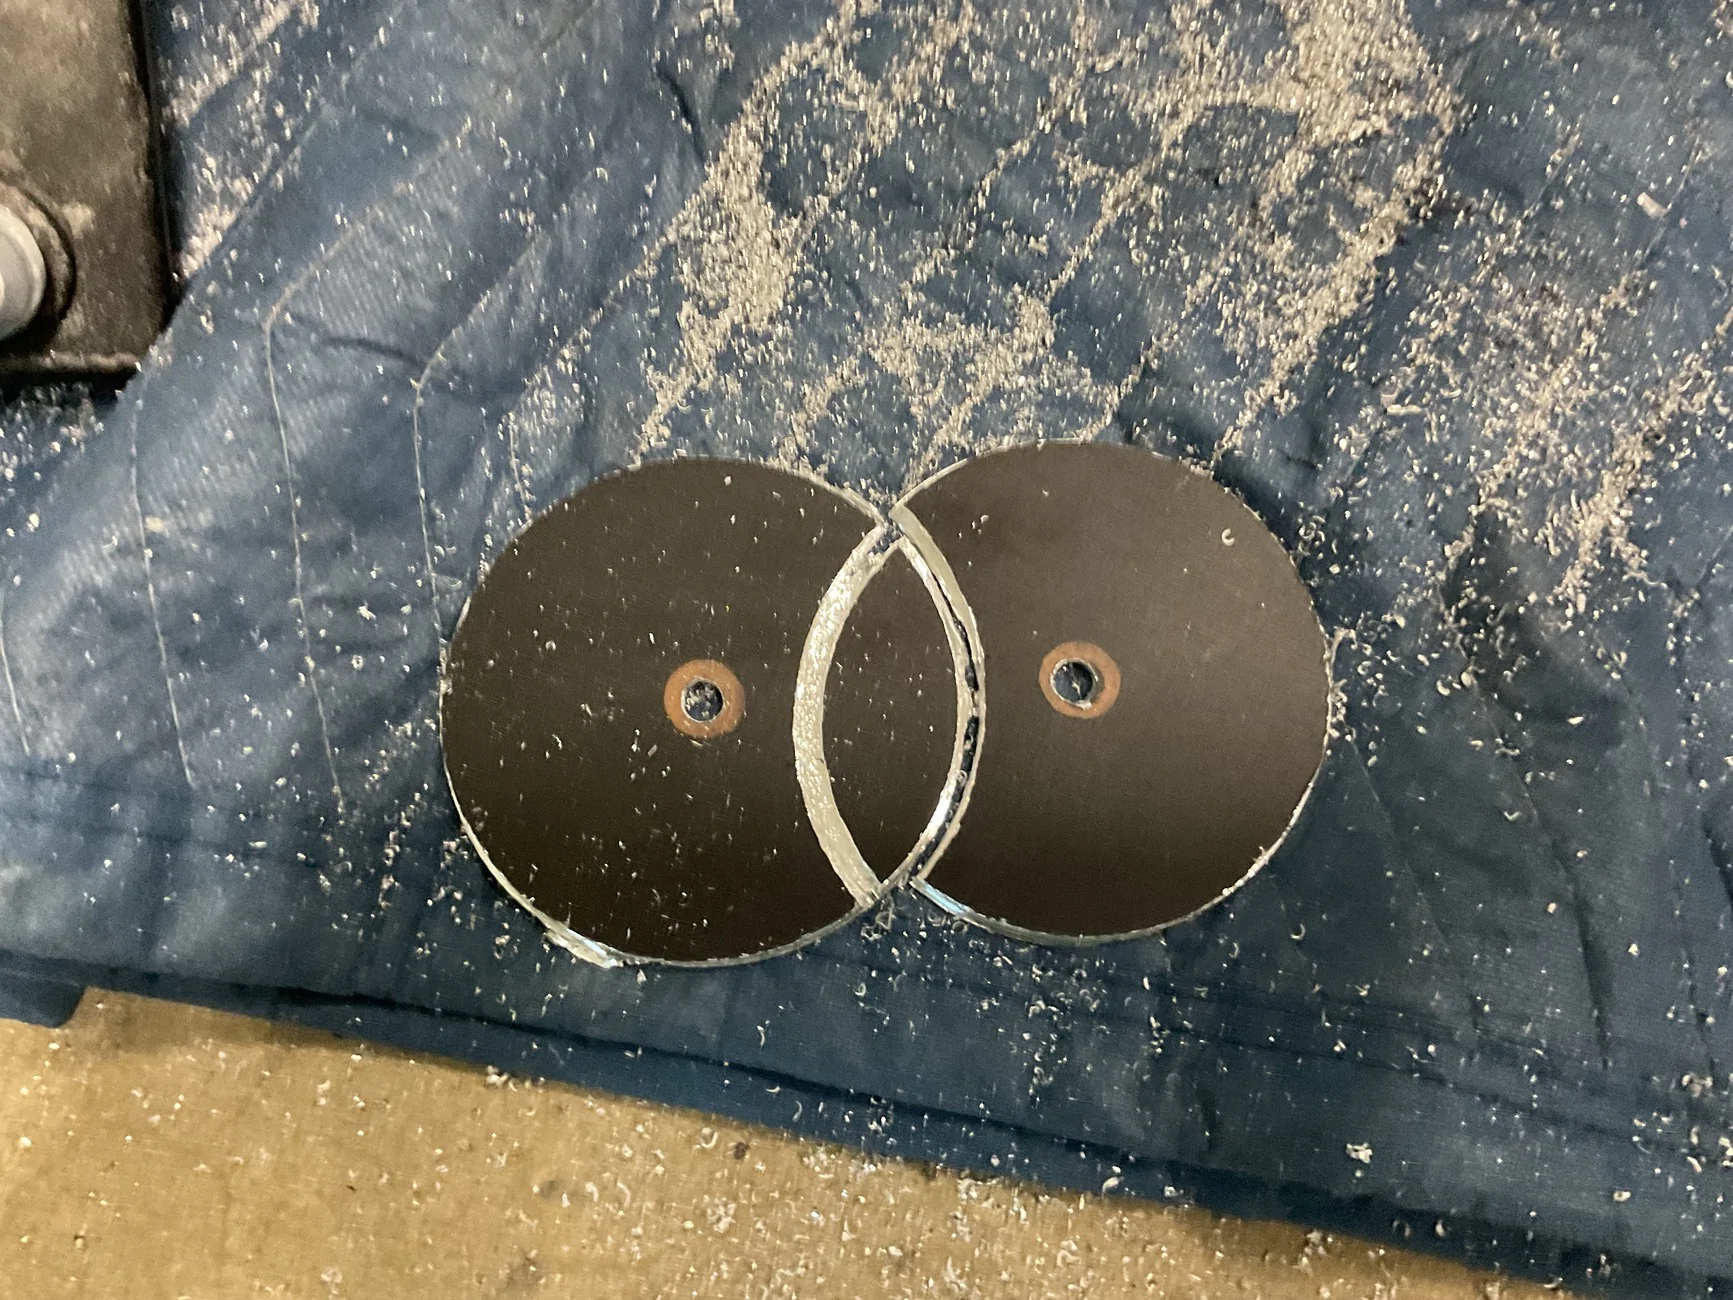
Now let’s talk about how I made the window. I used a 4” hole saw and traced halfway around it, drew a straight line and traced halfway around the hole saw again to form an oval. I then drilled pilot holes and went to work with the hole saw and cut two circles, followed by a straight cut in the middle with my Dremel to complete the oval. Finally, I hand filed and beveled the window.
I don’t know what the type or thickness of the material is that was used, but I’ll need to find out, so that I can make a piece to have welded back in. Overall, I’d say it tuned out pretty good, minus the small spot where the hole saw jumped. That should be taken care of when it gets welded back up.
Furthermore, with heat and pressure fluctuations, perhaps one or more of the weld pebbles/slag could have dislodged over time and clogged up my coolant system.
Now let’s talk about how I made the window. I used a 4” hole saw and traced halfway around it, drew a straight line and traced halfway around the hole saw again to form an oval. I then drilled pilot holes and went to work with the hole saw and cut two circles, followed by a straight cut in the middle with my Dremel to complete the oval. Finally, I hand filed and beveled the window.
I don’t know what the type or thickness of the material is that was used, but I’ll need to find out, so that I can make a piece to have welded back in. Overall, I’d say it tuned out pretty good, minus the small spot where the hole saw jumped. That should be taken care of when it gets welded back up.

Last edited:
Sponsored
19BULLITTwhipple
Well-Known Member
- Joined
- Mar 23, 2021
- Threads
- 29
- Messages
- 272
- Reaction score
- 159
- Location
- California
- First Name
- Ramzi
- Vehicle(s)
- Bullitt 2019
They should give you all your money back!
Joshinator99
Well-Known Member
- Joined
- May 13, 2023
- Threads
- 1
- Messages
- 610
- Reaction score
- 1,137
- Location
- Massachusetts
- First Name
- Josh
- Vehicle(s)
- 2022 Mustang GT Premium, 2017 Camaro 2SS
Once upon a time I bought myself a MIG welder and decided to teach myself to weld. That weld looks like my first one. That’s NOT a good thing by the way.I went ahead and windowed the BL Fab tank today, to see what in the heck was going on inside. To my surprise, I found an old small screw inside. Not a big deal compared to the weld inside. It looks like…I’ll just let you guys judge for yourselves, as to what it looks like). I can clearly see why the coolant side leaked over into the catch can side.
Furthermore, with heat and pressure fluctuations, perhaps one or more of the weld pebbles/slag could have dislodged over time and clogged up my coolant system.
Now let’s talk about how I made the window. I used a 4” hole saw and traced halfway around it, drew a straight line and traced halfway around the hole saw again to form an oval. I then drilled pilot holes and went to work with the hole saw and cut two circles, followed by a straight cut in the middle with my Dremel to complete the oval. Finally, I hand filed and beveled the window.
I don’t know what the type or thickness of the material is that was used, but I’ll need to find out, so that I can make a piece to have welded back in. Overall, I’d say it tuned out pretty good, minus the small spot where the hole saw jumped. That should be taken care of when it gets welded back up.

masonhoare9
Well-Known Member
- Joined
- Nov 11, 2025
- Threads
- 1
- Messages
- 51
- Reaction score
- 199
- Location
- united states
- First Name
- mason
- Vehicle(s)
- 2015 mustang gt
Fabraction company by the wayI went ahead and windowed the BL Fab tank today, to see what in the heck was going on inside. To my surprise, I found an old small screw inside. Not a big deal compared to the weld inside. It looks like…I’ll just let you guys judge for yourselves, as to what it looks like. I can clearly see why the coolant side leaked over into the catch can side.
Furthermore, with heat and pressure fluctuations, perhaps one or more of the weld pebbles/slag could have dislodged over time and clogged up my coolant system.
Now let’s talk about how I made the window. I used a 4” hole saw and traced halfway around it, drew a straight line and traced halfway around the hole saw again to form an oval. I then drilled pilot holes and went to work with the hole saw and cut two circles, followed by a straight cut in the middle with my Dremel to complete the oval. Finally, I hand filed and beveled the window.
I don’t know what the type or thickness of the material is that was used, but I’ll need to find out, so that I can make a piece to have welded back in. Overall, I’d say it tuned out pretty good, minus the small spot where the hole saw jumped. That should be taken care of when it gets welded back up.

masonhoare9
Well-Known Member
- Joined
- Nov 11, 2025
- Threads
- 1
- Messages
- 51
- Reaction score
- 199
- Location
- united states
- First Name
- mason
- Vehicle(s)
- 2015 mustang gt
I just bought a borescope so I will share what the inside of mine looks like as well.I went ahead and windowed the BL Fab tank today, to see what in the heck was going on inside. To my surprise, I found an old small screw inside. Not a big deal compared to the weld inside. It looks like…I’ll just let you guys judge for yourselves, as to what it looks like. I can clearly see why the coolant side leaked over into the catch can side.
Furthermore, with heat and pressure fluctuations, perhaps one or more of the weld pebbles/slag could have dislodged over time and clogged up my coolant system.
Now let’s talk about how I made the window. I used a 4” hole saw and traced halfway around it, drew a straight line and traced halfway around the hole saw again to form an oval. I then drilled pilot holes and went to work with the hole saw and cut two circles, followed by a straight cut in the middle with my Dremel to complete the oval. Finally, I hand filed and beveled the window.
I don’t know what the type or thickness of the material is that was used, but I’ll need to find out, so that I can make a piece to have welded back in. Overall, I’d say it tuned out pretty good, minus the small spot where the hole saw jumped. That should be taken care of when it gets welded back up.
cbrtrx
Well-Known Member
At this point I agree.They should give you all your money back!
Sponsored
masonhoare9
Well-Known Member
- Joined
- Nov 11, 2025
- Threads
- 1
- Messages
- 51
- Reaction score
- 199
- Location
- united states
- First Name
- mason
- Vehicle(s)
- 2015 mustang gt
I have a dispute with them as we speak. Im trying to get as much money back as i can with missing hardware, parts, fittings etc.At this point I agree.
cbrtrx
Well-Known Member
I know others that have done the same. Hope it works out for you.I have a dispute with them as we speak. Im trying to get as much money back as i can with missing hardware, parts, fittings etc.
masonhoare9
Well-Known Member
- Joined
- Nov 11, 2025
- Threads
- 1
- Messages
- 51
- Reaction score
- 199
- Location
- united states
- First Name
- mason
- Vehicle(s)
- 2015 mustang gt
Yeah they responded twice to 10 emails. In 14 business days…… I just have a feeling im just going to be waiting until my credit card company contacts me about it.I know others that have done the same. Hope it works out for you.
OP
OP
NGOT8R
Well-Known Member
- Thread starter
- #389
This sounds all too familiar. I went through this with them a little over a year and a half ago. I had initially ordered an 80MM turbo and was ghosted for what seemed like forever. Finally, after informing them of my intent to dispute the $1900 turbo purchase that I hadn’t received and the lack of proper communication, they upgraded me to the 88MM turbo at no additional charge. It was a huge headache.Yeah they responded twice to 10 emails. In 14 business days…… I just have a feeling im just going to be waiting until my credit card company contacts me about it.
The other thing that didn’t sit right with me was when I ordered the Treadstone IC from BL Fab, they had it drop shipped from Treadstone and when it arrived at my door, there were no mounting brackets with it. I contacted BL Fab a couple of times about the issue and they finally sent me the brackets. Needless to say, I’ll have to pay to have them welded on.
The crazy thing is, they initially told me that my fabricator should be able to make brackets and weld them on.
To be fair on my part, the only thing that I should have had to modify with this kit was the cold side piping to the throttle body because I switched intakes to the Holley Lo Ram which had a 72* downward angle.
I didn’t bother reaching out to BL Fab about my leaking coolant tank because, knowing what I know now about how it was welded on the inside, even if they had sent me another one, I wouldn’t have confidence in it lasting long term before it failed from the heat and expansion/contraction.
masonhoare9
Well-Known Member
- Joined
- Nov 11, 2025
- Threads
- 1
- Messages
- 51
- Reaction score
- 199
- Location
- united states
- First Name
- mason
- Vehicle(s)
- 2015 mustang gt
Yup they responded to dispute threat and the dispute. Told them how we can fix it never answered. Don’t know how you can run a business like this even if you don’t have the best product.This sounds all too familiar. I went through this with them a little over a year and a half ago. I had initially ordered an 80MM turbo and was ghosted for what seemed like forever. Finally, after informing them of my intent to dispute the $1900 turbo purchase that I hadn’t received and the lack of proper communication, they upgraded me to the 88MM turbo at no additional charge. It was a huge headache.
The other thing that didn’t sit right with me was when I ordered the Treadstone IC from BL Fab, they had it drop shipped from Treadstone and when it arrived at my door, there were no mounting brackets with it. I contacted BL Fab a couple of times about the issue and they finally sent me the brackets. Needless to say, I’ll have to pay to have them welded on.
The crazy thing is, they initially told me that my fabricator should be able to make brackets and weld them on.
To be fair on my part, the only thing that I should have had to modify with this kit was the cold side piping to the throttle body because I switched intakes to the Holley Lo Ram which had a 72* downward angle.
I didn’t bother reaching out to BL Fab about my leaking coolant tank because, knowing what I know now about how it was welded on the inside, even if they had sent me another one, I wouldn’t have confidence in it lasting long term before it failed from the heat and expansion/contraction.
Sponsored