Sponsored

Upgraded sway bars for Mach 1?

OP
OP
Mikepol2

Mikepol2

Well-Known Member
Joined
Jul 17, 2018
Threads
140
Messages
3,996
Reaction score
7,125
Location
Pittsburgh, PA
First Name
Mike
Vehicle(s)
2021 Mach 1, 2019 Ram 1500
Just responded to your email - it appears that the kit was not ordered & a Ford Performance kit was ordered. I have let our internal team know about the description.

Thank you,

TJ
The Steeda kit arrived today, thanks TJ, can't wait to get them installed! Hopefully the weather is decent on some upcoming day off work.

Also, I can confirm that the rear bar measures 1 inch diameter, not 1-1/8 as is listed on the Specifications tab of the website for the 555-1017 kit. So the front is about 5% thicker than the stock handling package bar, and the rear is about 6% thicker.
 
OP
OP
Mikepol2

Mikepol2

Well-Known Member
Joined
Jul 17, 2018
Threads
140
Messages
3,996
Reaction score
7,125
Location
Pittsburgh, PA
First Name
Mike
Vehicle(s)
2021 Mach 1, 2019 Ram 1500
Installation day! Here are some notes on installing Steeda 555-1017 front and rear sway bars on a Mach 1 with the handling package. Essential uncommon tools are an extended length pivoting head 18 mm ratchet wrench, a 1/2” drive ratchet universal joint (wobbler), and a 24” long 1/2” drive socket extension.

To remove the front end links you need a 17 mm open end wrench to hold the stud, and the 18 mm ratchet wrench to remove the nut. Would be tough but doable with a regular box end wrench but why bother when you have the ratchet wrench. Lots of Loctite and not a lot of room behind it. Also, because of the lines running to the strut, there is not enough room to easily slide the end link out of the sway bar. Once I removed the four bracket bolts, though, the end links popped right out. EDIT: To switch holes after installation, you need to remove the upper end link nuts too. That would have made the original install easier as well.

For the passenger side sway bar bracket, you need a 24” long extension with a wobbler and 18 mm socket to reach the bolts. I removed the 10 mm coolant tank bolts to get more room. There is room to reach down from the top to lift out the front bolt, and it’s easy to remove the rear bolt from the wheel well.

For the driver side, you need to remove the airbox. There are four 10 mm studs that hold the top frame on. Remove the frame and you can then remove the air filter. Then there is one 10 mm bolt that holds the lower part of the box in place. It is a real bitch wiggling it out of there. The front sway bar bracket bolt is very easy to reach, but the rear bolt is blocked by the alternator so you need to remove the rear bolt from the wheel well. There is a black plastic shroud that attaches to the frame with two plastic pushpins that must be removed before you can reach the rear bolt. The rear bolt is the worst of the four. I can’t see any way of getting it out without the extended pivoting ratchet wrench.

Removing the bar is a bugger. I did it from the passenger side because there is a small fluid line there that I wanted to be sure not to damage. In the end, you almost end up turning the bar towards the middle of the car to get it out, and thread it down through the suspension, not underneath everything. I also turned the wheels all the way towards the left to make room, and there was barely enough. It was a little easier threading the new bar in, I just put the bushings on first and then put on the brackets after it was in place.


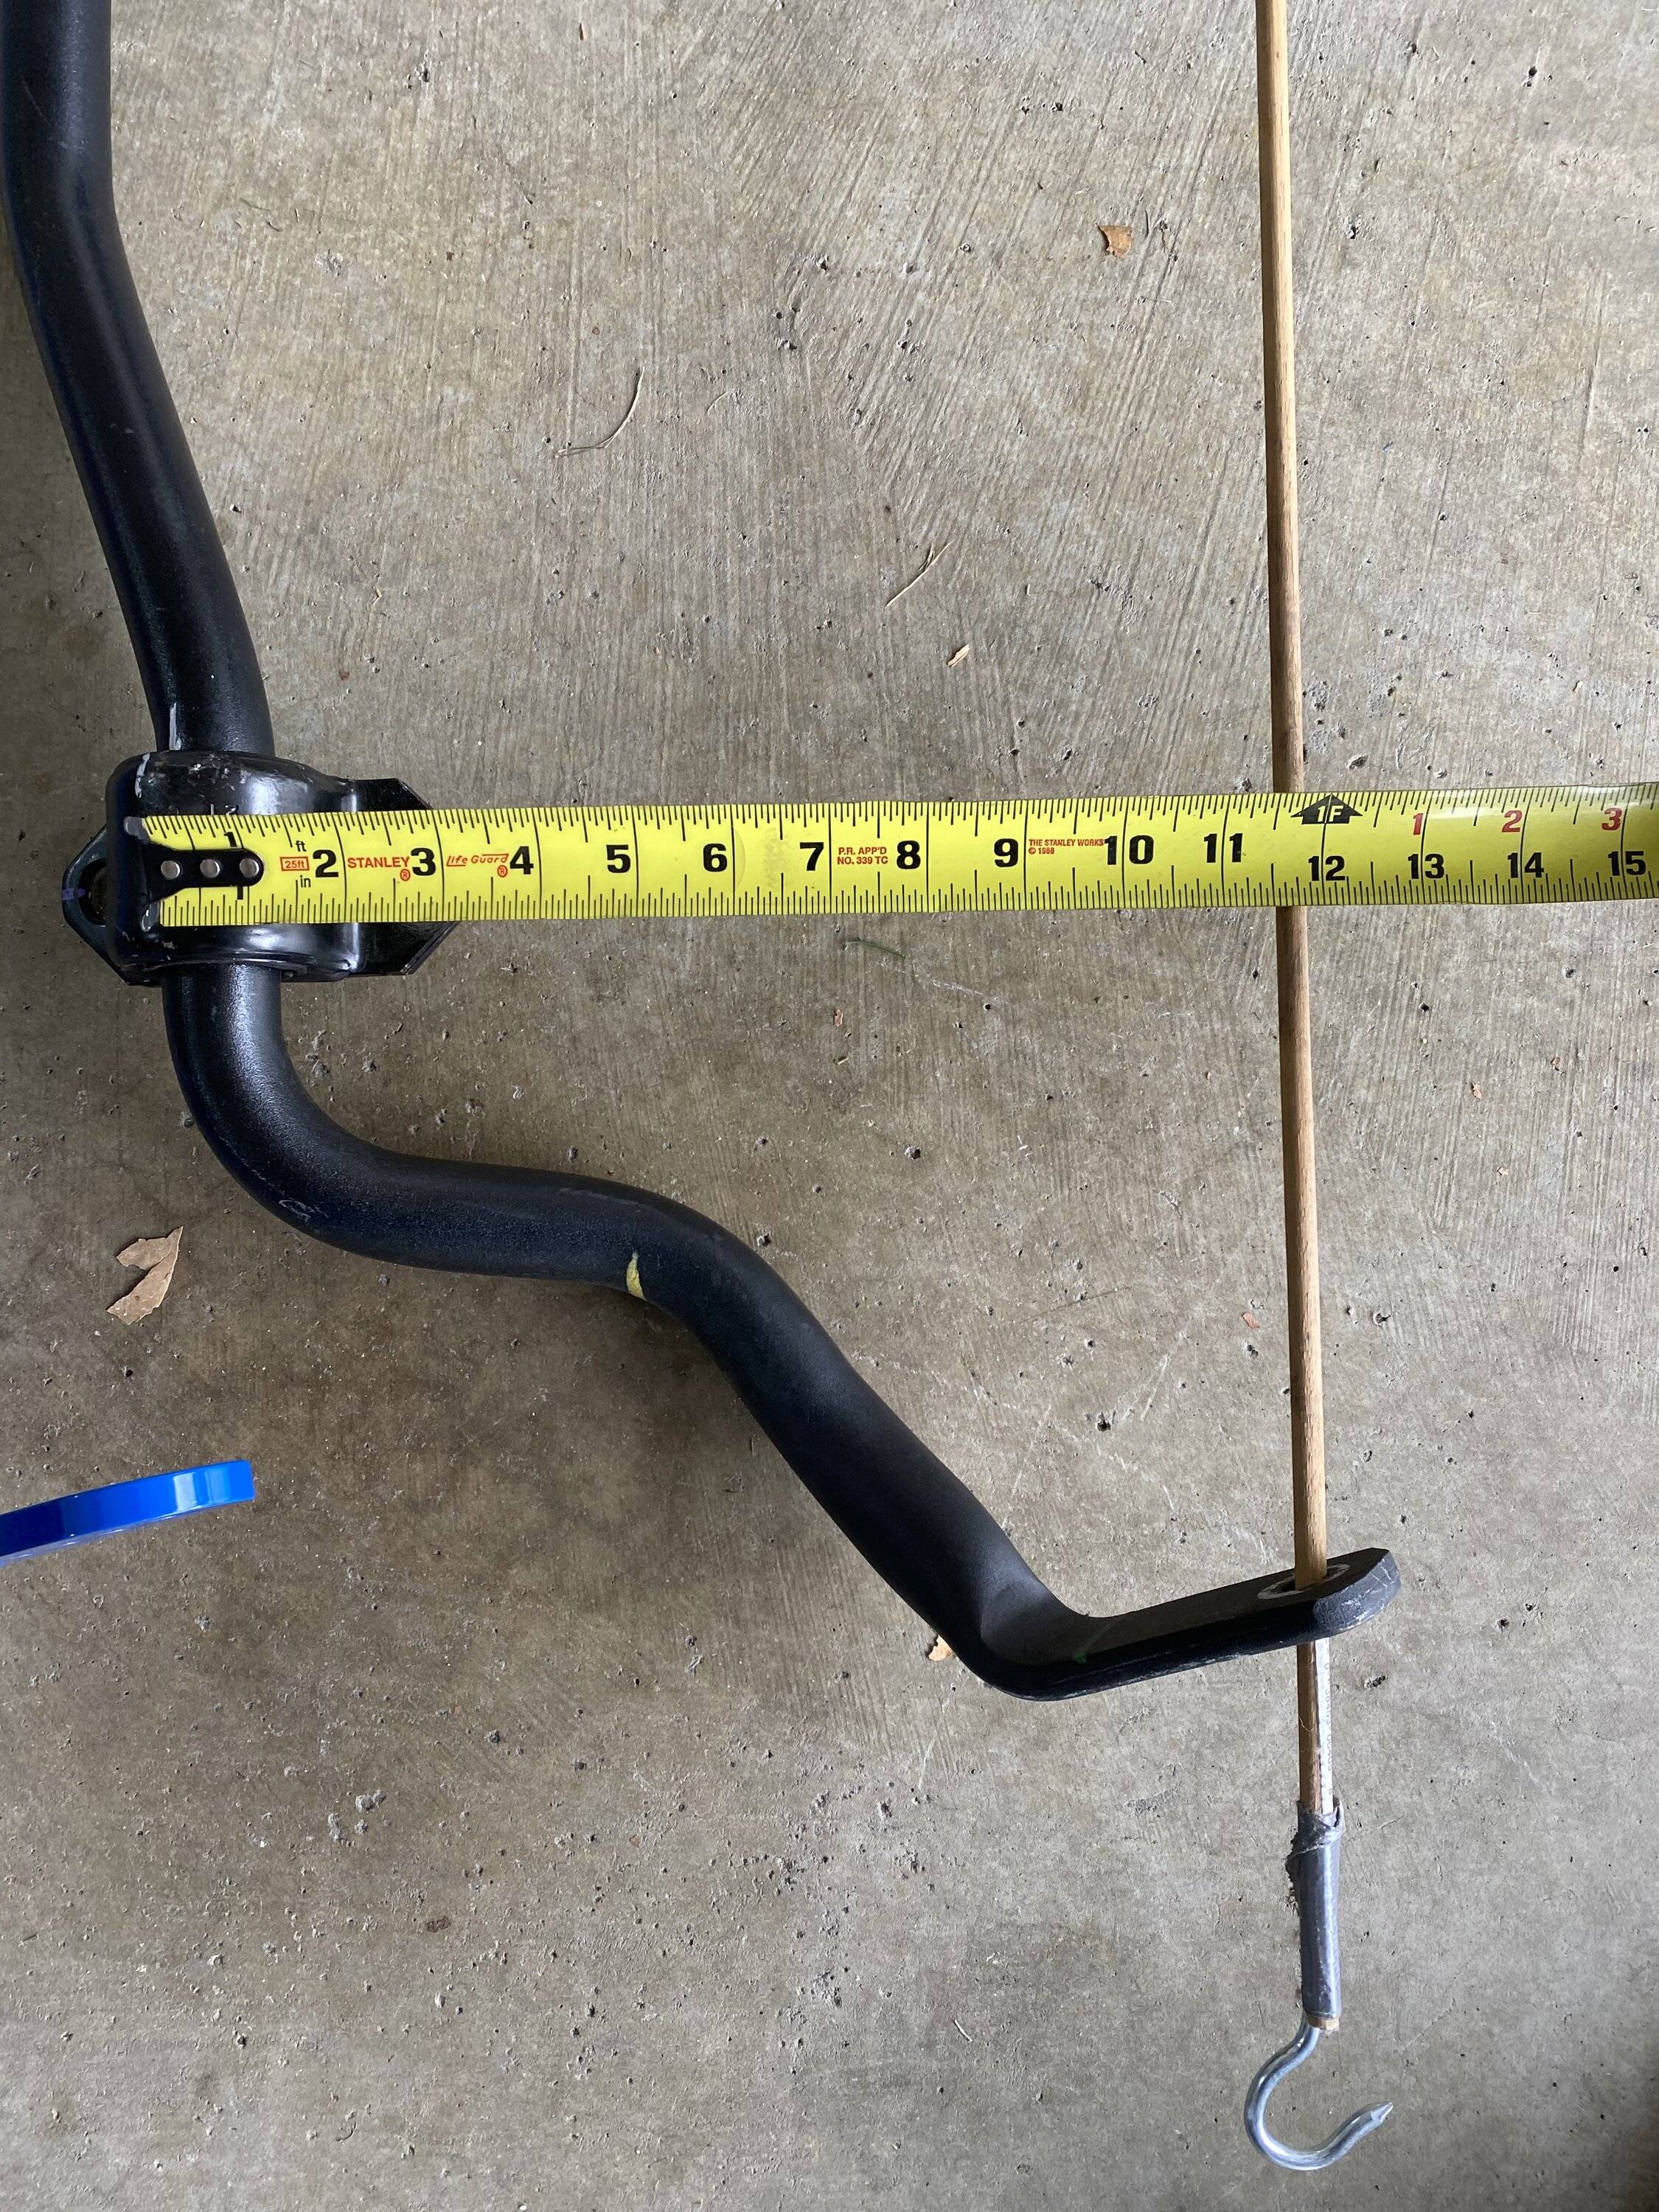
The front stock bar with brackets weighs about 15 pounds, and the Steeda bar and brackets is around 17 pounds, understandable with it having longer end sections and being thicker. It is around 11-3/4” from the center of the brackets to the stock end link holes. I actually measured about the same distance for the second stiffest mounting hole of the four holes on the Steeda bracket, so if you have a Mach 1 HP, and you want a stiffer front above the 5% larger diameter, you need to use the front (stiffest) mounting hole. That measurement is around 11-1/8” and is what I used. Be aware that when applying the lubricant they send for the bushings, there is one tube packaged with the front bar but none with the rear bar. So that tube needs to cover both bars.

IMG_6492.jpeg


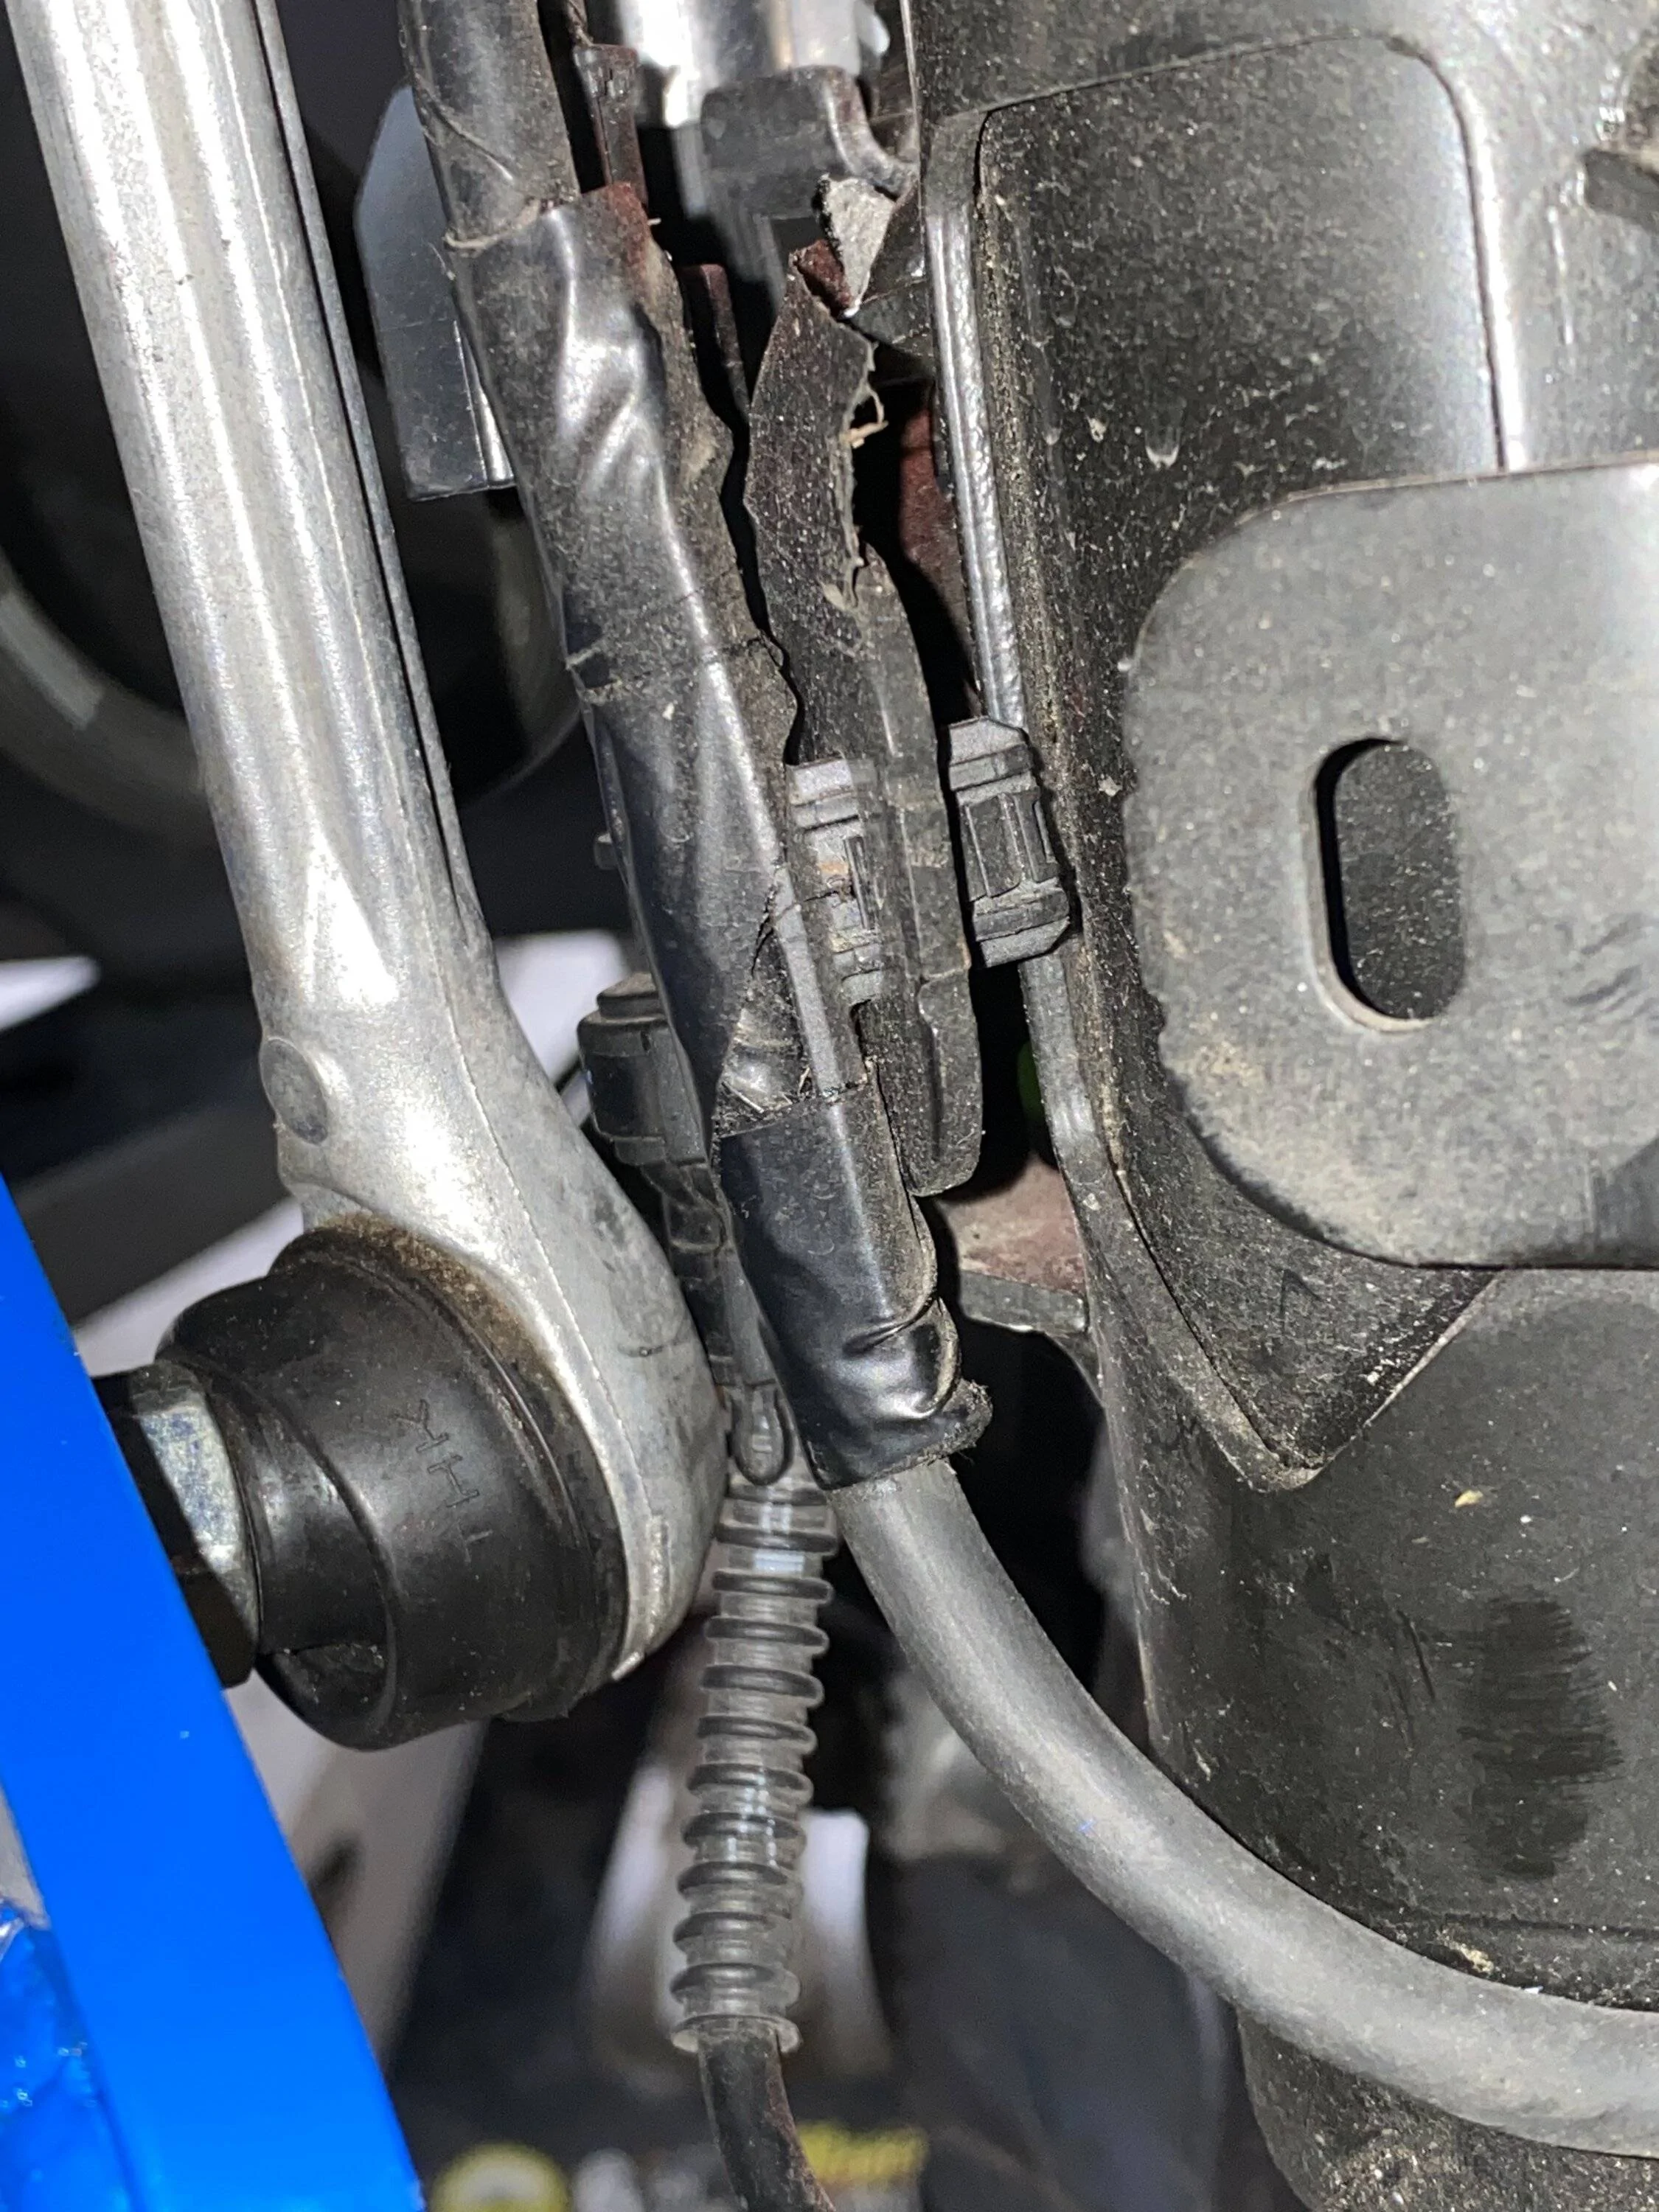
With the links in the stiffest setting, they seem to make contact with some of the plastic wiring on the back of the strut when the wheel is turned all the way to the left, but not so much that it is full pinch.

IMG_6495.jpeg


For the rear, use a 10 mm socket to remove the emergency brake cable bracket from each side. Then use the extended 18 mm ratcheting wrench and a 6 mm Allen wrench to remove the end links from the bar. Remove the four 13 mm bolts holding the brackets in place and slide out the bar.

I am guessing that the rear Steeda bar is hollow, because it only weighs about 6 pounds, versus 11 pounds for the stock bar. It’s about 8-1/4” from the center of the stock end link holes to the center of the bracket, which is about the same as the softest (end) hole of the three holes on the Steeda bar. Since I went up one hole stiffer from stock on the front bar, I also went up one on the back, using the center hole. You will need to use the supplied new parking brake mounting brackets, you will see why when you install them. They take a 13 mm wrench on the back.

Driving impressions: pretty much exactly what I was hoping for! I did not get to take it on a huge test drive, but basically in normal mode, it corners like it’s in track mode. You do pay the consequence of the car following undulations in the road, but turn in is crisp, and it is flat as a pancake around the curves. I was not able to come anywhere near breaking anything loose, but get the sense that it may tend to understeer a bit, so I may need to move the rear bar to the stiffest setting. Which is good, because I honestly don’t think there is anyway to remove that front end link and move it to another hole without loosening the mounting brackets. I don’t track it so I won’t be able to tell as well as some of you guys do, but I wanted better cornering with the stock neutrality, and so far seem to have found it.
 
Last edited:

Sponsored

OP
OP
Mikepol2

Mikepol2

Well-Known Member
Joined
Jul 17, 2018
Threads
140
Messages
3,996
Reaction score
7,125
Location
Pittsburgh, PA
First Name
Mike
Vehicle(s)
2021 Mach 1, 2019 Ram 1500
For those of us with Mach 1's with the handling package, what front and rear sway bar settings would you recommend for your 555-1017 kit to reduce body roll in corners (street driving, not track) but keep the stock oversteer/understeer balance?
This is what our internal team recommended when setting up that package on your Mustang:

On his car, we would typically start with the rear bar on the middle setting and the front bar one in from full soft.

After this, he would evaluate the results and make the adjustment to just one bar at a time until he has the results he is looking for.

Best,

TJ
@tj@steeda wondering if you wouldn't mind having your suspension guys compare their suggestion to what I found when I installed the bars? I am no expert and am wondering if my logic for hole selection is wrong because it doesn't line up with what was recommended.

Torsion spring area sizes:
Stock front: 33.3 mm x 5.0 mm wall
Steeda front: 1-3/8" = 34.9 mm; based on similar weights I would assume the Steeda bar is also hollow
34.9 / 33.3 = 4.8% larger diameter

Stock rear: 24 mm solid
Steeda rear: 25.4 mm hollow based on weight comparison to stock
25.4 / 24 = 5.8% larger diameter but probably a little less effective torsion resistance because it's hollow

So diameter wise the Steeda bars are both around 5% larger than stock, which makes hole selection a lot easier.

Lever-arm area:
Stock front: 11.75" from the end link hole to the center of the mounting bracket, which is about the same distance as the 2nd stiffest Steeda front hole

Stock rear: 8.25", which is about the same distance as the softest Steeda hole

So based on all that it seemed that using the stiffest front and middle rear Steeda holes, I would be increasing the effective bar by about the same amount between the front and the rear (one hole stiffer than stock). My rear hole choice matched your suggestion but I'm two holes stiffer in the front. What the heck did I do wrong?

Thanks!
 
OP
OP
Mikepol2

Mikepol2

Well-Known Member
Joined
Jul 17, 2018
Threads
140
Messages
3,996
Reaction score
7,125
Location
Pittsburgh, PA
First Name
Mike
Vehicle(s)
2021 Mach 1, 2019 Ram 1500
@tj@steeda wondering if you wouldn't mind having your suspension guys compare their suggestion to what I found when I installed the bars? I am no expert and am wondering if my logic for hole selection is wrong because it doesn't line up with what was recommended.

Torsion spring area sizes:
Stock front: 33.3 mm x 5.0 mm wall
Steeda front: 1-3/8" = 34.9 mm; based on similar weights I would assume the Steeda bar is also hollow
34.9 / 33.3 = 4.8% larger diameter

Stock rear: 24 mm solid
Steeda rear: 25.4 mm hollow based on weight comparison to stock
25.4 / 24 = 5.8% larger diameter but probably a little less effective torsion resistance because it's hollow

So diameter wise the Steeda bars are both around 5% larger than stock, which makes hole selection a lot easier.

Lever-arm area:
Stock front: 11.75" from the end link hole to the center of the mounting bracket, which is about the same distance as the 2nd stiffest Steeda front hole

Stock rear: 8.25", which is about the same distance as the softest Steeda hole

So based on all that it seemed that using the stiffest front and middle rear Steeda holes, I would be increasing the effective bar by about the same amount between the front and the rear (one hole stiffer than stock). My rear hole choice matched your suggestion but I'm two holes stiffer in the front. What the heck did I do wrong?

Thanks!
Yeah, I wasn't really expecting to hear anything back on this one... crickets from Steeda. Swapped one hole softer front and rear today to give that a try.
 

tj@steeda

Well-Known Member
Diamond Sponsor
Joined
Mar 21, 2014
Threads
586
Messages
6,952
Reaction score
4,453
Location
Florida
First Name
Timothy
Vehicle(s)
2019 Steeda Mustang - White Carbon Edition
Vehicle Showcase
1
Yeah, I wasn't really expecting to hear anything back on this one... crickets from Steeda. Swapped one hole softer front and rear today to give that a try.
My apologies - I didn't see the previous message. Please call at 1800 950 0774 and ask to Speak to John - he is part of our suspension team but why the reference to crickets? If the set up works compared to the suggested set up - then you should be good, no?

TJ
 
OP
OP
Mikepol2

Mikepol2

Well-Known Member
Joined
Jul 17, 2018
Threads
140
Messages
3,996
Reaction score
7,125
Location
Pittsburgh, PA
First Name
Mike
Vehicle(s)
2021 Mach 1, 2019 Ram 1500
but why the reference to crickets? If the set up works compared to the suggested set up - then you should be good, no?
I had asked for help understanding why I wasn't able to come up with the recommended settings but didn't see any answer. Seemed like some math that needed to be read and digested rather than talked about.

Today I did move the front and rear one hole softer to see what that felt like. Original settings were super fun but a little stiff for all occasions. Will give this a try and keep experimenting.
 

tj@steeda

Well-Known Member
Diamond Sponsor
Joined
Mar 21, 2014
Threads
586
Messages
6,952
Reaction score
4,453
Location
Florida
First Name
Timothy
Vehicle(s)
2019 Steeda Mustang - White Carbon Edition
Vehicle Showcase
1
I had asked for help understanding why I wasn't able to come up with the recommended settings but didn't see any answer. Seemed like some math that needed to be read and digested rather than talked about.

Today I did move the front and rear one hole softer to see what that felt like. Original settings were super fun but a little stiff for all occasions. Will give this a try and keep experimenting.
Yes & the team that would be able to digest & read, provide feedback is John, Jamie & Rodney (who is out of the office) - with the data that you are trying to digest - it would best for a phone call to John to talk through your request so he can advise in real-time & answer any follow up questions.

Thank you!

TJ
 

Sponsored

RobZ71LM7

Well-Known Member
Joined
Oct 14, 2021
Threads
21
Messages
765
Reaction score
1,254
Location
Louisville, KY
First Name
Rob
Vehicle(s)
2021 Mach 1, 2019 F-150
“so if you have a Mach 1 HP, and you want a stiffer front above the 5% larger diameter, you need to use the front (stiffest) mounting hole.”

The Steeda front bar is one of the stiffest front bars made for the S550 so driving it full stiff on the street is overkill. You don’t have to be that stiff to go beyond the HP.
 

shogun32

Well-Known Member
Joined
Feb 8, 2019
Threads
92
Messages
16,223
Reaction score
14,019
Location
Northern VA
First Name
Matt
Vehicle(s)
'19 GT/PP, '23 GB Mach1, '12 Audi S5 (v8+6mt)
Vehicle Showcase
2
I have the Steeda front one 2nd softest, stock PP1 rear. The calculation of stiffness in relation to diameter is not linear. And hollow vs solid is also a significant divergence. I don't have the formulas handy.

If you don't have a Steeda rear bar, Steeda has previously said keep the fronts at the soft end of the scale.
 
OP
OP
Mikepol2

Mikepol2

Well-Known Member
Joined
Jul 17, 2018
Threads
140
Messages
3,996
Reaction score
7,125
Location
Pittsburgh, PA
First Name
Mike
Vehicle(s)
2021 Mach 1, 2019 Ram 1500
All other things being equal, a stock HP 24 mm solid rear bar will have a tiny bit more twist than a 25.4 mm hollow rear bar with a 5 mm wall, probably not a big enough difference to be felt. Obviously the Steeda bar's actual wall thickness may be different, but the two bars should be pretty similar.

Personally, I think for a HP car, softest rear hole and 2nd stiffest front hole is a good street setup. Balances out pretty well with the spring rates and MR programming. I took it out this morning and was able to get the rear end to break loose a tiny bit making a hard left turn, which is what I was looking for, I'd rather have the back break loose first. Ride is a little stiffer than stock but not at all unbearable.

On to the next project! Just not sure what it will be yet though. I'm thinking seek and destroy mission on two super annoying rattles in the cabin, left A pillar and right C pillar.
 
Last edited:
OP
OP
Mikepol2

Mikepol2

Well-Known Member
Joined
Jul 17, 2018
Threads
140
Messages
3,996
Reaction score
7,125
Location
Pittsburgh, PA
First Name
Mike
Vehicle(s)
2021 Mach 1, 2019 Ram 1500
UPDATE... after about 500 miles / 3 months with the front at 2nd stiffest and rear at softest, I switched the front back to full stiff. I just missed the go-kart like fun of the full stiff front, amazing what a difference there is between full stiff and 2nd stiff.

Had been thinking about doing it for a few weeks and yesterday turned right on a red light in track mode and mashed it and the ass end swung out left like a pendulum, that was the final straw, definitely needed to tone down that oversteer.
 

shogun32

Well-Known Member
Joined
Feb 8, 2019
Threads
92
Messages
16,223
Reaction score
14,019
Location
Northern VA
First Name
Matt
Vehicle(s)
'19 GT/PP, '23 GB Mach1, '12 Audi S5 (v8+6mt)
Vehicle Showcase
2
amazing what a difference there is between full stiff and 2nd stiff.
that's why we consult medical professionals and their magical drugs...

mode and mashed it and the ass end swung out left like a pendulum, that was the final straw, definitely needed to tone down that oversteer.
Is that 'oversteer' though?
Sponsored


Top