Sponsored

2023 GT Premium - My Twin Turbo Build

OP
OP
AcceptableNebula

AcceptableNebula

Well-Known Member
Joined
Apr 5, 2023
Threads
19
Messages
335
Reaction score
927
Location
Massachusetts
First Name
Jake
Vehicle(s)
2023 Ford Mustang GT Premium
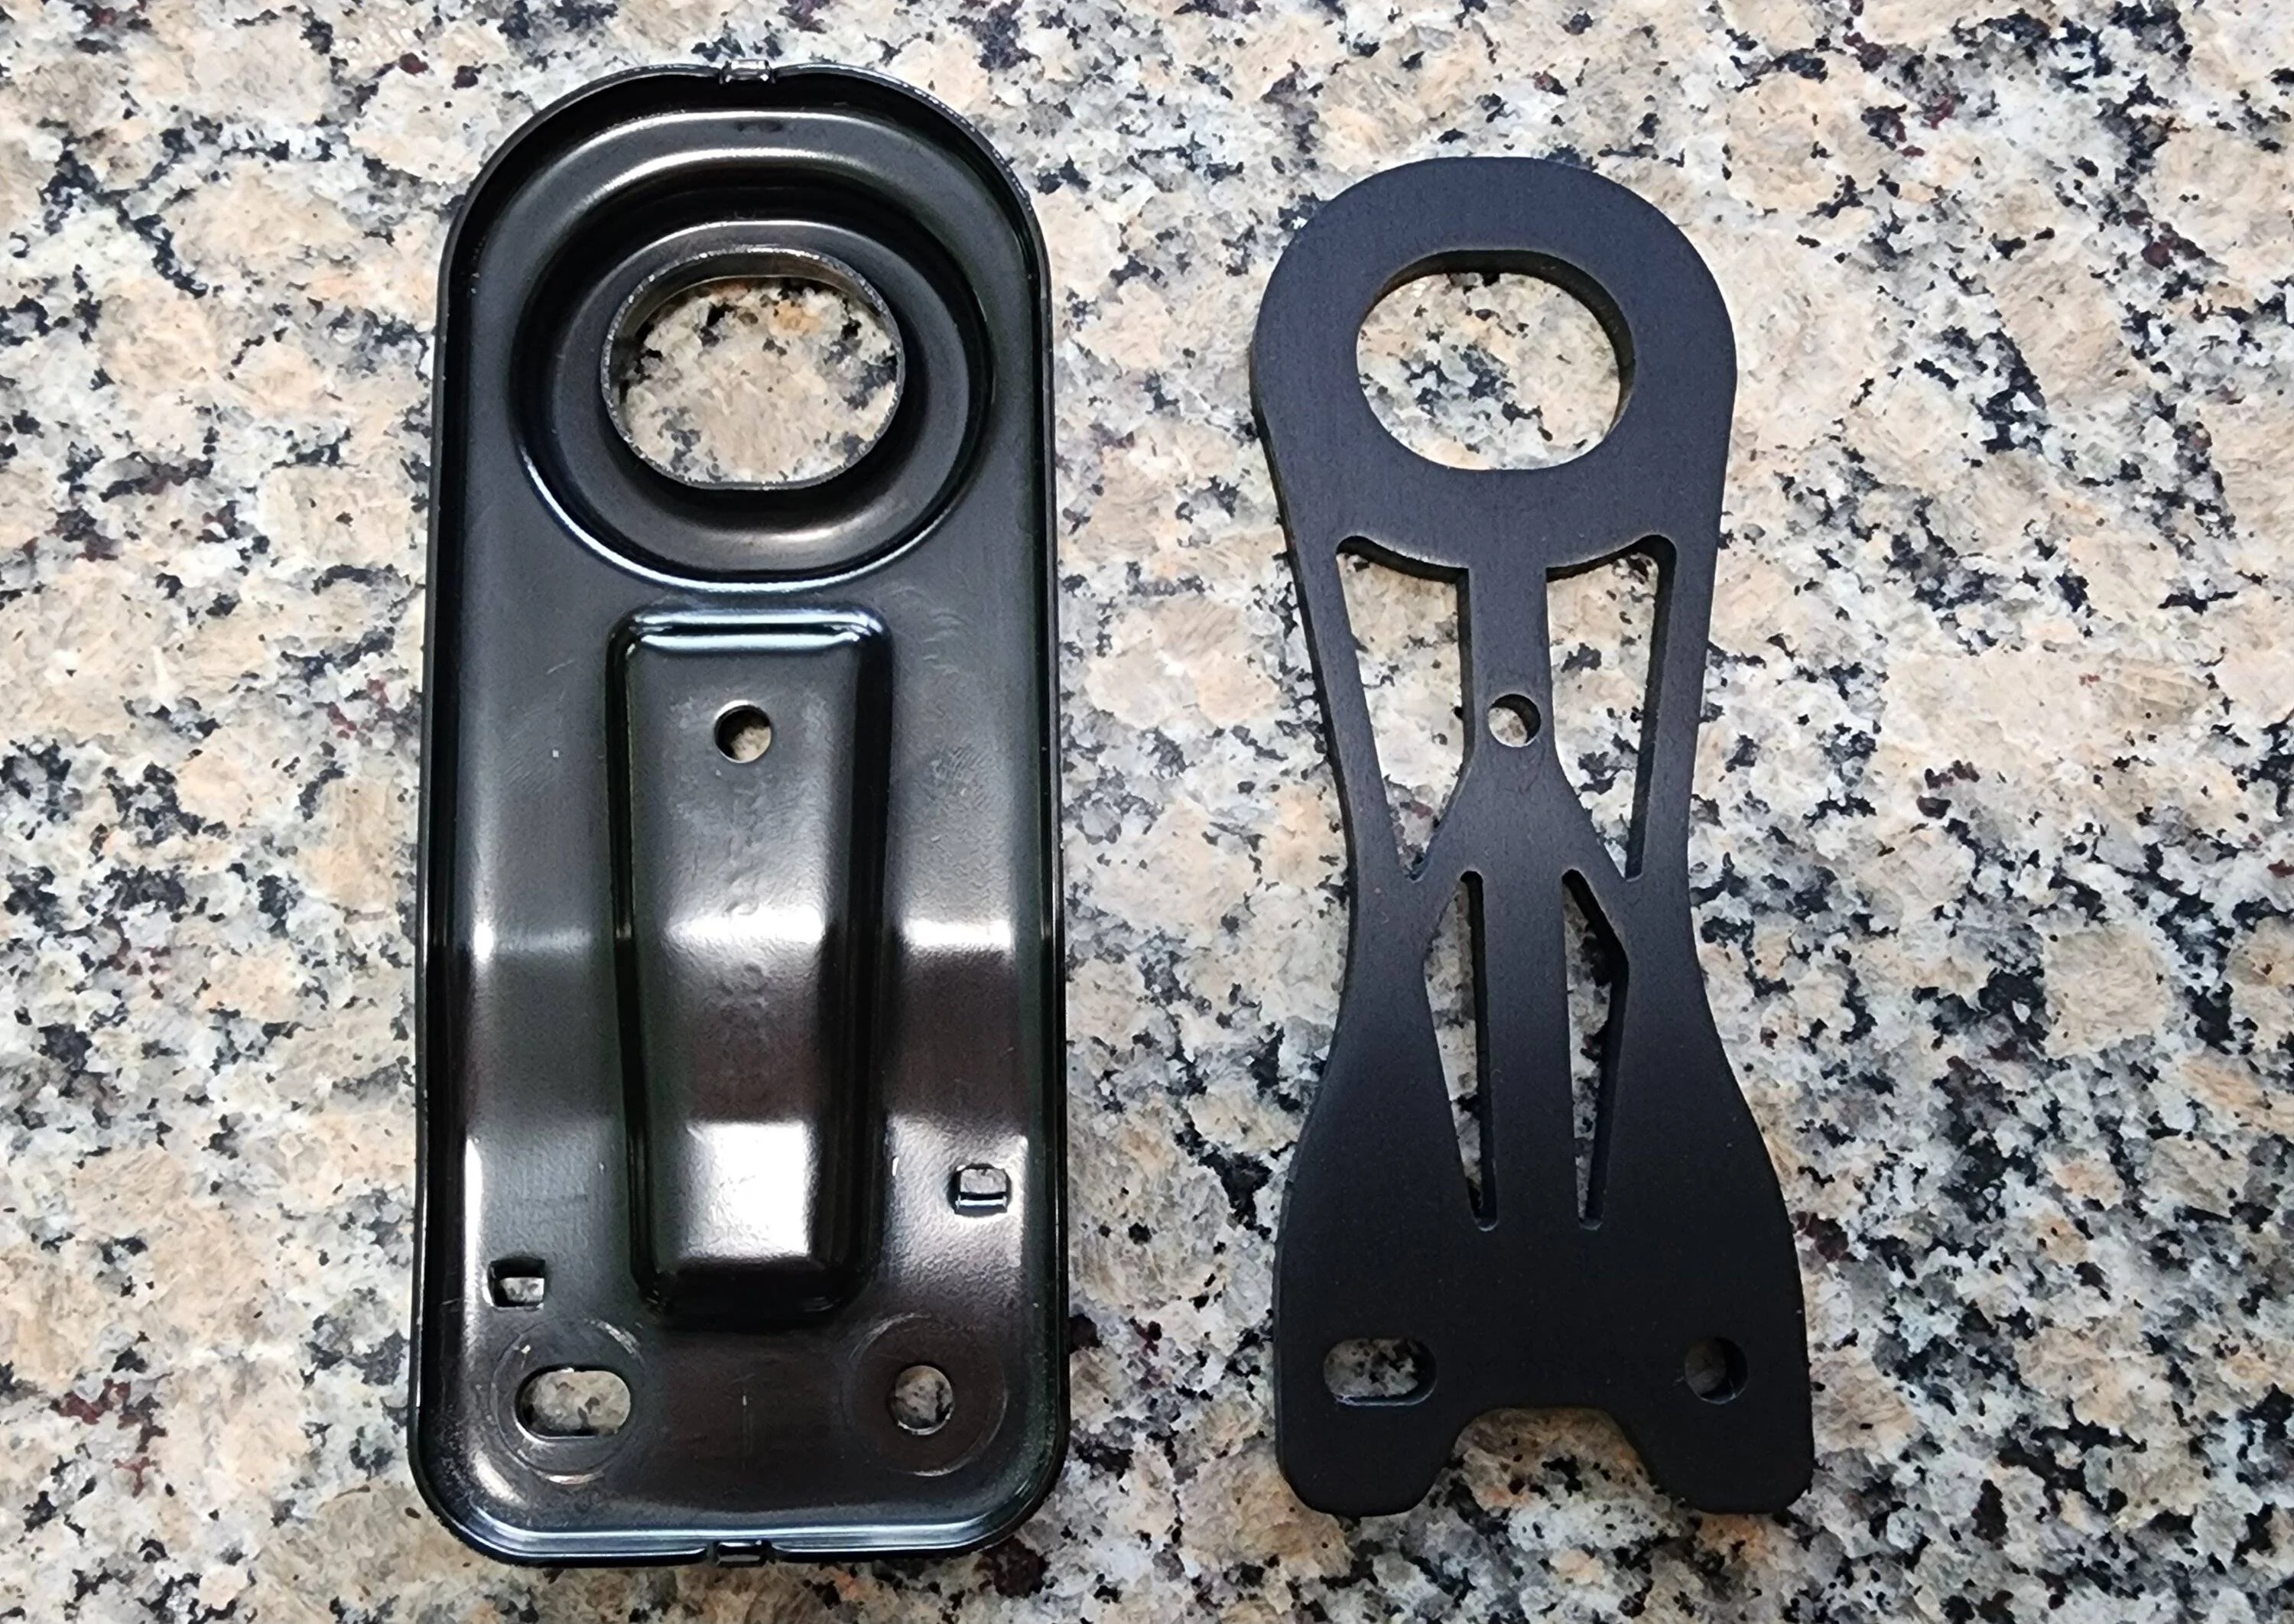
Aluminum Upper Radiator Brackets
Odometer: 534 miles


While waiting for a few more things to arrive, I created these. I can't stand all the stamped steel stuff on this car. After watching every single Star Trek episode as a kid, the first time I saw these mounts, all I could see was the USS Enterprise. So with a touch of Enterprise inspiration, I came up these. Cut out of 6061 aluminum. A quick anodizing and they are ready to go.

Total weight savings is 6 oz for the pair over the factory steel mounts.

20230629_170241.webp
Sponsored

 
Last edited:
OP
OP
AcceptableNebula

AcceptableNebula

Well-Known Member
Joined
Apr 5, 2023
Threads
19
Messages
335
Reaction score
927
Location
Massachusetts
First Name
Jake
Vehicle(s)
2023 Ford Mustang GT Premium
Heater Core Piping Delete Part 1
Odometer: 534 miles


Considering I don't drive the car when it's cold out, I want to temporarily remove the heater hoses and coolant. If the fall comes, and I find I need it, I can put the stock fittings on and refill the heater core.

A couple companies make the fittings, but at the cost of $150 for 2 little pieces of aluminum, I decided to make my own.

With a scrap 3" piece of 6061 I had kicking around, I turned down the stock to the OD of the OEM pipe. Cut the groove for the O-ring and parted the piece. Spun it around and turned the face for a better surface. Next stop was an indexing mount, that allowed me to clean off the excess material and put the correct radius on the mounting tab. Gave the piece an anodized finish and it's ready to go.

I'll make the other side in Part 2. For those wondering, the 2 hoses weigh 2.1 lbs. I unfortunately didn't get the volume of coolant sucked out of the heater core, which is probably the larger weight savings. Ditching the hoses is as much about cleaning up the engine bay and keeping heat from the fuel as it is about the weight.

20230701_142904.jpg


20230701_144741.webp


20230701_144652.jpg


20230701_151554.jpg


20230702_210216.webp
 
Last edited:
OP
OP
AcceptableNebula

AcceptableNebula

Well-Known Member
Joined
Apr 5, 2023
Threads
19
Messages
335
Reaction score
927
Location
Massachusetts
First Name
Jake
Vehicle(s)
2023 Ford Mustang GT Premium
On3 Twin Turbo Kit - Part 2
Odometer:534 miles


Made some more progress. While I did pay a company in Hartford to ceramic coat my hot side, I was so unhappy with the quality of the top coat, I just couldn't give them any more business. They do have a polished aluminum ceramic coating that a few friends have that is very tough. However, their "cast iron" is just a top coat that comes off with your fingernail.

I turned to NIC Industries and their product Cerakote. I've used it in the past to top coat the undisputed champion of ugly header coatings, Swaintech White Lightning, with great results. It took a little trial and error but I figured out 42g of Cerakote Glacier Titanium and 18g of Glacier Black made a very close color match to the other "cast iron" coating on the rest of my pipes. Cerakote is far more durable to bumps and scratches. I had to modify the down pipes a bit as the MMR boat-sized valve covers hit both sides with their superfluous squareness.

I did the cold side pipes in the Glacier Black as to not drown the engine bay in dark gray. While not impossible to damage, I am very happy with the color and durability of the high temp Cerakote. Over the winter I will start to experiment with the regular stuff that they use on firearms to possibly replace the anodizing.

I deleted the oil cooler from the car, and bought the Improved Racing lower radiator hose. However, I decided to use the double venturi tee fitting in the stock lower hose to feed the turbos and wastegates with coolant. Using my favorite hose, Insulone by Dayco, I started running the hoses. Insulone is made for extreme cold weather, and has an insulation barrier sandwiched in the middle. Keeping these turbos as cold as possible will cut down on the consumption of the $50/ounce grease. Pulling from the lower hose is the coldest fluid the car has to offer.

Also had to order a Granatelli #3 Plug wire. The standoffs provided by MMR for the external plug coil put enough stress on the wire. It was not far from pulling itself off the plug. This wire is a bit longer and gives enough slack to reach the coil without stress. I still have to machine my own standoff since they gave me 2 mismatched standoffs.

I have not installed new injectors or Fore pump setup yet. So I am hoping to be able to start the car on the stock tune for a few minutes before continuing to the cat back setup.

20230703_195240.jpg


20230703_142318.webp


20230627_163356.jpg
 
Last edited:

TonyNJ

Well-Known Member
Joined
Jul 14, 2021
Threads
52
Messages
2,474
Reaction score
3,730
Location
Northern NJ
Website
www.instagram.com
First Name
Tony
Vehicle(s)
22 GT500HE Black Stripes, 20 GT350HE, 16 GT350R Ba
Jake, how do you plan to tune this beast when it's all put together? Do you have a background in tuning modern cars? Looking forward that the odometer update number grow.
 

Sponsored

OP
OP
AcceptableNebula

AcceptableNebula

Well-Known Member
Joined
Apr 5, 2023
Threads
19
Messages
335
Reaction score
927
Location
Massachusetts
First Name
Jake
Vehicle(s)
2023 Ford Mustang GT Premium
Jake, how do you plan to tune this beast when it's all put together? Do you have a background in tuning modern cars? Looking forward that the odometer update number grow.
Still investigating Tuners. I am very familiar HPTuners, but not with Coyote tuning. Would like to stay with HPT and find an experienced tuner that doesn't lock the tune. I can't wait to put some more miles on it, but I still have quite the pile of parts to install. These valve covers have set me back quite a bit for reasons I haven't shown yet and fit of the turbo piping. Still need to do the cat back active exhaust setup, fuel system, and I have all the parts for rear suspension/drivetrain. I don't see it going for a few more weeks. More excited to get it the drag pack on it and get it to the drag strip.
 

Mach VII

Well-Known Member
Joined
Mar 22, 2017
Threads
15
Messages
1,138
Reaction score
2,642
Location
Berkshire Hills, MA
First Name
John
Vehicle(s)
2019 Mustang GT 401A, 1989 Lincoln Mk VII LSC
Impresive work Jake, sounds like you are located not far from me. What track do you visit, Lebanon Valley?
 
OP
OP
AcceptableNebula

AcceptableNebula

Well-Known Member
Joined
Apr 5, 2023
Threads
19
Messages
335
Reaction score
927
Location
Massachusetts
First Name
Jake
Vehicle(s)
2023 Ford Mustang GT Premium
Impresive work Jake, sounds like you are located not far from me. What track do you visit, Lebanon Valley?
Yep, that's it.
 

VictorH

Well-Known Member
Joined
Mar 4, 2021
Threads
30
Messages
642
Reaction score
922
Location
South Carolina
First Name
Victor
Vehicle(s)
2021 Mach 1
Wow, what an impressive build. That and both your fabrication skills and access to some very nice machining equipment is impressive. Best wishes on not too many more hiccups in the process.
 

Prodigal

Well-Known Member
Joined
Jul 31, 2022
Threads
89
Messages
1,154
Reaction score
1,759
Location
OKC
Vehicle(s)
2021 Mach 1
Yeah this project is bad ass. Your skills remind me of the AWD Project Traction guy. Amazing.
 

Sponsored
OP
OP
AcceptableNebula

AcceptableNebula

Well-Known Member
Joined
Apr 5, 2023
Threads
19
Messages
335
Reaction score
927
Location
Massachusetts
First Name
Jake
Vehicle(s)
2023 Ford Mustang GT Premium
Heater Core Block Off Part 1.5

Had a little time today to tinker with the car. Since this fitting will have a connection, I used a stronger 7075 aluminum to make it. Starting from a 2" round bar, I made a -12an male fitting on one side and turned the other side to the 0.752" diameter of the factory pipe. Since this fitting can rotate, I double o-ringed the bottom. Cut a 1.375" hex to hold.

I should have time to make the bracket and test fit a 90⁰ elbow fitting tomorrow. It will be close if it will interfere with the cylinder head. Worst case is a cut a groove in the bottom of the hex and sink the fitting further into the water pump.

20230705_134339.webp


20230705_162807.jpg


20230705_162030.webp


20230705_162054.webp
 
Last edited:
OP
OP
AcceptableNebula

AcceptableNebula

Well-Known Member
Joined
Apr 5, 2023
Threads
19
Messages
335
Reaction score
927
Location
Massachusetts
First Name
Jake
Vehicle(s)
2023 Ford Mustang GT Premium
Harness Reroute Part 1

I haven't found wiring daunting for over 25 years. Figured this part of the TT project would be the easiest. Extending a couple wires is nothing, especially with the correct Delphi terminals and tools.

This is still an easy project if you are okay with hacking up or not even running an inner fender. I don't see a lot of finished pictures of it, well at least in a Gen 3 10R car. The provided brackets place the fuse box in the path the inner fender. That required removing over an inch off the bracket. Modifying the back of the fuse box to remove some of the dead air space allowed me to bring the fuse box an extra inch closer and further forward. This final resting position still contacts the inner fender but without any tension on it.

The adjuster cable for the fog light contacts the fuse box cover, so I started looking at aftermarket fog lights/turn signals. Turns out the Diode Dynamics product has a single hex head adjuster. So I bought those and that solved that problem. That's what I tell myself at least. I was definitely swayed by the different look of the light, and brighter features. The black surround on them is a better match than the stock chrome.

Of all the videos I watched there was 1 common concern with the install. Everyone was worried about the main harness from the fuse box being sandwiched between the inner fender and the chassis. I don't think that area sees a ton of stress but I figured I could come up with something.

I took a block of Fortal 7075, a very strong aluminum, and machined out the shape of the harness that crosses that junction. Cut that shape out of the car, secured into place with structural panel bond, and riveted into place with stainless rivets.

I figured that the inner wheel well color would just be Rapid Red without the pearl coat. Clearly I was wrong but I don't think it really matters.

The drivers side was more straight forward. No modifications were required. At this point, only the motor harnesses are in the engine bay.

20230527_164407.jpg


20230528_123554.jpg


20230528_145204.jpg


20230617_191138.jpg


20230706_104817.jpg


20230601_130840.webp


20230601_130859.webp
 
OP
OP
AcceptableNebula

AcceptableNebula

Well-Known Member
Joined
Apr 5, 2023
Threads
19
Messages
335
Reaction score
927
Location
Massachusetts
First Name
Jake
Vehicle(s)
2023 Ford Mustang GT Premium
Turbo Coating/Update

Didn't have a lot of time today but I was able to sandblast texture the cold side turbo housings and Cerakote them with Glacier Silver ceramic coating. Not that I need the functionality of ceramic, but it does offer a tough good looking finish.

The 12an Pushlok 90 also arrived so I was able to make sure my new fitting worked. Tomorrow I will make the bracket to secure it and anodize both pieces.

20230707_195543.jpg


20230706_160932.jpg
Sponsored


Top