DFB5.0
Well-Known Member
- Thread starter
- #1
This is the extend of my mechanical skills, I'm sure I'm capable of more but I just lack the confidence and have a fear of jacking something up to the point where I would have to involve someone else. So I pick my mark with these sort of things, then farm the rest out to the experts. While I know how things work, don't ask me about how to do something mechanical, keep walking. Ask me what wheel cleaner to use or anything detailing related, I'm your man!
So, fitting a Ford Performance oil catch can on a Mustang could not be simpler for someone like me. This part was designed in tandem with the engine packaging itself. This is evident in the way it install so neatly, which I will elaborate more on as I go.
First step is to remove the engine cover to gain access to the hoses, in particular the one that connects to the inlet manifold.
Next, remove the existing hose connectors on the head and inlet manifold, these are released by pushing a tab on the side of the connection and gently lifting.


Next is to remove a push clip that holds a wiring loom in place. This took the most time, as the wires are thin here and brute force would have caused a headache. This clip did not want to budge for me, in the end I got it removed just enough to the insert a blade and cut in free.
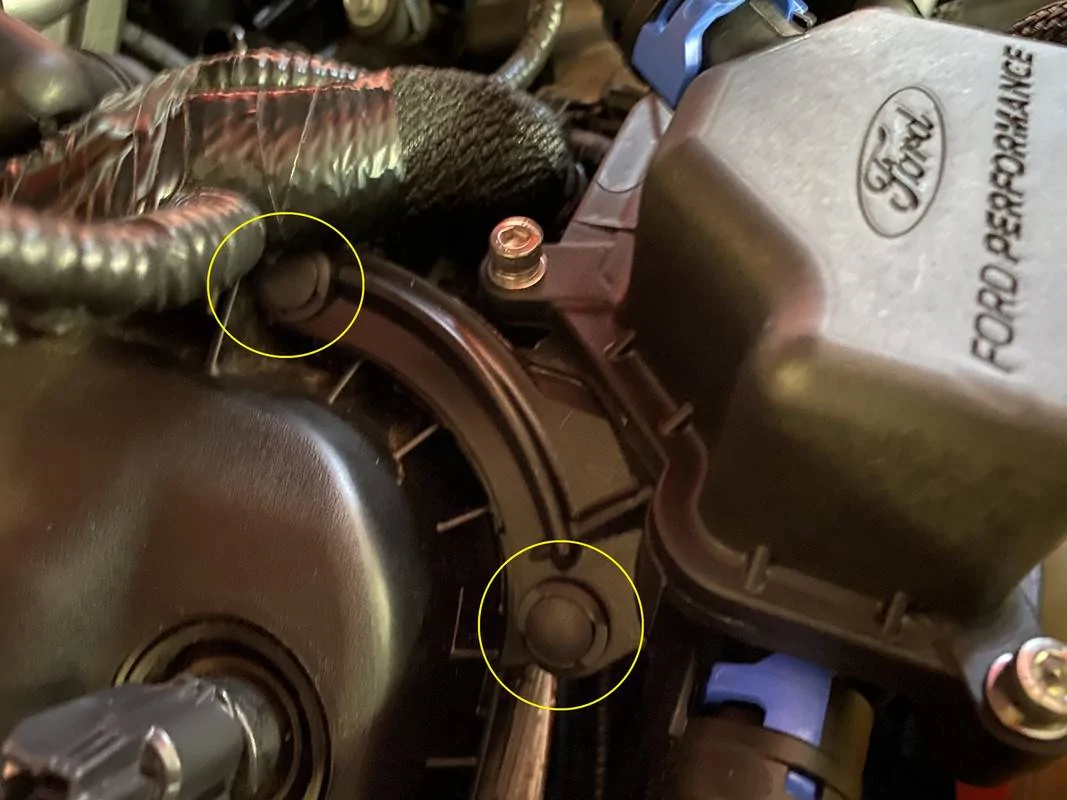
With that clip removed and the loom lifted a touch, this reveals the two holes where the catch can is attached to the rocker cover. As mentioned, this is where the OE-ness comes in, the unit is molded to fit just so and uses pre-existing holes to attach to.
Next, attach to two supplied hoses, again a click on fitting.
Now it's a matter of wiggling the unit into place, being sure to keep the wiring loom above the unit, and locate the push tabs into the holes on the rocker cover.
Tip of the Day - ensure the supplied push-pins are seated properly on the unit prior to attempting to install....................unlike this noob. One of them wasn't seated on mine and it popped off and dropped into the engine bay. Luckily for me, the pin dropped all the way through and landed under the front right tyre.

The base of the push-pin should be flush with the body of the can, like below -
Once wiggled into place, push the tabs down to secure it to the rocker cover.
Now attach the new hoses to the head and inlet manifold. Fold the wiring loom back down and around the unit.
Re-install the engine cover and you are done.
As you can see, this addition is very discreet, very neat, very OE spec, just the way I like it.
So, fitting a Ford Performance oil catch can on a Mustang could not be simpler for someone like me. This part was designed in tandem with the engine packaging itself. This is evident in the way it install so neatly, which I will elaborate more on as I go.
First step is to remove the engine cover to gain access to the hoses, in particular the one that connects to the inlet manifold.
Next, remove the existing hose connectors on the head and inlet manifold, these are released by pushing a tab on the side of the connection and gently lifting.


Next is to remove a push clip that holds a wiring loom in place. This took the most time, as the wires are thin here and brute force would have caused a headache. This clip did not want to budge for me, in the end I got it removed just enough to the insert a blade and cut in free.


With that clip removed and the loom lifted a touch, this reveals the two holes where the catch can is attached to the rocker cover. As mentioned, this is where the OE-ness comes in, the unit is molded to fit just so and uses pre-existing holes to attach to.

Next, attach to two supplied hoses, again a click on fitting.

Now it's a matter of wiggling the unit into place, being sure to keep the wiring loom above the unit, and locate the push tabs into the holes on the rocker cover.
Tip of the Day - ensure the supplied push-pins are seated properly on the unit prior to attempting to install....................unlike this noob. One of them wasn't seated on mine and it popped off and dropped into the engine bay.
Luckily for me, the pin dropped all the way through and landed under the front right tyre.
The base of the push-pin should be flush with the body of the can, like below -

Once wiggled into place, push the tabs down to secure it to the rocker cover.
Now attach the new hoses to the head and inlet manifold. Fold the wiring loom back down and around the unit.


Re-install the engine cover and you are done.


As you can see, this addition is very discreet, very neat, very OE spec, just the way I like it.
Sponsored
Last edited:


