- Joined
- Dec 20, 2014
- Threads
- 171
- Messages
- 1,399
- Reaction score
- 636
- Location
- Lake Worth, FL
- Website
- www.uprproducts.com
- Vehicle(s)
- 15 GT
- Thread starter
- #1
One of the most popular exterior quick mods of the 05-09 Mustangs were the sequential style lights for the rear. It really set them off from the rest. Even Ford picked up on it and they have been added to all Mustang's since 2010. But it's only for the blinkers. Still looks great though!
Diode Dynamics has been stepping up with the Mustang scene over the last couple years and just about all of us have a set of their lights in our cars. The work that they do is extremely beyond the rest!!
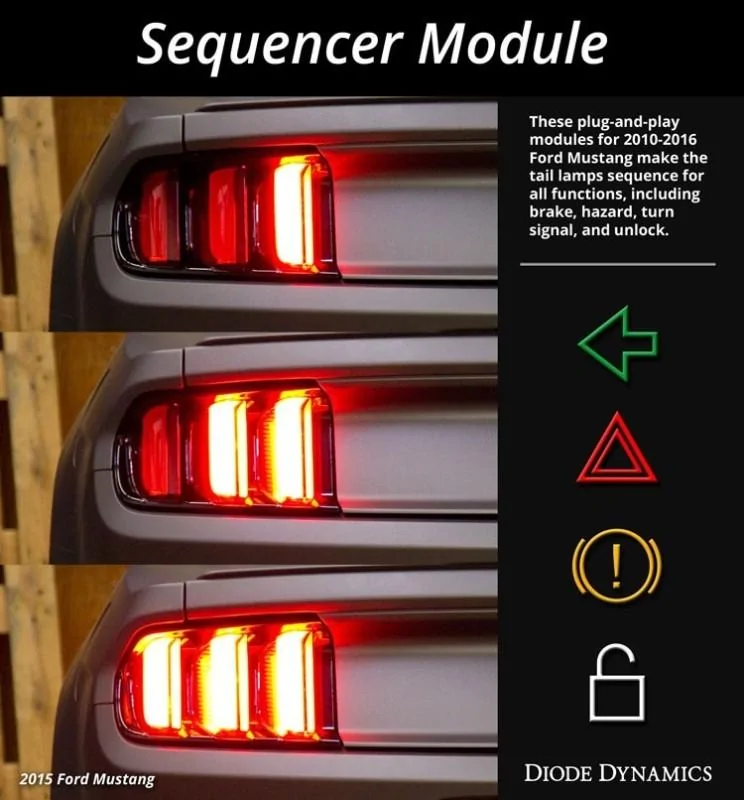
Now.. their newest additional to their line up is the 2010-2016 Mustang Sequencer Module System. This will allow you to have a full sequential look with the brakes, hazards and blinkers.

And I must add that this is by far one of the easiest modification to install. A total of maybe 15minutes.
As a dealer for Diode... I decided to do a little install for it though just to show how quick and easy it is along with a video to show the end result compared to the factory.

As you can see, they come in a small packet with just 2 connectors. Their is no splicing or re-wiring. This is a 100% plug and play kit.
Install:
( iF YOU HAVE A SUB OR ANYTHING ELSE IN THE WAY, REMOVE THAT FIRST)
First thing you need to do is pop open the trunk and remove the center carpet which will show your spare or Air compression.

The next step is to remove the 4 screw caps / storage back hooks that hold the plastic panel to the rear of the trunk.
Once the 4 are removed, you can remove the panel. It is clipped on so a little force can be used to pull it off. Remove it in a upward motion.
With witch-ever side you do first (I did the driver side for this install) Their will be a push pin that holds the carpet to the side. Simple grab the side and pull it out. You are going to re-use this clip so don't destroy it.
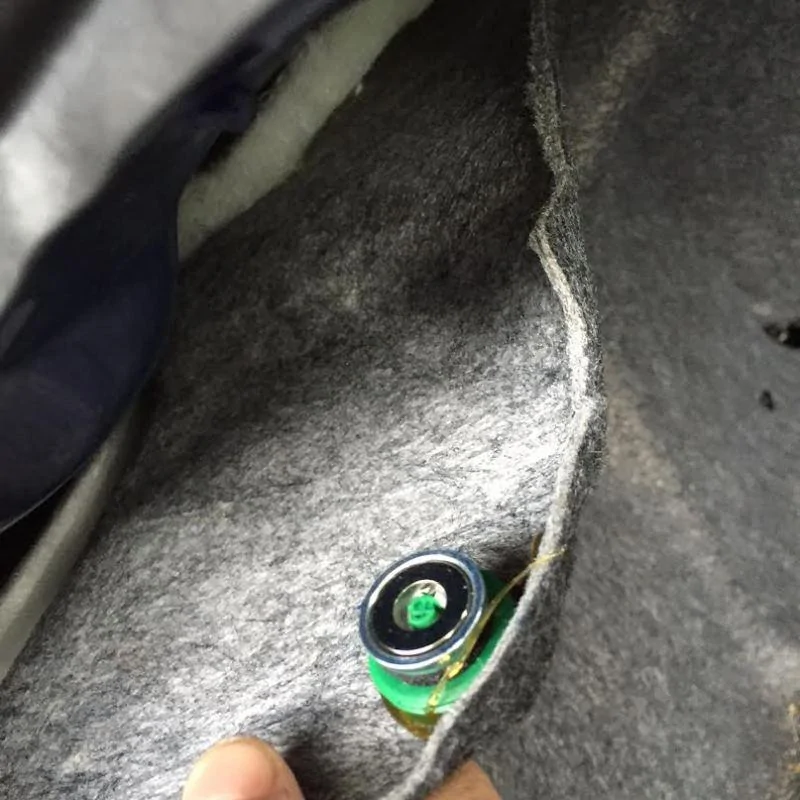
On the same carpet panel, their will be a magnet that holds it in place that is next to the rear speakers on the upper panel. This is a simple pull down to remove step.
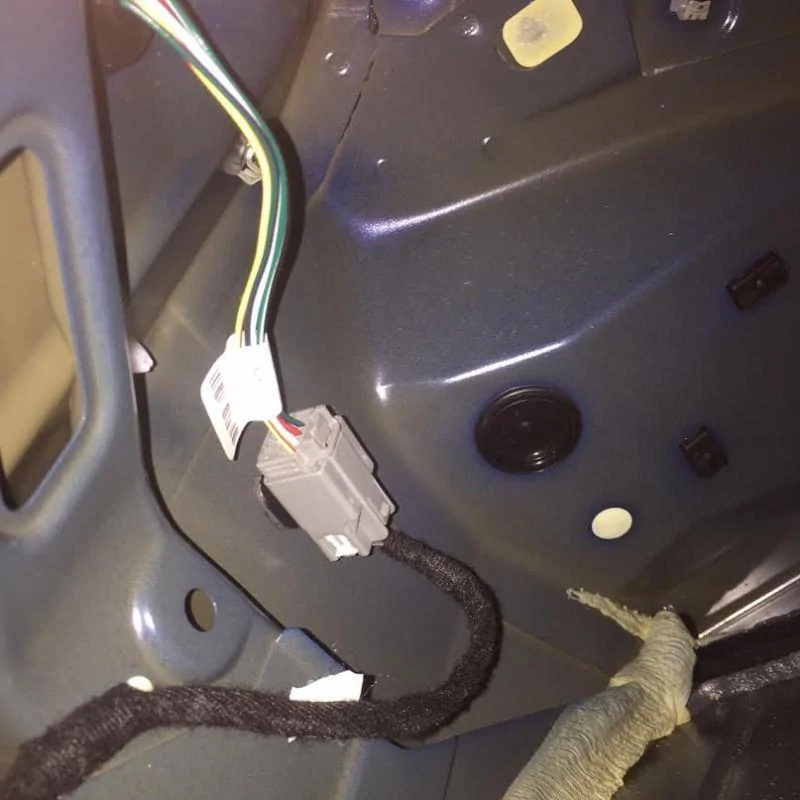
You can then pull the panel to the side and reach the tail light connectors. The connection is the only one in that area so you can't mistake it for anything else.
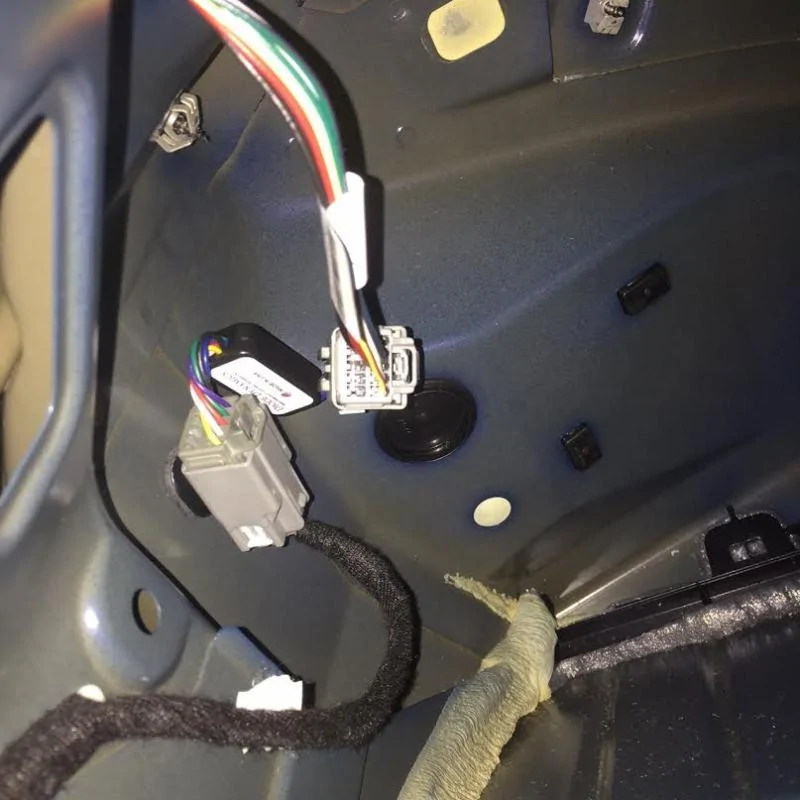
From here, all you need to do is un-plug the factory connector and place the new Diode Dynamics Sequencer Module inbetween it. And as you can see in the picture below, it is the same as the OEM connection so it plugs right in.
(Always check the lights to make sure you have a secure connection and they work)
_______________
AND YOUR DONE!! You will repeat the same steps on the opposite side. Once both sides are installed, you can put the panels back in place and put the trunk back to normal.
Here is a video showing the end result along with comparing the factory flash to the new one.
You can purchase these through us for $80.00 shipped (Continental States) Call us at 561-588-6630 or you can PM me.
Thanks for your time!!
Diode Dynamics has been stepping up with the Mustang scene over the last couple years and just about all of us have a set of their lights in our cars. The work that they do is extremely beyond the rest!!
Now.. their newest additional to their line up is the 2010-2016 Mustang Sequencer Module System. This will allow you to have a full sequential look with the brakes, hazards and blinkers.
And I must add that this is by far one of the easiest modification to install. A total of maybe 15minutes.
As a dealer for Diode... I decided to do a little install for it though just to show how quick and easy it is along with a video to show the end result compared to the factory.

As you can see, they come in a small packet with just 2 connectors. Their is no splicing or re-wiring. This is a 100% plug and play kit.
Install:
( iF YOU HAVE A SUB OR ANYTHING ELSE IN THE WAY, REMOVE THAT FIRST)
First thing you need to do is pop open the trunk and remove the center carpet which will show your spare or Air compression.

The next step is to remove the 4 screw caps / storage back hooks that hold the plastic panel to the rear of the trunk.

Once the 4 are removed, you can remove the panel. It is clipped on so a little force can be used to pull it off. Remove it in a upward motion.
With witch-ever side you do first (I did the driver side for this install) Their will be a push pin that holds the carpet to the side. Simple grab the side and pull it out. You are going to re-use this clip so don't destroy it.

On the same carpet panel, their will be a magnet that holds it in place that is next to the rear speakers on the upper panel. This is a simple pull down to remove step.
You can then pull the panel to the side and reach the tail light connectors. The connection is the only one in that area so you can't mistake it for anything else.
From here, all you need to do is un-plug the factory connector and place the new Diode Dynamics Sequencer Module inbetween it. And as you can see in the picture below, it is the same as the OEM connection so it plugs right in.
(Always check the lights to make sure you have a secure connection and they work)
_______________
AND YOUR DONE!! You will repeat the same steps on the opposite side. Once both sides are installed, you can put the panels back in place and put the trunk back to normal.
Here is a video showing the end result along with comparing the factory flash to the new one.
You can purchase these through us for $80.00 shipped (Continental States) Call us at 561-588-6630 or you can PM me.
Thanks for your time!!
Sponsored
