HextallS550
Well-Known Member
- Joined
- Jan 2, 2017
- Threads
- 19
- Messages
- 1,182
- Reaction score
- 668
- Location
- Dearborn, MI
- Vehicle(s)
- 2017 GT
- Thread starter
- #1
** UPDATED 12/14/2017** New graphics
So I'd like to have one all encompassing post for those that want to swap to Sync 3. The original thread has great information but it's long and cluttered and we really need to start something that answers your questions plus add the information that we have collectively found.
HUGE thank you to everyone who contributed on Mustang6G! @HizliBullet @zackmd1 @mustangmike86 @Spart @sv9999 @fordsvtparts @RedFireV8 @mgrey

*UPDATED*
The Basics
This modification will require you to program certain modules. You will need FORScan software:
http://www.forscan.org/
Follow the directions to sign up for their board, you must have a membership to receive an extended license, only an extended license can make the as built data mods that are required.
AngelDeath has an excellent How To for the basics:
http://www.mustang6g.com/forums/showpost.php?p=1437662&postcount=1
FORScan programming requires a J2534 device, I use the Ford VCM-II because its what I have, most people use:
https://www.amazon.com/ScanTool-426101-OBDLink-Bluetooth-Professional/dp/B006NZTZLQ
2015-2017 cars with 4.2" non touchscreen are base cars
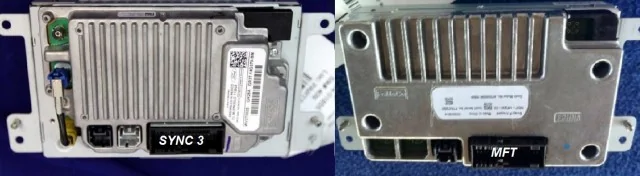
2015 cars with a touchscreen are My Ford Touch aka MFT (NOT Sync 2)
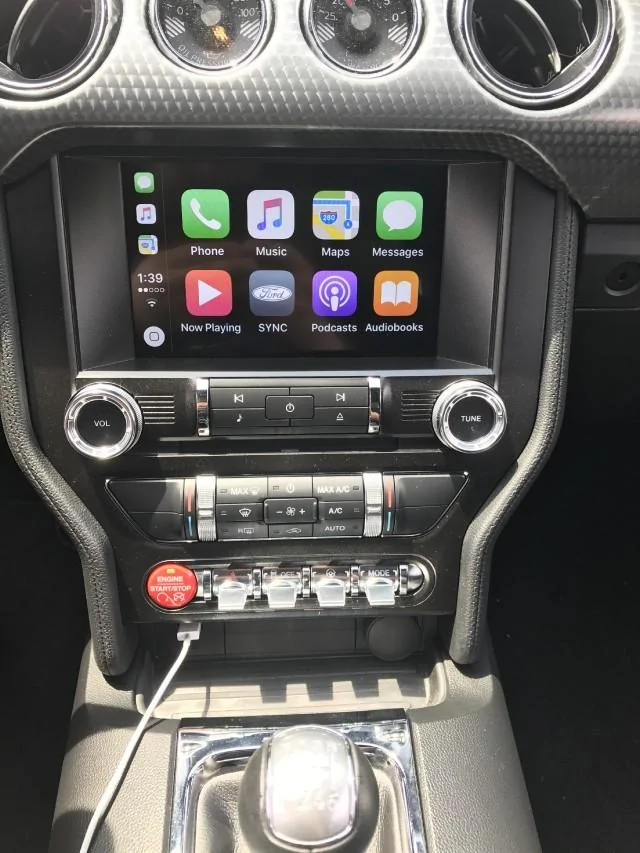
2016-2017 cars with a touchscreen are Sync 3
The touchscreen and APIM; Accessory Protocol Interface Module (for you "engineering types with 3 friends") aka Sync module are basically one unit. The cars with the non-touch screen have the 4.2" screen and a separate Sync module.
The ACM is the Audio Control Module. It is housed below the APIM, it contains the CD player, a 4 channel amplifier and the tuners for FM/AM/SAT/HD
Premium cars have SDARS aka SAT aka SiriusXM already, some have HD Radio as well, base cars will need an ACM if they want SAT or SAT/HD.
The Hub is the USB connection inside of your console.
If you have a base car or MFT and want CarPlay or Android Auto you need a new hub.
What do I need?
1. APIM/Touchscreen aka Sync Module Accessory Protocol Interface Module for short, LOL
Application: Base to Sync 3 and MFT to Sync 3

2. ACM - Audio Control Module THIS IS TOTALLY OPTIONAL
Application: If you have a base car and want to add Sirius or Sirus and HD radio you will need the proper ACM.
If you have MFT and want to add HD Radio you will need the proper ACM
If you have a base car and do not want Sirius or Sirius/HD you can use your stock ACM
-It's actually pretty easy to tell the difference between the three kinds
--Base cars had on black Fakra connector on the back
--SAT cars had a black as well as a curry Fakra connector on back and the SDARS ID printed on the label
--SAT/HD have a black and curry Fakra connector on the rear, the SDARS ID and a disclaimer about HD printed on the label
-- Your ACM has nothing to do with your capability to add NAV. I see eBay sellers who will try and tell you that it does, it does not.
-Part Numbers: (Engineering number) FR3T-19C107-XX (< SUFFIX)
Most of the modules with SAT have a suffix that begins with T i.e FR3T-19C107-TE i.e FR3T-19C107-TA
SAT/HD begin with M, or C, i.e FR3T-19C107-MJ or i.e FR3T-19C107-CA
Base cars mainly have J and S suffixes.
My advice is not to purchase anything without pictures.


3. HU5Z-19A387-A Media Hub
Application: Base to Sync 3 or MFT to Sync 3 REQUIRED for CarPlay AND Android Auto
If you have MFT you will also need to adapt the power supply to this new hub. Harness By Hextall makes an adapter and we actually give them out for free if you send us your MFT touchscreen brackets!
MFT Hubs are NOT compatible with Sync 3 APIMs! Do not attempt to use the MFT hub with Sync 3.
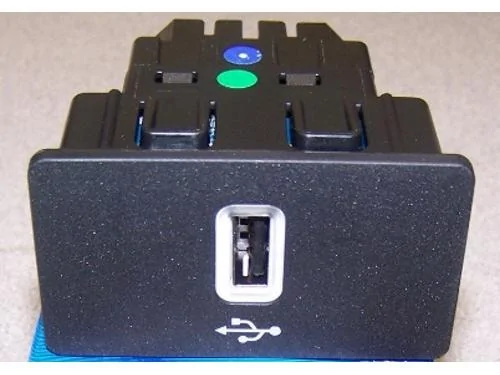
The base hub is different than MFT or Sync 3. It's not really a hub, just a bezel with a female USB connected to it.
You will have to add terminals to the base APIM connector for the Premium hubs. The Sync 3 hubs are simply power and ground. Pin 1 on the hub goes to Pin 8 on the APIM and Pin 4 on the hub goes to Pin 38 on the APIM. (Yes, there is a pin currently in 38 simply remove the existing pin and tape it back) this is part of our plug n play harness.
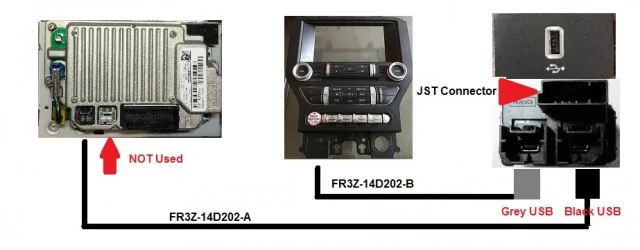
4. Bezel to Hub USB Cable FR3Z-14D202-B
APIM to Hub cable FR3Z-14D202-A
Application: Base to Sync 3. if you want Apple Car Play or Android Auto you have to upgrade to the HU5Z hub and the Ford USB cables. The USB cables on the HU5Z hub are different and have a different routing compared to base cars. The black cable, FR3Z-14D202-A connects the APIM to the hub and the grey cable FR3Z-14D202-B connects the hub to your bezel for full functionality of the system. Cables are less than $19 each at ANF White Bear Lake with our da pint code. See below for routing
You have to understand that in order for things to work as Ford intended you must install them as Ford intended. The last thing you want is a cheap USB cable to have an issue during a system update. That is why I recommend the new Ford cables vs. trying to cobble something together. You should also be aware that you cannot update properly to Sync 2.2 or higher without this hub. If the $50 they cost is really going to break you, it's time to stop modding cars. Jumping over nickles to get to pennies is how GM does things.

5. Premium bezel You only need a bezel if you have a base car. Premium bezels now command a premium price because Ford is routing bezel manufacturing to production instead of service. However we are now able to supply these as part of our 2015-18 or 2019 kits. We use the new 2018 Recaro bezel without the heated seat buttons.
6.SAT antenna
Application: Base to Sync 3
Sirius has a newer antenna listed under part # NGVA3. I can confirm that this is the best Sirius antenna currently on the market and it is fairly cheap. You will need to change the connector from SMB to a curry Fakra or purchase a curry Fakra to SMB adapter. If you want a simpler solution we sell these custom tailored to Mustang so you don't need special tools and you don't need to stash 25ft of antenna cable. We have these for $39.99
https://www.amazon.com/gp/product/B01HRCTD0G/ref=ox_sc_sfl_title_1?ie=UTF8&psc=1&smid=ATVPDKIKX0DER
https://www.amazon.com/Eightwood-Fe...id=1496321475&sr=1-2&keywords=curry+fakra+smb
7. GPS antenna
Application: Base to Sync 3 and MFT to Sync 3
ALL 2015+ Mustangs have a GPS antenna, it doesn't matter if you have a base car or MFT or Sync 3. However, the GPS antenna in the base and MFT cars is not compatible with Sync 3. The Fakra connector on the rear of the APIM supplies the other modules with GPS. After many failures of Amzaon antennas we no longer recommend the cheap Chinese antennas and now now manufacture our own from OE quality parts. Our antenna is $39.99
8. Trim Panel Clips
If you follow the instructions posted below for the Ford GT350 starter button install and you use a proper set of plastic trim removal tools you wll avoid broken clips. However, it is inevitable that shit happens when disassembling your car. Therefore you may want to have some of the trim panel clips on hand:
W717661-S300 - Yellow clips
w714972s300 - Blue clips
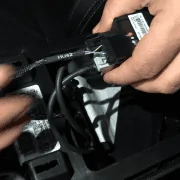
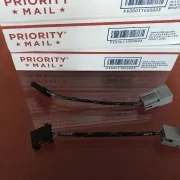
Base cars ONLY: Follow the instructions below for pin changes. Custom built plug n play harnesses are also available. See picture below for finished harness.

MFT Cars: you only need to purchase or make the hub adapter above
Be aware that the instructions below may not make any sense until you take your car apart. Unhook your battery first! I take no responsibility for the modifications listed here, you are on your own if you fuck something up.
The best guide for disassembling your dash and center column is the instructions provided by Ford Performance for the GT350 starter button. Using these and the proper tools will make it much easier as you will know where to pry and what to remove:
DISASSEMBLY
1. After disassembly remove the four screws holding in the 4.2" screen, it will obvoiusly no longer be used. Then remove the 3 or 4 screws holding in the base sync module. This is the black box located behind the 4.2" screen. This module will no longer be used. Now, remove the ACM by removing the four screws holding it in.
2. Remove the connector from the factory GPS module and tape it back to the harness. It will no longer be used.
Media Module Installation
1. Remove the base USB header panel by pushing it toward the rear of the car from the rear of the panel itself.
2. Route the leg of the harness labeled ‘HUB’ through the center console along with the black USB cable form the dash as well as the grey USB cable that will run to the bezel. Simply snap the HU5Z hub into place and then route your grey USB wire to the approximate position of the old bezel USB connector.
3. Using a wide flat blade screwdriver carefully pry the old GPS module from it metal mounting bracket, If you are careful and take your time the adhesive will stay with the bracket. Attach your GPS antenna to this.
4. You're now ready to begin the install.
If you changed the ACM to the Sirius or Sirius/HD version connect the black Fakra for the analog antenna and the curry fakra for the Sirius antenna, next, attach the ACM with the four screws removed earlier.
14. Install the APIM/Touchscreen by inserting the 54 pin connector and then attaching it to the car with the four screws removed earlier.
15. Finish reinstalling your trim panels and center console by reverting to the Ford Performance GT350 starter button directions above.
So I'd like to have one all encompassing post for those that want to swap to Sync 3. The original thread has great information but it's long and cluttered and we really need to start something that answers your questions plus add the information that we have collectively found.
HUGE thank you to everyone who contributed on Mustang6G! @HizliBullet @zackmd1 @mustangmike86 @Spart @sv9999 @fordsvtparts @RedFireV8 @mgrey
*UPDATED*
The Basics
This modification will require you to program certain modules. You will need FORScan software:
http://www.forscan.org/
Follow the directions to sign up for their board, you must have a membership to receive an extended license, only an extended license can make the as built data mods that are required.
AngelDeath has an excellent How To for the basics:
http://www.mustang6g.com/forums/showpost.php?p=1437662&postcount=1
FORScan programming requires a J2534 device, I use the Ford VCM-II because its what I have, most people use:
https://www.amazon.com/ScanTool-426101-OBDLink-Bluetooth-Professional/dp/B006NZTZLQ
2015-2017 cars with 4.2" non touchscreen are base cars
2015 cars with a touchscreen are My Ford Touch aka MFT (NOT Sync 2)
2016-2017 cars with a touchscreen are Sync 3
The touchscreen and APIM; Accessory Protocol Interface Module (for you "engineering types with 3 friends") aka Sync module are basically one unit. The cars with the non-touch screen have the 4.2" screen and a separate Sync module.
The ACM is the Audio Control Module. It is housed below the APIM, it contains the CD player, a 4 channel amplifier and the tuners for FM/AM/SAT/HD
Premium cars have SDARS aka SAT aka SiriusXM already, some have HD Radio as well, base cars will need an ACM if they want SAT or SAT/HD.
The Hub is the USB connection inside of your console.
If you have a base car or MFT and want CarPlay or Android Auto you need a new hub.
What do I need?
1. APIM/Touchscreen aka Sync Module Accessory Protocol Interface Module for short, LOL
Application: Base to Sync 3 and MFT to Sync 3
2. ACM - Audio Control Module THIS IS TOTALLY OPTIONAL
Application: If you have a base car and want to add Sirius or Sirus and HD radio you will need the proper ACM.
If you have MFT and want to add HD Radio you will need the proper ACM
If you have a base car and do not want Sirius or Sirius/HD you can use your stock ACM
-It's actually pretty easy to tell the difference between the three kinds
--Base cars had on black Fakra connector on the back
--SAT cars had a black as well as a curry Fakra connector on back and the SDARS ID printed on the label
--SAT/HD have a black and curry Fakra connector on the rear, the SDARS ID and a disclaimer about HD printed on the label
-- Your ACM has nothing to do with your capability to add NAV. I see eBay sellers who will try and tell you that it does, it does not.
-Part Numbers: (Engineering number) FR3T-19C107-XX (< SUFFIX)
Most of the modules with SAT have a suffix that begins with T i.e FR3T-19C107-TE i.e FR3T-19C107-TA
SAT/HD begin with M, or C, i.e FR3T-19C107-MJ or i.e FR3T-19C107-CA
Base cars mainly have J and S suffixes.
My advice is not to purchase anything without pictures.

3. HU5Z-19A387-A Media Hub
Application: Base to Sync 3 or MFT to Sync 3 REQUIRED for CarPlay AND Android Auto
If you have MFT you will also need to adapt the power supply to this new hub. Harness By Hextall makes an adapter and we actually give them out for free if you send us your MFT touchscreen brackets!
MFT Hubs are NOT compatible with Sync 3 APIMs! Do not attempt to use the MFT hub with Sync 3.
The base hub is different than MFT or Sync 3. It's not really a hub, just a bezel with a female USB connected to it.
You will have to add terminals to the base APIM connector for the Premium hubs. The Sync 3 hubs are simply power and ground. Pin 1 on the hub goes to Pin 8 on the APIM and Pin 4 on the hub goes to Pin 38 on the APIM. (Yes, there is a pin currently in 38 simply remove the existing pin and tape it back) this is part of our plug n play harness.
4. Bezel to Hub USB Cable FR3Z-14D202-B
APIM to Hub cable FR3Z-14D202-A
Application: Base to Sync 3. if you want Apple Car Play or Android Auto you have to upgrade to the HU5Z hub and the Ford USB cables. The USB cables on the HU5Z hub are different and have a different routing compared to base cars. The black cable, FR3Z-14D202-A connects the APIM to the hub and the grey cable FR3Z-14D202-B connects the hub to your bezel for full functionality of the system. Cables are less than $19 each at ANF White Bear Lake with our da pint code. See below for routing
You have to understand that in order for things to work as Ford intended you must install them as Ford intended. The last thing you want is a cheap USB cable to have an issue during a system update. That is why I recommend the new Ford cables vs. trying to cobble something together. You should also be aware that you cannot update properly to Sync 2.2 or higher without this hub. If the $50 they cost is really going to break you, it's time to stop modding cars. Jumping over nickles to get to pennies is how GM does things.
5. Premium bezel You only need a bezel if you have a base car. Premium bezels now command a premium price because Ford is routing bezel manufacturing to production instead of service. However we are now able to supply these as part of our 2015-18 or 2019 kits. We use the new 2018 Recaro bezel without the heated seat buttons.
6.SAT antenna
Application: Base to Sync 3
Sirius has a newer antenna listed under part # NGVA3. I can confirm that this is the best Sirius antenna currently on the market and it is fairly cheap. You will need to change the connector from SMB to a curry Fakra or purchase a curry Fakra to SMB adapter. If you want a simpler solution we sell these custom tailored to Mustang so you don't need special tools and you don't need to stash 25ft of antenna cable. We have these for $39.99
https://www.amazon.com/gp/product/B01HRCTD0G/ref=ox_sc_sfl_title_1?ie=UTF8&psc=1&smid=ATVPDKIKX0DER
https://www.amazon.com/Eightwood-Fe...id=1496321475&sr=1-2&keywords=curry+fakra+smb
7. GPS antenna
Application: Base to Sync 3 and MFT to Sync 3
ALL 2015+ Mustangs have a GPS antenna, it doesn't matter if you have a base car or MFT or Sync 3. However, the GPS antenna in the base and MFT cars is not compatible with Sync 3. The Fakra connector on the rear of the APIM supplies the other modules with GPS. After many failures of Amzaon antennas we no longer recommend the cheap Chinese antennas and now now manufacture our own from OE quality parts. Our antenna is $39.99
8. Trim Panel Clips
If you follow the instructions posted below for the Ford GT350 starter button install and you use a proper set of plastic trim removal tools you wll avoid broken clips. However, it is inevitable that shit happens when disassembling your car. Therefore you may want to have some of the trim panel clips on hand:
W717661-S300 - Yellow clips
w714972s300 - Blue clips
Base cars ONLY: Follow the instructions below for pin changes. Custom built plug n play harnesses are also available. See picture below for finished harness.

MFT Cars: you only need to purchase or make the hub adapter above
Be aware that the instructions below may not make any sense until you take your car apart. Unhook your battery first! I take no responsibility for the modifications listed here, you are on your own if you fuck something up.
The best guide for disassembling your dash and center column is the instructions provided by Ford Performance for the GT350 starter button. Using these and the proper tools will make it much easier as you will know where to pry and what to remove:
DISASSEMBLY
1. After disassembly remove the four screws holding in the 4.2" screen, it will obvoiusly no longer be used. Then remove the 3 or 4 screws holding in the base sync module. This is the black box located behind the 4.2" screen. This module will no longer be used. Now, remove the ACM by removing the four screws holding it in.
2. Remove the connector from the factory GPS module and tape it back to the harness. It will no longer be used.
Media Module Installation
1. Remove the base USB header panel by pushing it toward the rear of the car from the rear of the panel itself.
2. Route the leg of the harness labeled ‘HUB’ through the center console along with the black USB cable form the dash as well as the grey USB cable that will run to the bezel. Simply snap the HU5Z hub into place and then route your grey USB wire to the approximate position of the old bezel USB connector.
3. Using a wide flat blade screwdriver carefully pry the old GPS module from it metal mounting bracket, If you are careful and take your time the adhesive will stay with the bracket. Attach your GPS antenna to this.
4. You're now ready to begin the install.
If you changed the ACM to the Sirius or Sirius/HD version connect the black Fakra for the analog antenna and the curry fakra for the Sirius antenna, next, attach the ACM with the four screws removed earlier.
14. Install the APIM/Touchscreen by inserting the 54 pin connector and then attaching it to the car with the four screws removed earlier.
15. Finish reinstalling your trim panels and center console by reverting to the Ford Performance GT350 starter button directions above.
Sponsored
Last edited: