BullittBoy
Well-Known Member
- Thread starter
- #1
I installed my Steeda Stop the Hop Kit on the Mach 1 this morning and I thought I would offer a few tips as I did my install on Quick Jacks. Both Steeda and CJ Pony parts have great install video's and I highly recommend you watch both them before you install to make it much easier process. It took me about 3 hours but I did take my time and that includes setting up the Quick Jacks and then taking them down, putting away everything when I was done. Steeda's video is all in one video, CJ Pony parts breaks his install up into 3 separate video's. One for the Derlin bolt sleeve supports, one for the aluminum bushing collars and then the last for the subframe bar support mounts.
The kit I bought is the Stop the Hop starter kit. Steeda 555-4455 Mustang 'Stop the Hop' Starter Kit (15-26)

Blue loctite on all bolts
Each of the 4 subframe mount bolts have rubber bushing on top and on the bottom. The kit comes with aluminum support "collars" that help keep the bushings from moving as much side to side. The kit has bushing supports for each of the 4 mount points. One is a 2 piece design that is oval and goes on the rear lower bushing. Pay attention to the sizes as they are specific for the front and back on each side. After I watched the video's, I taped mine up and wrote on them where they went so when I was under the car, I didn't have to think about it. I also made a little drawing with the torque specs for all the hardware, again so I could just look, set the wrench and go.
For each side (do one side at a time), you loosen the rear subframe bolt about an inch and then remove the forward subframe bolt to do the install of the collars. bolt the front back up and then you can remove the rear subframe bolt and do those collar installs. Both video's show this in detail. Do one side at a time.
One of the aluminum bushing supports is a bit of a bitch to install but if you have some good long handled adjustable pliers and a pry bar, it will help get the piece installed. It is a 2 piece bushing support that is oval and the smaller of the 2 pieces goes on the inside of the lower bushing and it goes right next to part of the subframe which makes it difficult to get on. I found that adding grease to both the aluminum piece and the rubber bushing helped get it on rather than just the one side. The pliers help you get it to seat and then with the pry bar, you can nudge it and help it in place. If you remove the rear tire, it would be much easier to install it, so if I were doing it again, I would remove the rear tires to give you more room to get that piece in and finesse it. In CJ Pony's video he makes it look easy, but that was the most time-consuming part of the install was getting that small piece of the 2 piece collar in. Once I got the inside smaller piece in place, the larger side was much easier to get on. Not hard, just takes some time and patience. Pony's video (3 of them) shows it pretty clearly, but it looks much easier in the video than it is!
The other thing, when you get to the subframe bar supports, the forward mounting location will be right over the Quick Jack rails, so that makes removing the one stock bolt and starting the new supplied bolts a bit of a bitch. I got them in and could tighten up the forward bolt with a ratcheting box end , but could only get the rear one in by hand as the wrench wouldn't fit. I have SVE pucks on my car, so it is in the close proximity to the rear bolt. I ended up having to wait until I got the car down off the quick jacks to torque those 2 bolts each side. If i were to do it again, I would use double blocks on the quick jack to make more room to get my hand in there and/or tools.
One other thing, on one of my forward subframe bolt holes where the derlin bushings go up into, I had some crud and a bit of rust, so I did have to use a piece of sand paper to get in there and clean that out some. I sprayed some WD40 up in them and made sure they were clean so the derlin bushing would go up in them easy. Make sure you orient the bushing the right way into the hole as the subframe bolt only goes in all the way from one side of the derlin bushing opening.
Other than that, pretty easy install. This pic is of the rear subframe collar (2 piece one) and you can see how close it is to the frame.

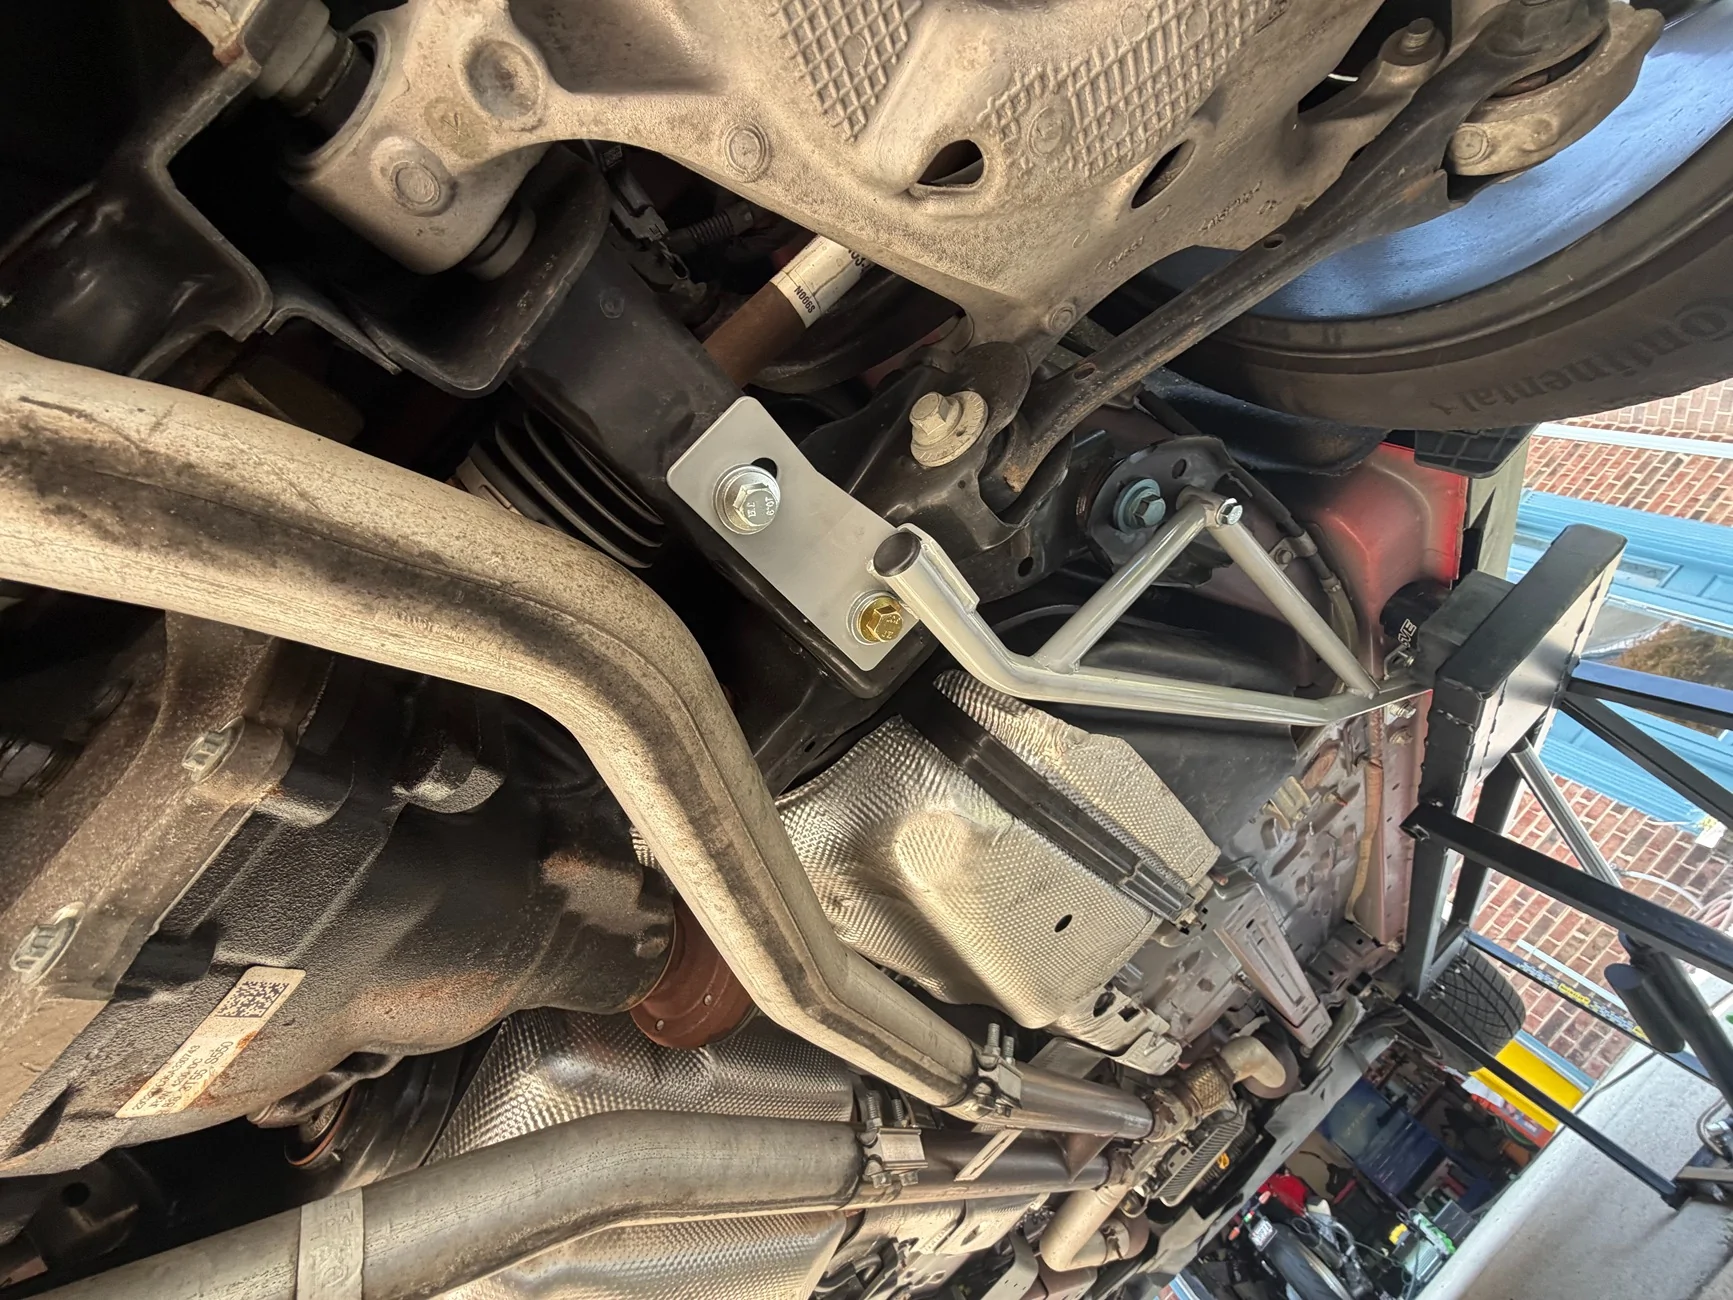
Subframe bar mounts. If you zoom in and look at the front, you can see how tight that space is, especially if you have pucks mounted! Doubling up the blocks on the quick jacks would solve that issue. Would be a non-issue on a 2 or 4 post lift.
A drawing a i made to have under the car with me so I wouldn't forget the torque specs and which bolts go where.

The kit I bought is the Stop the Hop starter kit. Steeda 555-4455 Mustang 'Stop the Hop' Starter Kit (15-26)
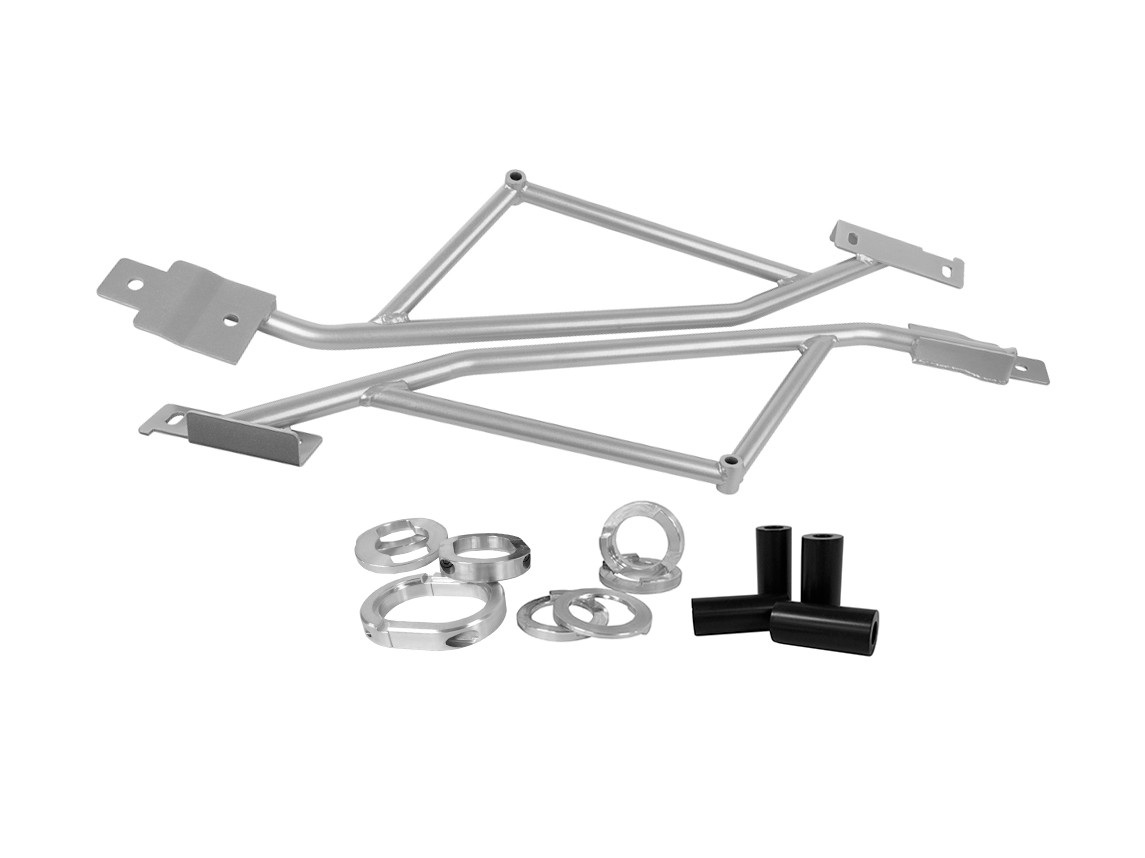
Blue loctite on all bolts
Each of the 4 subframe mount bolts have rubber bushing on top and on the bottom. The kit comes with aluminum support "collars" that help keep the bushings from moving as much side to side. The kit has bushing supports for each of the 4 mount points. One is a 2 piece design that is oval and goes on the rear lower bushing. Pay attention to the sizes as they are specific for the front and back on each side. After I watched the video's, I taped mine up and wrote on them where they went so when I was under the car, I didn't have to think about it. I also made a little drawing with the torque specs for all the hardware, again so I could just look, set the wrench and go.
For each side (do one side at a time), you loosen the rear subframe bolt about an inch and then remove the forward subframe bolt to do the install of the collars. bolt the front back up and then you can remove the rear subframe bolt and do those collar installs. Both video's show this in detail. Do one side at a time.
One of the aluminum bushing supports is a bit of a bitch to install but if you have some good long handled adjustable pliers and a pry bar, it will help get the piece installed. It is a 2 piece bushing support that is oval and the smaller of the 2 pieces goes on the inside of the lower bushing and it goes right next to part of the subframe which makes it difficult to get on. I found that adding grease to both the aluminum piece and the rubber bushing helped get it on rather than just the one side. The pliers help you get it to seat and then with the pry bar, you can nudge it and help it in place. If you remove the rear tire, it would be much easier to install it, so if I were doing it again, I would remove the rear tires to give you more room to get that piece in and finesse it. In CJ Pony's video he makes it look easy, but that was the most time-consuming part of the install was getting that small piece of the 2 piece collar in. Once I got the inside smaller piece in place, the larger side was much easier to get on. Not hard, just takes some time and patience. Pony's video (3 of them) shows it pretty clearly, but it looks much easier in the video than it is!
The other thing, when you get to the subframe bar supports, the forward mounting location will be right over the Quick Jack rails, so that makes removing the one stock bolt and starting the new supplied bolts a bit of a bitch. I got them in and could tighten up the forward bolt with a ratcheting box end , but could only get the rear one in by hand as the wrench wouldn't fit. I have SVE pucks on my car, so it is in the close proximity to the rear bolt. I ended up having to wait until I got the car down off the quick jacks to torque those 2 bolts each side. If i were to do it again, I would use double blocks on the quick jack to make more room to get my hand in there and/or tools.
One other thing, on one of my forward subframe bolt holes where the derlin bushings go up into, I had some crud and a bit of rust, so I did have to use a piece of sand paper to get in there and clean that out some. I sprayed some WD40 up in them and made sure they were clean so the derlin bushing would go up in them easy. Make sure you orient the bushing the right way into the hole as the subframe bolt only goes in all the way from one side of the derlin bushing opening.
Other than that, pretty easy install. This pic is of the rear subframe collar (2 piece one) and you can see how close it is to the frame.
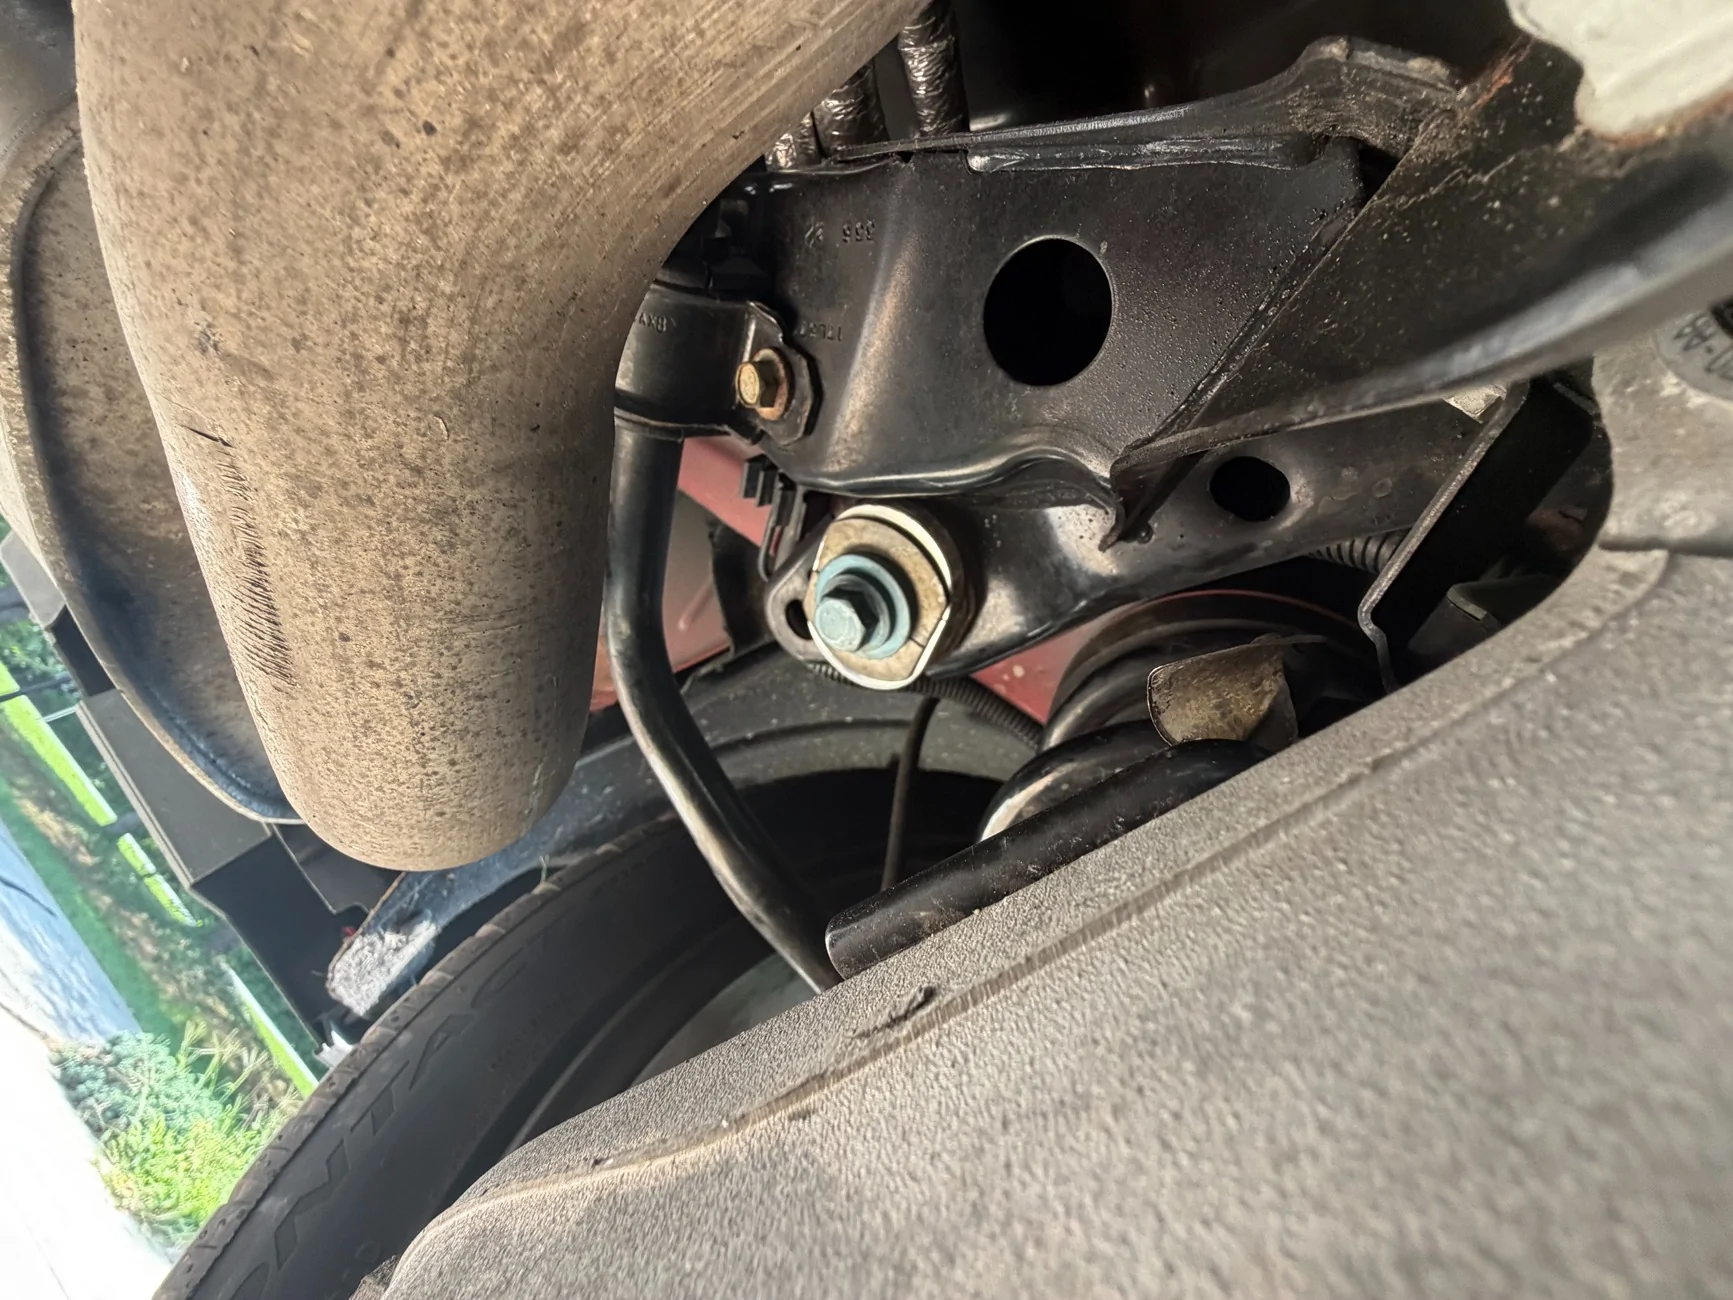
Subframe bar mounts. If you zoom in and look at the front, you can see how tight that space is, especially if you have pucks mounted! Doubling up the blocks on the quick jacks would solve that issue. Would be a non-issue on a 2 or 4 post lift.
A drawing a i made to have under the car with me so I wouldn't forget the torque specs and which bolts go where.

Sponsored
Last edited: