sonicc
Mr. Bond
- Thread starter
- #1
I take no responsibility if you mess up something or get injured. These instructions are provided as a reference to help out with this job.
A few days ago the A/C stopped working on my 5.0 and it started making a grinding noise whenever I'd try to turn on A/C. Took a look under the hood and this is what I see sitting on top of the sway bar:

The hub/compressor pulley (part with clutch material) was all chewed up
This is at 50k miles, so out of warranty. The bolt that holds it was nowhere to be found...good thing it wasn't caught by the accessory belt.
I tried to find a DIY on how to do the A/C compressor clutch, but without much luck, so I bit the bullet and got a 3 day subscription to Ford/Motorcraft service manual to tackle this. This write up is for 5.0 but clutch replacement will be similar for other engines too.
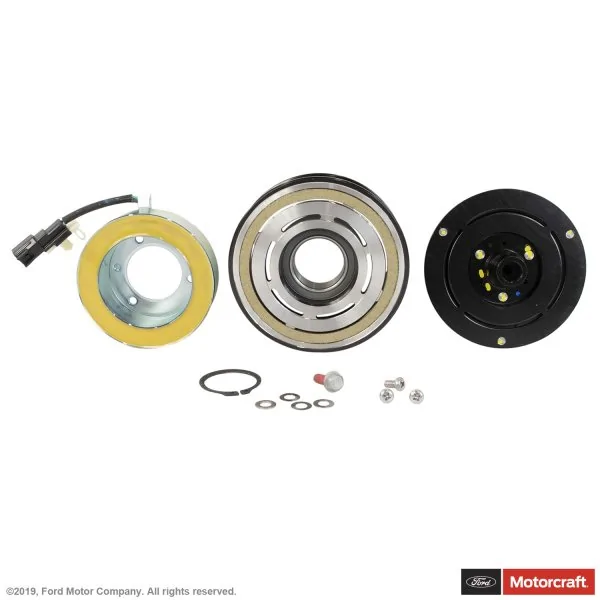
I ordered the OEM Motorcraft A/C clutch that comes as a kit with clutch plate, hub, and coil from RockAuto. It's about $100 cheaper than ordering from Ford (at the time of writing this).

Tools:
Start by removing the intake tube and overflow bottle. Remove upper radiator hose for better access (drain radiator first or coolant will be drained for you via other means all over your garage floor).

You'll be looking at something like this:
Step 2:
Since my clutch plate fell off, I didn't have to deal with removing that. If yours is still there, you'll need to remove the 10mm bolt that's holding it.

You'll need something to hold the plate in place while you take out the 10mm bolt.
Step 3:
Now you need to remove the belt for A/C compressor. The 5.0 engine uses a separate belt for A/C and there's no tensioner or way to adjust/loosen the tension. Factory service manual calls for cutting the A/C belt in order to remove it . I wasn't going to do that.
Put an 18mm socket on the crank bolt, put the ratchet, and use breaker bar to turn the engine clockwise. Use a small pry bar to get the belt to slip off the compressor pulley. Once it's off the compressor pulley, move the belt out of the way.
Step 4:
In order to be able to remove the compressor pulley, there's a snap ring that needs to be removed. I forgot to take a picture, but it is illustrated here:

IT IS VERY IMPORTANT TO GET A GOOD PAIR OF SNAP RING PLIERS for removal and re-installation of this snap ring. You'll hate life if you don't. The ones at part stores suck.
Step 5:
Now put the gear puller around the pulley and remove the pulley. You can probably use pry bars, but I wouldn't recommend it.

After you remove the compressor pulley, you'll be looking at the clutch coil
I decided to replace mine since it came with the kit and it would suck having to do this again in case the coil fails down the road. The coil is held in place by 3 screws. Remove them, slide the coil off, and unclip and disconnect the power connector behind it. Install new coil.
Step 6:
install the new pulley/clutch hub. Process is the opposite of Step 5, without the use of gear puller obviously. I used a small hammer to tap around it so it goes evenly until it was fully seated on.
Step 7:
With hub (compressor pulley) seated on, use the snap ring pliers and install the new (or old) snap ring.
Step 8:
Now's the fun part of putting the belt back on. At this point it might be easier to remove the accessory belt - which is how service manual describes it.

Take the A/C belt and twist the belt so the ribs face the front of the car (as illustrated in the image above), then slip it behind the crankshaft pulley. Once it's completely behind the crankshaft pulley, slide it on the compressor pulley and make sure it's fully seated in the groves on compressor pulley.
Now get the belt started on the crankshaft pulley (closest to the compressor). At the point where belt can't go on any more, take a zip tie and feed it through the spoke of the crankshaft pulley and then over the belt. Picture below shows how it's done with accessory belt out of the way. The idea is the same - to have the zip tie hold the belt in place while you rotate the crankshaft. If the accessory belt is still in place then the zip tie has to be installed a little before the spot illustrated in pic below:
With zip tie holding the belt, start slowly rotating the crank with ratchet and breaker bar. If you opted to not remove the accessory belt previously, the zip tie will eventually get stuck on it as you turn the crank. Cut the zip tie as the belt should be on far enough at this point to not slip off the crankshaft pulley. If it does slip off, you'll need to repeat this step.
With zip tie cut off, start rotating the crank slowly and make sure the belt is going on. As you make a full rotation the belt should seat onto the crank fully, just make sure all the ribs are in the grooves. If one of the ribs is off, you can use a pry bar to push/guide it into the right spot as you rotate the crank.
Rotate the crank a few times just to make sure the belt is on there correctly.
Step 9:
Now's time to install the clutch plate. If you ordered a kit, it should come with some washers/spacers and a new bolt. Those washers are needed to set the correct gap between the plate and hub. Put all the washers into clutch plate spline part that goes onto the compressor shaft, put the clutch plate onto the shaft, and then install the 10mm bolt. Tighten the bolt just tight enough for now, it will get torqued later.
You will need a feeler gauge to check the gap between the clutch plate and the hub (compressor pulley). If you're not sure which one is which at this point: the black part is the clutch plate and the part where the belt goes on is the hub. Feeler gauge needs to slip between those two. Per the factory service manual the gap should be between 0.3mm and 0.6mm. Check the gap at 3 points that are about equal distance from each other - I used the silver rivet looking things as reference.
If the gap is outside of those specs, you'll need to remove/add spacers.
Once the gap is set, you can now torque the 10mm bolt to 177 in-lb (~15 ft-lb). Pay attention to which units your torque wrench has or you'll have a bad day.
Step 10:
Reinstall everything removed in step 1, add coolant, etc.
Test out the compressor by turning on A/C
Hope this was helpful.
A few days ago the A/C stopped working on my 5.0 and it started making a grinding noise whenever I'd try to turn on A/C. Took a look under the hood and this is what I see sitting on top of the sway bar:

The hub/compressor pulley (part with clutch material) was all chewed up

This is at 50k miles, so out of warranty. The bolt that holds it was nowhere to be found...good thing it wasn't caught by the accessory belt.
I tried to find a DIY on how to do the A/C compressor clutch, but without much luck, so I bit the bullet and got a 3 day subscription to Ford/Motorcraft service manual to tackle this. This write up is for 5.0 but clutch replacement will be similar for other engines too.
I ordered the OEM Motorcraft A/C clutch that comes as a kit with clutch plate, hub, and coil from RockAuto. It's about $100 cheaper than ordering from Ford (at the time of writing this).
Tools:
- 10mm socket
- feeler gauge
- torque wrench (one that measures in in-lb preferably)
- zip ties
- small pry bar
- 18mm socket, ratchet, and breaker bar
- gear puller
- snap ring pliers
Start by removing the intake tube and overflow bottle. Remove upper radiator hose for better access (drain radiator first or coolant will be drained for you via other means all over your garage floor).

You'll be looking at something like this:

Step 2:
Since my clutch plate fell off, I didn't have to deal with removing that. If yours is still there, you'll need to remove the 10mm bolt that's holding it.

You'll need something to hold the plate in place while you take out the 10mm bolt.
Step 3:
Now you need to remove the belt for A/C compressor. The 5.0 engine uses a separate belt for A/C and there's no tensioner or way to adjust/loosen the tension. Factory service manual calls for cutting the A/C belt in order to remove it . I wasn't going to do that.
Put an 18mm socket on the crank bolt, put the ratchet, and use breaker bar to turn the engine clockwise. Use a small pry bar to get the belt to slip off the compressor pulley. Once it's off the compressor pulley, move the belt out of the way.
Step 4:
In order to be able to remove the compressor pulley, there's a snap ring that needs to be removed. I forgot to take a picture, but it is illustrated here:

IT IS VERY IMPORTANT TO GET A GOOD PAIR OF SNAP RING PLIERS for removal and re-installation of this snap ring. You'll hate life if you don't. The ones at part stores suck.
Step 5:
Now put the gear puller around the pulley and remove the pulley. You can probably use pry bars, but I wouldn't recommend it.

After you remove the compressor pulley, you'll be looking at the clutch coil

I decided to replace mine since it came with the kit and it would suck having to do this again in case the coil fails down the road. The coil is held in place by 3 screws. Remove them, slide the coil off, and unclip and disconnect the power connector behind it. Install new coil.
Step 6:
install the new pulley/clutch hub. Process is the opposite of Step 5, without the use of gear puller obviously. I used a small hammer to tap around it so it goes evenly until it was fully seated on.
Step 7:
With hub (compressor pulley) seated on, use the snap ring pliers and install the new (or old) snap ring.
Step 8:
Now's the fun part of putting the belt back on. At this point it might be easier to remove the accessory belt - which is how service manual describes it.

Take the A/C belt and twist the belt so the ribs face the front of the car (as illustrated in the image above), then slip it behind the crankshaft pulley. Once it's completely behind the crankshaft pulley, slide it on the compressor pulley and make sure it's fully seated in the groves on compressor pulley.
Now get the belt started on the crankshaft pulley (closest to the compressor). At the point where belt can't go on any more, take a zip tie and feed it through the spoke of the crankshaft pulley and then over the belt. Picture below shows how it's done with accessory belt out of the way. The idea is the same - to have the zip tie hold the belt in place while you rotate the crankshaft. If the accessory belt is still in place then the zip tie has to be installed a little before the spot illustrated in pic below:

With zip tie holding the belt, start slowly rotating the crank with ratchet and breaker bar. If you opted to not remove the accessory belt previously, the zip tie will eventually get stuck on it as you turn the crank. Cut the zip tie as the belt should be on far enough at this point to not slip off the crankshaft pulley. If it does slip off, you'll need to repeat this step.
With zip tie cut off, start rotating the crank slowly and make sure the belt is going on. As you make a full rotation the belt should seat onto the crank fully, just make sure all the ribs are in the grooves. If one of the ribs is off, you can use a pry bar to push/guide it into the right spot as you rotate the crank.
Rotate the crank a few times just to make sure the belt is on there correctly.
Step 9:
Now's time to install the clutch plate. If you ordered a kit, it should come with some washers/spacers and a new bolt. Those washers are needed to set the correct gap between the plate and hub. Put all the washers into clutch plate spline part that goes onto the compressor shaft, put the clutch plate onto the shaft, and then install the 10mm bolt. Tighten the bolt just tight enough for now, it will get torqued later.
You will need a feeler gauge to check the gap between the clutch plate and the hub (compressor pulley). If you're not sure which one is which at this point: the black part is the clutch plate and the part where the belt goes on is the hub. Feeler gauge needs to slip between those two. Per the factory service manual the gap should be between 0.3mm and 0.6mm. Check the gap at 3 points that are about equal distance from each other - I used the silver rivet looking things as reference.
If the gap is outside of those specs, you'll need to remove/add spacers.
Once the gap is set, you can now torque the 10mm bolt to 177 in-lb (~15 ft-lb). Pay attention to which units your torque wrench has or you'll have a bad day.
Step 10:
Reinstall everything removed in step 1, add coolant, etc.
Test out the compressor by turning on A/C
Hope this was helpful.
Sponsored
Last edited: