
OP
OP
Stanv03
Well-Known Member
- Thread starter
- #31
Well, I am happy to say everything went well with the install. Dash cams are up and running. Turn on when car turns on and off when car goes off! I was extremely nervous but with the help you and everyone else gave me. I was able to get it done. Tapped into the right fuses as you mentioned . I’m going to keep it for now on those fuses. But eventually I’ll switch it to a constant power fuse to get that 24hr parking mode feature. I just want to wait and get a new battery to be on the safer side since my battery is old right now. But I am extremely grateful for the info I got from you.It's all good and we all gotta learn some where. I've been dealing with electronics on cars for years. Car stereos, alarm systems, LED lights, and anything else that can be wired.
You learn by asking questions and diving into it, if you make a mistake you'll learn from that mistake and never do it again.
The best advice that I can give and is rule of thumb is to unhook your car battery so there's no power when you're preparing to do the fuse taps.
Take a good look at your car and look at how you want to run the wires. There is going to be plenty of wire so you'll be good on wire.
As S550HPP mentioned, be careful with the A Pillars. You shouldn't have to remove them at all. Use your fingers and your trim tool to tuck the wire. I personally would start from the top where you'll be mounting the camera and leave a good amount of wire so you can mount your camera exactly how you want. Tuck your wire and work your way to the A Pillar on the passenger side. Without taking the pillar off, use your trim tool to push the wire around it. I personally kept it at the top of the pillar right between it and the headliner and tucked it behind the pillar and then worked my way to the other side to the door weather strip. There is a metal lip that the weather strip is on, tuck your wire between that metal lip and the headliner next to the weather strip.
You should be officially on the passenger side of your car and ready to work your way down to the fuse panel. Take off the fuse panel door by sliding the panel door straight up and pull out, I believe all of the S550s are the same so they'll be two clips that hold the door snug, when you pull the door after sliding up it should pop off. Once that's removed, you'll need to remove the trim by the footwell and door, to remove that piece pop up the trim in the middle right next to the passenger seat and door (only the front part of that trim needs to be pulled up). This will allow for you to remove the front trim piece. You should be able to pull the front trim piece that you skipped to reveal the full path of the wiring. That piece is only held on by two clips and the bottom is released because you already should have pulled up the front of the middle trim.
Run the wire down tucking it between that metal lip and weather strip all the way down into you get to the carpet. Once you get to this point, you're almost at the finish line. If you haven't done so already, unhook the negative battery cable from the battery so there's no power to the vehicle.
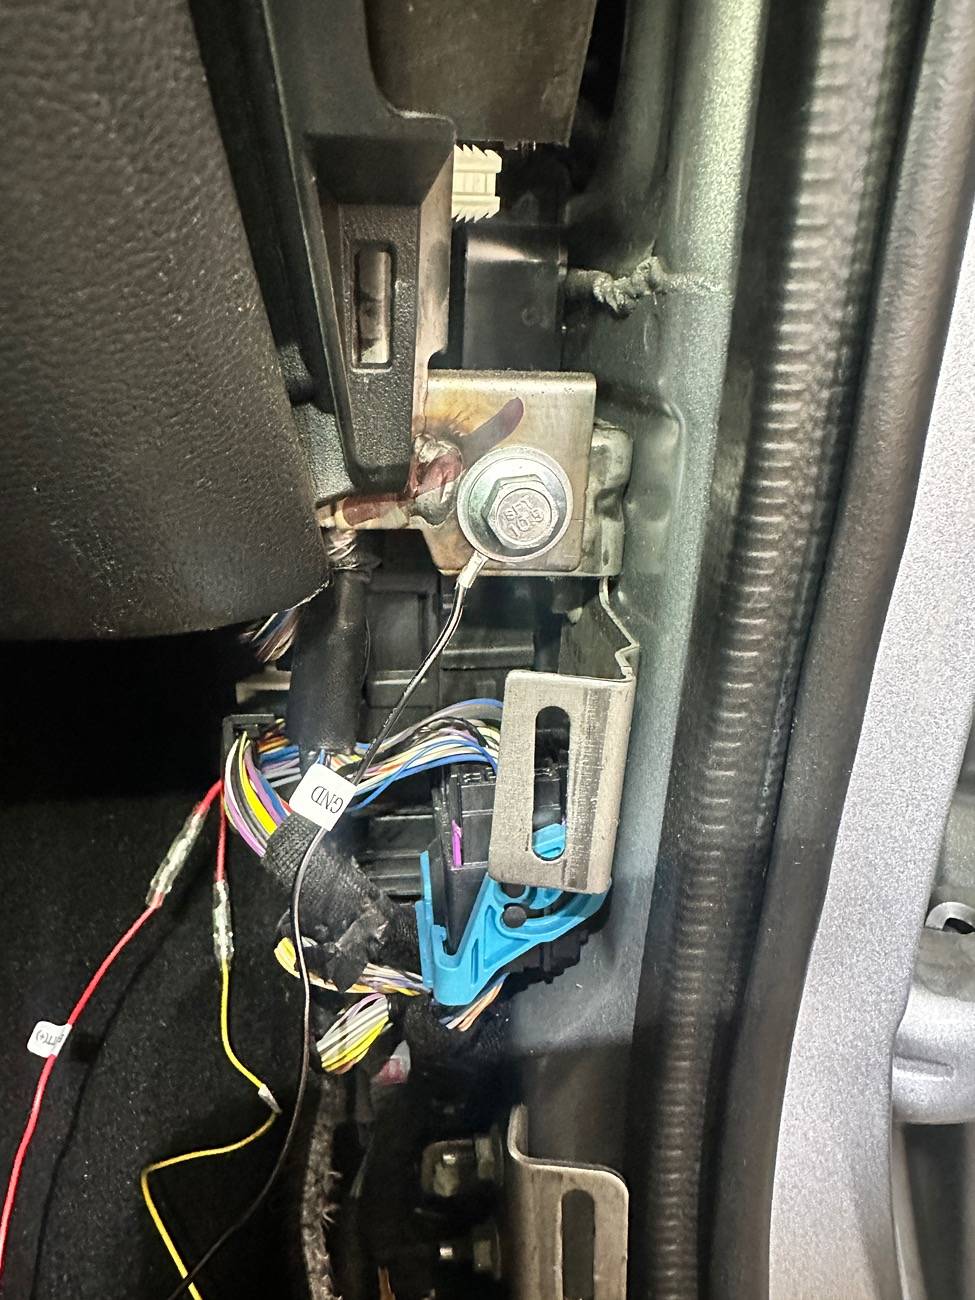
You should see a big bolt in front of you from the trim that you removed, I believe it's a 12 or 13 mm that's chrome in color, loosen that bolt and connect your ground wire to it by placing it behind that bolt. Tighten that bolt back down and make sure the ground wire is secure. Now You're officially ready to tap the fuses. Look into the the fuses that I've mentioned for your car.
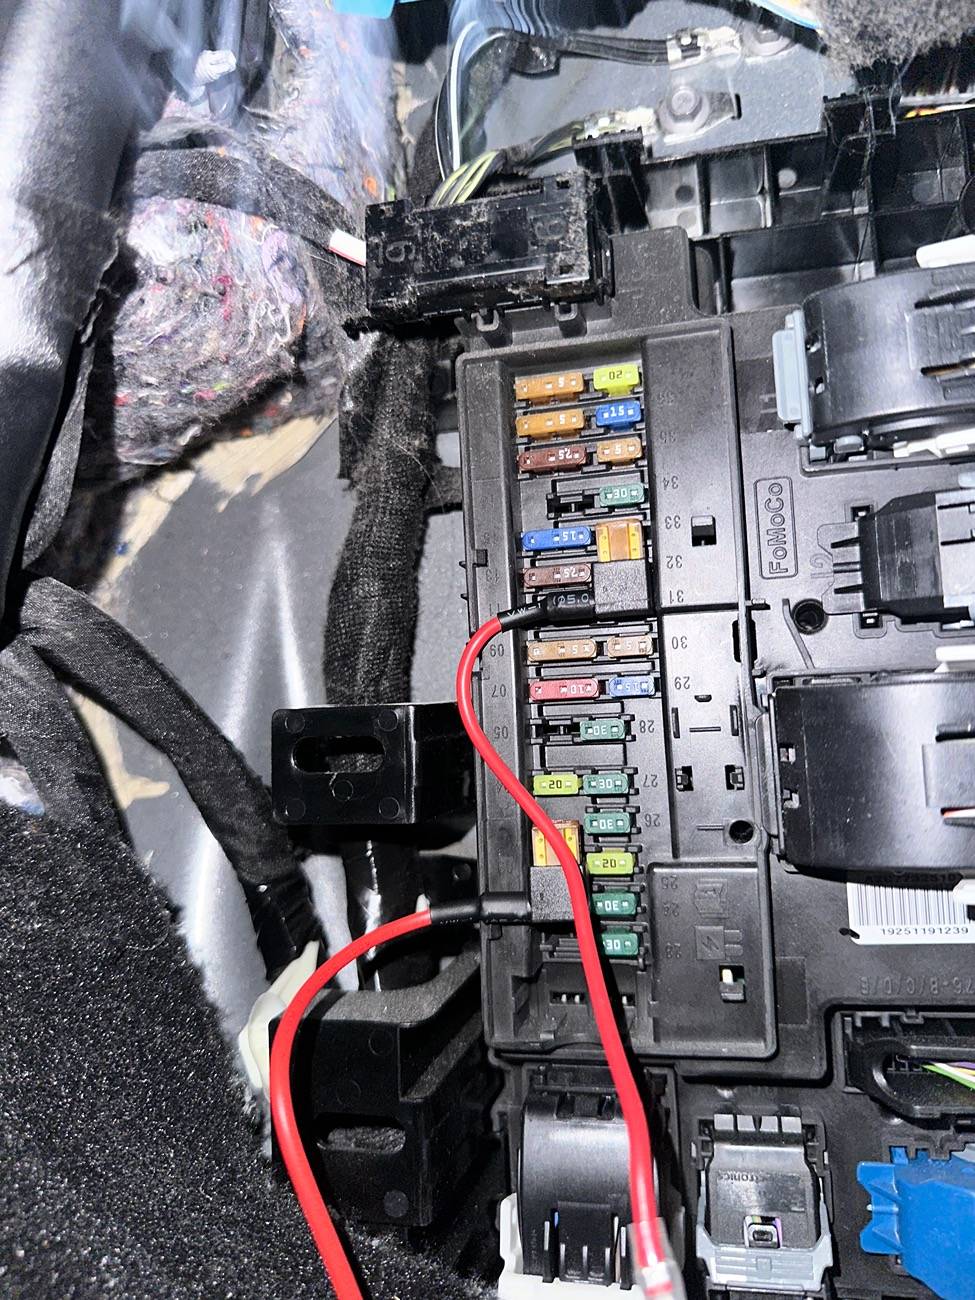
Remove Fuse #2 from the fuse box on the passenger side and place that fuse into the open end of the fuse tap. Plug the ACC fuse tap into where Fuse #2 was located. Connect the end of the wires from the fuse tap to the Hardwire kit for ACC to complete the connection
You'll repeat the same steps for the Battery Fuse tap for Fuse #31 by removing that fuse and placing it into the Battery Fuse tap. Plug that tap into Fuse #31 and connect the fuse tap end to the Battery wire of the Hardwire kit.
At this point you should have everything connected. Double check that ACC is connected to Fuse #2 and Battery is on Fuse #31. Also check the ground by tugging on it and make sure your connections are solid. If it all checks out and looks good, you need to prepare to test it out.
Connect the battery cable back onto the battery and connect your camera. I can't speak for the Vantrue E1 camera since I have the E3 but after connecting it. Turn your car on and I believe the camera will power on automatically. If it doesn't, power it on and go into your settings to set everything up (mainly parking mode for the Hardwire kit at this point). It's so much easier and quicker to set it up using the mobile app and connecting to it via Wifi.
After everything is set, test out the parking mode by turning off the car. It's easier to have the motion settings set for the camera versus the collision setting. Wait until all lights and everything cut off on the car. Now shake your camera up a little and you should see a green light come on indicating it's recording. I would recommend doing this for about 2 - 3 minutes just to be 100% sure. If you see it recording every time, this is indicating that your camera is receiving power properly from the Hardwire kit.
Now you should be good to go and you can mount the camera, tuck the wires in neatly so that they're well hidden, and put the trim pieces back on.
Good Luck!
Sponsored


