Sponsored
UNSAFE
Member
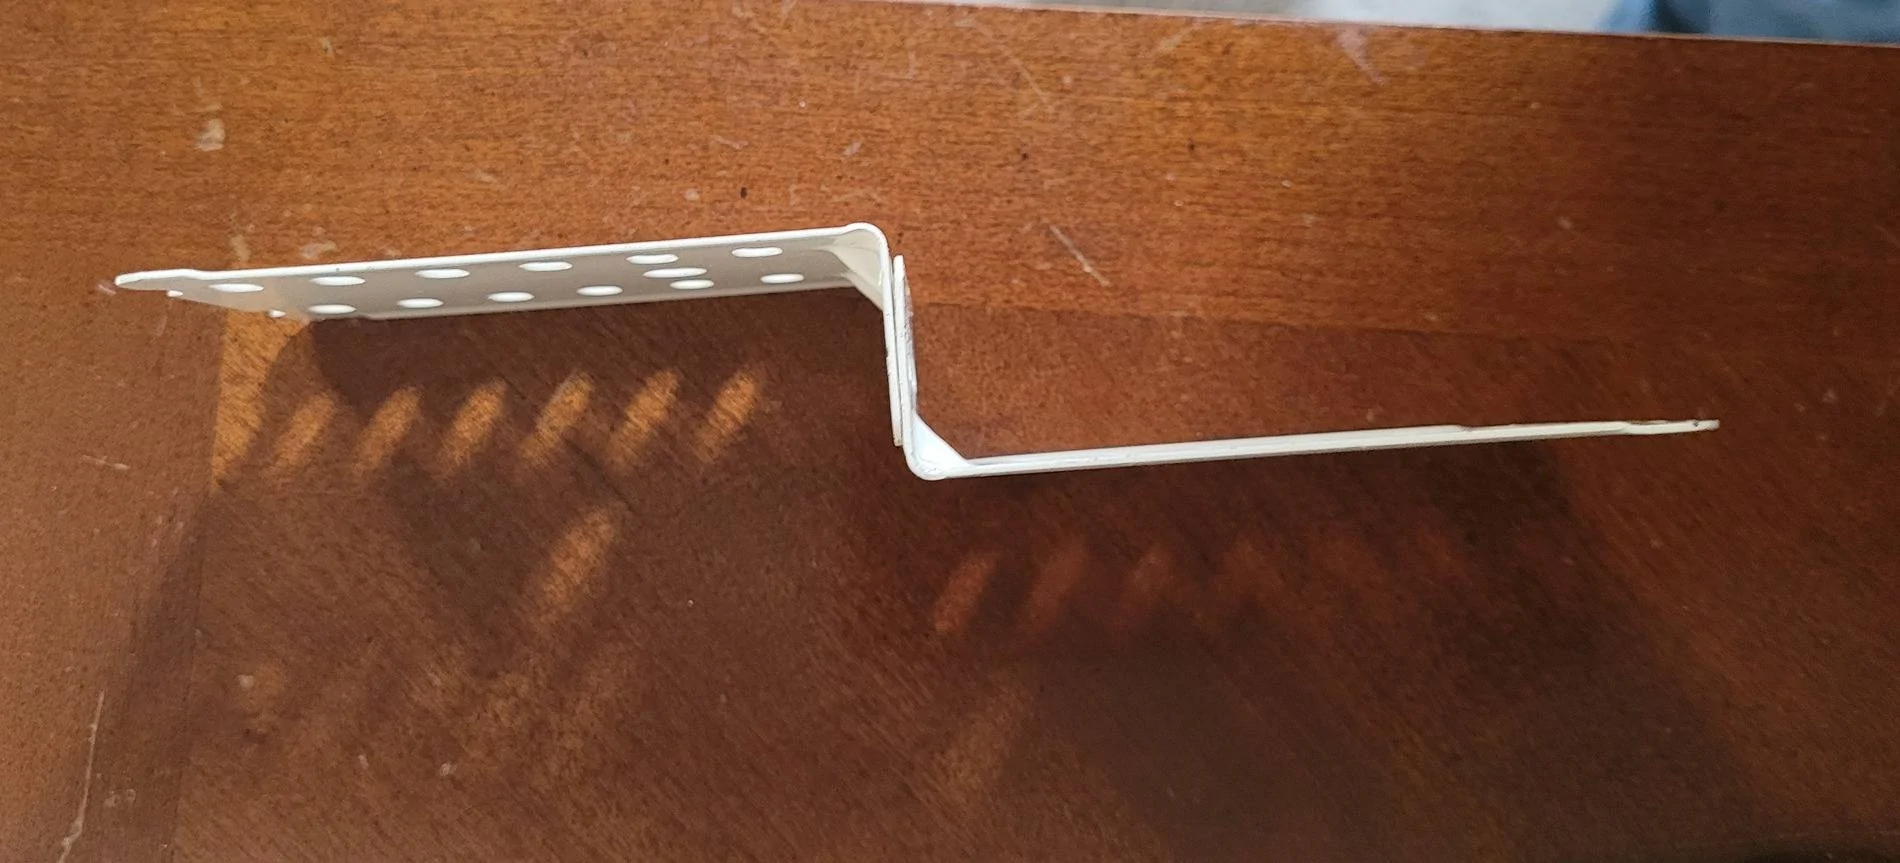
Awesome idea!OK, I'm trying to do this with stuff I have on hand. This is my current idea for a bracket for the rear camera.
The pieces are standoffs for mounting drapery brackets to the wall. I intend to pop rivnit them together in the offset position. I'll paint them a flat black and probably put a strip of black foam where the bracket will touch the seat. I haven't torn the car apart yet but I'm feeling pretty hopeful this is going to work


OP
OP
ORRadtech
Well-Known Member
- Joined
- Sep 12, 2019
- Threads
- 25
- Messages
- 4,089
- Reaction score
- 4,030
- Location
- Atlanta, Georgia
- First Name
- Dave
- Vehicle(s)
- 18 Mustang EcoBoost convertible, 14 Ford Fusion SE
- Thread starter
- #18
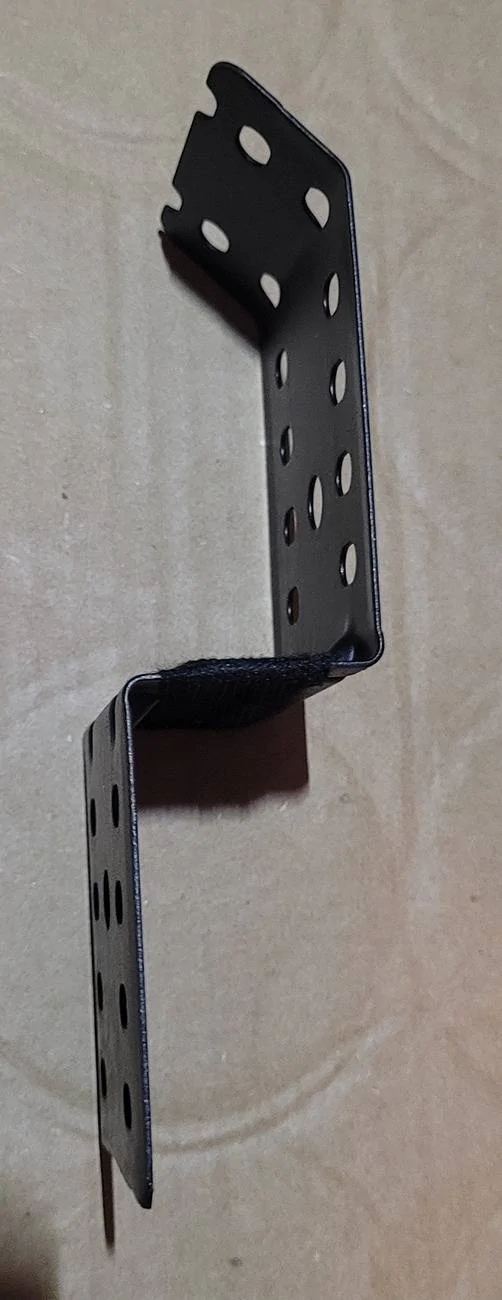
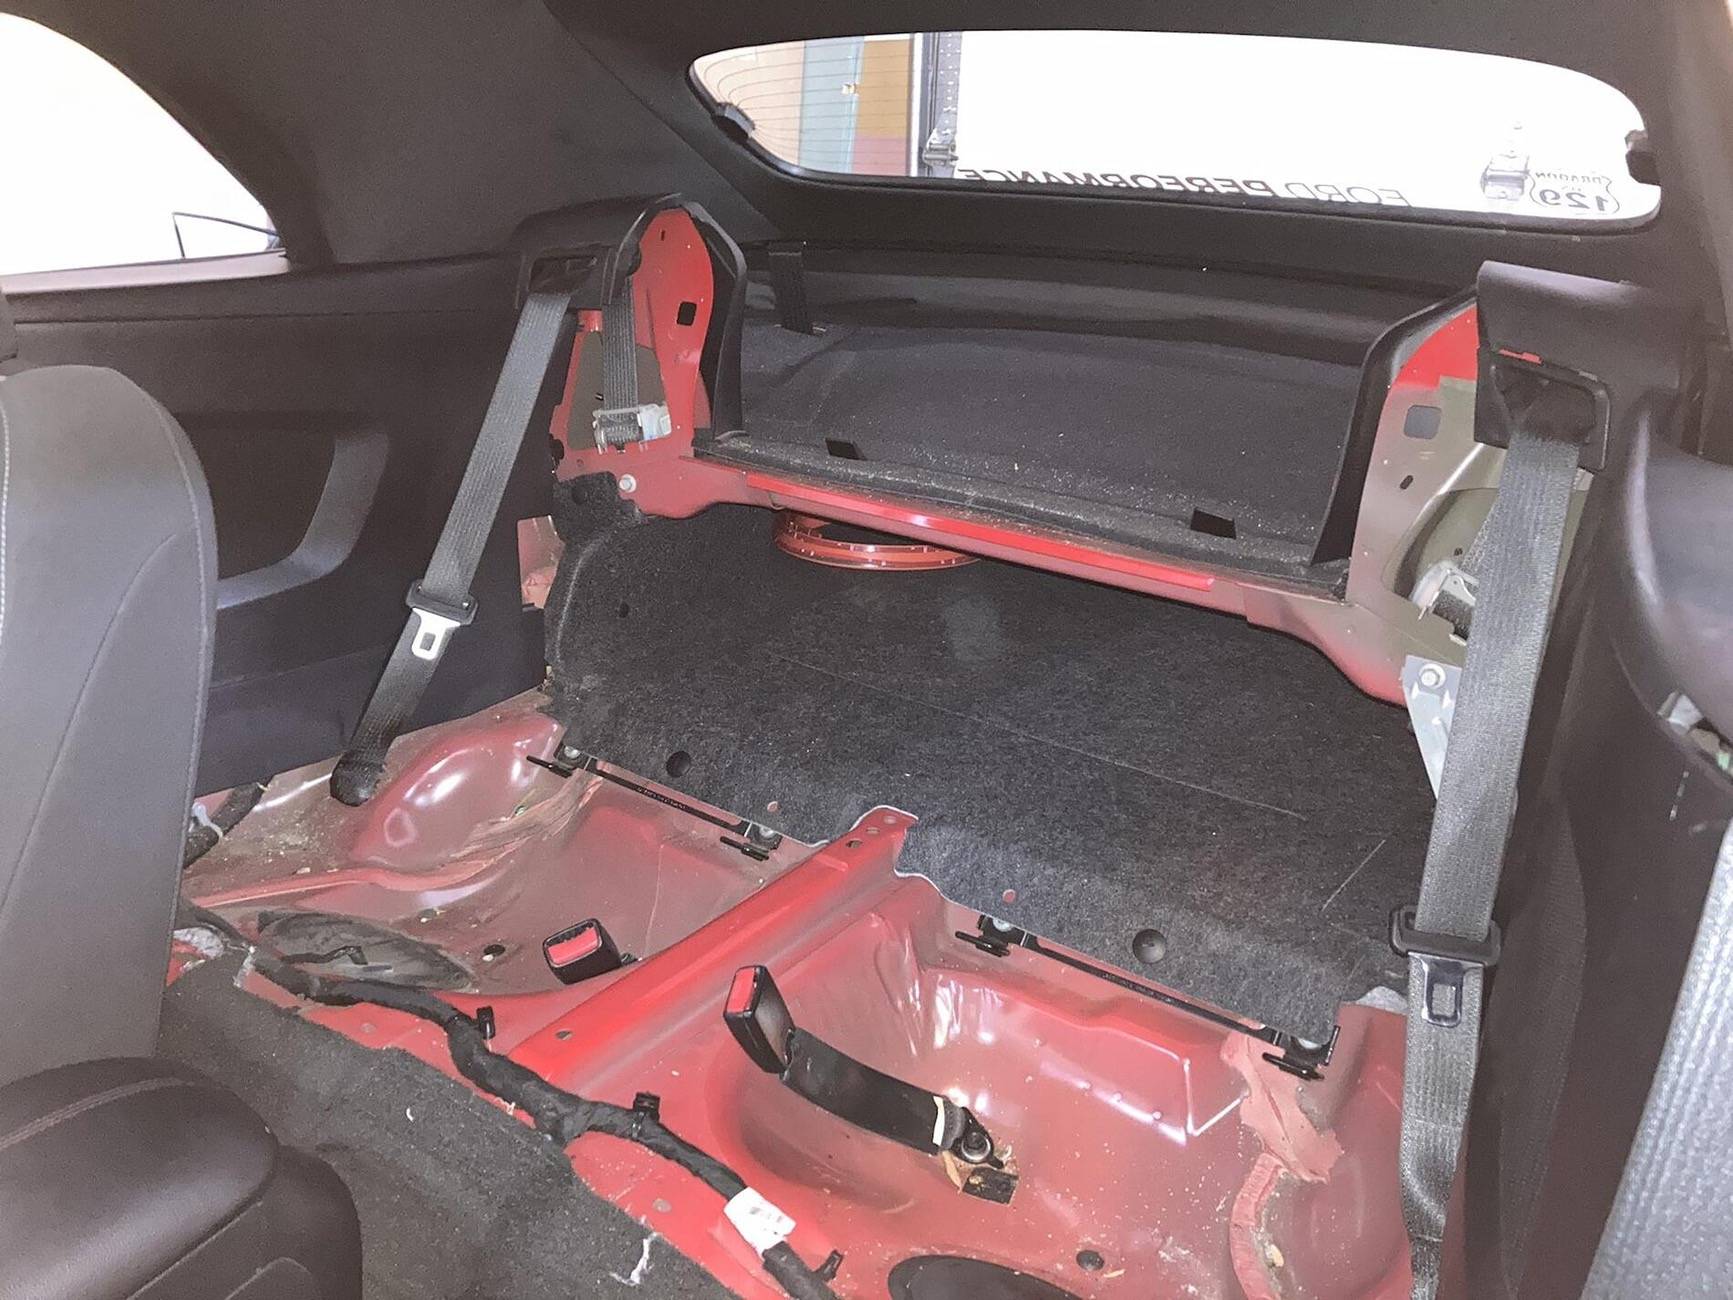
OK, nearly done. The front facing dash cam is in and wired, the wire is run from the front cam to behind the rear seat. Using a bunch of trim tools and a lot of cursing I was able to run the rear wire without removing the windshield or A-plllar trim. The rear seat base had to come out but I only removed the one bolt (shown) to give me a little wiggle room for the rear seat back. It did not need to come completely out. The bracket is finished. I had to bend it some so the top would clear it going up/down. I used some spray Plasti-dip for the finish and am just waiting for it to cure before I install it. I will post pics of the finished install when done.


UNSAFE
Member
Looks awesome! Can't wait to see it installed. Today, I installed the front and rear cams in our Mustang Convertible. Although the rear cam isn't mounted yet. It took me a few hours along with some cursing alsoOK, nearly done. The front facing dash cam is in and wired, the wire is run from the front cam to behind the rear seat. Using a bunch of trim tools and a lot of cursing I was able to run the rear wire without removing the windshield or A-plllar trim. The rear seat base had to come out but I only removed the one bolt (shown) to give me a little wiggle room for the rear seat back. It did not need to come completely out. The bracket is finished. I had to bend it some so the top would clear it going up/down. I used some spray Plasti-dip for the finish and am just waiting for it to cure before I install it. I will post pics of the finished install when done.

OP
OP
ORRadtech
Well-Known Member
- Joined
- Sep 12, 2019
- Threads
- 25
- Messages
- 4,089
- Reaction score
- 4,030
- Location
- Atlanta, Georgia
- First Name
- Dave
- Vehicle(s)
- 18 Mustang EcoBoost convertible, 14 Ford Fusion SE
- Thread starter
- #20
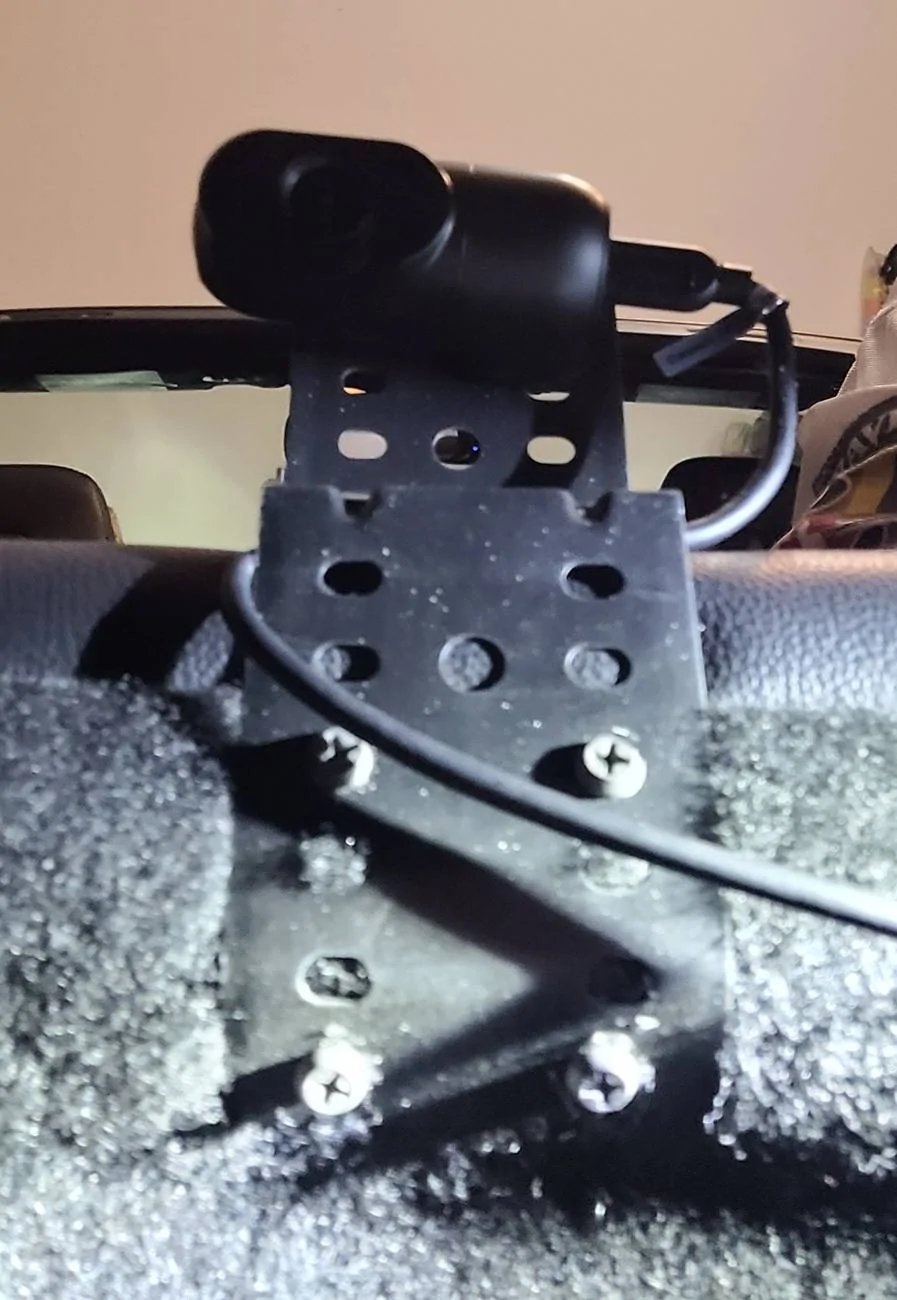
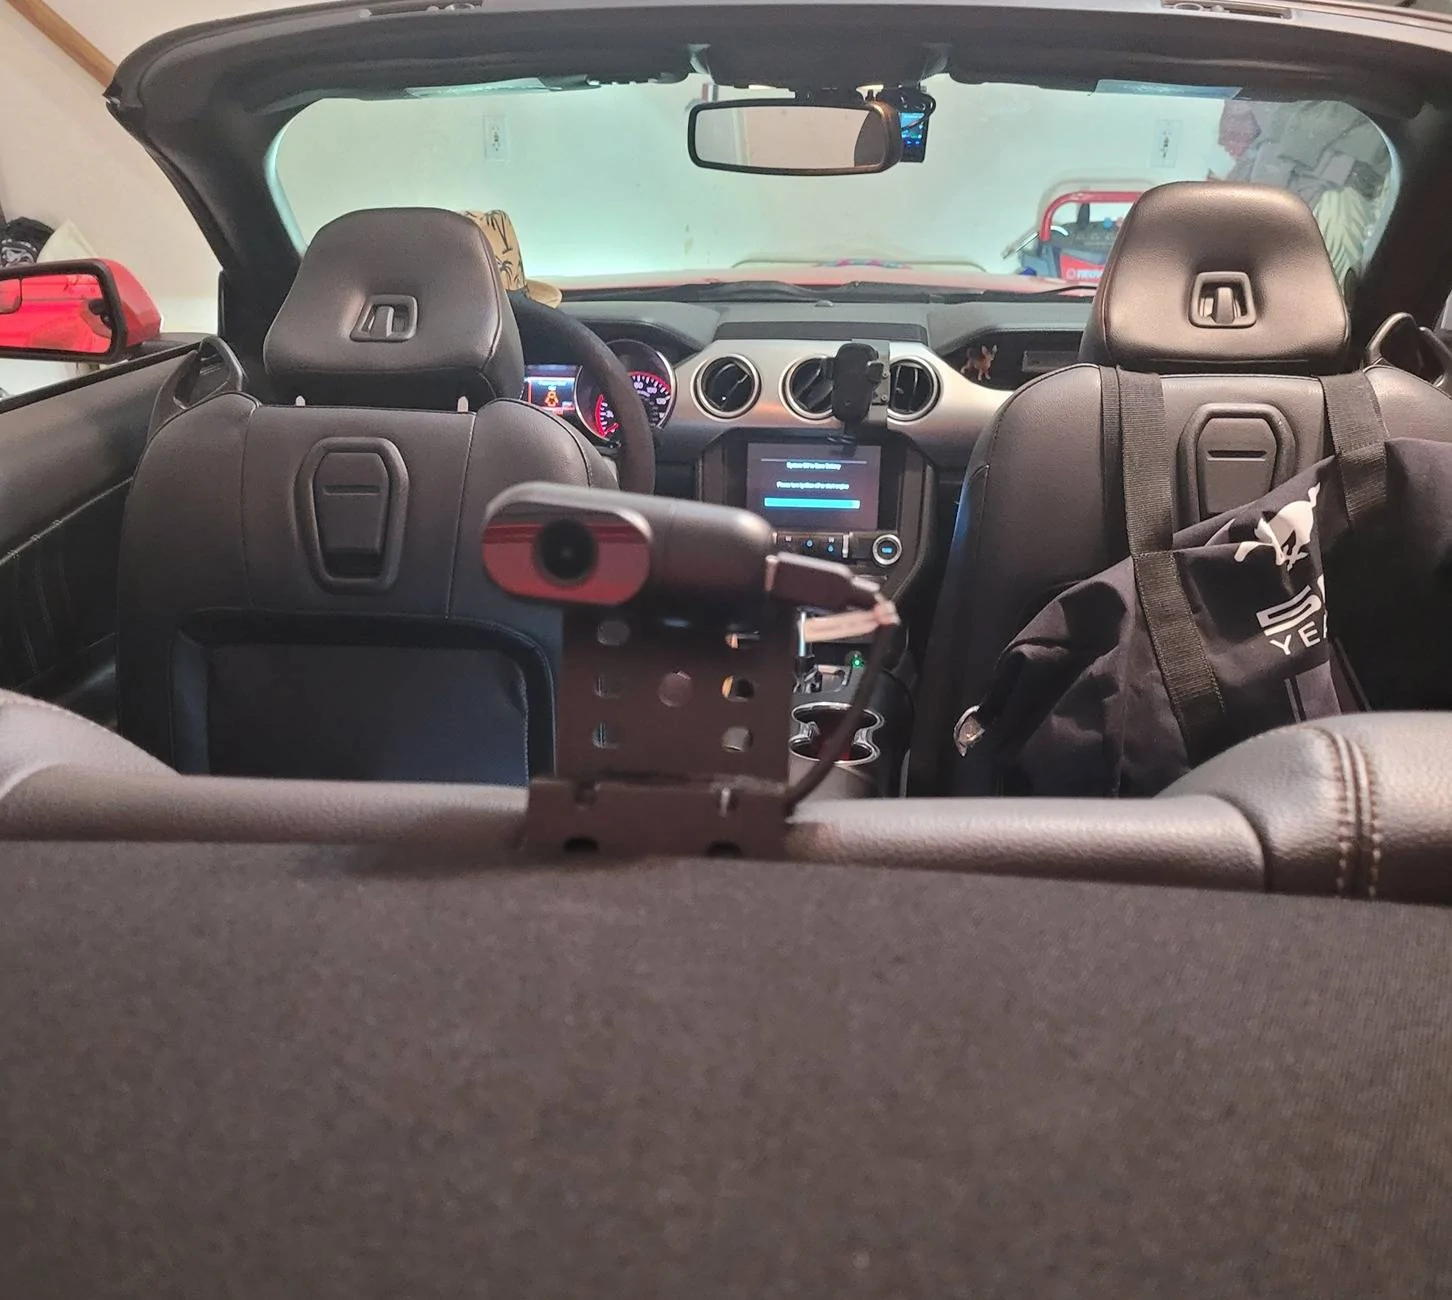
All done except for setting up the camera. That will have to wait until tomorrow though as I managed to run the battery down.
Anyway, I'm pretty happy with the way it turned out. It's pretty unobtrusive and seems solid. I'll know more once I road test it.
Here's pictures of the install. The camera is a bit tilted in the pics but that's from the wire being too tight, I fixed it once I noticed it.


Anyway, I'm pretty happy with the way it turned out. It's pretty unobtrusive and seems solid. I'll know more once I road test it.
Here's pictures of the install. The camera is a bit tilted in the pics but that's from the wire being too tight, I fixed it once I noticed it.


Sponsored
UNSAFE
Member
Amazing job! I see where you attached the bottom of the bracket to the seat with screws. What size/length are your screws? What do they screw in to?All done except for setting up the camera. That will have to wait until tomorrow though as I managed to run the battery down.
Anyway, I'm pretty happy with the way it turned out. It's pretty unobtrusive and seems solid. I'll know more once I road test it.
Here's pictures of the install. The camera is a bit tilted in the pics but that's from the wire being too tight, I fixed it once I noticed it.
OP
OP
ORRadtech
Well-Known Member
- Joined
- Sep 12, 2019
- Threads
- 25
- Messages
- 4,089
- Reaction score
- 4,030
- Location
- Atlanta, Georgia
- First Name
- Dave
- Vehicle(s)
- 18 Mustang EcoBoost convertible, 14 Ford Fusion SE
- Thread starter
- #22
The screws are pretty short. Maybe 4 times the thickness of the bracket. Just some i have on hand. I've screwed them directly into the seat back which is pretty heavy guage plastic covered with a very short nap "carpet". It seems pretty solid. If the prove to be too weak, or pull out, I'll probably try to install nut serts. But I figure I'll be able to take these out and the carpet would probably hide any damage.
S550HPP
Well-Known Member
I honestly respect the initiative and effort but I think the plain old 3M tape to seat top looks way cleaner, and cam is straight.
A great 1st attempt with on hand materials.
A great 1st attempt with on hand materials.
Johnnybee
Well-Known Member
Great proof of concept. I’m sure that the tinkerers amongst us will try to make our own takes on this. My thought was to attach the mount to the sheet metal art the top of the opening into the trunk (not my car, I asked for a picture on the forum to consider mount solutions).

Sponsored
UNSAFE
Member
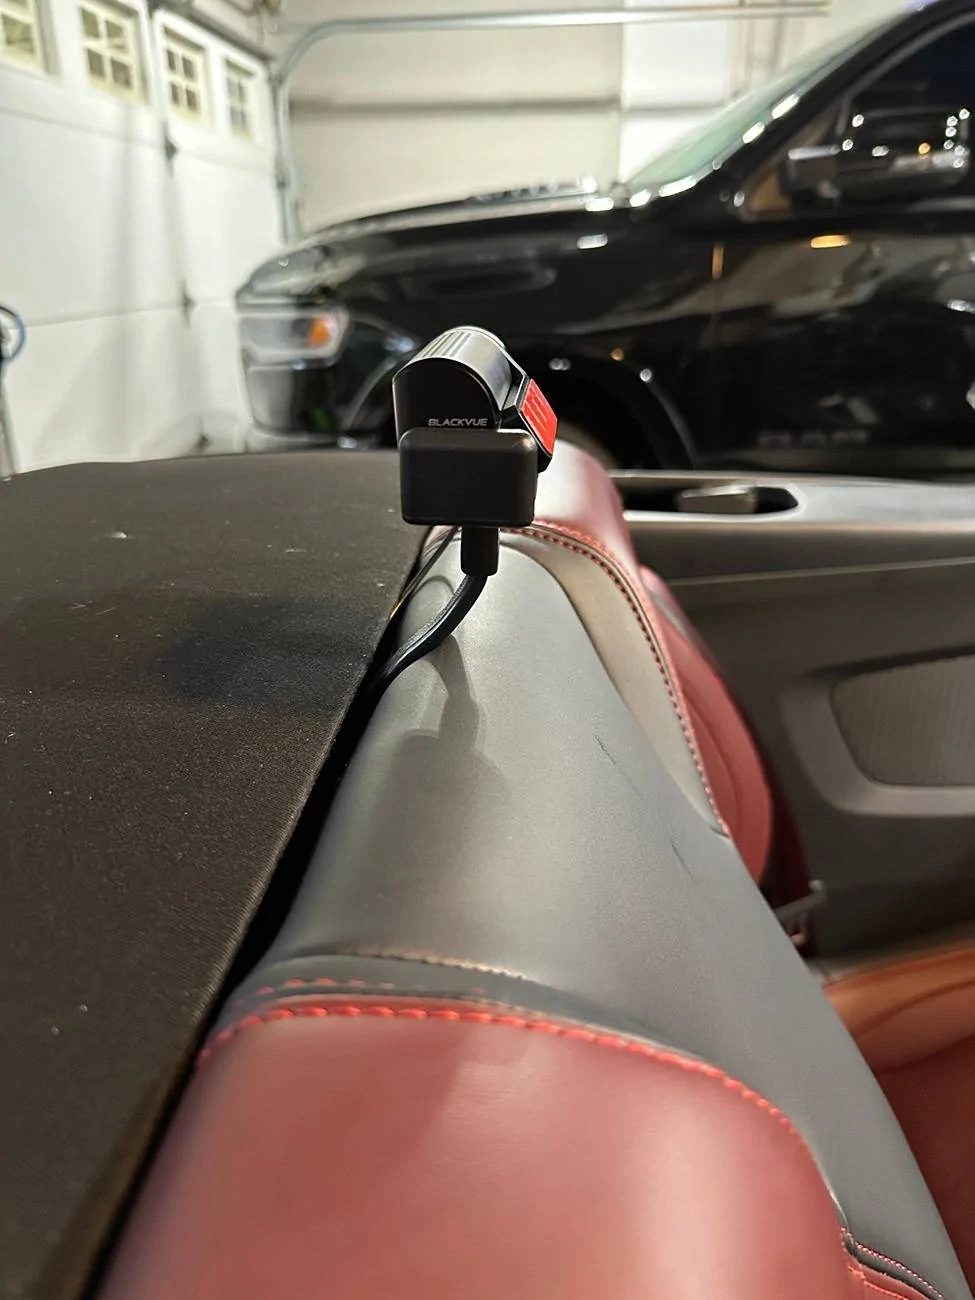
After recently taking in the ideas and advice shared on this thread and brainstorming possible ways to mount the rear camera in our convertible, I've come up with a solution that I've been working on the past few days. Let me know your thoughts.
Other than my time, tools , and a can of black semi-gloss spray paint I already had, the only two other things I bought were the Gooseneck Flexible Clamp Cell Phone Holder and pack of 2" Mending Bands.
Items I purchased:
My steps:
1. Power on the camera and install in the clamp/gooseneck holder.
2. Open the camera app to see the rear camera's view.
3. This next step requires being in the rear seat. Adjust the gooseneck holder accordingly to find the ideal position for the rear camera, both with the top up and down, as well as making sure the camera mount/position does not interfere with the top opening or closing. I then molded the gooseneck holder to follow the contour of the back of the rear seat.. What's great about this holder is that it is flat and can be molded and bent to practically any shape while also maintaining rigidity and the shape you make.
4. At this point I bent two of the mending bands into a flat C-shape to fit the flat gooseneck holder against the rear seat back. I then spray painted the mending bands.
5. With rear seat back laying on a table and with the back of it facing up, I put the gooseneck holder in position and secured it to the rear of the seat back with the mending band screws. I'll be painting the screw heads to blend in better.
A few additional thoughts. First, at this time the camera is held in place by the cell phone clamp, but my goal is to replace it with something more like a flat base that the camera could be affixed to with the double sided tape. I'm looking for something that will fit the gooseneck holder with the correct thread count. Second, I'll be securing the loose cable to the gooseneck holder with small zip ties. Finally, after a test run of a few miles, there is no camera shake, which makes me very happy!
Here are some photos of the project:


Last edited:
Johnnybee
Well-Known Member
@UNSAFE that is a great solution. For my Canadian friends, this is available on Amazon.ca here https://www.amazon.ca/Gooseneck-Flexible-Headboard-Overhead-Compatible/dp/B0D3CWY625
OP
OP
ORRadtech
Well-Known Member
- Joined
- Sep 12, 2019
- Threads
- 25
- Messages
- 4,089
- Reaction score
- 4,030
- Location
- Atlanta, Georgia
- First Name
- Dave
- Vehicle(s)
- 18 Mustang EcoBoost convertible, 14 Ford Fusion SE
- Thread starter
- #28
Nice. If I wasn't happy with what I made I might go that route. I know some people don't like the camera sticking up, and that's fine. But I believe that the extra couple of inches in height will give a better field of view and hopefully capture details it wouldn't if it were lower. Also, I just can't bring myself to tape something to the upholstery.After recently taking in the ideas and advice shared on this thread and brainstorming possible ways to mount the rear camera in our convertible, I've come up with a solution that I've been working on the past few days. Let me know your thoughts.
Other than my time, tools , and a can of black semi-gloss spray paint I already had, the only two other things I bought were the Gooseneck Flexible Clamp Cell Phone Holder and pack of 2" Mending Bands.
Items I purchased:
My steps:
1. Power on the camera and install in the clamp/gooseneck holder.
2. Open the camera app to see the rear camera's view.
3. This next step requires being in the rear seat. Adjust the gooseneck holder accordingly to find the ideal position for the rear camera, both with the top up and down, as well as making sure the camera mount/position does not interfere with the top opening or closing. I then molded the gooseneck holder to follow the contour of the back of the rear seat.. What's great about this holder is that it is flat and can be molded and bent to practically any shape while also maintaining rigidity and the shape you make.
4. At this point I bent two of the mending bands into a flat C-shape to fit the flat gooseneck holder against the rear seat back. I then spray painted the mending bands.
5. With rear seat back laying on a table and with the back of it facing up, I put the gooseneck holder in position and secured it to the rear of the seat back with the mending band screws. I'll be painting the screw heads to blend in better.
A few additional thoughts. First, at this time the camera is held in place by the cell phone clamp, but my goal is to replace it with something more like a flat base that the camera could be affixed to with the double sided tape. I'm looking for something that will fit the gooseneck holder with the correct thread count. Second, I'll be securing the loose cable to the gooseneck holder with small zip ties. Finally, after a test run of a few miles, there is no camera shake, which makes me very happy!
Here are some photos of the project:
I've driven mine a few days now and the camera being there is not too intrusive. In fact, once the "new" wore off I hardly notice it at all.
UNSAFE
Member
Thanks! Drove 20 miles this morning with no issues and the field of view is perfect.@UNSAFE that is a great solution. For my Canadian friends, this is available on Amazon.ca here https://www.amazon.ca/Gooseneck-Flexible-Headboard-Overhead-Compatible/dp/B0D3CWY625
UNSAFE
Member
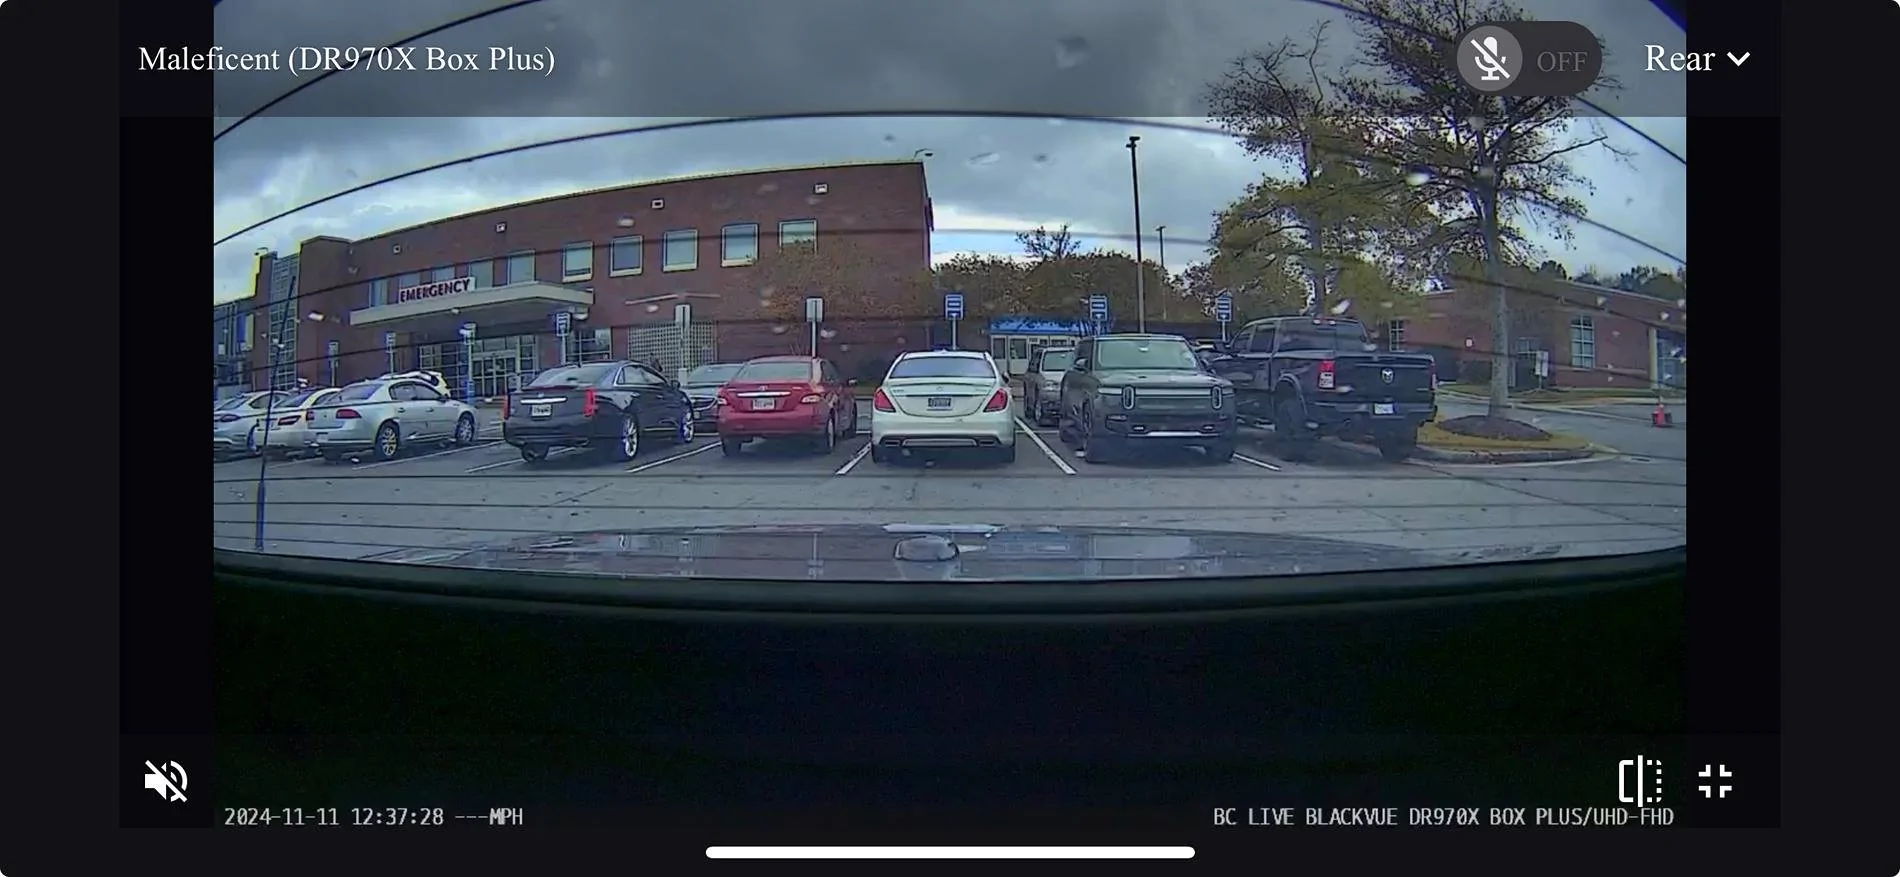
I agree about the camera needing to be raised a few inches to get a better field of view, especially with the top up. Here's a screenshot of the current field of view with the top closed.Nice. If I wasn't happy with what I made I might go that route. I know some people don't like the camera sticking up, and that's fine. But I believe that the extra couple of inches in height will give a better field of view and hopefully capture details it wouldn't if it were lower. Also, I just can't bring myself to tape something to the upholstery.
I've driven mine a few days now and the camera being there is not too intrusive. In fact, once the "new" wore off I hardly notice it at all.
Sponsored