Sponsored

Blowfish bracket adjustment question

dead_inside

Well-Known Member
Joined
Nov 22, 2019
Threads
14
Messages
474
Reaction score
1,285
Location
PNW
Vehicle(s)
16 GT Prem PP
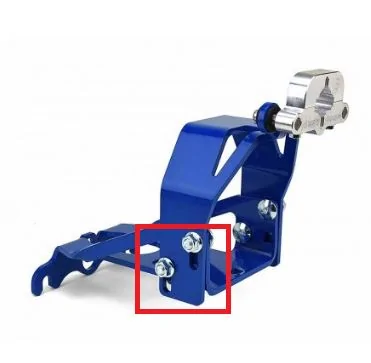
I have a question that all my lurking/searching on this forum and watching install vids has not been able to answer for me. I have the Blowfish Racing shifter bracket waiting for me to install it and where the upper and lower brackets are connected by the 4 carriage bolts there is play for up/down adjustment. Posts on this forum have people talking about their shifter being lower or higher after the install of the bracket. The install vids say to "Push up" on the bracket but dont indicate how much. I am curious how to identify what is the most neutral and close to stock setting to tighten down the bolts? Are they supposed to be in the position of the attached photo? Any and all info is appreciated!
Capture.webp
Sponsored


thelostotter

Well-Known Member
Joined
Sep 13, 2017
Threads
31
Messages
435
Reaction score
223
Location
AZ
Vehicle(s)
2017 GTPP
Great choice going with the Blowfish bracket, mine works great. Change out the fluid if you haven't yet, the BG Syncroshift II that people talk about here works great for me in daily driving and HPDE.

You can get an idea of where the shifter sits when you remove the bracket/rubber bushing that slips over the aft end of the shifter that mounts to the body. The BF bracket piece replaces it, but you can align it similarly as you tighten down the nuts you circled.
 
OP
OP
dead_inside

dead_inside

Well-Known Member
Joined
Nov 22, 2019
Threads
14
Messages
474
Reaction score
1,285
Location
PNW
Vehicle(s)
16 GT Prem PP
Great choice going with the Blowfish bracket, mine works great. Change out the fluid if you haven't yet, the BG Syncroshift II that people talk about here works great for me in daily driving and HPDE.

You can get an idea of where the shifter sits when you remove the bracket/rubber bushing that slips over the aft end of the shifter that mounts to the body. The BF bracket piece replaces it, but you can align it similarly as you tighten down the nuts you circled.
Thank you for the wisdom! I'm very excited to feel the improvement after the install. I don't have any severe complaints about the MT82 but could easily appreciate some improvement. I have read about the various fluids and the positive feedback from members on here. So, putting in some BG is one more recommendation I will follow. In your experience, was it the bracket or the fluid that had the most positive improvement with the "nibbling" in normal driving shifts? Thanks again for your time!
 

thelostotter

Well-Known Member
Joined
Sep 13, 2017
Threads
31
Messages
435
Reaction score
223
Location
AZ
Vehicle(s)
2017 GTPP
The fluid did more for the nibble/notchiness during typical driving than the bracket did. The bracket helped with high RPM lockout which I used to get frequently but it never occurs now. It gave a much more solid feeling to the shifter, it just feels better all the time.
 

Lime1GT

Well-Known Member
Joined
Nov 12, 2016
Threads
5
Messages
214
Reaction score
62
Location
Winnipeg, Mb. Ca.
First Name
Thomas
Vehicle(s)
2017 Mustang GT PP
If you want the shifter to be mounted same height as OEM; measure the shifter height from inside the car, in neutral, top of shift knob to top of console. Then have a friend verify height as you set the bracket adjustment from under the car. That's the way I would have done it if I'd had someone around when I was installing mine.
 

Sponsored

OP
OP
dead_inside

dead_inside

Well-Known Member
Joined
Nov 22, 2019
Threads
14
Messages
474
Reaction score
1,285
Location
PNW
Vehicle(s)
16 GT Prem PP
I appreciate you both sharing your experience and knowledge. Lime1GT, is there a measurement that can be taken from under the car to achieve the same result? The folks at Blowfish kindly offered me some guidance that said in the S550 there is a weather seal on the factory shifter that contacts the floor. All I need to do is push up until that seal makes contact with the floor and then tighten it down. From your experience, does that sound like an adequate way to assure proper alignment and fit?
 

Lime1GT

Well-Known Member
Joined
Nov 12, 2016
Threads
5
Messages
214
Reaction score
62
Location
Winnipeg, Mb. Ca.
First Name
Thomas
Vehicle(s)
2017 Mustang GT PP
A quote from another thread I answered. "Installed mine, no hoist. Biggest problem I had was the tunnel boot dropped along with the shifter as the rear shifter body mount was removed. It was hard to refit from under the car. I wedged the shifter so it wouldn't drop from it's own weight while installing the Blowfish bracket. One of the few mods I've done with really noticeable results. Made sure bracket was aligned, raised and clearanced as close to tunnel as possible so shifter was in original position and there wouldn't be tugging on the tunnel boot. OEM shifter is fine now although it could use a white shift knob for accent."

So I had done basically as Blowfish suggested. Just make sure the weather seal "boot" is still fastened to the floor after the install or engine heat and noise will get under your console. The boot has a double lip that must be positioned with one lip above the tunnel hole and the other below. If it falls down while installing the bracket it is very hard to reinstall from underneath with a screwdriver and pick as there is very little room to maneuver the tools.
 

Lime1GT

Well-Known Member
Joined
Nov 12, 2016
Threads
5
Messages
214
Reaction score
62
Location
Winnipeg, Mb. Ca.
First Name
Thomas
Vehicle(s)
2017 Mustang GT PP
You can see in the first picture I used a support with just light pressure under the trans just in case loosening the 3 mount bolts, it wouldn't let the trans drop or shift. 2nd pic you can see barely just to the right, part of the boot lip I was mentioning. I also smeared a bit of silicone grease into the pin grommet.
IMG_0953.webp
IMG_0949.JPG
 

Lime1GT

Well-Known Member
Joined
Nov 12, 2016
Threads
5
Messages
214
Reaction score
62
Location
Winnipeg, Mb. Ca.
First Name
Thomas
Vehicle(s)
2017 Mustang GT PP
Previously installed Steeda H-Pipe removed to help with Blowfish bracket install. Also installed Steeda full length, low profile jacking rails.
IMG_0962.webp
Sponsored


Top