Sponsored

nGauge Dashboard Heat/AC Vent Install

Vile_the_Bastage

of Clan Bastage
Joined
Nov 9, 2014
Threads
23
Messages
614
Reaction score
230
Location
Midwest
First Name
Internet Legend
Vehicle(s)
2015 Mustang GT Premium
**Edit: If you want to know how this thing functions, there is an ongoing thread that discusses its capabilities located here - http://www.mustang6g.com/forums/showthread.php?t=23467**

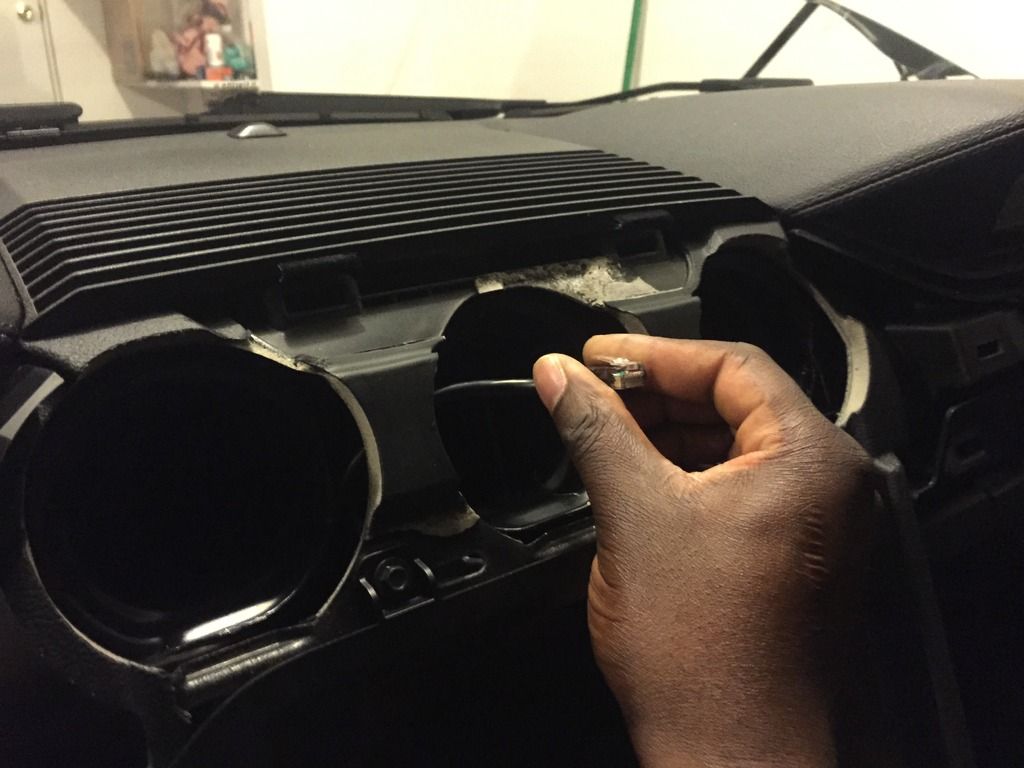
Alright, I got this thing installed the way I wanted, and I have to say it really wasn't that hard of a job. If you want to hide the OBDII wire really well, you are going to have to pull out the entire faux aluminum bezel all the way across the dashboard, to include the chrome speedometer/RPM bezel above the steering wheel. I routed my cable from the OBDII port up through all the plasics above it, and over the steering wheel. It terminates underneath the center AC vents.

The nGauge itself is wedged into the AC vent from the front with a couple rounds of black electrical tape (black rubber bands could possibly work as well), and then secured in the back with black silicone RTV. I tacked it on in a manner that I could easily peel it off and take the nGauge out (I should never really have to do this).

(Pictured below, I have already reinstalled the speedometer/RPM bezel above the steering wheel but if you look closely, you will notice that its only held on with two small 7mm bolts on the bottom, two more 7mm bolts on the far left, and plastic tabs around the top. Remember to remove the bottom plastics first and disconnect your headlight switch and you trunk latch switch)


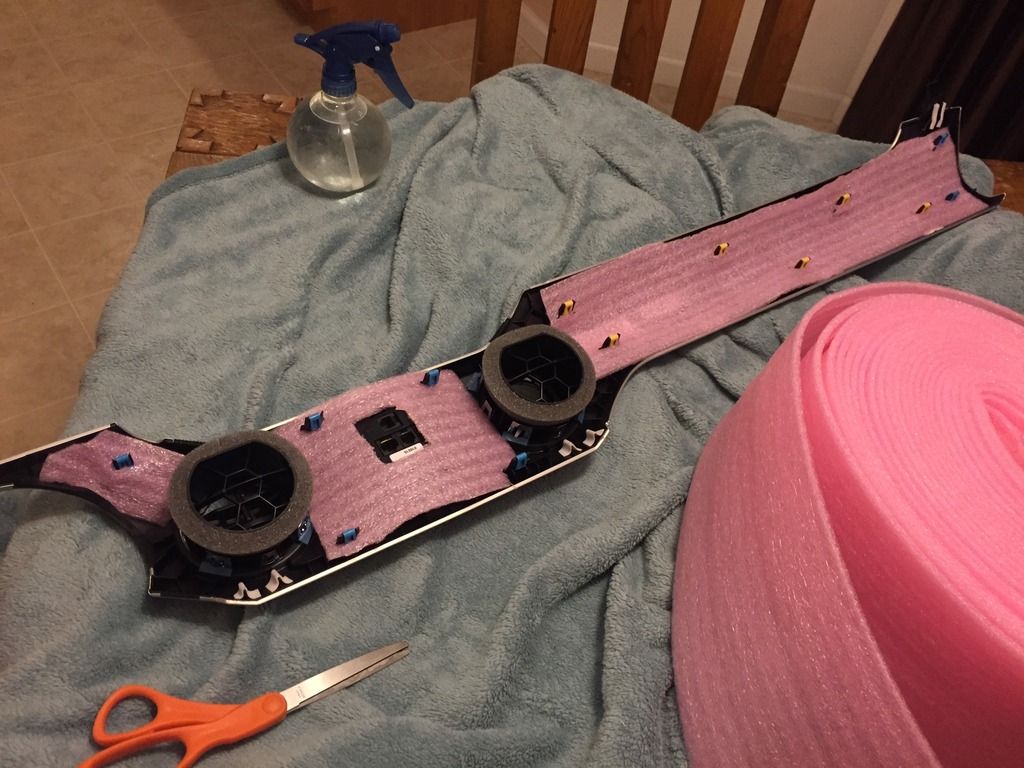
I also threw a bit of foam behind my passenger/center bezel piece because occasionally it rattled. Pretty snug now.


Here is everything put back, with the nGauge installed.


I had a bit of extra wire hanging around the OBDII clutch area. Don't forget to clean this up (zip tie it or tape it out of the way). Hope this is somewhat informative for any of you wanting to install this way.
Sponsored

 
Last edited:

ero 5.0

Well-Known Member
Joined
Feb 7, 2015
Threads
63
Messages
772
Reaction score
112
Location
Bay Area, CA
First Name
Eric
Vehicle(s)
2015 mustang gt 5.0
nicely done
 

2L8IWON

Well-Known Member
Joined
Oct 8, 2014
Threads
13
Messages
365
Reaction score
73
Location
Where I live
Vehicle(s)
Mustang
Awesome job!

What's the viewing angle like from there?
 
OP
OP
Vile_the_Bastage

Vile_the_Bastage

of Clan Bastage
Joined
Nov 9, 2014
Threads
23
Messages
614
Reaction score
230
Location
Midwest
First Name
Internet Legend
Vehicle(s)
2015 Mustang GT Premium
The viewing angle is no different then what you get looking at the MyFord Touch infotainment system. It's no 144 Hz 4K resolution Gsync gaming monitor, but it does what it's supposed to do and is clearly visible from both the driver and passenger seats.
 

Chameleon

Well-Known Member
Gold Sponsor
Joined
Feb 17, 2014
Threads
157
Messages
11,994
Reaction score
4,264
Location
S550 INTERIOR DRESS UP
Website
www.ebay.com
Vehicle(s)
03' Cobra, 05' GT, 13' GT, 15' GT
Nice work. For some reason I thought the nguage looked huge and would never fit that.
 

Sponsored

Todd15Fastback

Well-Known Member
Joined
Dec 10, 2013
Threads
80
Messages
10,523
Reaction score
3,883
Location
Atlanta, GA
First Name
Todd
Vehicle(s)
2015 Mustang GT PP Fastback
DAMN!! Nice job man. This should be a sticky for people.

Kudos to you:)
 

tevol1

Well-Known Member
Joined
Nov 15, 2014
Threads
8
Messages
76
Reaction score
8
Location
Missouri
Vehicle(s)
2015 GT
My question how are you gonna use the SD card slot? Isnt it on the side of the gauge?
 
OP
OP
Vile_the_Bastage

Vile_the_Bastage

of Clan Bastage
Joined
Nov 9, 2014
Threads
23
Messages
614
Reaction score
230
Location
Midwest
First Name
Internet Legend
Vehicle(s)
2015 Mustang GT Premium
My question how are you gonna use the SD card slot? Isnt it on the side of the gauge?
I mentioned this in the following video:

[ame]

Scrub to 2:16 and you will see why you don't ever need to pull the SD card. I added my Lund tune to the device with it sitting just where I have it.
 

tevol1

Well-Known Member
Joined
Nov 15, 2014
Threads
8
Messages
76
Reaction score
8
Location
Missouri
Vehicle(s)
2015 GT
So Much for me skipping the video Lol. Looks good man Thanks for taking the time to make the video.
 

Chameleon

Well-Known Member
Gold Sponsor
Joined
Feb 17, 2014
Threads
157
Messages
11,994
Reaction score
4,264
Location
S550 INTERIOR DRESS UP
Website
www.ebay.com
Vehicle(s)
03' Cobra, 05' GT, 13' GT, 15' GT
Vile of Clan Bastage - Meant to ask you, once you had the dash off is it easy to pop the bezels?
 

Sponsored
OP
OP
Vile_the_Bastage

Vile_the_Bastage

of Clan Bastage
Joined
Nov 9, 2014
Threads
23
Messages
614
Reaction score
230
Location
Midwest
First Name
Internet Legend
Vehicle(s)
2015 Mustang GT Premium
Vile of Clan Bastage - Meant to ask you, once you had the dash off is it easy to pop the bezels?
Oh, man taking off that faux aluminum bezel was too easy, you just have to make sure you take everything off in the right order. Starting with the passenger side, remove the lower section next to the door first because one of the clips goes through the main bezel that the AC vents are located in.

Once that bottom portion is off, starting from the passenger door you pull the bezel away from the dashboard, being careful not to break/drop the little clips.

The driver side does involve a few bolts that you need to keep track of because they are different lengths and have different threads. However, the heads are all 7mm, so one socket wrench, extension, and 7mm socket will take care of those as you expose them. Start with the bottom bezel next to the door, and it will expose 3 -4 bolts. Remove those, and then take the bezel and coin drawer out (unsnap the connector that is hooked to your trunk latch button). Remove the bolts exposed underneath that and then remove the small remaining faux aluminum bezel that has your headlight switch (disconnect this switch as well).

On the right side of the steering wheel there should only be one bolt holding the chrome/plastic bezel on that sits behind the wheel. The rest are all snaps. Removing the driver side bezels will allow you to easily hide the OBDII wire that you will run to the AC vents.

Reading this all back, it seems a bit complicated but it really was extremely easy. At no point did I feel like I was going to break something, or was in over my head....

Although I was drinking before I started....
 
OP
OP
Vile_the_Bastage

Vile_the_Bastage

of Clan Bastage
Joined
Nov 9, 2014
Threads
23
Messages
614
Reaction score
230
Location
Midwest
First Name
Internet Legend
Vehicle(s)
2015 Mustang GT Premium
So Much for me skipping the video Lol. Looks good man Thanks for taking the time to make the video.
No worries, man. I posted the video in the Engine Mods forum because it had more to do with how the gauge functioned. I just kind of copied and pasted how I did it on this thread.:D
 

MDRN

Well-Known Member
Joined
May 21, 2015
Threads
9
Messages
95
Reaction score
10
Location
Maryland
Vehicle(s)
N/A
Nice install. Very clean looking. Did you see any wiring or spots where the PP gauges could plug in while you had the trim off? Been thinking of switching my non PP panel to the PP one and haven't seen anyone pull that center trim off before. Once again looks great!
 
OP
OP
Vile_the_Bastage

Vile_the_Bastage

of Clan Bastage
Joined
Nov 9, 2014
Threads
23
Messages
614
Reaction score
230
Location
Midwest
First Name
Internet Legend
Vehicle(s)
2015 Mustang GT Premium
Not exactly sure how or where those gauges connect. If they are like aftermarket gauges, I'm guessing you would have to run them through the firewall to connect to the components that they will be monitoring. Didn't see any pre-run wires or connectors behind the bezel or underneath the dash... but I will admit that I wasn't really looking for that.

There is quite a bit a space for cable management though, so if it is like running aftermarket gauges, it should be pretty easy. While laying on my back I did notice several spots where one could run an analog boost gauge, a wideband, or any other device through the firewall and into the engine bay.


Top