Sponsored

2023 GT Premium - My Twin Turbo Build

OP
OP
AcceptableNebula

AcceptableNebula

Well-Known Member
Joined
Apr 5, 2023
Threads
19
Messages
335
Reaction score
927
Location
Massachusetts
First Name
Jake
Vehicle(s)
2023 Ford Mustang GT Premium
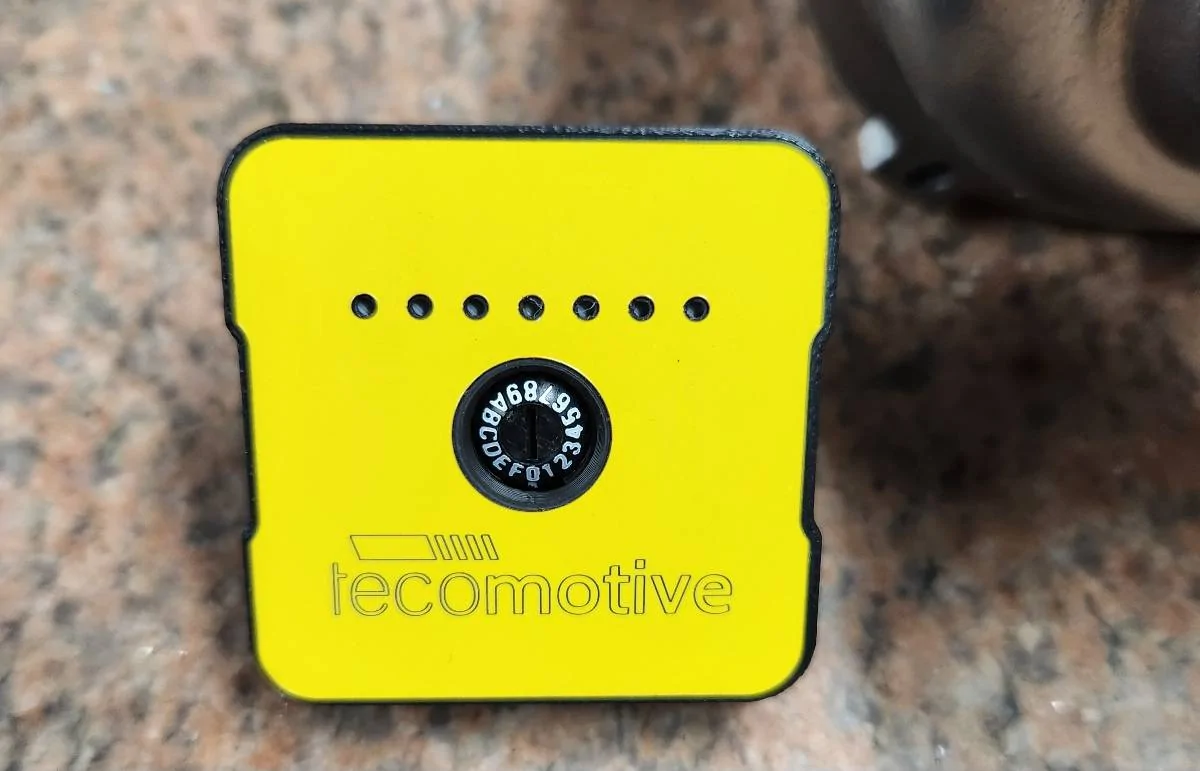
With the arrival of the Pierburg CWA400 electric water pump, I was able to start getting some of the new cooling setup going. While I'm not 100% sure I love this controller. It looks very simple, but packs a lot of programming features. Unfortunately, you program it like a gym locker combination lock. The factory programming seems to be exactly what I need without any changes. The dial sets the mode and temperature. Also allows you to crank the pump to 100% in a test mode.

The electric water pump setup will help me clear room for the dual charge pipes, and also help with cooling the motor down. Changing the pump differential location will allow me to send the coldest coolant to the turbos and return that coolant directly back to the radiator, instead of sending it mixed back to the motor. The ultimate goal is to be able to plug the Mustang into my dual alternator F350 in between runs and run the fans and water pump with the engine off.

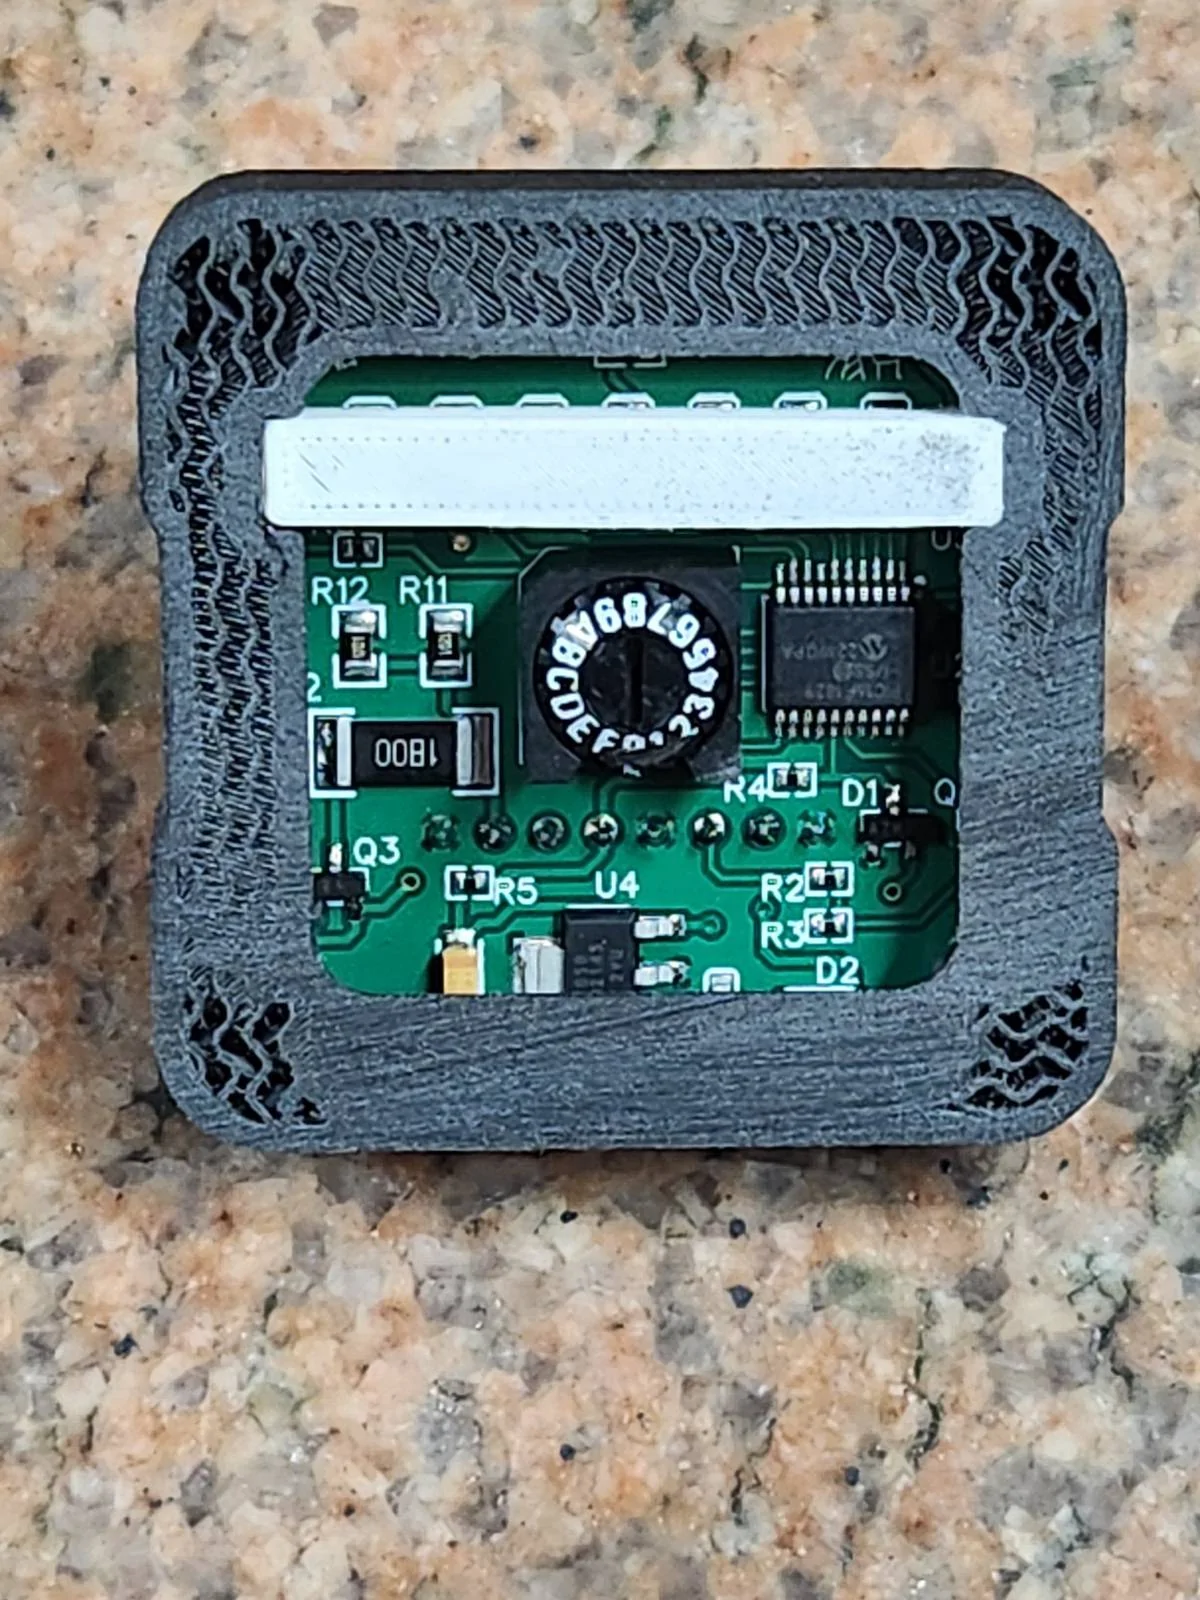
The little yellow square controller isn't gonna fly though. There's no need to see that information unless you want to know it. The car coolant temp will be the first indicator I would look at. So I decided to hide the controller out of sight. I removed the top layer of the controller case to facilitate integrating it into a car panel. Unfortunately, there are very few flat sections of visible panel in the Mustang. I literally assumed I'd have my choice of locations. The best I could come up with is in the top of the A pillar. Something I can see but won't be in the direct line of sight. I machined a little aluminum escutcheon for the drilled hole for the multifunction dial. The LEDs are 4mm apart so I put the 0.050" holes in to align with the LED. This plastic does not cut cleanly with end mills or drill bits. I secured the case to the A pillar cover with a urethane plastic cement. More to come as I start installing the harness.

20240424_141818.jpg


20240424_143903.webp


20240424_170250.webp


20240425_173015.jpg


20240425_224121.jpg
Sponsored

 
OP
OP
AcceptableNebula

AcceptableNebula

Well-Known Member
Joined
Apr 5, 2023
Threads
19
Messages
335
Reaction score
927
Location
Massachusetts
First Name
Jake
Vehicle(s)
2023 Ford Mustang GT Premium
Got to take the car to the track for some low boost shakedown passes. After shaking the rust off, it was good to finally not get rained out and get some runs in. Best run of the night at 9psi was 10.5@137 mph with a horrible 60' of 1.86. Car was short shifting at 6800 rpm. After diving thru the logs, even though I had the traction control off, the stability was keeping the shift table in Traction Control. The tune is now fixed so that can't happen again. Next time I will just pull the fun plug to make sure.


After getting a few transmission wrenches on the dyno, the line pressure is just about maxed out. Since I am still working out all the kinks, I'm praying the 10r80 will hold on for the rest of the year. Since we can get snow anytime in September/October that isn't a long time. I decided to get all the stuff in preparation for winter projects. I got the Suncoast Stage 2 rebuild kit, Suncoast SFI flexplate, and the Anodized shell from Ford. Having a 23 I possibly could have that shell but I don't know for sure.

20240818_200150.jpg


20240818_213527.jpg
 
Last edited:
OP
OP
AcceptableNebula

AcceptableNebula

Well-Known Member
Joined
Apr 5, 2023
Threads
19
Messages
335
Reaction score
927
Location
Massachusetts
First Name
Jake
Vehicle(s)
2023 Ford Mustang GT Premium
Well we went to Lebanon Valley Dragway on Friday the 13th. After turning the power up, it seems the transmission was not impressed. Even reducing the torque management kept me at a best ignition timing of 9 degrees, when I'm supposed to be at 18. The nights best performance was a 10.8 @ 134 mph. At least we got a few good pictures from the evening.

signal-2024-09-14-19-43-15-855.jpg


signal-2024-09-14-21-24-24-717.jpg
 
Last edited:
OP
OP
AcceptableNebula

AcceptableNebula

Well-Known Member
Joined
Apr 5, 2023
Threads
19
Messages
335
Reaction score
927
Location
Massachusetts
First Name
Jake
Vehicle(s)
2023 Ford Mustang GT Premium
Well with winter underway, it's time to button up some of these projects I've been meaning to get done.

Last year I bought the RMS R8 roll bar and shot it in urethane Rapid Red. I wasn't overly excited to add 52 lbs to the car so I held off installing it until I was going fast enough to feel like I could use a little extra safety.

While the general consensus is that the center beam is hardened in the Mustang, that didn't make a lot of sense. Starting off with fresh drill bits helps immensely, however, I did find the sections people are struggling with. These sections are work hardened during assembly. Two of the holes cut easily, however, the other two were difficult because the hardening is not complete in the section. Even carbide drills were chipping from the constant change from hard and soft sections. I found starting small and working up to a size large enough to use a carbide burr on. That makes short work of the hardened sections.

I also hate the bolt designs these kits come with. Both RPM and RMS bars Ive had in various cars end up with this. Crooked holes on angles make the bolts stress on the edge of the head. So I measured the angle and machined some angled washers to help with the fit.

20241024_200857.jpg


20241025_165351.webp
 

Sponsored

OP
OP
AcceptableNebula

AcceptableNebula

Well-Known Member
Joined
Apr 5, 2023
Threads
19
Messages
335
Reaction score
927
Location
Massachusetts
First Name
Jake
Vehicle(s)
2023 Ford Mustang GT Premium
Another project that was put on the back burner was the GT350 front suspension. While I had plans to make a setup that would allow me to run the 30 lb, 15.5", GT350 front rotors and then run the Girodisc PP, 23 lb, 15" rotor. That required making custom offset hats as the PP and GT350 rotors are about 7mm off from each other.

So I setup both rotors on the surface plate so I could get some legitimate measurements and design a custom hat. In the middle of that, I had a thought. This is a lot of work for 7lbs per side, and changing rotors back and forth didn't seem like a lot of fun. Plus, even just washing the car starts the inevitable rotor rust. So I looked into Carbon Ceramic rotors. I was shocked to learn no Mustang came with them. Some rotor kits are available for the GT350 to the tune of $13k.

So I decided to make my own setup. After doing a lot of checking car brake sizes that are equipped with carbon ceramic rotors, I found 2 cars to that fit my plan.

After extensive measuring, and borrowing *cough cough* some design inspiration from one of the existing kits on the market, I designed my own hat. The offset is almost double from the McLaren brake rotor hat, so I thought having a chamfer design was definitely the best out there.

I machined a double slug out of 7075 T6 aluminum. Both insides and the center bores done in one piece. 7075 T6 is slightly less rigid than 6061, but nearly double the tensile strength. Plus 7075 also flexes slightly more before fracturing. One split I could machine the outer faces, then put in the bolt pattern and clip pockets/slots. Sounds easy in a sentence but there is a ton of setup to insure runout does not exceed 0.0005" on the tip.

The test fit was a success so I will disassemble and Cerakote the hats in Titanium color to stick with the Rapid Red/Dark Gray color theme.

The weight savings per front rotor is over 14 lbs. The rear set will be around 11 lbs per rotor in savings, but I haven't made those hats yet.

signal-2024-12-05-21-11-36-434.jpg


signal-2024-12-05-21-11-36-434-1.jpg


20241209_120521.jpg


20250117_151830.jpg


20250115_133750.jpg


20250117_152708.jpg


20250117_152716.jpg


20241226_070713.webp
 
Last edited:
OP
OP
AcceptableNebula

AcceptableNebula

Well-Known Member
Joined
Apr 5, 2023
Threads
19
Messages
335
Reaction score
927
Location
Massachusetts
First Name
Jake
Vehicle(s)
2023 Ford Mustang GT Premium
I finished one of the rear hats thanks to MLK's day off from work. I ended up pivoting the design. I like the diagonal supports but only 1 low production person does the hats that way. Meanwhile Brembo and RacingBrake do not do it. Kinda feel like I should just do what the big players do.

I removed the diagonal support and stepped it down. There are good sized radius transitions to avoid any potential stress risers. I also added 5 8mmx1.25 holes in the event the hat ever got stuck to the hub. Can't exactly hit the rotor with a hammer...

Also added air vents to the front rotor design. They were on the front Brembo hats but not on the rear, so I left them out of the rear hats.

The rear hat on the right is about half an inch larger in diameter. I can't test fit it til tomorrow when my Dark Horse rear knuckles get delivered. I am converting the rear of my 23 to the 24 Brembo setup. The brake rotors are 14" instead of GT350 15" and avoids the 12mm wheel offset gain you get from the GT350 ebrake in the drum. I will just have to adapt a small ebrake cable caliper to the knuckle using the already provided mounting points. The 24DH has an electric caliper, so I have no interest in that. I would like to be able to pull the handle in the event I ever have a hydraulic brake failure.

There is a weight savings in the rear caliper changed even after adding a second caliper. However, the substantial weight savings comes from the rotor change.

I haven't weighed them assembled with the new hats yet, but that's coming soon.

20250121_193309.jpg


20250121_193330.jpg


20250104_063730.jpg


20250104_063655.jpg


20241219_135410.jpg


20241219_135241.jpg
 
OP
OP
AcceptableNebula

AcceptableNebula

Well-Known Member
Joined
Apr 5, 2023
Threads
19
Messages
335
Reaction score
927
Location
Massachusetts
First Name
Jake
Vehicle(s)
2023 Ford Mustang GT Premium
I assembled one of the rear rotors with a couple fasteners to double check everything. The caliper spacing was going to be an issue as these carbon ceramic rings are 5mm larger in diameter than the Dark Horse rear rotor. I did have to put a 0.100" washer on the caliper mount to pad it out to test fit. I need to check the clearance to the iron rotor first and get better measurements before setting that final amount of spacing. These rear calipers are also radial mount like the GT350 front calipers are, so spacing it out is easy. I will make a semi-permanent spacer and attach it to the knuckle. It technically clears but Brembo recommends 3mm of clearance iirc.

These calipers will get shot in Rapid Red like I did to the front calipers. I also have to find a parking brake caliper that will work. I'm hoping I don't need to add making calipers to my to-do list.

20250123_182739.jpg


20250123_182807.jpg
 
Last edited:
OP
OP
AcceptableNebula

AcceptableNebula

Well-Known Member
Joined
Apr 5, 2023
Threads
19
Messages
335
Reaction score
927
Location
Massachusetts
First Name
Jake
Vehicle(s)
2023 Ford Mustang GT Premium
Well I haven’t updated this in a couple months so I’ll try to recap the progress so far.

The rotor hats are complete and installed on the rings. I ended up Cerakoting them in a Titanium color. That just required texturing them with 80 grit Aluminum Oxide and then cleaning them in Acetone.

The coating is very resilient to chemicals and abrasion so it should stand up well.

20250219_162530.webp


20250223_201051.jpg


20250223_201108.jpg
 

WD Pro

Well-Known Member
Joined
Jan 18, 2018
Threads
132
Messages
6,769
Reaction score
13,554
Location
United Kingdom
Vehicle(s)
Lime GT
Vehicle Showcase
1
I’m interested in the comment on the 24 and the short vertical links (from your picture) - any pics of those fitted ? :like:

Might not be your cup of tea, but I put silicon caps on my 12.9’s (after coating them with waxoyl :

1742755577769-f6.webp


WD :like:
 

Sponsored
OP
OP
AcceptableNebula

AcceptableNebula

Well-Known Member
Joined
Apr 5, 2023
Threads
19
Messages
335
Reaction score
927
Location
Massachusetts
First Name
Jake
Vehicle(s)
2023 Ford Mustang GT Premium
Speaking of rust, while removing the Viking shocks from the car, I found the UPR upper shock mount bearing rusted in one spot. I could not get the bearing to free up. Must’ve been the few car washes it got last year from about 220 miles.

The design captures water if it is sprayed up. Considering when I come back from the strip, things are covered in rubber and brake dust, spraying water into the wheel wells is a necessity.

Fortunately, I was able to source 303 stainless steel bearings to fit in the bore. It won’t stop the water from sitting there, but I’ll look to blow the water out after scrubbing down the car, along with the corrosion resistant properties of 303.

20250321_104116.jpeg
 
Last edited:
OP
OP
AcceptableNebula

AcceptableNebula

Well-Known Member
Joined
Apr 5, 2023
Threads
19
Messages
335
Reaction score
927
Location
Massachusetts
First Name
Jake
Vehicle(s)
2023 Ford Mustang GT Premium
While the rear LCA was out of the car, I held the Cortex Racing bearing spacers and thought that would be a good part to recreate out of Titanium for a very small weight savings. Each weighs 89g or 1/5th of a pound. Making 4 our if Gr 23 Titanium basically equates to taking 1.5 of the stainless ones out of the car.


20250216_193055.jpg


20250216_194958.jpg


20250216_195008.jpg
 
Last edited:

NGOT8R

Well-Known Member
Joined
Jul 19, 2020
Threads
153
Messages
9,227
Reaction score
7,693
Location
Florida
First Name
Adrian
Vehicle(s)
2019 Bullitt
Great job as usual! I’ve been meaning to go back and look at this thread again to review some of the modifications that you made for your turbo install.
 
OP
OP
AcceptableNebula

AcceptableNebula

Well-Known Member
Joined
Apr 5, 2023
Threads
19
Messages
335
Reaction score
927
Location
Massachusetts
First Name
Jake
Vehicle(s)
2023 Ford Mustang GT Premium
The front GT350 conversion was a bit more involved than I had planned. The aluminum knuckle was the draw all along, and the other pieces were just necessary to have it. Radial mount front calipers ended being great since the rear Dark Horse calipers are also radial mount. Two years ago when I bought the front parts, converting the rear to DH wasn’t even a thought (nor did it exist).

Unfortunately, a lot of parts listings are incorrect for the GT350. All the numbers I had come up with actually didn’t fit the aluminum knuckle. I had to work with Quirk Parts in Boston for the numbers, and even their Ford system did not have part numbers available for the tension links. I had to look through part numbers and guess at the correct part based on description. Fortunately my guess was correct. Tie rod ends are specific as well even though a lot of listings show the MEF314 as correct but it’s not.

Since the front lower control arm for the GT350 has a bearing instead of a rubber bushing, the ginormous tension link bushing would be the only rubber bushing in the car. So I elected to ditch it for a Cortex spherical bearing. I won’t didn’t have time to make these front bearing spacers over in titanium but it’s hot on my list after I rebuild the transmission and get the car aligned.

The 15.5” rotors definitely fill the 20s a lot better than the GT 14” setup. I am not a fan of the one time use bolts, so I ordered a set of stainless caliper studs from OPMustang.com. Hopefully I can find a correct stud for the rear ones.

For those wondering why there is a steel rotor in the picture, this thing needs a serious alignment. I am going to leave the steel on until all the work is done. I don’t need an “oops my wrench slipped, and broke your rotor” story.

IMG_0066.jpeg


IMG_2025-03-23-215635.jpeg


IMG_0073.jpeg


IMG_2025-03-23-230828.jpeg
Sponsored

 
Last edited:


Top