Sponsored

Snow Performance Stage 3 DI Install Notes

OP
OP
Bull Run

Bull Run

Well-Known Member
Joined
Feb 24, 2017
Threads
64
Messages
983
Reaction score
632
Location
AZ
Vehicle(s)
2015 Mustang EB Prem PP
I tried fitting the tank in the position shown in the first picture, but it’s too tight and it fits too closely to the timing cover and belts. It seems to me that the only alternative is to fit both the tank and the pump in the trunk. My concern is that I will have to pull all those wires and lines all the way to the engine bay and I don’t see how I can do this, lol! I mean, I will have a professional do it but still...
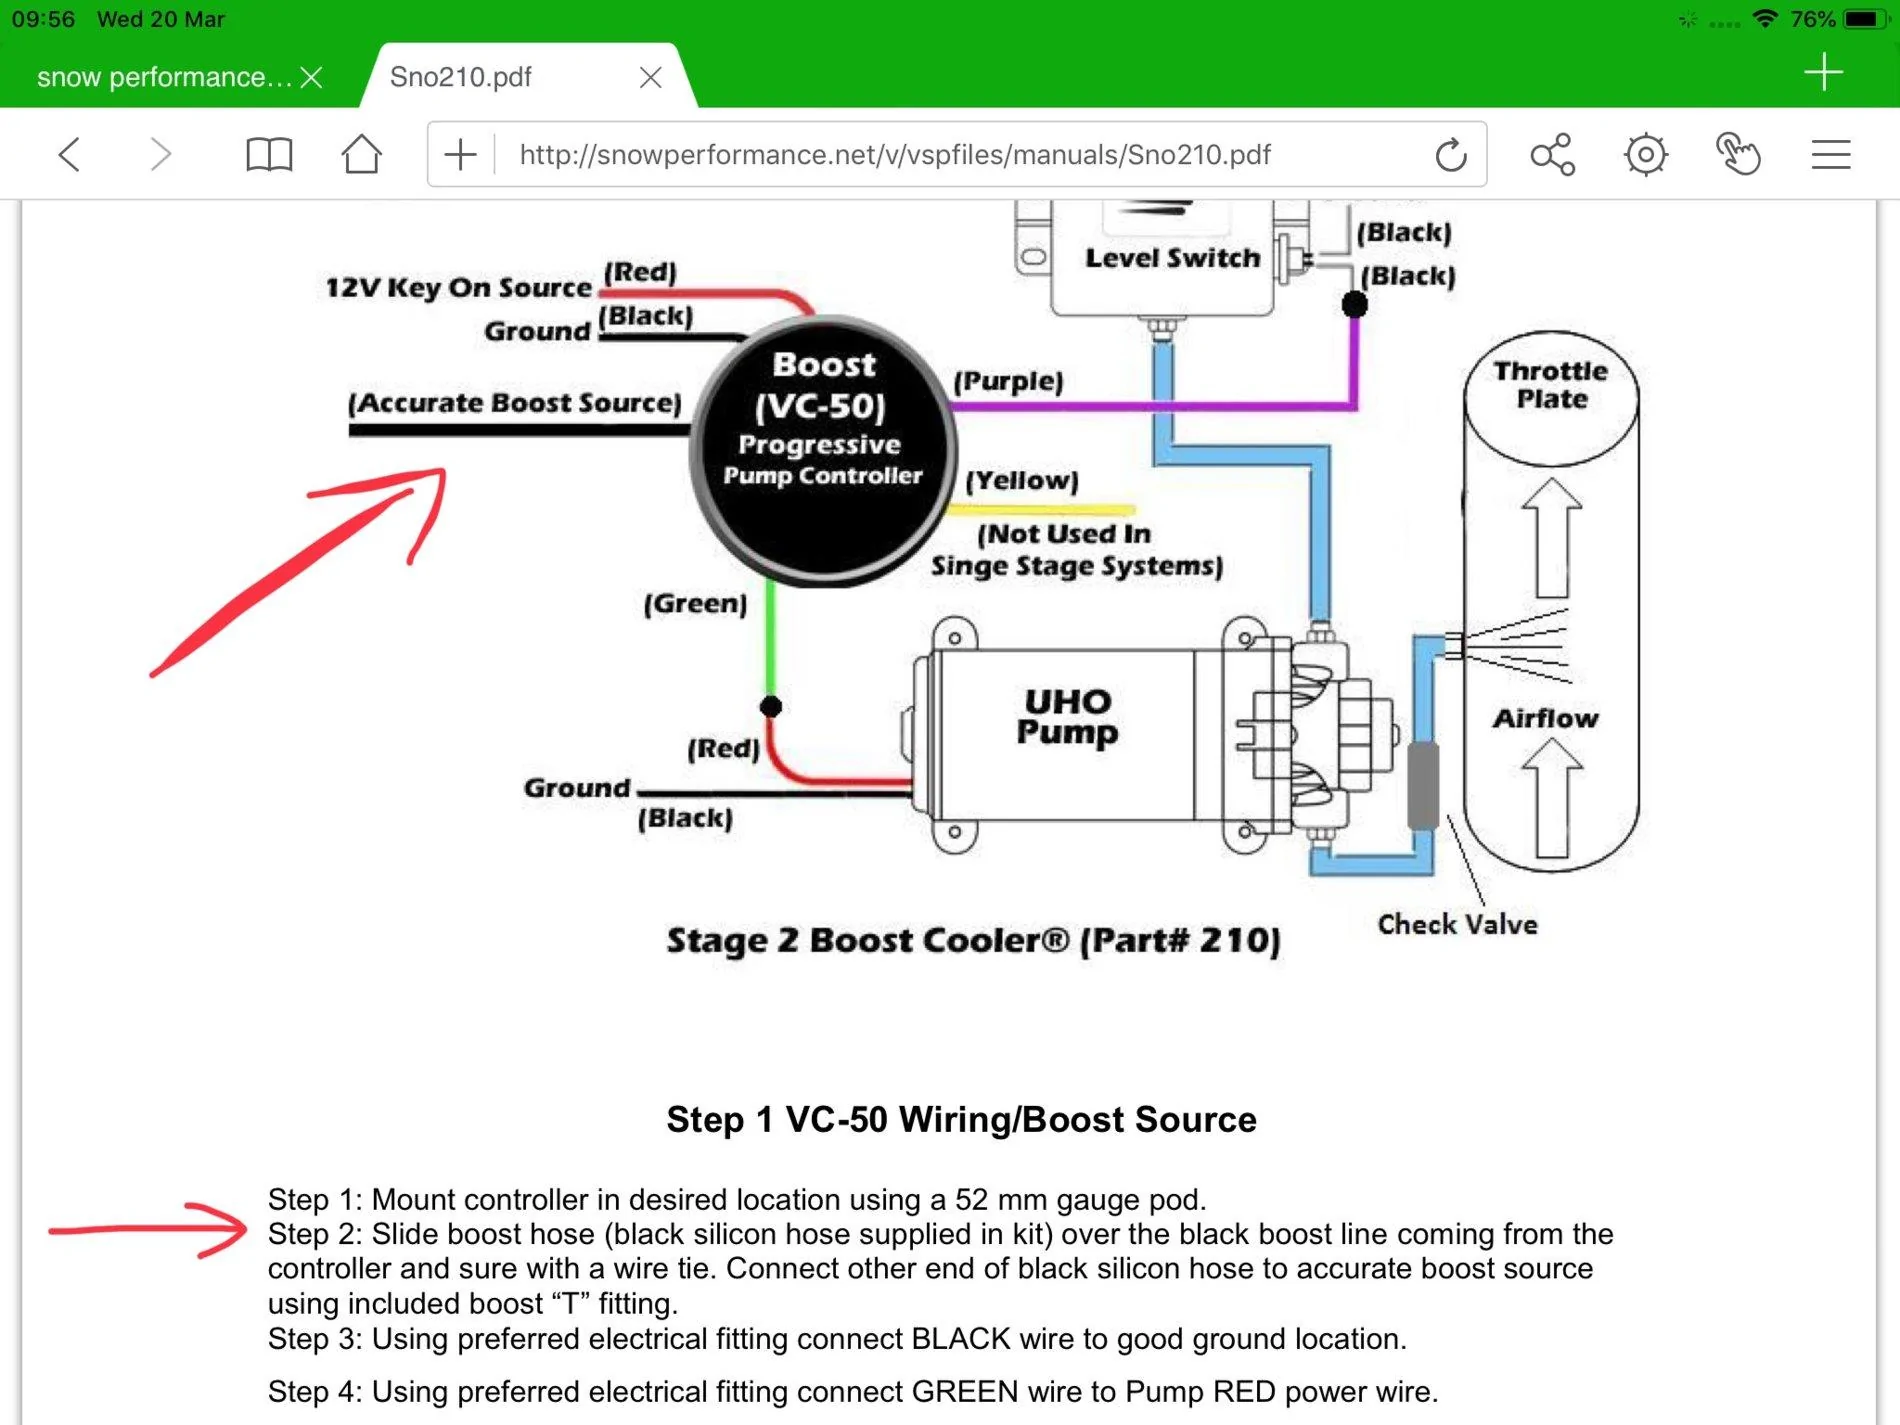
I routed the wires the same way Adam did in the video below in 15:22. I recommend not using the same grounding point he did as I had random issues until I used another point.

Sponsored


MakStang

Well-Known Member
Joined
Dec 11, 2016
Threads
15
Messages
1,678
Reaction score
265
Location
Greece
Website
www.cellentis.uk
First Name
Makis
Vehicle(s)
A 2017 miraculous little beast
I decided to install the tank and the pump in the engine bay, like Ron described above.

@ronemca @Bull Run what’s the “accurate boost source” described in step 2 in the instructions below (red arrows) where you connected the other end of the black silicon boost hose?

Also where did you connect the red wire of the controller? Did you tap into a switched fuse in the fuse box and if yes, which one?

324261C1-C7A8-45BB-A365-6E74EE21D919.jpeg
 
Last edited:

ronemca

Well-Known Member
Joined
Sep 7, 2016
Threads
38
Messages
499
Reaction score
77
Location
ON Cda
First Name
Ron
Vehicle(s)
2016 P/EB w PP
Snow provides a (B)oost (R)eference (A)dapter that gets instsalled in place of the factory vac fitting just behind the TB. That component provides three attachment ports for vac lines (one pre-plugged from the SP factory IIRC) It is ideal to connect your vac line to this.

It took me awhile to locate a switched source of under-hood power in the BJB, but I did find one. OTTOMY I don't recall the fuse number, but I'll send you a pic later.
 

MakStang

Well-Known Member
Joined
Dec 11, 2016
Threads
15
Messages
1,678
Reaction score
265
Location
Greece
Website
www.cellentis.uk
First Name
Makis
Vehicle(s)
A 2017 miraculous little beast
Snow provides a (B)oost (R)eference (A)dapter that gets instsalled in place of the factory vac fitting just behind the TB. That component provides three attachment ports for vac lines (one pre-plugged from the SP factory IIRC) It is ideal to connect your vac line to this.
So is it absolutely necessary to buy this Boost Reference Adapter (or a throttle body spacer) in order to get access to an "accurate boost source"? Isn't there any other place where I can connect the black silicon hose that comes from the controller?
 
Last edited:

ronemca

Well-Known Member
Joined
Sep 7, 2016
Threads
38
Messages
499
Reaction score
77
Location
ON Cda
First Name
Ron
Vehicle(s)
2016 P/EB w PP
I am not sufficiently knowledgeable in this specific area to answer that question. I’m sorry. But - fwiw - the BRA is super-simple to affix...and provides you with a spare vac source for future expansion. (Boost gauge & WGA for example)
 

Sponsored

MakStang

Well-Known Member
Joined
Dec 11, 2016
Threads
15
Messages
1,678
Reaction score
265
Location
Greece
Website
www.cellentis.uk
First Name
Makis
Vehicle(s)
A 2017 miraculous little beast
OP
OP
Bull Run

Bull Run

Well-Known Member
Joined
Feb 24, 2017
Threads
64
Messages
983
Reaction score
632
Location
AZ
Vehicle(s)
2015 Mustang EB Prem PP
I decided to install the tank and the pump in the engine bay, like Ron described above.

@ronemca @Bull Run what’s the “accurate boost source” described in step 2 in the instructions below (red arrows) where you connected the other end of the black silicon boost hose?

Also where did you connect the red wire of the controller? Did you tap into a switched fuse in the fuse box and if yes, which one?
The TUNE+ kit came with a TB spacer with two ports (which I kept). I used one of the ports for the boost reference source. The other port can be used for a nozzle if you're not spraying into the charge pipe.

TB spacer that came with the TUNE+ kit: https://www.full-race.com/store/eco...oboost-throttle-body-spacer-with-boost-ports/

They also have an adapter for the MAP sensor to add a boost reference source there. I'd gone this route had I known about it, but I already trimmed the charge pipe to accommodate the TB spacer.

https://www.stage3motorsports.com/T...smart-MAP-Sensor-Boost-Reference-Adapter.html
 

MakStang

Well-Known Member
Joined
Dec 11, 2016
Threads
15
Messages
1,678
Reaction score
265
Location
Greece
Website
www.cellentis.uk
First Name
Makis
Vehicle(s)
A 2017 miraculous little beast
@Bull Run thank you. I ended up buying the Torque Solution TB spacer from a friend of mine:

https://www.unleashedtuning.com/torque-solution-tb-spacer-2015-ford-mustang-ecoboost-black/

This one also has two ports, so I will use one of them for the boost reference source. I will not use the other port, as I am going to spray directly into the charge pipe.

The only thing that I am missing (it is not included in the TB spacer kit) is the barbed fitting that has to be fitted on the port that will be used for the boost reference source, where the rubber hose coming from the controller will be connected (in red circle below). Anyone knows where I can find one of those fittings?

20190323_003233.jpg
 

MakStang

Well-Known Member
Joined
Dec 11, 2016
Threads
15
Messages
1,678
Reaction score
265
Location
Greece
Website
www.cellentis.uk
First Name
Makis
Vehicle(s)
A 2017 miraculous little beast
OP
OP
Bull Run

Bull Run

Well-Known Member
Joined
Feb 24, 2017
Threads
64
Messages
983
Reaction score
632
Location
AZ
Vehicle(s)
2015 Mustang EB Prem PP
@Bull Run thank you. I ended up buying the Torque Solution TB spacer from a friend of mine:

https://www.unleashedtuning.com/torque-solution-tb-spacer-2015-ford-mustang-ecoboost-black/

This one also has two ports, so I will use one of them for the boost reference source. I will not use the other port, as I am going to spray directly into the charge pipe.

The only thing that I am missing (it is not included in the TB spacer kit) is the barbed fitting that has to be fitted on the port that will be used for the boost reference source, where the rubber hose coming from the controller will be connected (in red circle below). Anyone knows where I can find one of those fittings?

20190323_003233.jpg
I got the kit used and it only came with one flimsy plastic barbed fitting that I replace with a brass one that I got from a local auto parts store. I think the threading was 3/8" NTP, but take the vacuum hose and one of the nozzles with you to compare the barb size and threading.
 

Sponsored

5.0yote

AKA Bananana & 3.7Cyclone
Joined
Jul 18, 2015
Threads
29
Messages
619
Reaction score
148
Location
Mansfield, MA
Website
www.youtube.com
First Name
Don
Vehicle(s)
2016 Mustang Ecoboost Premium
Vehicle Showcase
1

ronemca

Well-Known Member
Joined
Sep 7, 2016
Threads
38
Messages
499
Reaction score
77
Location
ON Cda
First Name
Ron
Vehicle(s)
2016 P/EB w PP
Yes - I’m sorry - I made an error. The BRA to which I referred was indeed from TurboSmart, and came with my 10# WGA. Sorry for that mix-up! It’s a nice little device; easy to install and allows for future expansion (like...oh...a vac-driven WGA maybe!)
 
OP
OP
Bull Run

Bull Run

Well-Known Member
Joined
Feb 24, 2017
Threads
64
Messages
983
Reaction score
632
Location
AZ
Vehicle(s)
2015 Mustang EB Prem PP
Just a quick update on the install:

1. The pump's still fine being mounted on top of the underbody cover. One afterthought is that I should've used a pair of quick disconnect connections for the power wires going to the pump so I can easily disconnect the pump if I need to remove the cover. I left some slack in the wires so I'll cut them and install new connections the next time I need to remove the cover.

2. Rerouted passenger size brake ducting's still in place. I'll reroute the drive's side to match the next time I take the bumper cover off.

3. Zero leaks from the installed fitting on the windshield washer bottle.

4. Purposely ran the fluid low enough to trigger the failsafe on hard stops. The warning light still works and the boost control solenoid gets disabled as confirmed by a code being stored and boost being limited to ~17 psi.

5. The default setting injected too much too soon, so I backed off until I started to see a noticeable increase in the knock counts and negative ignition corrections as monitored on the Cobb. Decreased the injection start point a little bit to see how it'll do as the temperature's starting to warm up.
Sponsored


Top