Sponsored

Steeda Progressives - cannot get spring perch seated

mikes2017gt

Well-Known Member
Joined
Feb 21, 2017
Threads
64
Messages
999
Reaction score
343
Location
San Antonio, TX
Vehicle(s)
17 GT Prem M/T 3.55
I have been trying for three days get my Steeda Progressive Springs, Shocks and Camber Plates installed. It's gone from frustrating to ridiculous to embarrassing.

I followed all instructions to the letter, on the spring instructions here https://www.steeda.com/assets/images/documents/S550-Spring-Installation.pdf as well as for the shocks and camber plates.

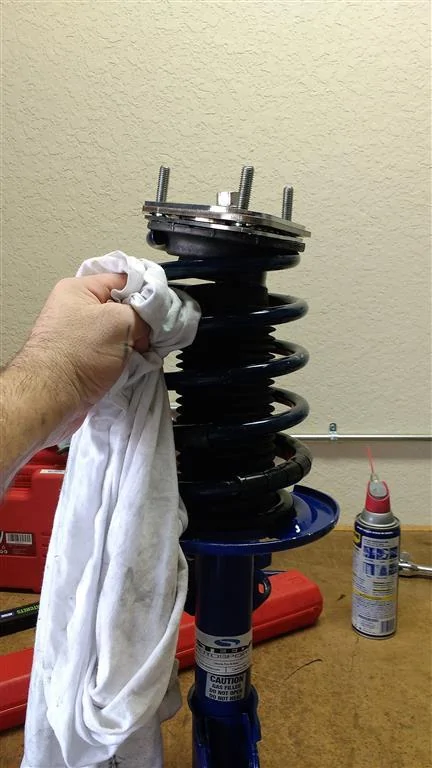
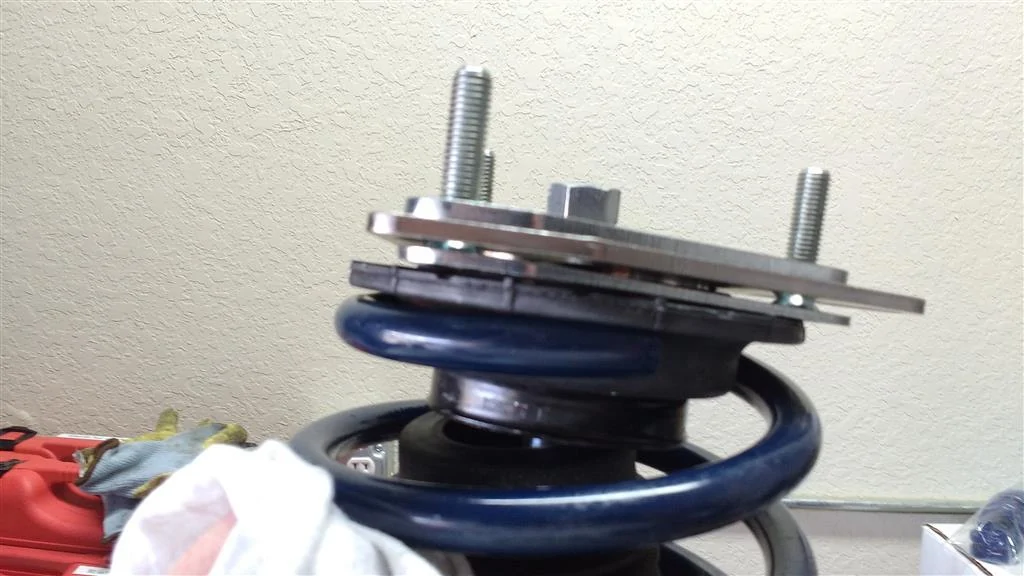
I got the first one in OK...took some fiddling but the camber plate/perch looked right so I installed it. The second one I'm about to lose my mind with. No matter how I flip the spring the perch will either not seat straight or won't go in at all. The other end of the spring is always seated correctly against the tang on the lower perch. I don't know what I'm doing wrong.

One end of the spring is large enough to accept the spring perch, but the coil is too tilted, resulting in the cockeyed result you see. The other end of the spring is too small to accept the perch, resulting in the pinched and not seated perch you also see.

I really need some help, please. :tsk:

I won't chance my Photobucket account not working so I'll just throw the pics in here. I have removed and flipped the spring half a dozen times at this point. It ALWAYS looks like these pictures, depending on how I flip it.
IMG_20170711_185103965 (Large).webp
IMG_20170711_185139936 (Large).webp
IMG_20170711_190242114 (Large).webp
IMG_20170711_185130674 (Large).webp
Sponsored


BmacIL

Enginerd
Joined
Sep 21, 2014
Threads
69
Messages
14,989
Reaction score
8,907
Location
Naperville, IL
Vehicle(s)
2015 Guard GT Base, M/T
Vehicle Showcase
1
You have to compress the spring more. Compress it enough to where the top mount bottoms on the shock shaft seat. When you release the spring it'll sort itself out.
 
OP
OP
mikes2017gt

mikes2017gt

Well-Known Member
Joined
Feb 21, 2017
Threads
64
Messages
999
Reaction score
343
Location
San Antonio, TX
Vehicle(s)
17 GT Prem M/T 3.55
You have to compress the spring more. Compress it enough to where the top mount bottoms on the shock shaft seat. When you release the spring it'll sort itself out.
You mean where the shock shaft enters the shock body? Is that even possible to compress it that far? Also, which end of the spring is supposed to go against the upper perch? I'd imagine the end that perch actually fits in, but I don't know up from down at this point. I even burnt out one spring compressor (thread stripped) and had to buy another. That's how many times I've done the in/out cycle for both springs. :tsk:
 

BmacIL

Enginerd
Joined
Sep 21, 2014
Threads
69
Messages
14,989
Reaction score
8,907
Location
Naperville, IL
Vehicle(s)
2015 Guard GT Base, M/T
Vehicle Showcase
1
You mean where the shock shaft enters the shock body? Is that even possible to compress it that far? Also, which end of the spring is supposed to go against the upper perch? I'd imagine the end that perch actually fits in, but I don't know up from down at this point. I even burnt out one spring compressor (thread stripped) and had to buy another. That's how many times I've done the in/out cycle for both springs. :tsk:
No, the portion of the shock shaft where the threads end. The top mount should sit firmly on that and you should compress the spring enough so it can.
 
OP
OP
mikes2017gt

mikes2017gt

Well-Known Member
Joined
Feb 21, 2017
Threads
64
Messages
999
Reaction score
343
Location
San Antonio, TX
Vehicle(s)
17 GT Prem M/T 3.55
Yup, did that. I have the nut fully seated onto the threaded portion of the rod and torqued to spec. Still have the results you see. Getting the perch on is not the problem. It's getting the perch to seat level in the spring.

Oh wait...you mean get the top of the top mount past the threaded portion? Didn't go that far...
 

Sponsored

BmacIL

Enginerd
Joined
Sep 21, 2014
Threads
69
Messages
14,989
Reaction score
8,907
Location
Naperville, IL
Vehicle(s)
2015 Guard GT Base, M/T
Vehicle Showcase
1
Yup, did that. I have the nut fully seated onto the threaded portion of the rod and torqued to spec. Still have the results you see. Getting the perch on is not the problem. It's getting the perch to seat level in the spring.

Oh wait...you mean get the top of the top mount past the threaded portion? Didn't go that far...
No definitely not that. The Camber plate bottom should be sitting on the lip of the shock shaft where the threads end.
 

Dragster

Well-Known Member
Joined
Nov 11, 2014
Threads
132
Messages
868
Reaction score
287
Location
USA
Vehicle(s)
2015 GT PP
I had the Steeda Ultralite linears and they had the same problem. There was a pretty long thread about them, and it was apparently pretty common. Steeda's response was that it was okay, and at least for the Ultralites, that's what it was supposed to look like. I wasn't satisfied with that (or with the drop), so I sold them and went with Eibach Sportlines.
 

BmacIL

Enginerd
Joined
Sep 21, 2014
Threads
69
Messages
14,989
Reaction score
8,907
Location
Naperville, IL
Vehicle(s)
2015 Guard GT Base, M/T
Vehicle Showcase
1
I had the Steeda Ultralite linears and they had the same problem. There was a pretty long thread about them, and it was apparently pretty common. Steeda's response was that it was okay, and at least for the Ultralites, that's what it was supposed to look like. I wasn't satisfied with that (or with the drop), so I sold them and went with Eibach Sportlines.
Yeah except clearly in this case, the camber plate is not sitting flush with the shoulder on the strut shaft.
 

wildcatgoal

@sirboom_photography
Joined
Feb 8, 2016
Threads
76
Messages
6,589
Reaction score
2,512
Location
USA
Vehicle(s)
TBD
Spring should be compressed to install camber plate and initially secure top nut. Use a small impact to drive nut down when spring is compressed - just until it locks. Then slowly release the spring. Then install the strut/spring assembly onto the car torquing all assembly bolts to spec and ensuring you've cleaned the threads of all re-used bolts and re-applied loctite where appropriate. Torque top not to spec with vehicle on the ground (which is what I do, or if I don't have an appropriate socket to hold the strut shaft still while torquing, I use my larger Makita impact and zap it real quick three times which with battery impact gets it on spec every time so far). When vehicle is on the ground the spring will fully seat on the top seat bearing. Ensure you can rotate the camber plate assembly around in a circle relatively easily before installing into the car to ensure that there is no unexpected binding of the top seat bearing (not common). Once you've completed the installation, have someone turn the wheels left and right slowly while you watch on both sides the strut assembly articulate to ensure there is no binding, popping, bonging, or any other indications of an improper installation before driving.

This helps understand what's happening: [ame]

Steeda Progressive springs should be oriented as shown in this photo.

Great spring choice!
Capture.webp
 

BmacIL

Enginerd
Joined
Sep 21, 2014
Threads
69
Messages
14,989
Reaction score
8,907
Location
Naperville, IL
Vehicle(s)
2015 Guard GT Base, M/T
Vehicle Showcase
1
Yeah flip the spring around. It needs to accept the perch. Compress the spring enough and then the camber plate should bolt flush to the shoulder on the shaft.
 

Sponsored
OP
OP
mikes2017gt

mikes2017gt

Well-Known Member
Joined
Feb 21, 2017
Threads
64
Messages
999
Reaction score
343
Location
San Antonio, TX
Vehicle(s)
17 GT Prem M/T 3.55
[MENTION=21494]wildcatgoal[/MENTION]: Thank you for the reply. If I told you I watched that very CJPP video 20 times would you believe me? See how as he uncompresses the spring, it comes straight up, evenly surrounding the spring perch? Depending on the end of the spring, the top coil is either:

Too "tilted" on one end to fit evenly around 75% or more of the perch and tilts the whole assembly as tension is released or
Too small in diameter and the perch doesn't even fit inside. I could try compressing the spring even more, though TBH, I think I went about as far as Bill in the CJPP video.

So, in my pics, the ones with the tilted perch, THAT end of the spring is the larger end. Is that the end I should use? If everything will seat correctly once the suspension is loaded, why don't Steeda or CJPP mention this? Did I get a bum set of springs?
 

wildcatgoal

@sirboom_photography
Joined
Feb 8, 2016
Threads
76
Messages
6,589
Reaction score
2,512
Location
USA
Vehicle(s)
TBD
[MENTION=21494]wildcatgoal[/MENTION]: Thank you for the reply. If I told you I watched that very CJPP video 20 times would you believe me? See how as he uncompresses the spring, it comes straight up, evenly surrounding the spring perch? Depending on the end of the spring, the top coil is either:

Too "tilted" on one end to fit evenly around 75% or more of the perch and tilts the whole assembly as tension is released or
Too small in diameter and the perch doesn't even fit inside. I could try compressing the spring even more, though TBH, I think I went about as far as Bill in the CJPP video.
I THINK you need to flip the spring over. I know it should be easy for me to tell in a photo, but... its not. EDIT: yes I can tell, the rubber isolator part of the spring should be on top. Ignore any Steeda or part number print on the spring. Steeda springs often have the logo printed in the spring coil upsidedown. Why I don't know. Make sure you have it right for the other spring, too. And the rear springs.
It is extremely important to get the rear springs right with these cars - people get goofy noises installing springs upsidedown all the time.


[MENTION=25806]SteedaTech[/MENTION] will be in here at least by tomorrow to round out the advice here. I've contacted them via PM to check this thread out on your behalf. Can always just PM that account and get personal help.

Hang in there... you should have seen my first attempt at doing this. :frusty:

Also, the spring in the video I showed you is a different spring - it's a linear spring, not your progressives. I can't find a video for Progressives.
 
OP
OP
mikes2017gt

mikes2017gt

Well-Known Member
Joined
Feb 21, 2017
Threads
64
Messages
999
Reaction score
343
Location
San Antonio, TX
Vehicle(s)
17 GT Prem M/T 3.55
Thanks, wildcatgoal. To confuse matters (sorry!) I moved the rubber isolator around while assembling/disassembling the assembly Don't really remember which way it came from the factory, but I know for SURE that one end of the spring, the inner diameter of the opening is a lot larger than the other.

Thanks for all the help, everyone! Steeda, if you're out there, I could really use your help too!

ps
Marketing tip for Steeda; offer the front spring/strut assembly assembled for a reasonable price and you'll double your sales. This part of the install is incredibly difficult IMO.
 

wildcatgoal

@sirboom_photography
Joined
Feb 8, 2016
Threads
76
Messages
6,589
Reaction score
2,512
Location
USA
Vehicle(s)
TBD
I believe the smaller diameter should be on top along with the rubber isolator.
 
OP
OP
mikes2017gt

mikes2017gt

Well-Known Member
Joined
Feb 21, 2017
Threads
64
Messages
999
Reaction score
343
Location
San Antonio, TX
Vehicle(s)
17 GT Prem M/T 3.55
I believe the smaller diameter should be on top along with the rubber isolator.
Hmm. When I tried that, this is what I wound up with. The other side of the perch you can't see in the pic is seated. No way this will fit too. And not for nothing, but if there IS a TOP and a BOTTOM of something, why isn't it CLEARLY marked? Call me OCD but to me this is just plain common sense. Shipping crates are marked "This end up" and "UP" with an arrow for example.

I thought I'd have 500 miles on my already lowered and "Steeda'd Out" Mustang by now. Instead I'm still on Step 1. Well, at least I got the rust off the backs of the wheels with a wire brush already, so there's that little bit in the "Done" column. :roll:
IMG_20170711_190242114 (Large).webp
Sponsored


Top