HGFireHazard
Mustang Enthusiast
- Thread starter
- #1
Well that was an endeavor on jack stands! In the end though I'm super thrilled with everything. It sounds so good, and with the JLT added and tune too all I can say is wow! A huge thanks to Terry (Beefcake) for the great pricing, service, and speed of shipment. Everything was just absolutely perfect. It took me working off and on over 2 days. I probably spent about 12 hours total, but I never really am in a hurry wrenching. Also doing it once I'm sure I could cut at least a few hours off. Now, some tips!
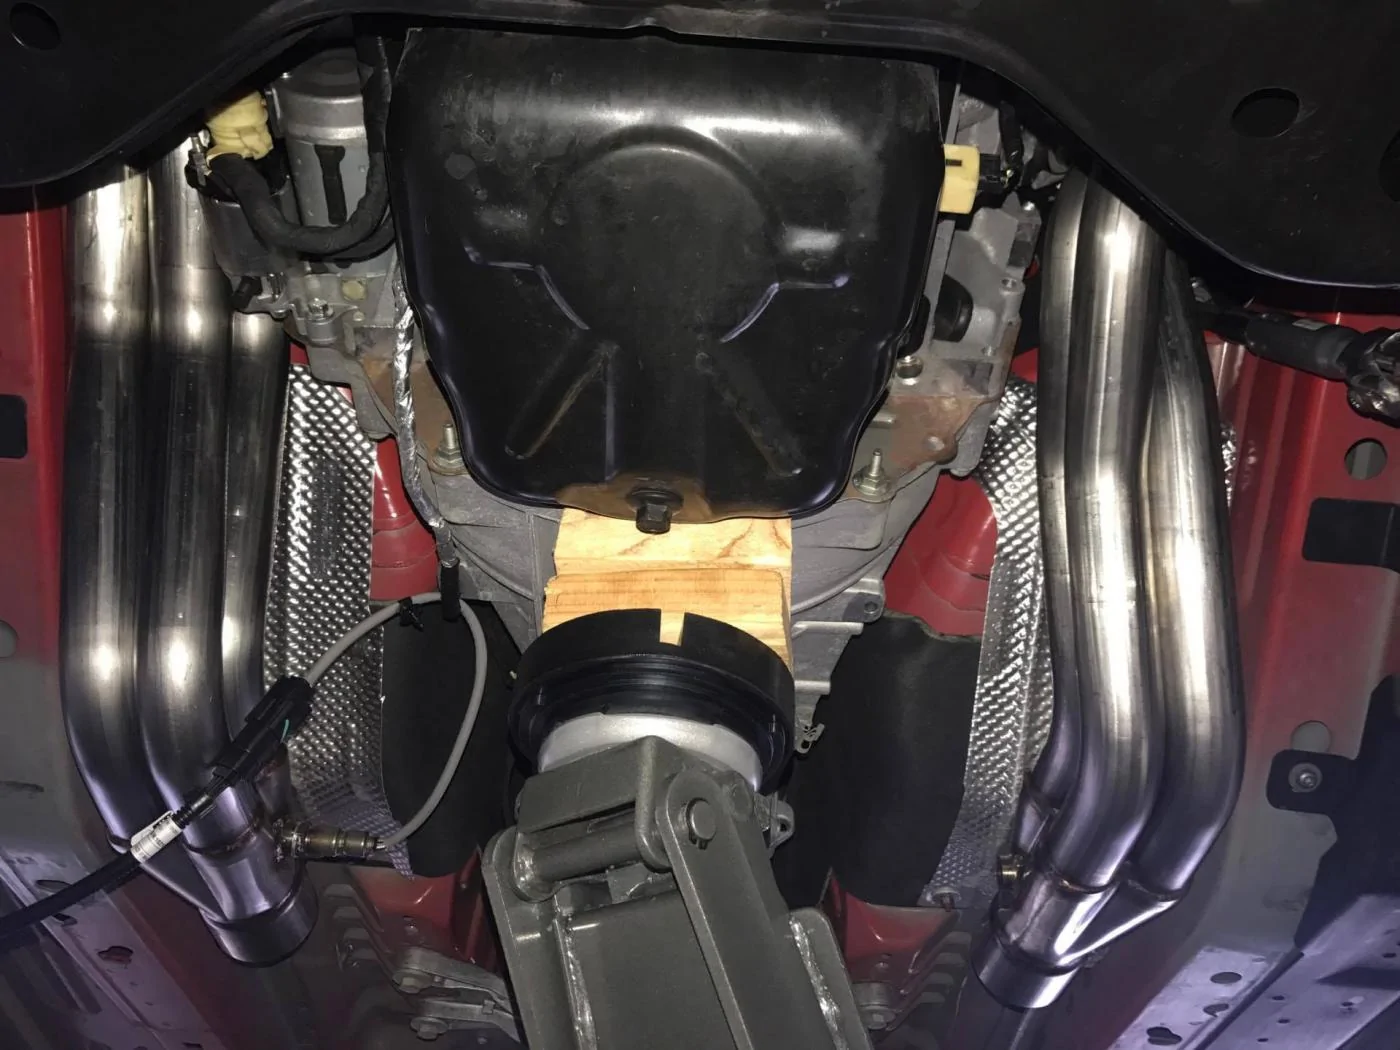
1: Remove the battery cover, battery, and battery box to have better access to the top of the passenger side header. This was huge for getting the top rear nuts/studs quite easily. You have to take off a few push fasteners on the cowl, the battery hold down, 3 bolts that hold the box in, then somewhere around 10 more bolts to get the shield out. Almost all of these were accessible with an extension and impact so it went quick.
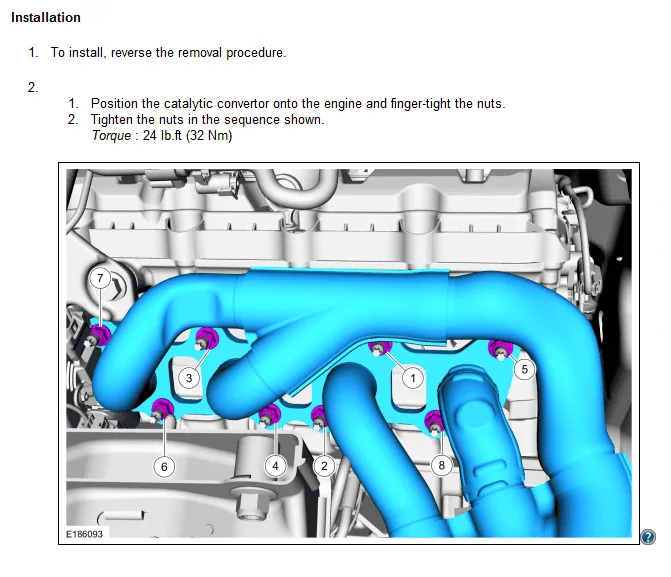
2. Put on ALL nuts before tightening any down. Some nuts will not have room to be put on if you tighten any down first!
3. Look to disconnect sensors along the backside of the motor as some people have reported breaking them when jacking the motor. If you don't jack the motor way up high you shouldn't have any issues here though. I lifted the motor until I could just barely feel the motor mount stud sticking through the bracket and this was enough room to reach everything and not break anything up top.
4. Some studs may need to be removed to get the header in place. If so, turn them out and in a few times before removal to make sure the hole in the block is true. On the passenger side I ended up removing 7. On the driver side I didn't have to remove any! On the top row, 2nd from the front stud I was not able to replace with the header in, there just wasn't enough room so I used a bolt here. Keep that in mind if you want to run all studs. This was the only bolt I used. If you want to replace all the studs with bolts run these in and out before you install the header to make sure they go in without any issues. This will prevent you from having to undo a bunch of work.
5. Ensure AC bolt and bracket is moved to ensure no false knock before installing headers! On passenger side. I just slid the bracket down towards the rear of the car.
6. Apply antiseize to the threads of the O2 sensors. These took some grunt to take off.
7. Move driver's seat all the way back before disconnecting battery to make it easier to loosen the steering shaft nuts. Also you have to remove the Torx bolt on the steering shaft to slide it off. It took me a few minutes to figure out why it wasn't coming off with it super loose.
8. The motor mount nut that holds the bracket to the mount was difficult to access on the driver side after the header was in. I was able to get a stubby ratcheting wrench (I think it was 15mm) on it from below. Passenger side still had fair access from the top with extensions and a wobble.
9. The top starter bolt was hard to get to. I used 2, 3" extensions. This seemed to be the perfect length to navigate in between the motor mount bracket and the starter itself.
10. I did NOT have to remove either motor mount! Just the bracket.
Tools Needed:
E8 Reverse Torx Bit and/or 1/4" socket
T40 Torx Bit
(regular and deep versions of each socket, 6 point preferred)
10mm socket
13mm socket
14mm socket
15mm socket
13mm ratchet wrench
14mm ratchet wrench
15mm ratchet wrench
7/8 wrench (O2 sensors)
Extensions both regular and wobble preferable as well as a swivel.
An extra set of hands at times is invaluable.
If anyone has any other tips let everyone know. A lot of these are found in a variety of threads but I wanted to attempt to consolidate them into one place for people who may do this in the future.


1: Remove the battery cover, battery, and battery box to have better access to the top of the passenger side header. This was huge for getting the top rear nuts/studs quite easily. You have to take off a few push fasteners on the cowl, the battery hold down, 3 bolts that hold the box in, then somewhere around 10 more bolts to get the shield out. Almost all of these were accessible with an extension and impact so it went quick.
2. Put on ALL nuts before tightening any down. Some nuts will not have room to be put on if you tighten any down first!
3. Look to disconnect sensors along the backside of the motor as some people have reported breaking them when jacking the motor. If you don't jack the motor way up high you shouldn't have any issues here though. I lifted the motor until I could just barely feel the motor mount stud sticking through the bracket and this was enough room to reach everything and not break anything up top.
4. Some studs may need to be removed to get the header in place. If so, turn them out and in a few times before removal to make sure the hole in the block is true. On the passenger side I ended up removing 7. On the driver side I didn't have to remove any! On the top row, 2nd from the front stud I was not able to replace with the header in, there just wasn't enough room so I used a bolt here. Keep that in mind if you want to run all studs. This was the only bolt I used. If you want to replace all the studs with bolts run these in and out before you install the header to make sure they go in without any issues. This will prevent you from having to undo a bunch of work.
5. Ensure AC bolt and bracket is moved to ensure no false knock before installing headers! On passenger side. I just slid the bracket down towards the rear of the car.
6. Apply antiseize to the threads of the O2 sensors. These took some grunt to take off.
7. Move driver's seat all the way back before disconnecting battery to make it easier to loosen the steering shaft nuts. Also you have to remove the Torx bolt on the steering shaft to slide it off. It took me a few minutes to figure out why it wasn't coming off with it super loose.
8. The motor mount nut that holds the bracket to the mount was difficult to access on the driver side after the header was in. I was able to get a stubby ratcheting wrench (I think it was 15mm) on it from below. Passenger side still had fair access from the top with extensions and a wobble.
9. The top starter bolt was hard to get to. I used 2, 3" extensions. This seemed to be the perfect length to navigate in between the motor mount bracket and the starter itself.
10. I did NOT have to remove either motor mount! Just the bracket.
Tools Needed:
E8 Reverse Torx Bit and/or 1/4" socket
T40 Torx Bit
(regular and deep versions of each socket, 6 point preferred)
10mm socket
13mm socket
14mm socket
15mm socket
13mm ratchet wrench
14mm ratchet wrench
15mm ratchet wrench
7/8 wrench (O2 sensors)
Extensions both regular and wobble preferable as well as a swivel.
An extra set of hands at times is invaluable.
If anyone has any other tips let everyone know. A lot of these are found in a variety of threads but I wanted to attempt to consolidate them into one place for people who may do this in the future.
Sponsored