ThatsMrGimp2U
Well-Known Member
- Thread starter
- #1
Hey guys. Figured I would throw this together real quick as some people haven't seen how easy it is to put these in. I really wish I had done these sooner, its much nicer to reach around the engine bay without the prop rod interfering.
Tools/Materials Needed:
-3/8" drive ratchet
-13mm socket
-10mm socket
-flat blade screw driver
-drill
-~1/8 drill bit
-7/8 drill bit
-blue Loctite
-rubbing alcohol
Install:
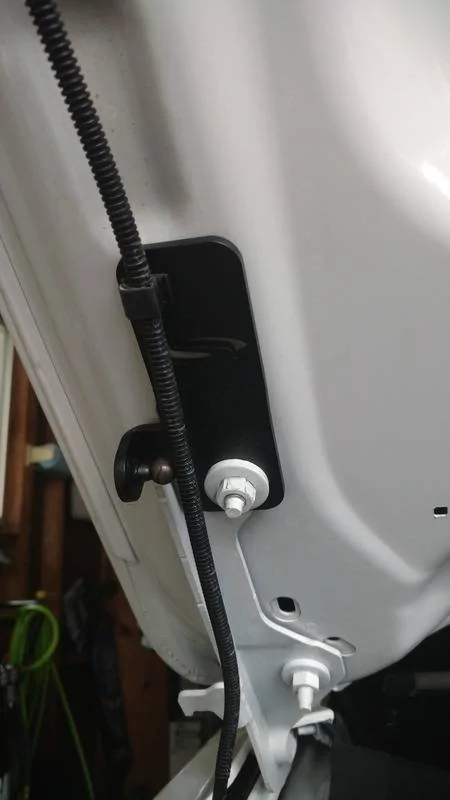
Open up the hood and support it with the prop rod. We are going to install the larger brackets included with the kit first. These go on the hood itself, with the socket facing inwards to the car. The passenger side bracket has an additional hole in it to accommodate the wiper fluid hose tie down. Just pull that out with your fingers. If you can't get it pry it out with your screwdriver, placing a rag or cloth in between it and the paint. Once thats out of the way remove the top (forward when the hood is down) 13mm nut. Grab the passenger side bracket, look at the backside and place the supplied rubber piece just above the steeda logo. It may be an idea to wipe this area off with alcohol first. Put into position with the stud from the hood going through the lower hole (the hole for the washer line should be lined up with the top hole in the bracket). Put the painted nut/washer combo back in place and tighten to 17 ft/lbs. Same steps for the drivers side. Remember, the sockets should face towards the engine bay.
This is what you should have so far.
Passenger Side

Driver Side
Now lets move on to the fender mounts. The battery tray needs a 7/8 hole drilled into it. Steeda's instructions say to mark this hole on the car. I took it upon myself to do it on the bench and think its slightly off as a result. Once you use the template to mark your hole, remove the remaining screw/stud fasteners and take the tray cover off. Pilot your hole with something around a 1/8 drill bit, then use a 7/8 bit (or step bit) to open it up. I touched up the edges with a file, you may not need to if you use a standard bit.
With the battery tray out of the way, the fender mounts are next. Put some loctite on the provided bolt before placing it through the bracket and threading it into the fender nut.
This is where it gets a little tricky. The instructions say you will find a groove with the nut running from left to right that will keep it from spinning. I didn't really get a good feeling of it. What i did was lift the bolt up from under neath the head with the blade of a flathead screwdriver, while tightening it with the 13mm socket. Worked like a charm. Tighten to 13 ft/lbs.
With the brackets on, its time to get the battery tray back into place. Coerce the tray over the fender bracket, line up the tabs by the firewall, and reinstall the threaded studs.
Steeda recommends waiting 24hrs to allow loctite to cure before installing the struts. Installing them is as simple as pushing them on. Spin the smaller shaft end to where the socket is opposite the one on the thicker end of the rod. The larger diameter of the rod connects to the hood. I should add, the sweet stickers that are included aren't intended for your toolbox. They look to be the perfect fit for the diameter of the strut...
After your connections are made close the hood slowly making sure nothing is making contact before you try and close it all the way. I heard some creaking the first time it shut. Has yet to do it since. Should you choose to, take a 10mm socket and remove the prop rod. I did, and put the screw back in its place to cover the hole.
Enjoy your propless hood!

Tools/Materials Needed:
-3/8" drive ratchet
-13mm socket
-10mm socket
-flat blade screw driver
-drill
-~1/8 drill bit
-7/8 drill bit
-blue Loctite
-rubbing alcohol
Install:
Open up the hood and support it with the prop rod. We are going to install the larger brackets included with the kit first. These go on the hood itself, with the socket facing inwards to the car. The passenger side bracket has an additional hole in it to accommodate the wiper fluid hose tie down. Just pull that out with your fingers. If you can't get it pry it out with your screwdriver, placing a rag or cloth in between it and the paint. Once thats out of the way remove the top (forward when the hood is down) 13mm nut. Grab the passenger side bracket, look at the backside and place the supplied rubber piece just above the steeda logo. It may be an idea to wipe this area off with alcohol first. Put into position with the stud from the hood going through the lower hole (the hole for the washer line should be lined up with the top hole in the bracket). Put the painted nut/washer combo back in place and tighten to 17 ft/lbs. Same steps for the drivers side. Remember, the sockets should face towards the engine bay.
This is what you should have so far.
Passenger Side
Driver Side

Now lets move on to the fender mounts. The battery tray needs a 7/8 hole drilled into it. Steeda's instructions say to mark this hole on the car. I took it upon myself to do it on the bench and think its slightly off as a result. Once you use the template to mark your hole, remove the remaining screw/stud fasteners and take the tray cover off. Pilot your hole with something around a 1/8 drill bit, then use a 7/8 bit (or step bit) to open it up. I touched up the edges with a file, you may not need to if you use a standard bit.
With the battery tray out of the way, the fender mounts are next. Put some loctite on the provided bolt before placing it through the bracket and threading it into the fender nut.
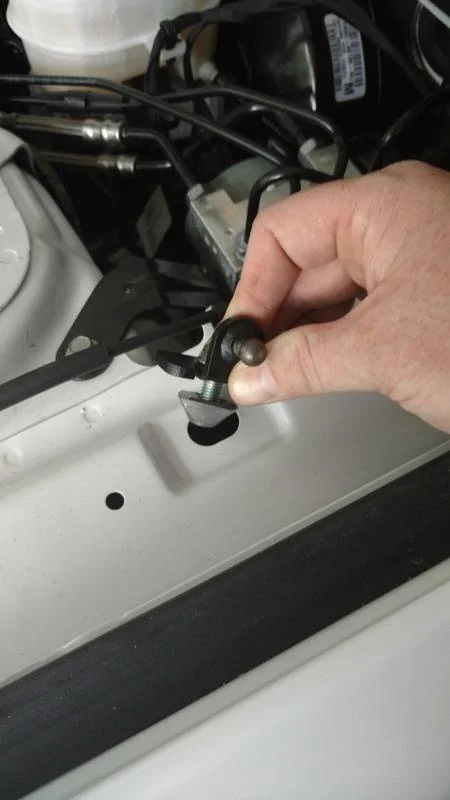
This is where it gets a little tricky. The instructions say you will find a groove with the nut running from left to right that will keep it from spinning. I didn't really get a good feeling of it. What i did was lift the bolt up from under neath the head with the blade of a flathead screwdriver, while tightening it with the 13mm socket. Worked like a charm. Tighten to 13 ft/lbs.

With the brackets on, its time to get the battery tray back into place. Coerce the tray over the fender bracket, line up the tabs by the firewall, and reinstall the threaded studs.

Steeda recommends waiting 24hrs to allow loctite to cure before installing the struts. Installing them is as simple as pushing them on. Spin the smaller shaft end to where the socket is opposite the one on the thicker end of the rod. The larger diameter of the rod connects to the hood. I should add, the sweet stickers that are included aren't intended for your toolbox. They look to be the perfect fit for the diameter of the strut...
After your connections are made close the hood slowly making sure nothing is making contact before you try and close it all the way. I heard some creaking the first time it shut. Has yet to do it since. Should you choose to, take a 10mm socket and remove the prop rod. I did, and put the screw back in its place to cover the hole.
Enjoy your propless hood!

Sponsored
")