derieuz
The Young Fella'
- Joined
- May 21, 2014
- Threads
- 115
- Messages
- 792
- Reaction score
- 154
- Location
- Southeast Michigan
- Vehicle(s)
- 2015 Mustang GT PP
- Thread starter
- #1
Full Tilt Boogie Kunckle-To-Toe Bearing (FT 548) Home Install
Estimated Time Required (Proper Tools): 1-2 Hours
Estimated Difficulty (Proper Tools): Moderate
Tools Required:
· Jack
· Jack stands
· All-Purpose Cleaner/Degreaser (Highly recommended)
· Automotive Assembly Grease/Lubricant (Highly Recommended)
· Red Loctite
· Work Gloves (Optional)
· Towels (Optional)
· 18mm Socket
· 13/16 Socket (Or whatever you use to remove wheel lug nuts)
· Snap-Ring Pliers
· Flapper Wheel or Fine-Grit Sandpaper (Highly Recommended)
· Adjustable Wrench (Or proper wrench used for bearing press, ratcheting wrenches are highly recommended!)
· Ball-Joint Press (Or equivalent tool used to press/extract bearings)
· Breaker Bar (Optional)
· Torque Wrench
· Ratcheting Socket
· Heart
· Determination
· Post-Success Beer (Mandatory)

1. Step 1: Jack up the car and place the car on jack stands.
2. Step 2: Remove the wheels from the car.
3. Step 3: Remove the 18mm bolt connecting the toe link to the knuckle assembly.
4. Step 4: Rotate the toe link out of the way, spray degreaser onto the existing bearing and any crevice that you can spray around the bearing
5. Step 5: Properly set up the ball-joint press or equivalent tool to extract the existing bearing, use a wrench to press the existing bearing out. You want to press the bearing out towards the rear of the car. You can use automotive grease on the threads of the extraction tool to allow the nut to spin easier and also to prevent the nut from seizing onto the threaded rod.
6. Step 6: Degrease and clean the bore that the bearing was in, use a flapper wheel or sand paper to remove any glue residue, oxidation, or imperfections in the surface. Do just enough to remove what is on the surface, you do not want to open up this bore anymore than you accidently have to (Theoretically should not open it up whatsoever). Clean and dry the bore.
7. Step 7: Using the snap-ring pliers, remove the snap ring from the FT548 Bearing.
8. Step 8: Put a thin layer of Red Loctite in the bore and around the FT 548 Bearing, position the bearing in the bore so that the lip of the bearing is on the side closer to the front of the car.
9. Step 9: Press the bearing in using pressing tool, Make sure that the bearing is being pressed in straight. This will prevent damaging the knuckle and make your job much easier.
10. Step 10: After the bearing is pressed in, use the snap-ring pliers to place the snap ring on the back-side of the bearing.
11. Step 11: After the bearing is successfully seated in the bore, use your automotive assembly grease and rub a thin amount of grease on the surface that contacts the toe-link and the areas of the bearing the protrude out of the knuckle. DO NOT get any grease inside the bearing (It is okay to get a small amount inside the hole that the bolt slides in, but DO NOT get any in the actual bearing). I am sure this might be okay as the bearing is sealed, but it is better safe than sorry. Also grease the inside surfaces of the toe link.
12. Step 12: Put a small amount of Blue Loctite (or Red if you only have red) on the end of the bolt that attaches the toe link to the knuckle.
13. Step 13: Line up the toe link to the bearing and thread the bolt into the hole using an 18mm socket.
14. Step 14: Using a jack, jack up the lower-control arm and get the wheel hub to about ride height.
15. Step 15: Set your torque wrench to 129 ft-lbs (175 nm) and torque down the 18mm bolt while the jack is holding the wheel hub at ride height.
16. Step 16: Lower the jack and put the wheels back on the car. Repeat Steps 1-15 on the opposite side.
Install Comments:
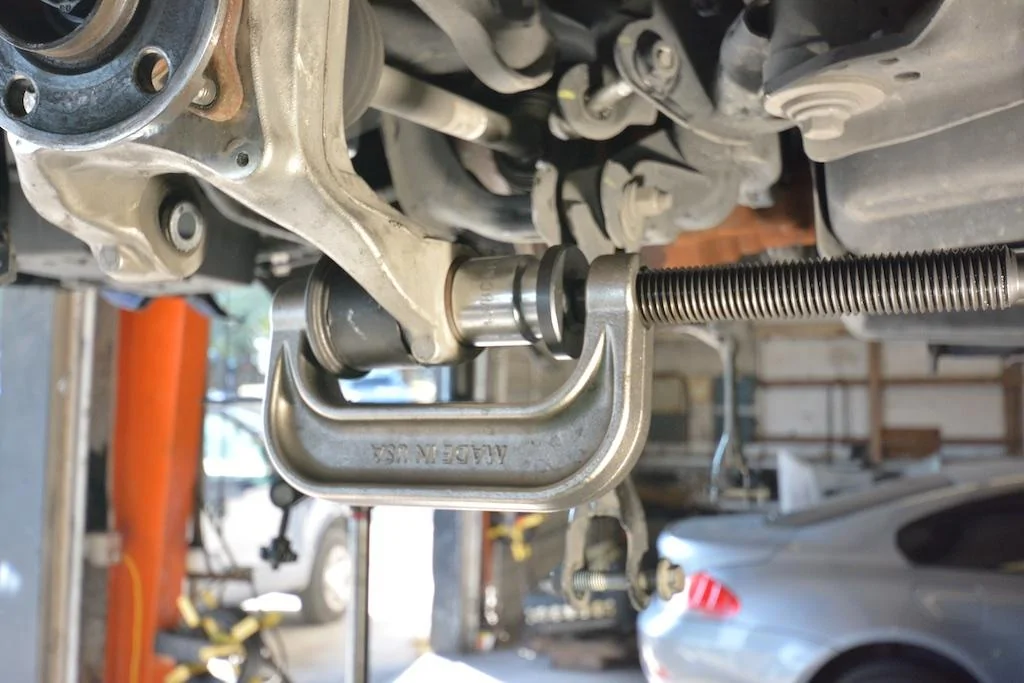
Without the proper tools (specifically the tools used to extract the old bearing), this install can be EXTREMELY FRUSTRATING. The ball-joint press that I rented was slightly too big for the bore and did not fit properly. I tried to use a smaller press but the rubber broke free from the aluminum sleeve that it was held in. I attempted to use a hack-saw to carefully saw out the aluminum sleeve but after 2 hours it did not want to come loose despite trying to chisel and pummel it out. I left my car on jack-stands for the night and called it quits. The next day at work, I made a tool that would be used to press and extract the bearing (very similar to the tool offered by Full Tilt Boogie Racing, IF YOU DO NOT HAVE ACCESS TO A MACHINE SHOP THIS TOOL WILL SAVE YOU 10+ HOURS OF TIME AND FRUSTRATION, IT IS WORTH THE MONEY!. When I got home, I used the tool that I made and the install was easy from there. I made sure to lube up the extraction tool to prevent it from seizing up, the bearing came out like butter! Getting the bearing out can be very difficult because it takes a lot of force to press out these things until you get them passed center, I did not use a breaker bar so it is do-able, but it will require a lot of man power and nicking of the knuckles on various suspension components. Pressing in the new bearing was very easy, especially with a clean surface and the red-loctite acting as lubricant temporarily. Getting the toe-link back into position required some muscle, but it was not difficult compared to the rest of the install journey that I have been on. Full Tilt Boogie Racing’s instructions state that you must torque down the bolt while the knuckle is at ride height if you still have a majority of your bushings as factory rubber, so make sure you take the extra 5 minutes to do this. A beer was very much needed after the first frustrating day of trying to get an old, shitty bearing out with improper tools. Please do yourself a favor, and either buy the proper tool from Full Tilt Boogie Racing (That can be used for all of their bearing I might add) or make the proper tool yourself. Here are some pictures of my mess:
Review:
This install was very much worth the initial struggle. This was a two-day job that started out as a mess but could have been a 2 hour job with the proper tools. I have been driving the car around for a few hours, there is absolutely zero NVH increase from the car that I can hear (I am very OCD about NVH, I can hear the tiniest exhaust leak from my resonator delete, so trust me when I say zero NVH). The rear end feels surprisingly much more responsive, You can oddly feel this very well when you go over small imperfections in the road. A TON of the wheel hop from a rolling launch is gone (It is 30 degrees and I do have 245 Blizzaks on though so take note of that) compared to before. I did not launch the car because I do not want to melt through my winter tires. In my eyes, I really think this bearing is worth it. The factory performance-pack toe-link has been proven to be actually decently stiff from the factory, so this should theoretically make the factory knuckle bearing deflect a lot more compared to other components that take the deflection themselves in the suspension. Replacing this rubber with a beautifully crafted spherical bearing definitely sharpens the ride response. I was skeptical of the pricing of these bearings at first, but I feel like I received 200% of my money's worth. In my journey to create the ultimate street-car with track capabilities, this was definitely a giant step in the right direction. Great job Full Tilt Boogie Racing, you have proven that you are still a highly respected company in the Mustang Racing world, I am looking forward to installing the rest of your suspension goodies. Road Courses, Here I come Any questions, feel free to ask me! Derieuz Out. :cheers:
You can see more of their products at http://fulltiltboogieracing.com/2015_S550_Suspension_Parts_and_Tools.htm
Estimated Time Required (Proper Tools): 1-2 Hours
Estimated Difficulty (Proper Tools): Moderate
Tools Required:
· Jack
· Jack stands
· All-Purpose Cleaner/Degreaser (Highly recommended)
· Automotive Assembly Grease/Lubricant (Highly Recommended)
· Red Loctite
· Work Gloves (Optional)
· Towels (Optional)
· 18mm Socket
· 13/16 Socket (Or whatever you use to remove wheel lug nuts)
· Snap-Ring Pliers
· Flapper Wheel or Fine-Grit Sandpaper (Highly Recommended)
· Adjustable Wrench (Or proper wrench used for bearing press, ratcheting wrenches are highly recommended!)
· Ball-Joint Press (Or equivalent tool used to press/extract bearings)
· Breaker Bar (Optional)
· Torque Wrench
· Ratcheting Socket
· Heart
· Determination
· Post-Success Beer (Mandatory)

1. Step 1: Jack up the car and place the car on jack stands.
2. Step 2: Remove the wheels from the car.
3. Step 3: Remove the 18mm bolt connecting the toe link to the knuckle assembly.

4. Step 4: Rotate the toe link out of the way, spray degreaser onto the existing bearing and any crevice that you can spray around the bearing

5. Step 5: Properly set up the ball-joint press or equivalent tool to extract the existing bearing, use a wrench to press the existing bearing out. You want to press the bearing out towards the rear of the car. You can use automotive grease on the threads of the extraction tool to allow the nut to spin easier and also to prevent the nut from seizing onto the threaded rod.

6. Step 6: Degrease and clean the bore that the bearing was in, use a flapper wheel or sand paper to remove any glue residue, oxidation, or imperfections in the surface. Do just enough to remove what is on the surface, you do not want to open up this bore anymore than you accidently have to (Theoretically should not open it up whatsoever). Clean and dry the bore.

7. Step 7: Using the snap-ring pliers, remove the snap ring from the FT548 Bearing.

8. Step 8: Put a thin layer of Red Loctite in the bore and around the FT 548 Bearing, position the bearing in the bore so that the lip of the bearing is on the side closer to the front of the car.

9. Step 9: Press the bearing in using pressing tool, Make sure that the bearing is being pressed in straight. This will prevent damaging the knuckle and make your job much easier.

10. Step 10: After the bearing is pressed in, use the snap-ring pliers to place the snap ring on the back-side of the bearing.
11. Step 11: After the bearing is successfully seated in the bore, use your automotive assembly grease and rub a thin amount of grease on the surface that contacts the toe-link and the areas of the bearing the protrude out of the knuckle. DO NOT get any grease inside the bearing (It is okay to get a small amount inside the hole that the bolt slides in, but DO NOT get any in the actual bearing). I am sure this might be okay as the bearing is sealed, but it is better safe than sorry. Also grease the inside surfaces of the toe link.
12. Step 12: Put a small amount of Blue Loctite (or Red if you only have red) on the end of the bolt that attaches the toe link to the knuckle.

13. Step 13: Line up the toe link to the bearing and thread the bolt into the hole using an 18mm socket.
14. Step 14: Using a jack, jack up the lower-control arm and get the wheel hub to about ride height.

15. Step 15: Set your torque wrench to 129 ft-lbs (175 nm) and torque down the 18mm bolt while the jack is holding the wheel hub at ride height.
16. Step 16: Lower the jack and put the wheels back on the car. Repeat Steps 1-15 on the opposite side.
Install Comments:
Without the proper tools (specifically the tools used to extract the old bearing), this install can be EXTREMELY FRUSTRATING. The ball-joint press that I rented was slightly too big for the bore and did not fit properly. I tried to use a smaller press but the rubber broke free from the aluminum sleeve that it was held in. I attempted to use a hack-saw to carefully saw out the aluminum sleeve but after 2 hours it did not want to come loose despite trying to chisel and pummel it out. I left my car on jack-stands for the night and called it quits. The next day at work, I made a tool that would be used to press and extract the bearing (very similar to the tool offered by Full Tilt Boogie Racing, IF YOU DO NOT HAVE ACCESS TO A MACHINE SHOP THIS TOOL WILL SAVE YOU 10+ HOURS OF TIME AND FRUSTRATION, IT IS WORTH THE MONEY!. When I got home, I used the tool that I made and the install was easy from there. I made sure to lube up the extraction tool to prevent it from seizing up, the bearing came out like butter! Getting the bearing out can be very difficult because it takes a lot of force to press out these things until you get them passed center, I did not use a breaker bar so it is do-able, but it will require a lot of man power and nicking of the knuckles on various suspension components. Pressing in the new bearing was very easy, especially with a clean surface and the red-loctite acting as lubricant temporarily. Getting the toe-link back into position required some muscle, but it was not difficult compared to the rest of the install journey that I have been on. Full Tilt Boogie Racing’s instructions state that you must torque down the bolt while the knuckle is at ride height if you still have a majority of your bushings as factory rubber, so make sure you take the extra 5 minutes to do this. A beer was very much needed after the first frustrating day of trying to get an old, shitty bearing out with improper tools. Please do yourself a favor, and either buy the proper tool from Full Tilt Boogie Racing (That can be used for all of their bearing I might add) or make the proper tool yourself. Here are some pictures of my mess:


Review:
This install was very much worth the initial struggle. This was a two-day job that started out as a mess but could have been a 2 hour job with the proper tools. I have been driving the car around for a few hours, there is absolutely zero NVH increase from the car that I can hear (I am very OCD about NVH, I can hear the tiniest exhaust leak from my resonator delete, so trust me when I say zero NVH). The rear end feels surprisingly much more responsive, You can oddly feel this very well when you go over small imperfections in the road. A TON of the wheel hop from a rolling launch is gone (It is 30 degrees and I do have 245 Blizzaks on though so take note of that) compared to before. I did not launch the car because I do not want to melt through my winter tires. In my eyes, I really think this bearing is worth it. The factory performance-pack toe-link has been proven to be actually decently stiff from the factory, so this should theoretically make the factory knuckle bearing deflect a lot more compared to other components that take the deflection themselves in the suspension. Replacing this rubber with a beautifully crafted spherical bearing definitely sharpens the ride response. I was skeptical of the pricing of these bearings at first, but I feel like I received 200% of my money's worth. In my journey to create the ultimate street-car with track capabilities, this was definitely a giant step in the right direction. Great job Full Tilt Boogie Racing, you have proven that you are still a highly respected company in the Mustang Racing world, I am looking forward to installing the rest of your suspension goodies. Road Courses, Here I come
Any questions, feel free to ask me! Derieuz Out. :cheers:You can see more of their products at http://fulltiltboogieracing.com/2015_S550_Suspension_Parts_and_Tools.htm
Sponsored
Last edited: