DFB5.0
Well-Known Member
- Thread starter
- #1
The following guide is what I do when “maintenance washing” my cars. For me, a maintenance wash is all about preserving a state of cleanliness and reducing the need to “deep clean”. For example, I rarely use a dedicated wheel cleaner because brake dust never has a chance to adhere to the wheel surface. For the purpose of this guide, I have used my favourite go to products, products that have been trialled over several years in the pursuit of my passion.


I always begin the process with the wheels and tires. Firstly, insert some hose guides under the tyres to prevent snagging during the wash process.

I use a dedicated wheel cleaning bucket with a grit guard filled with water and soap. For cleaning, I apply soap to the wheels from my foam cannon or use a wheel cleaner if required. I then use an assortment of brushes and mitts, this will change depending on the wheel design but usually entails a bristled and microfiber brush for cleaning the barrels and wheel arches, a boars hair brush for lugs, a wash mitt for the wheel face and a stiff bristle brush for the tires.

I will also clean the wheel well and exhaust tips at this step too.

A more detailed guide to wheels here –
PP1 Wheel Cleaning Guide | 2015+ S550 Mustang Forum (GT, EcoBoost, GT350, GT500, Bullitt, Mach 1) - Mustang6G.com
Wheels done, now onto the body. Fill your buckets with water and add soap directly to the wash pad. Mix up your foam cannon.
I don’t usually do the two-bucket method, mainly because I’m rarely attending to stuck on road grime or excessively dirty vehicles. My method involves first rinsing the vehicle down. I then foam the car with my chosen soap and use a wash mitt to attend to one panel at a time, rinsing the mitt in a bucket of water with a grit guard. (If the car is extra dirty, apply foam and allow to soak, rinse, re-foam and then wash with a mitt). I then thoroughly rinse the car off.

With the contact wash completed, I apply some rust inhibitor to the brake rotors and then move the car into the garage for the next steps.

In the garage, I use either my dedicated Big Boi blower or an EGO 765 to remove as much water as possible, including door jams, trunk lid surround, wheels and tyres.
I then use a medium drying towel and a drying aid to finish drying the car. The drying aid acts as a lubricant for the towel, while adding some extra shine and protection to the paint. Some products need specific treatments, but as general rule of thumb, prime the towel with a couple of sprays of product then a couple onto each panel as you move around the car to finish the drying process.
I then do the same thing to the door jambs. (These areas are often neglected as they can be tedious, but when dealt with at each wash, again, you are maintaining the state of cleanliness.)
Exterior glass is next. Interior glass is done as needed and not at every wash. I use two waffle weave towels, one to do the initial wipe, one for the final streak free wipe. It’s important for the glass to be cool and out of the sun to avoid streaky results. The waffle weave cloth also helps in that regard too.
The interior is then vacuumed.
Using a quick detailer, I then wipe the interior surfaces down. I’m using something like Carpro InnerQD or a rinse-less wash like ONR, this is all that is needed for maintenance washing/detailing.

Now for the engine bay. I use a quick detailer or drying aid, teamed with a towel to wipe and dry the painted surfaces. I then use the now damp towel to wipe over the various surfaces to remove dust and keep the engine bay clean. A good time to check your oil and fluids too.

Hood down and back onto the wheels. I spray some quick detailer or drying aid onto the wheel face and wipe over with a dedicated wheel towel. This completes the wheel drying process and adds some additional gloss/protection.
I then dress the tyres. I NEVER miss this step, it’s one of my favorite detailing tasks and really is the finishing touch!
Finished result!

All of that are the “basics” that I do at every single wash. The key is to add something extra each time, be that applying a leather protector, dressing the exterior plastics or polishing the exhaust tips. The concept here is “a little and often” rather than “a lot, less often”.
It’s important to note that there are many ways to wash and detail a car. I wouldn’t say my method is any better than any other, but this is just where much trial and error has brought me to. I have learnt so much by following what others have tried and I love being able to share this knowledge with others, perhaps helping others to increase their detailing abilities.
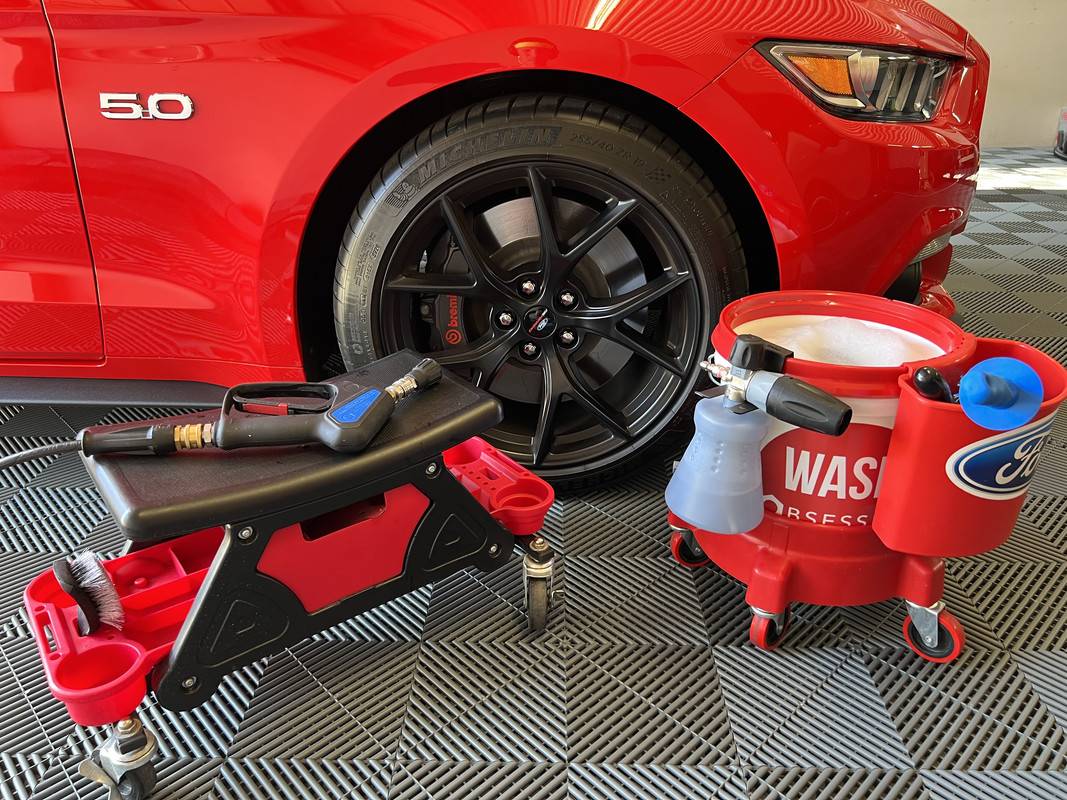

I always begin the process with the wheels and tires. Firstly, insert some hose guides under the tyres to prevent snagging during the wash process.


I use a dedicated wheel cleaning bucket with a grit guard filled with water and soap. For cleaning, I apply soap to the wheels from my foam cannon or use a wheel cleaner if required. I then use an assortment of brushes and mitts, this will change depending on the wheel design but usually entails a bristled and microfiber brush for cleaning the barrels and wheel arches, a boars hair brush for lugs, a wash mitt for the wheel face and a stiff bristle brush for the tires.


I will also clean the wheel well and exhaust tips at this step too.

A more detailed guide to wheels here –
PP1 Wheel Cleaning Guide | 2015+ S550 Mustang Forum (GT, EcoBoost, GT350, GT500, Bullitt, Mach 1) - Mustang6G.com
Wheels done, now onto the body. Fill your buckets with water and add soap directly to the wash pad. Mix up your foam cannon.


I don’t usually do the two-bucket method, mainly because I’m rarely attending to stuck on road grime or excessively dirty vehicles. My method involves first rinsing the vehicle down. I then foam the car with my chosen soap and use a wash mitt to attend to one panel at a time, rinsing the mitt in a bucket of water with a grit guard. (If the car is extra dirty, apply foam and allow to soak, rinse, re-foam and then wash with a mitt). I then thoroughly rinse the car off.


With the contact wash completed, I apply some rust inhibitor to the brake rotors and then move the car into the garage for the next steps.


In the garage, I use either my dedicated Big Boi blower or an EGO 765 to remove as much water as possible, including door jams, trunk lid surround, wheels and tyres.


I then use a medium drying towel and a drying aid to finish drying the car. The drying aid acts as a lubricant for the towel, while adding some extra shine and protection to the paint. Some products need specific treatments, but as general rule of thumb, prime the towel with a couple of sprays of product then a couple onto each panel as you move around the car to finish the drying process.

I then do the same thing to the door jambs. (These areas are often neglected as they can be tedious, but when dealt with at each wash, again, you are maintaining the state of cleanliness.)

Exterior glass is next. Interior glass is done as needed and not at every wash. I use two waffle weave towels, one to do the initial wipe, one for the final streak free wipe. It’s important for the glass to be cool and out of the sun to avoid streaky results. The waffle weave cloth also helps in that regard too.

The interior is then vacuumed.

Using a quick detailer, I then wipe the interior surfaces down. I’m using something like Carpro InnerQD or a rinse-less wash like ONR, this is all that is needed for maintenance washing/detailing.

Now for the engine bay. I use a quick detailer or drying aid, teamed with a towel to wipe and dry the painted surfaces. I then use the now damp towel to wipe over the various surfaces to remove dust and keep the engine bay clean. A good time to check your oil and fluids too.

Hood down and back onto the wheels. I spray some quick detailer or drying aid onto the wheel face and wipe over with a dedicated wheel towel. This completes the wheel drying process and adds some additional gloss/protection.

I then dress the tyres. I NEVER miss this step, it’s one of my favorite detailing tasks and really is the finishing touch!

Finished result!

All of that are the “basics” that I do at every single wash. The key is to add something extra each time, be that applying a leather protector, dressing the exterior plastics or polishing the exhaust tips. The concept here is “a little and often” rather than “a lot, less often”.
It’s important to note that there are many ways to wash and detail a car. I wouldn’t say my method is any better than any other, but this is just where much trial and error has brought me to. I have learnt so much by following what others have tried and I love being able to share this knowledge with others, perhaps helping others to increase their detailing abilities.
Sponsored
Last edited:


 The Karcher WD 6 Premium with the car cleaning kit (extended hose, carpet attachments, better crevice tool) has been a true workhorse.