Sponsored
 for sure.
OP
OP
NGOT8R
Well-Known Member
- Thread starter
- #392
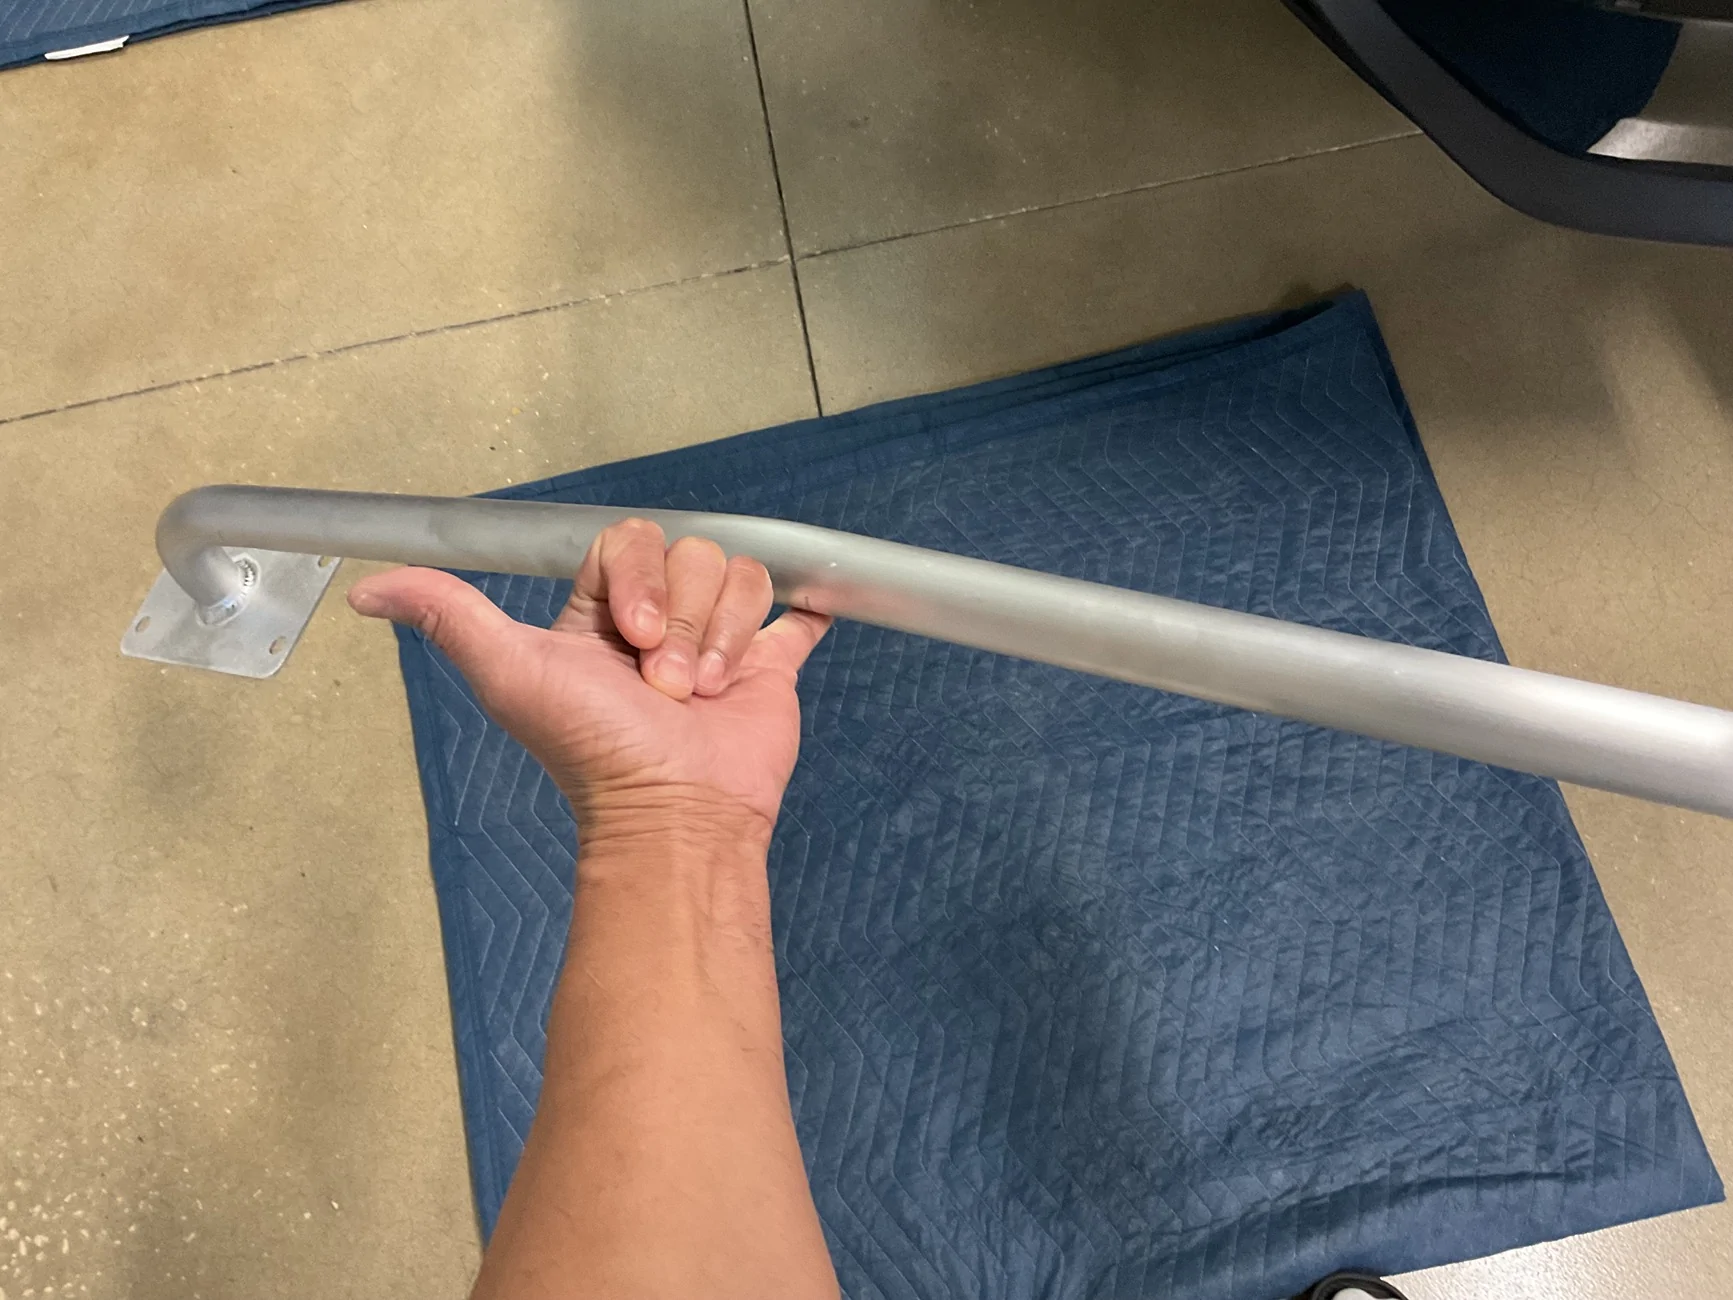
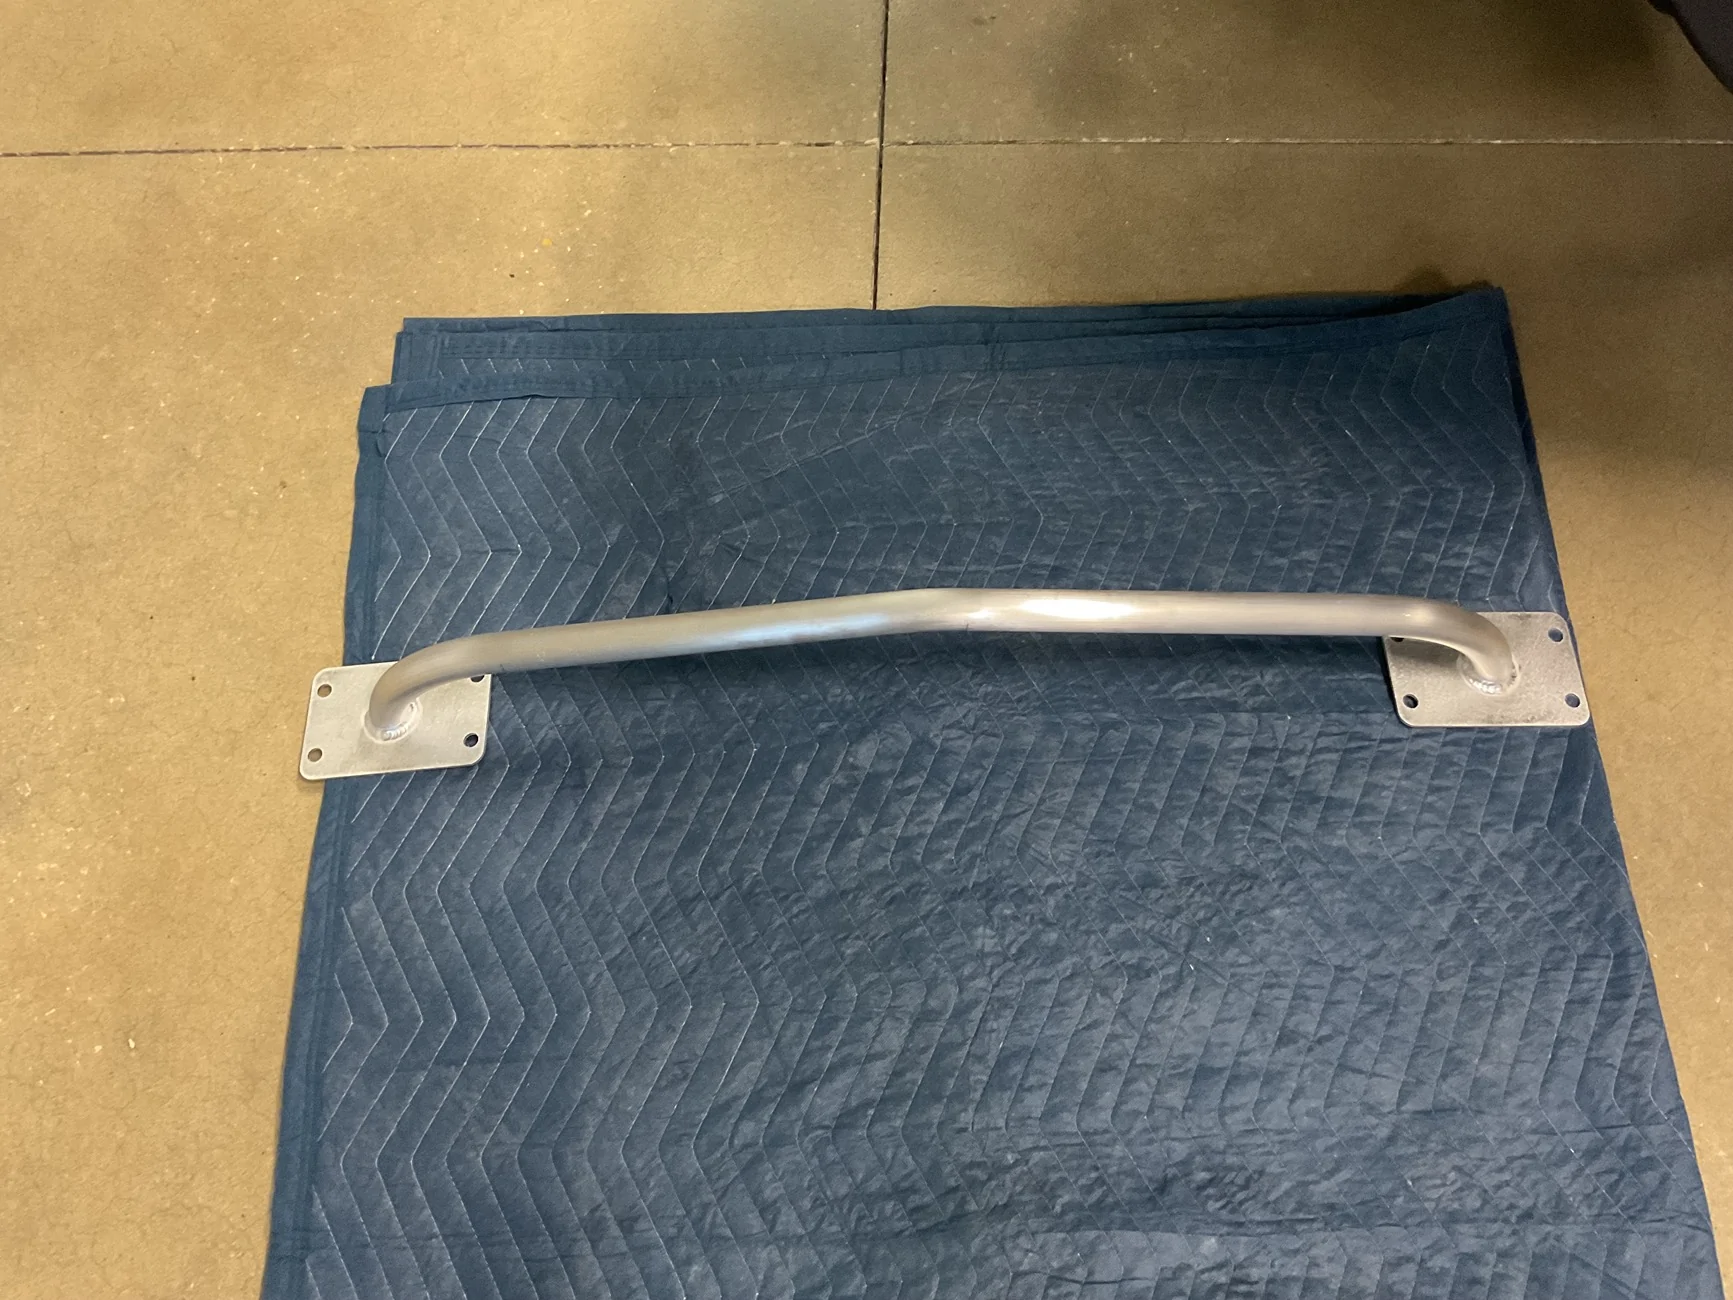
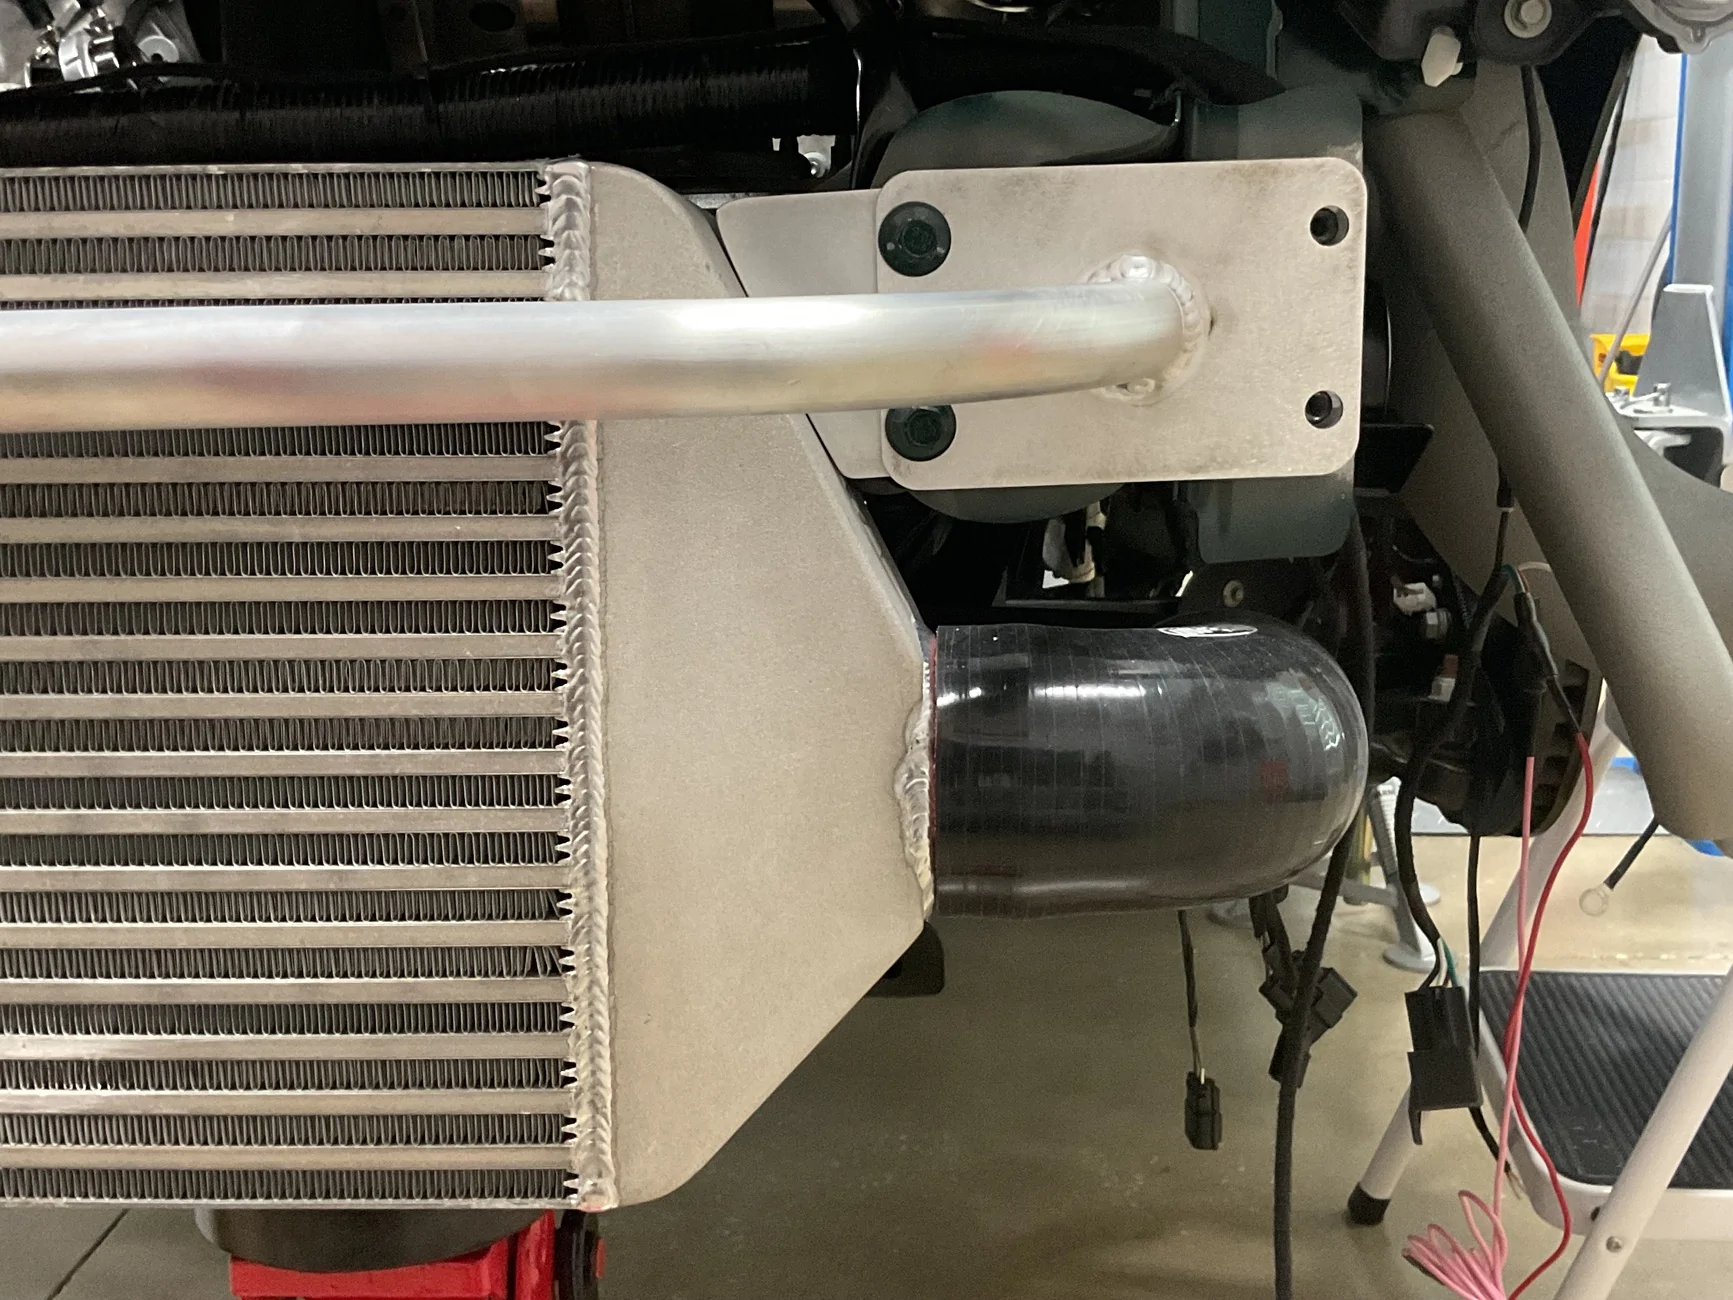
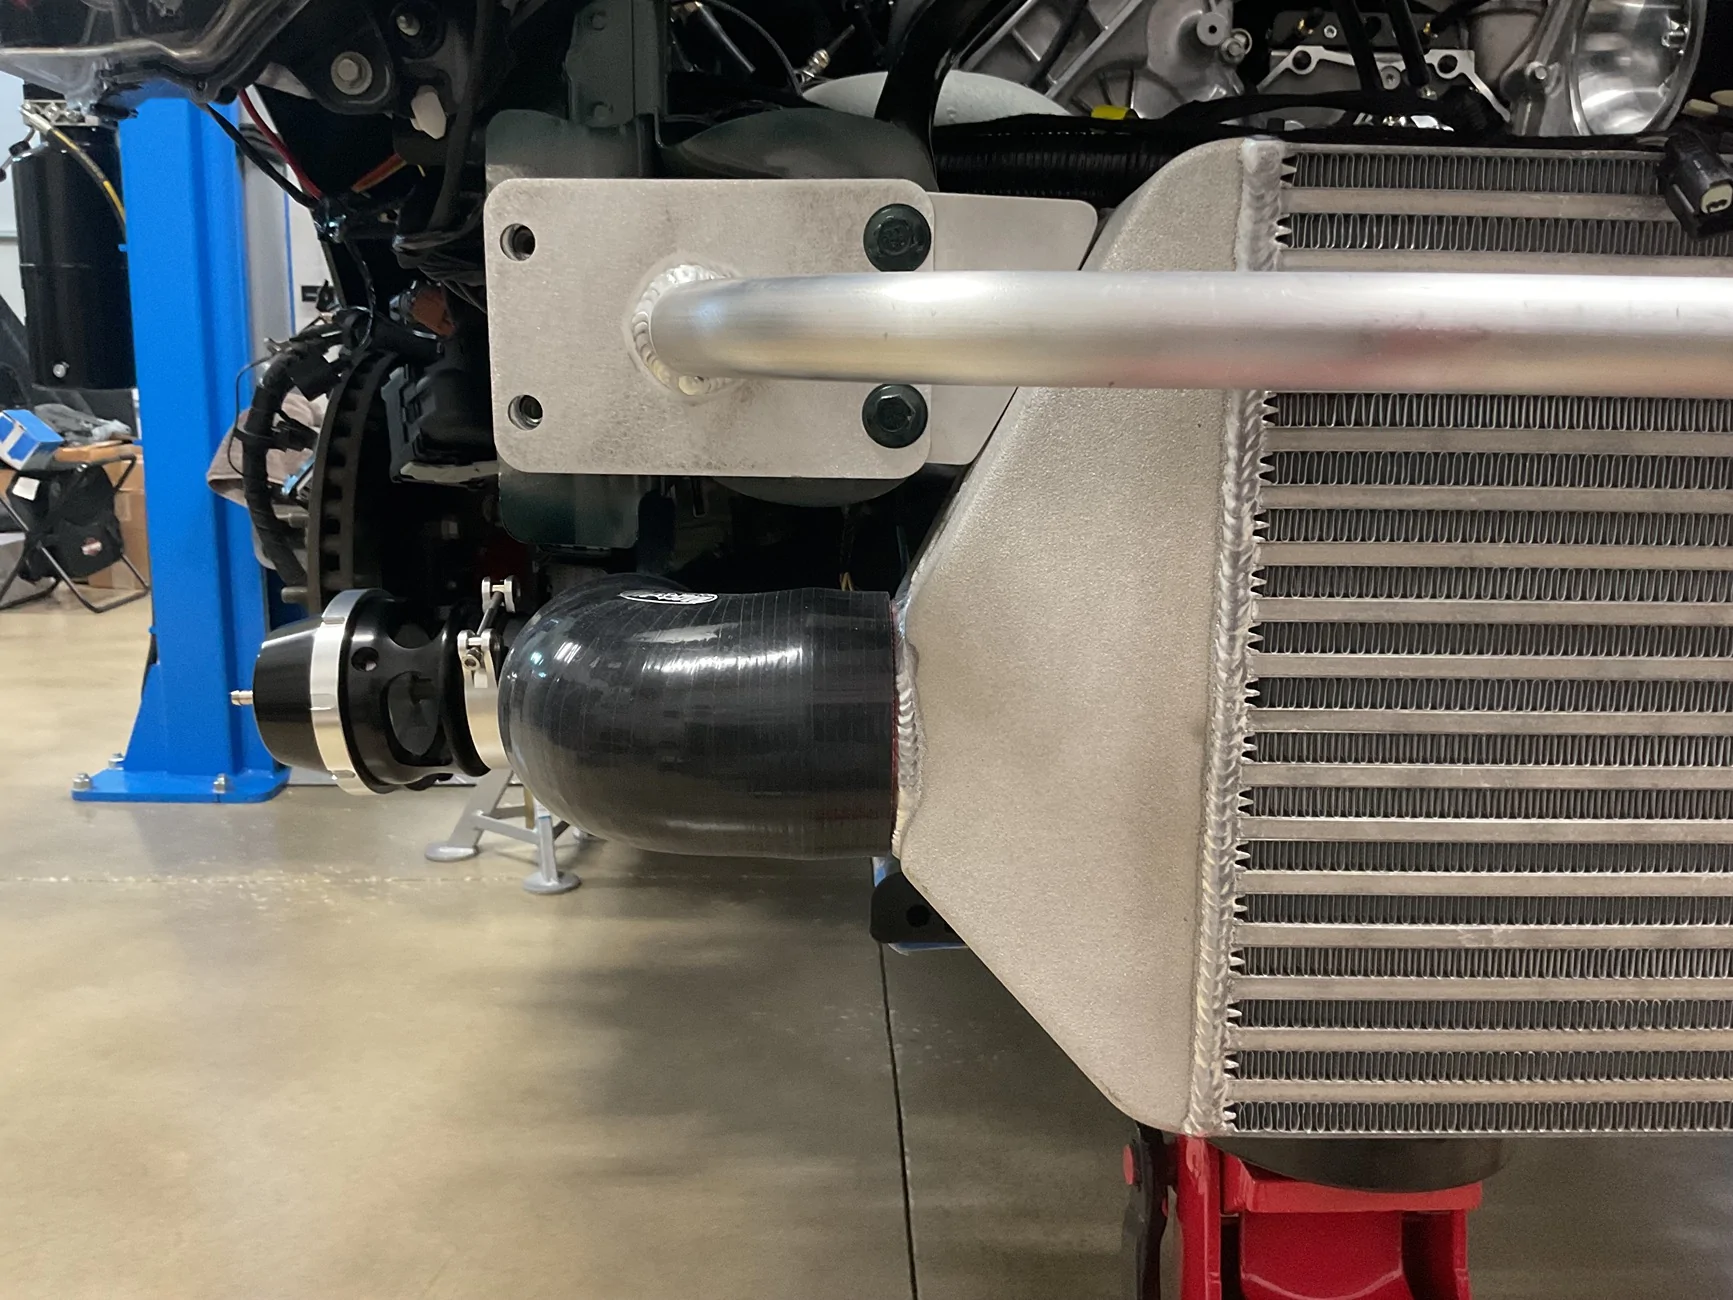
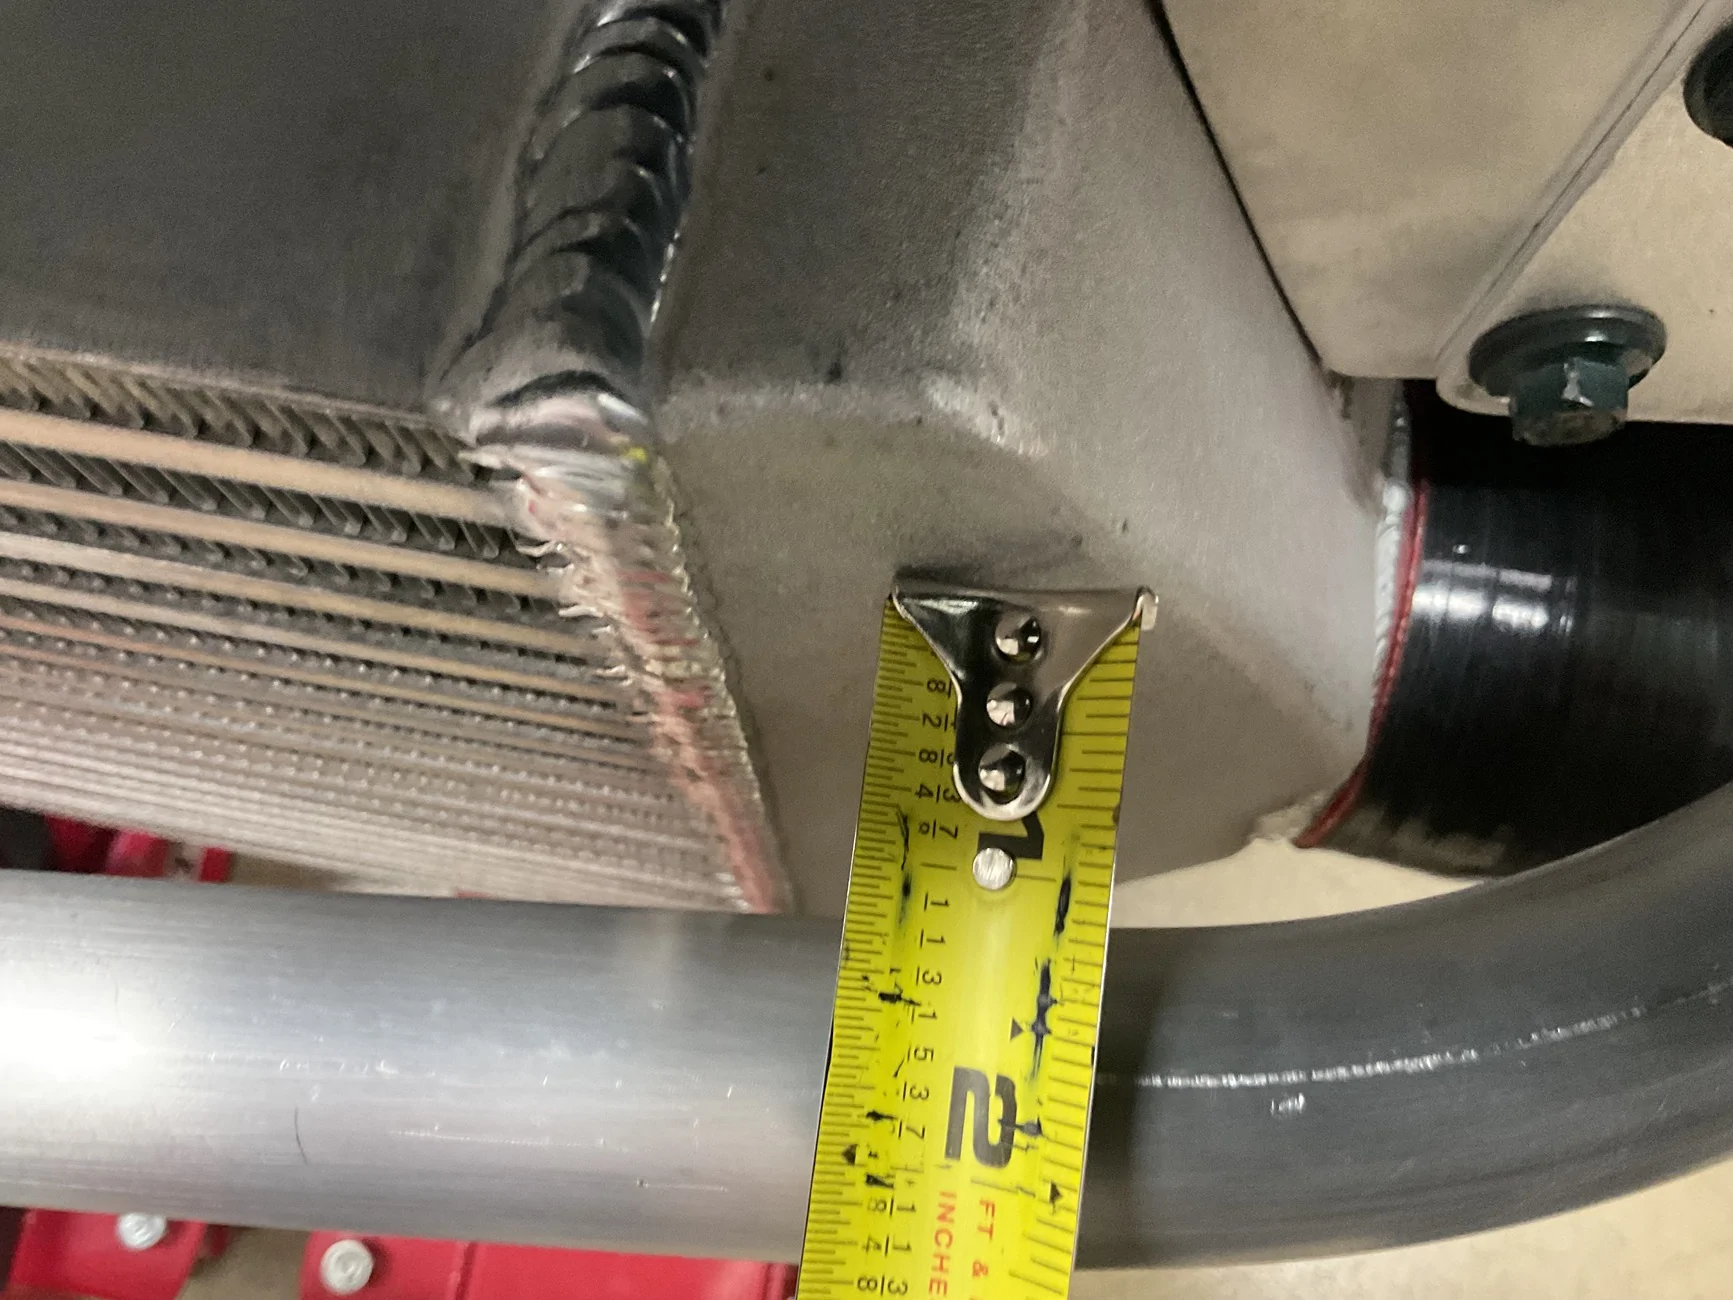
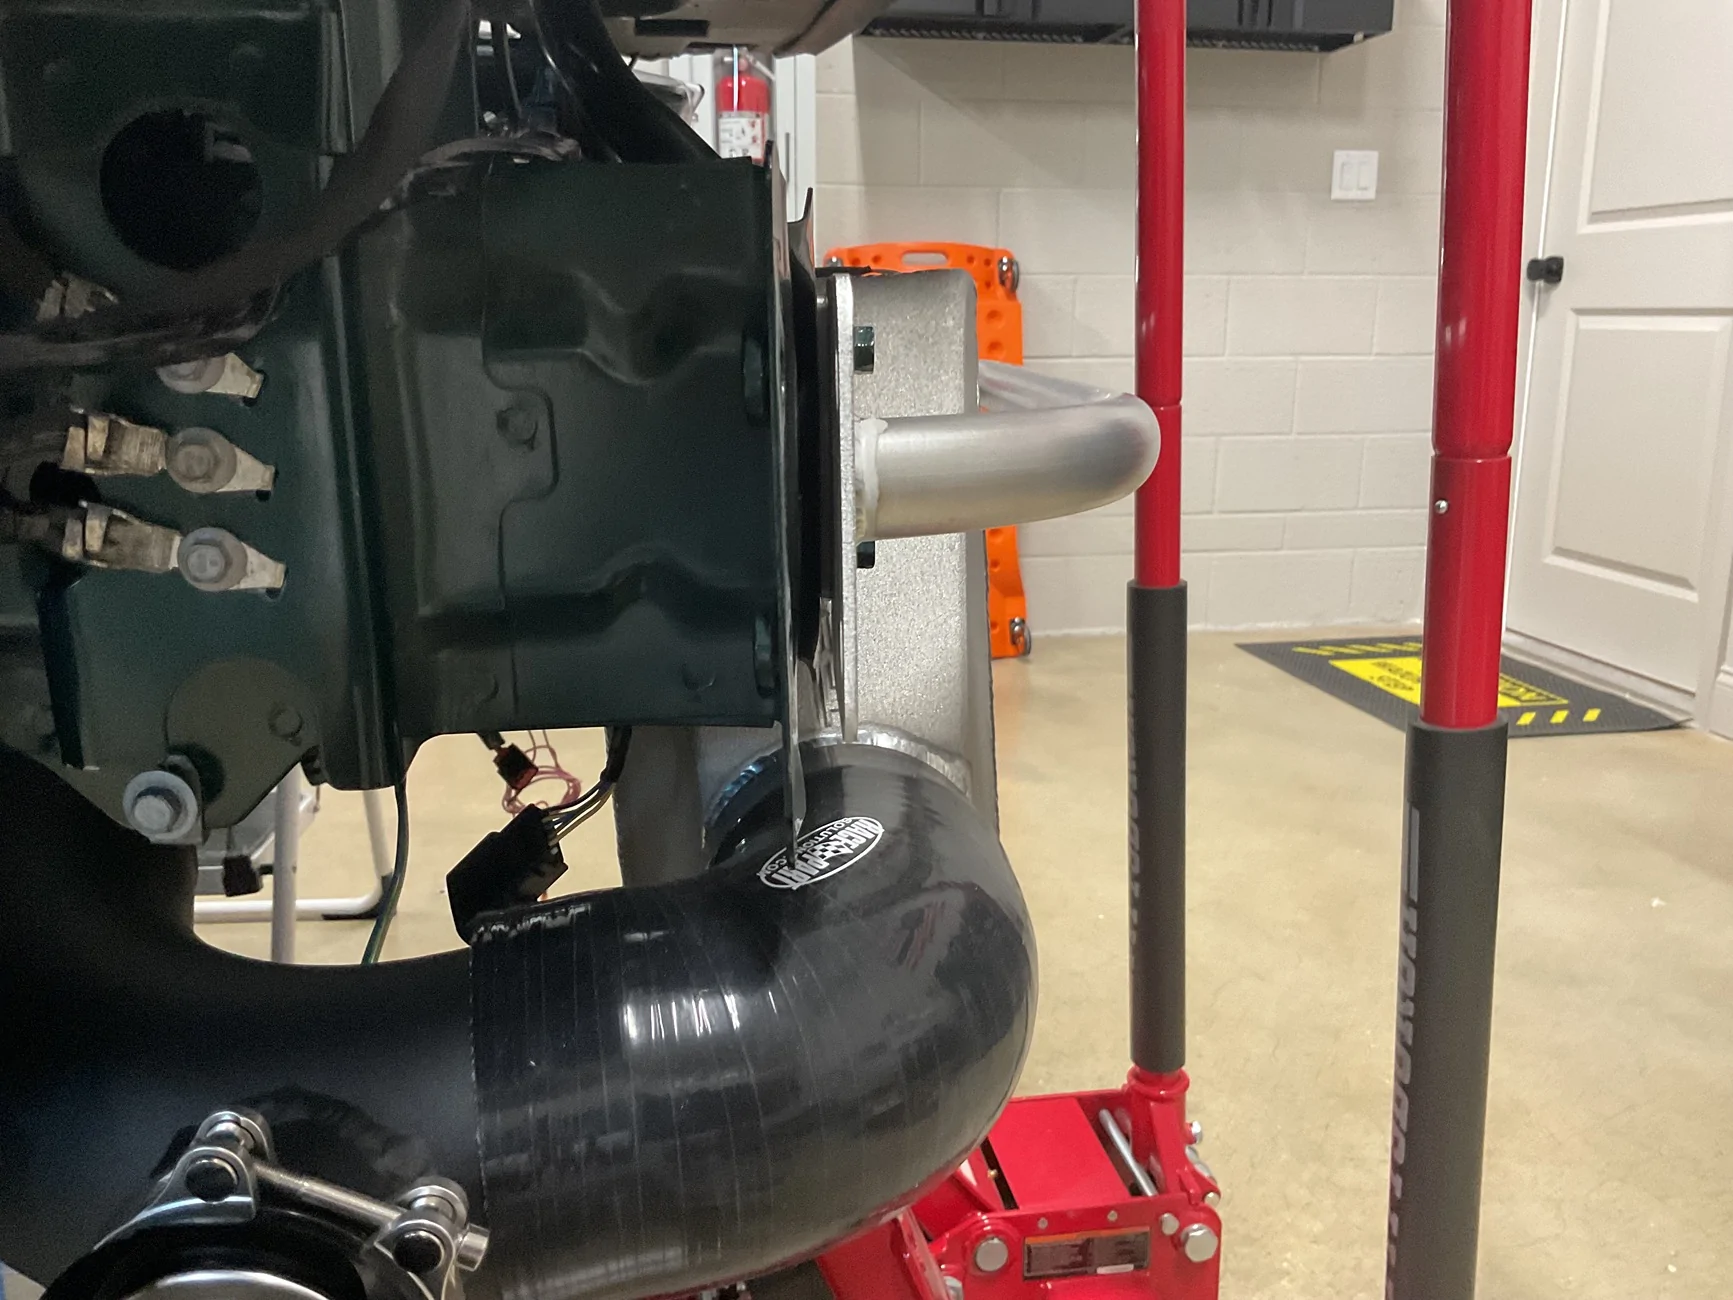
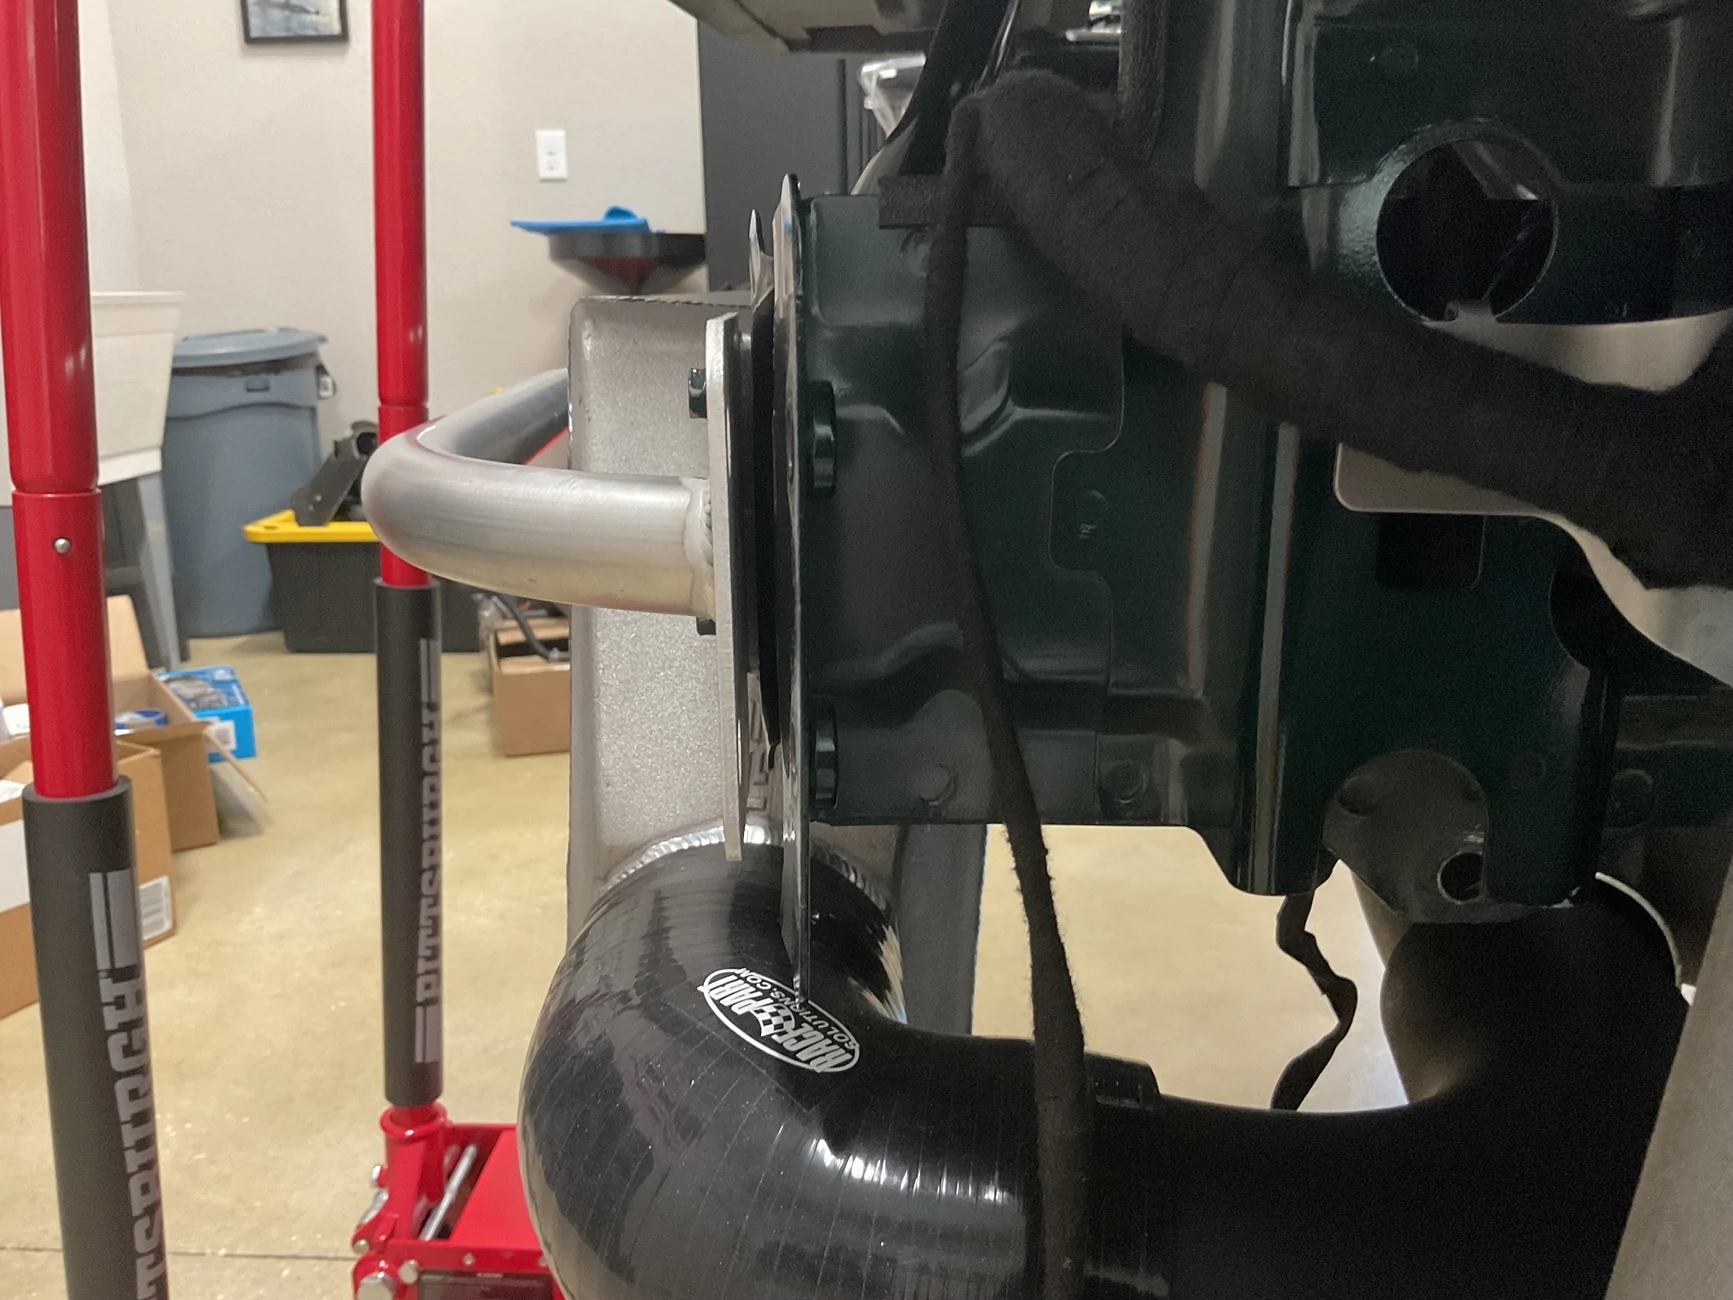
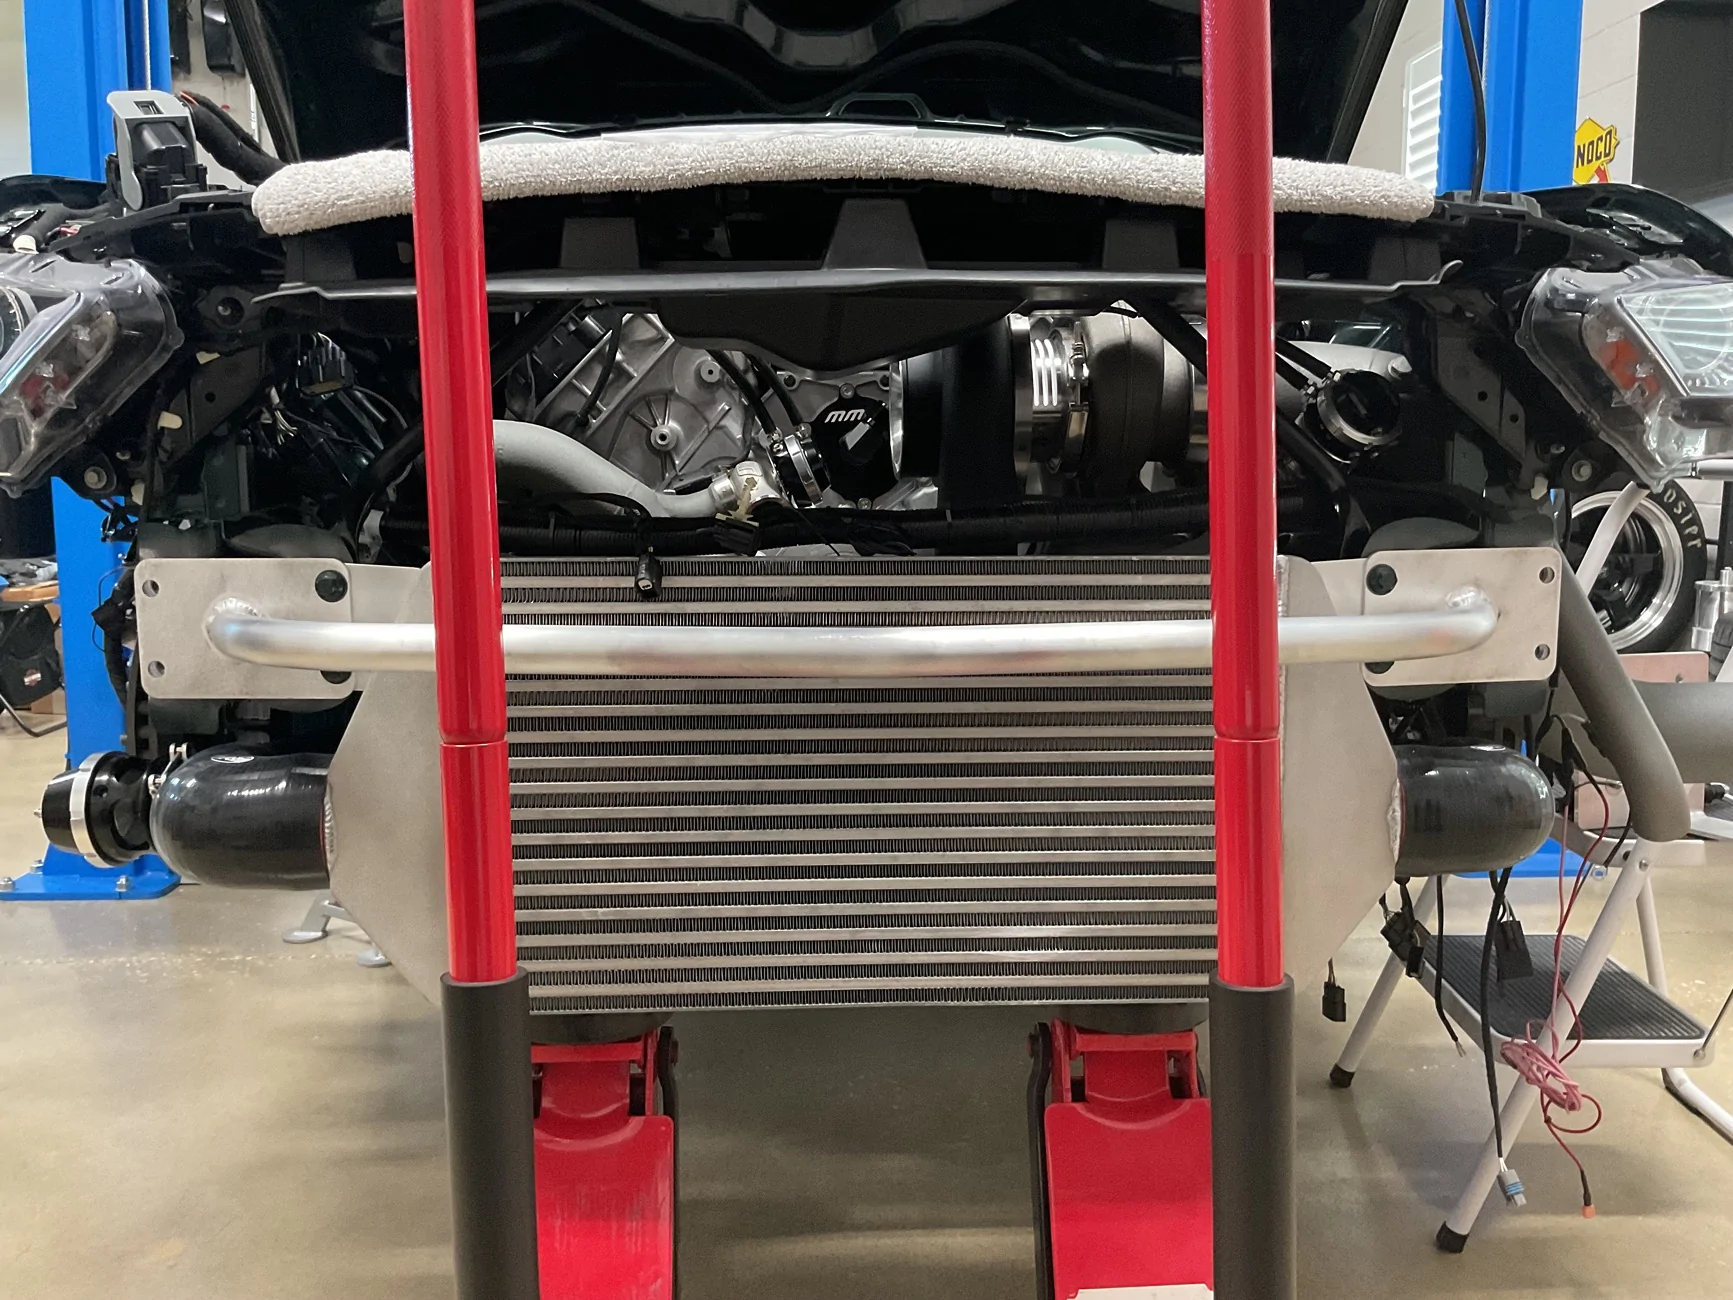
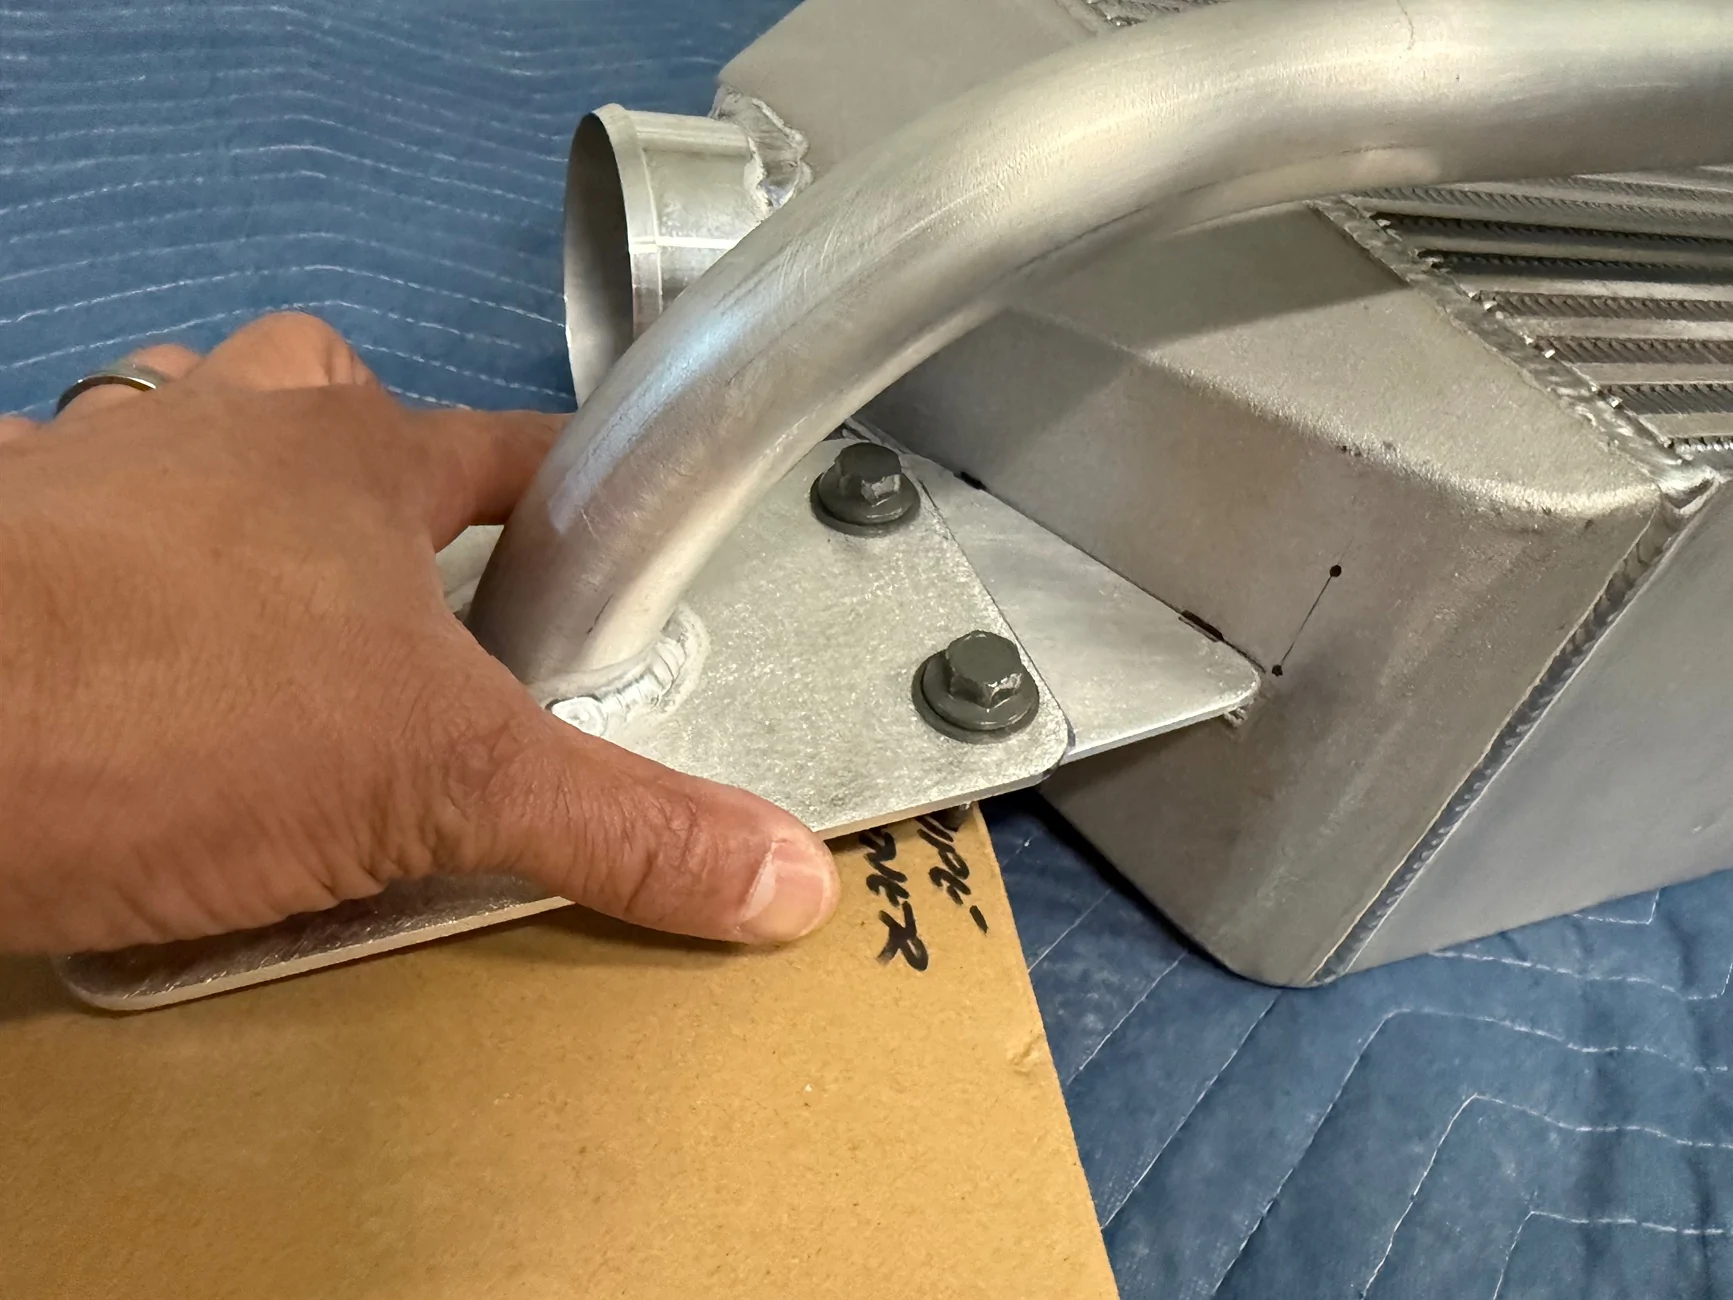
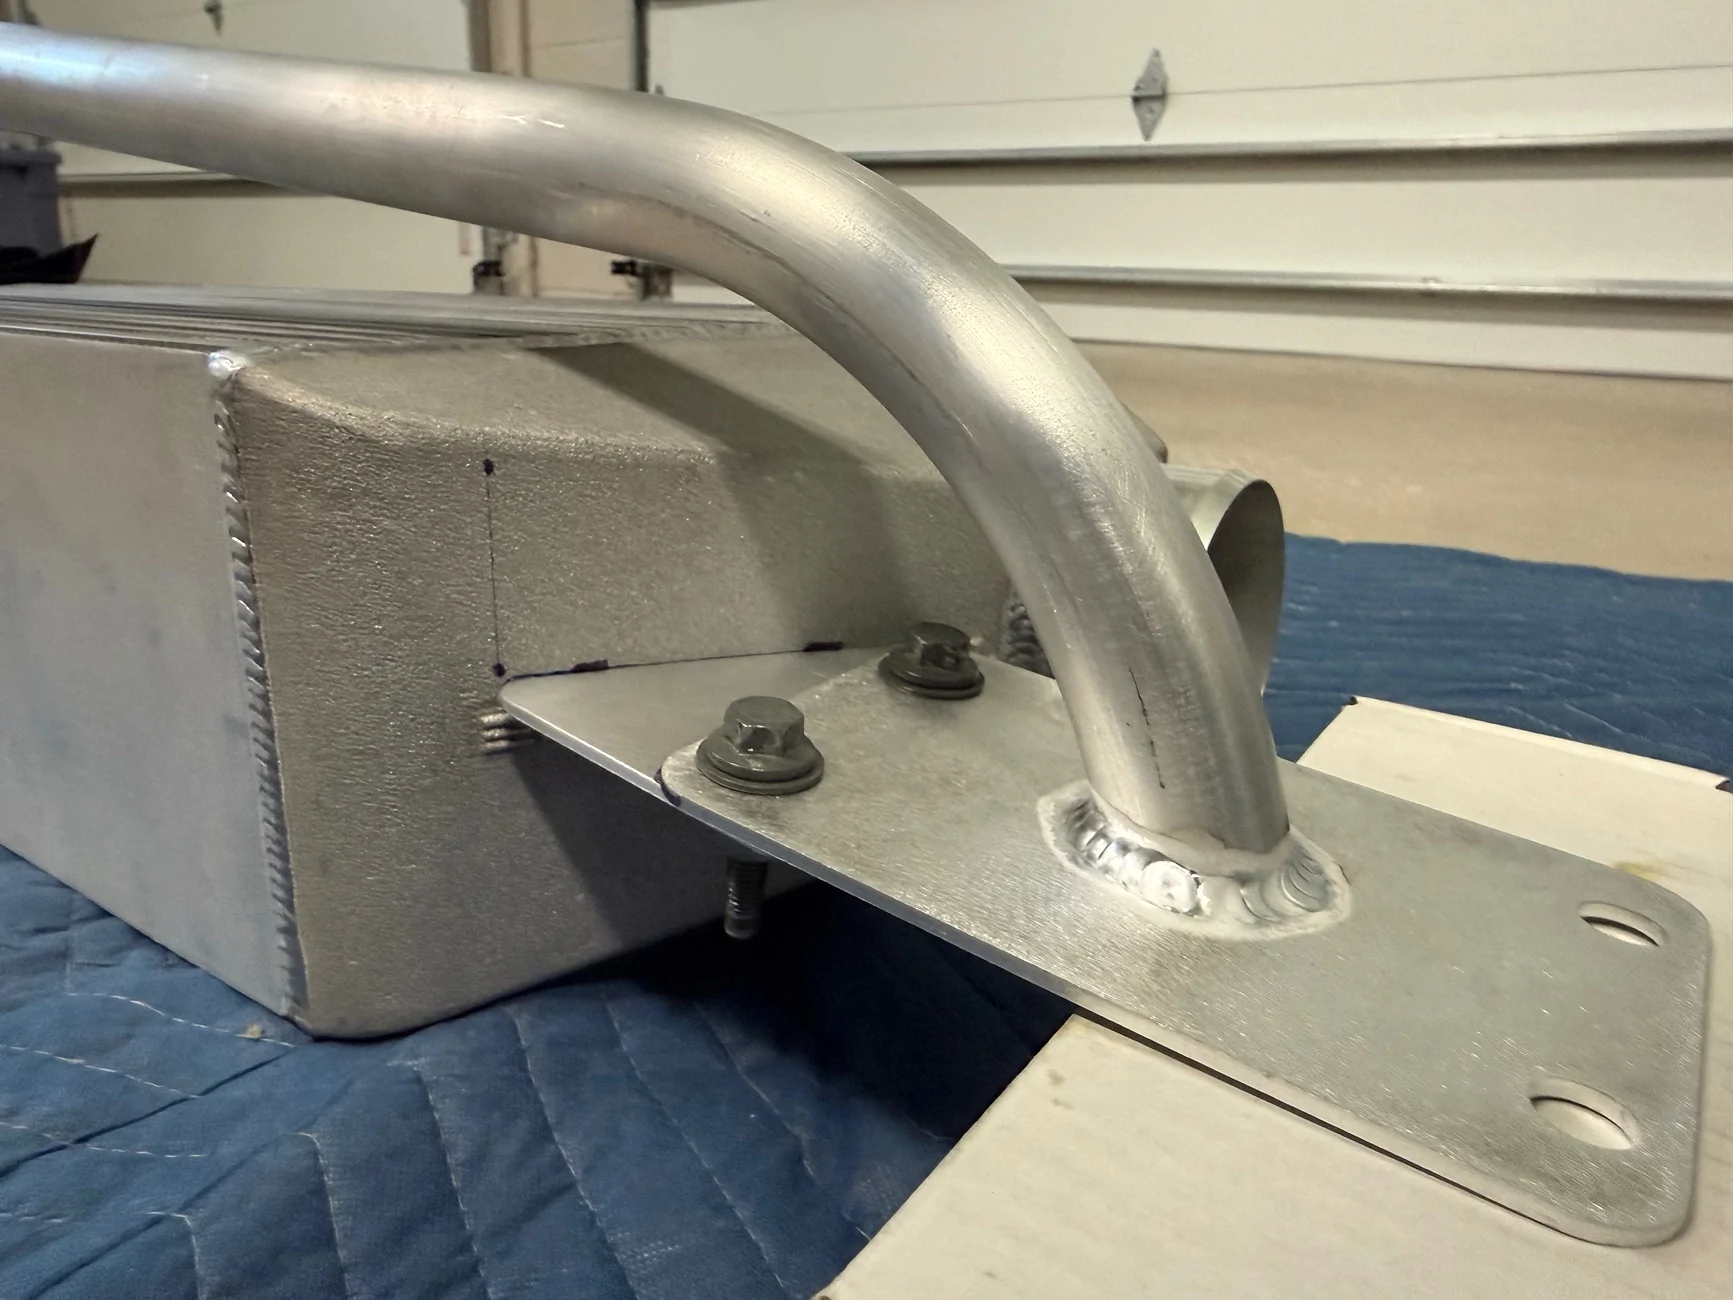
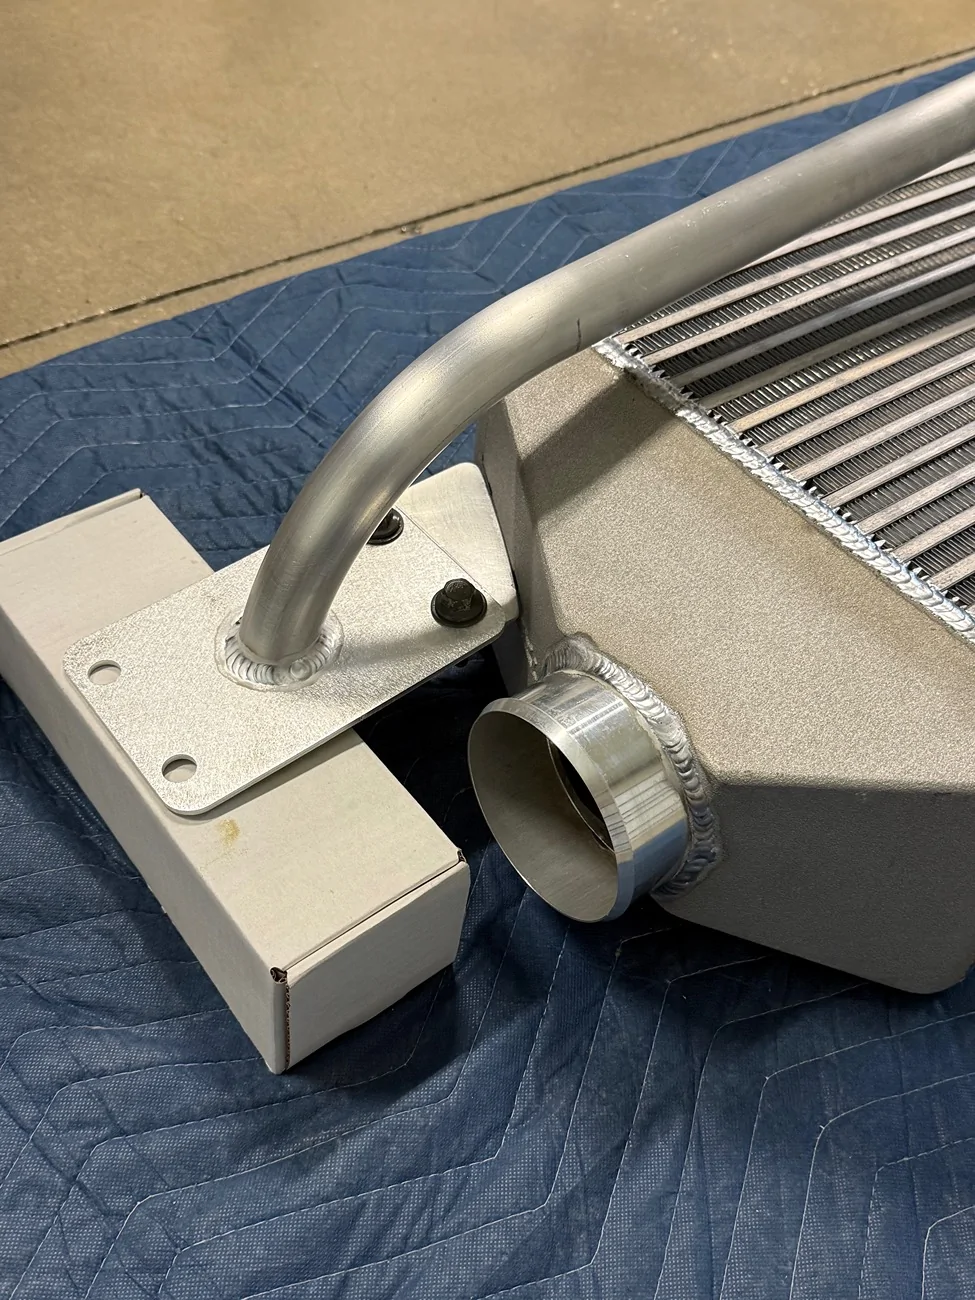
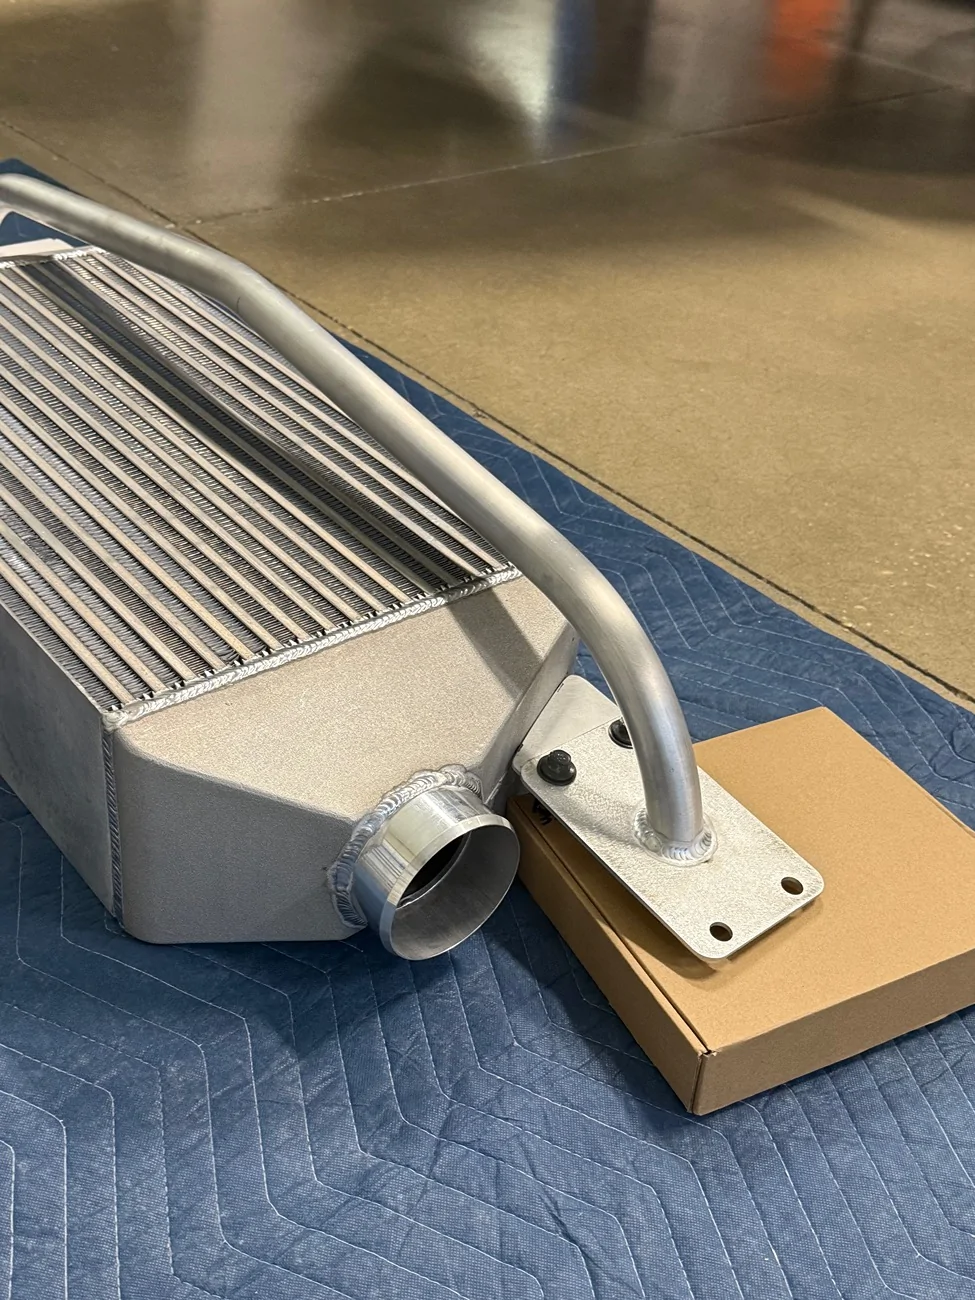
Testing fitment of the Mike Thomas Fab front bumper support bar appears to be very good. I do need to source some spacers for the outside mounting holes to put between the bar plate and frame rail. As you can see in the video, there’s plenty of clearance with the 6” IC. The bar is also super light and only weighs 2.2 lbs.

Last edited:
diambo4life
Well-Known Member
How do they not test this for each and every one they make as a normal QC check? Isn't this thing like $500?More info. on this subject:
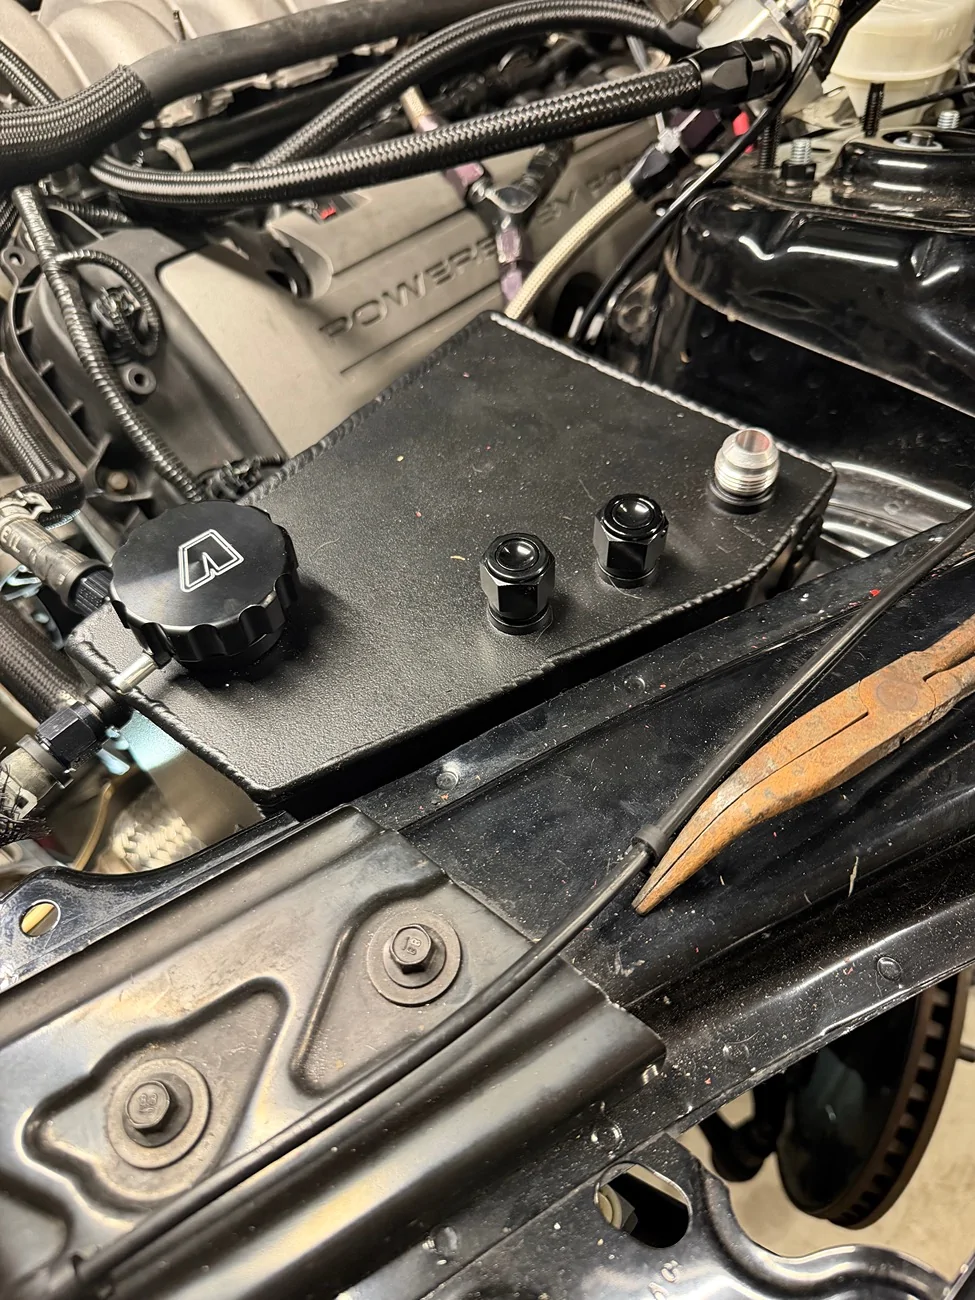
An internal divider leak in a
BL Fabrications (BL Fab) dual-chamber tank (often a coolant reservoir/oil catch can combo) is a critical failure because it allows cross-contamination between your cooling system and your engine's blow-by/oil vapors.
Symptoms of an Internal Divider Leak
- Contaminated Coolant: You may see an oily film, milky residue, or "sludge" inside the coolant side of the tank.
- Coolant in Catch Can: If you find significant amounts of watery, colored liquid (coolant) in the oil catch can side, the divider has likely breached.

wazslow
Well-Known Member
Man, I genuinely appreciate your skill and determination in getting this project completed. You are doing an amazing job both working on the car as well as documenting everything. I really think you would have been happier with the Hellion Street Sleeper kit. It's capable of 1000+hp without all of these challenges and you would still have air conditioning.
Sponsored
wingnutt
Well-Known Member
I really think you would have been happier with the Hellion Street Sleeper kit. It's capable of 1000+hp without all of these challenges and you would still have air conditioning.

OP
OP
NGOT8R
Well-Known Member
- Thread starter
- #397
Thank you! Tbh, the BL Fab kit was one of the first ones that I saw and it really appealed to me. Unfortunately, it would prove to be quite the challenge to install, complete with lots of surprises (and not the good kind either). I trusted that it was as advertised, which was a mistake. Looking back, if I had it to do over again, I may have chosen a different kit and definitely talked to the guys running turbo S550s at the track to get their feedback on the various kits being used.Man, I genuinely appreciate your skill and determination in getting this project completed. You are doing an amazing job both working on the car as well as documenting everything. I really think you would have been happier with the Hellion Street Sleeper kit. It's capable of 1000+hp without all of these challenges and you would still have air conditioning.
gimmie11s
Well-Known Member
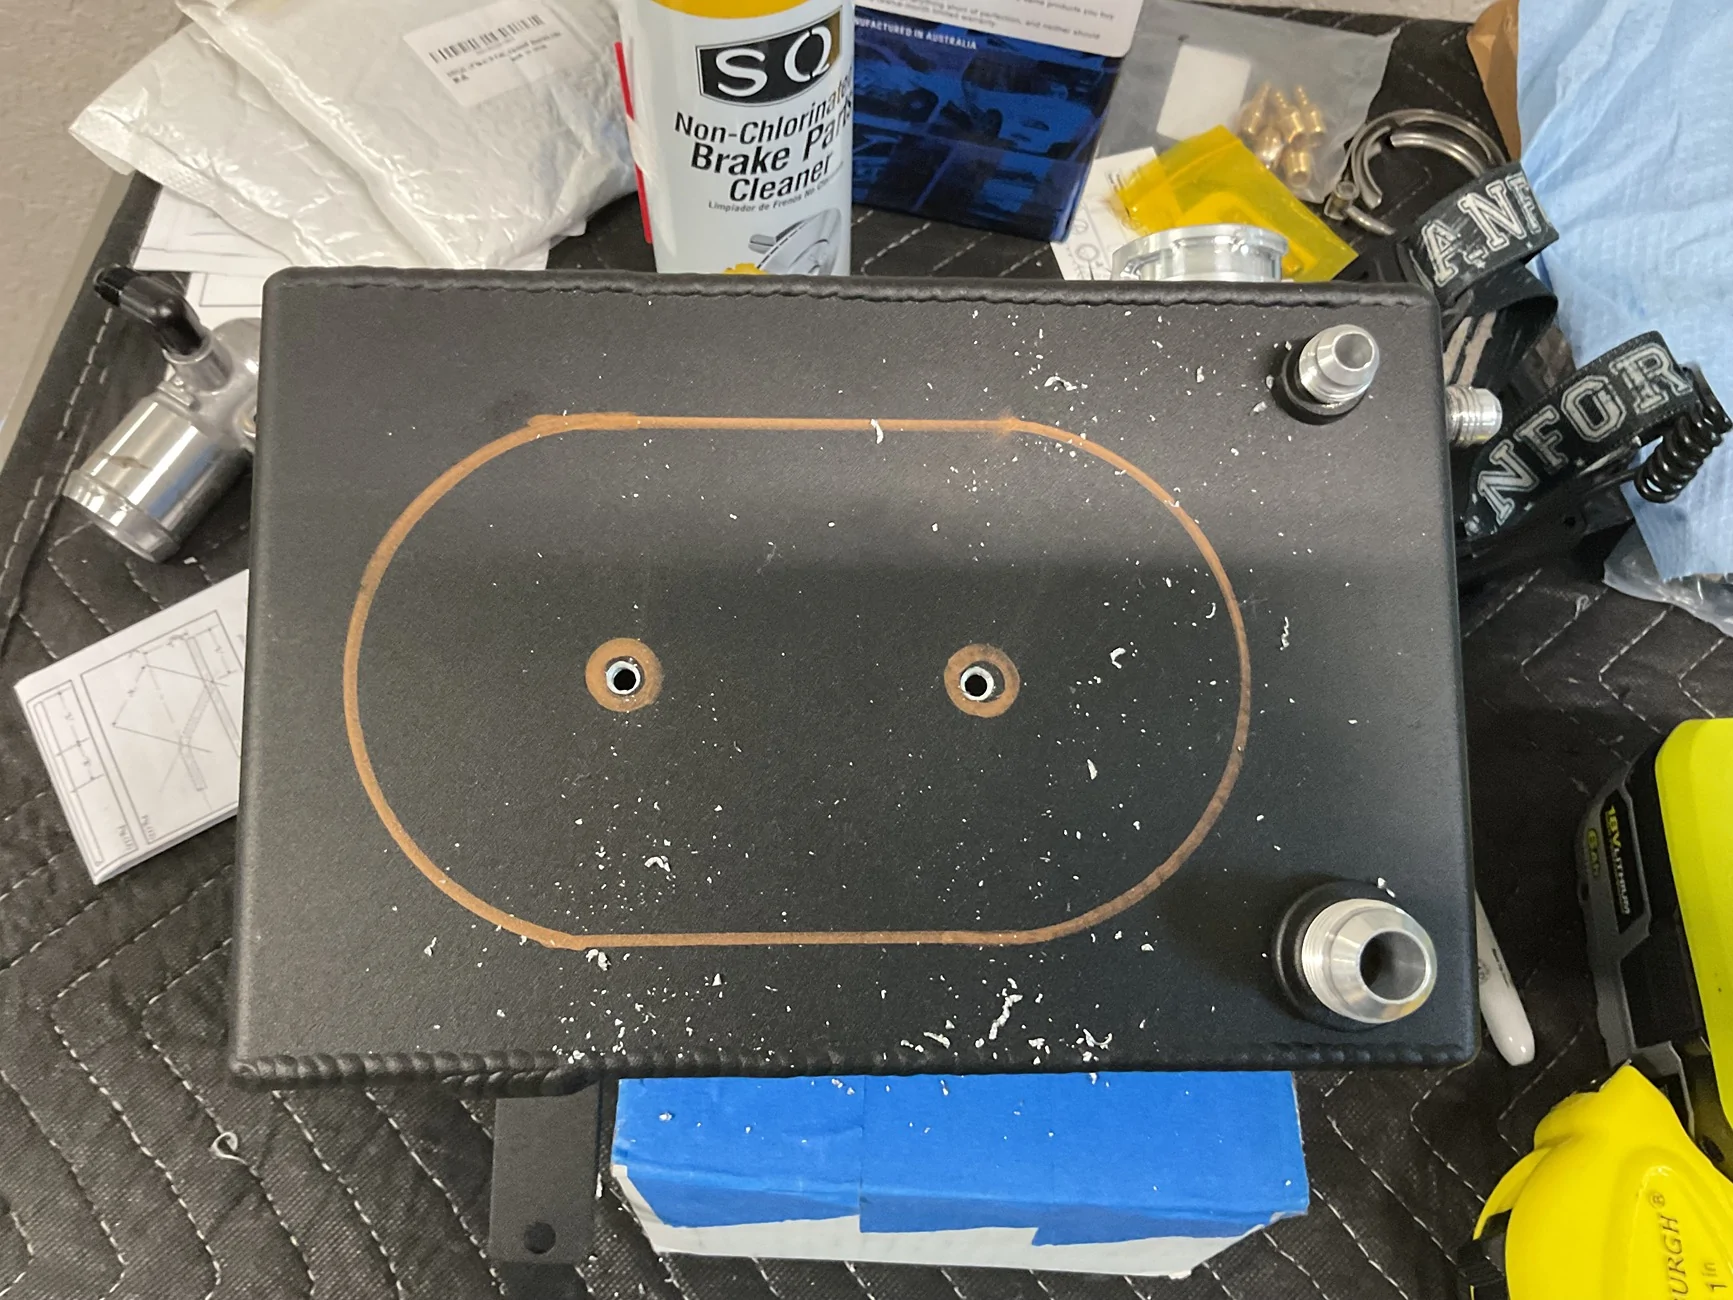
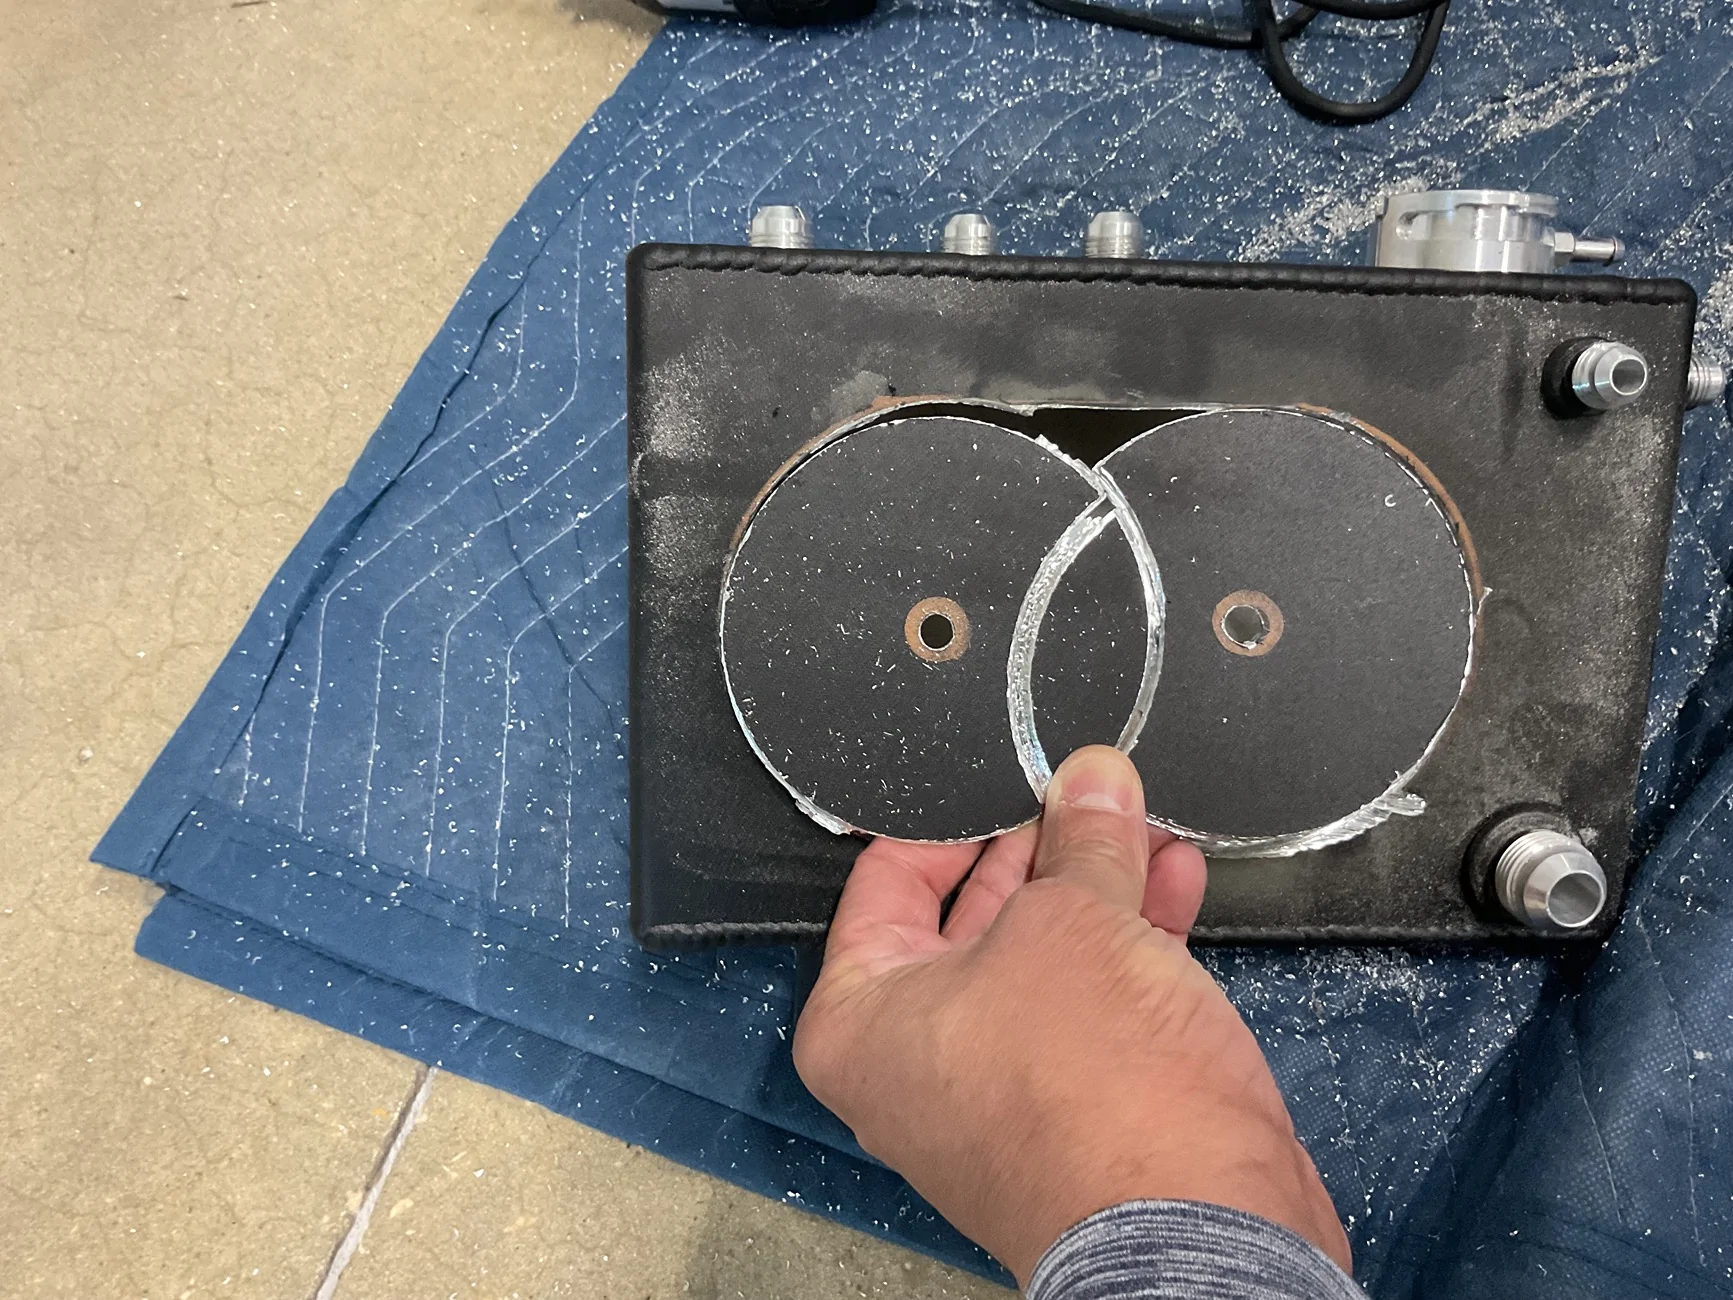
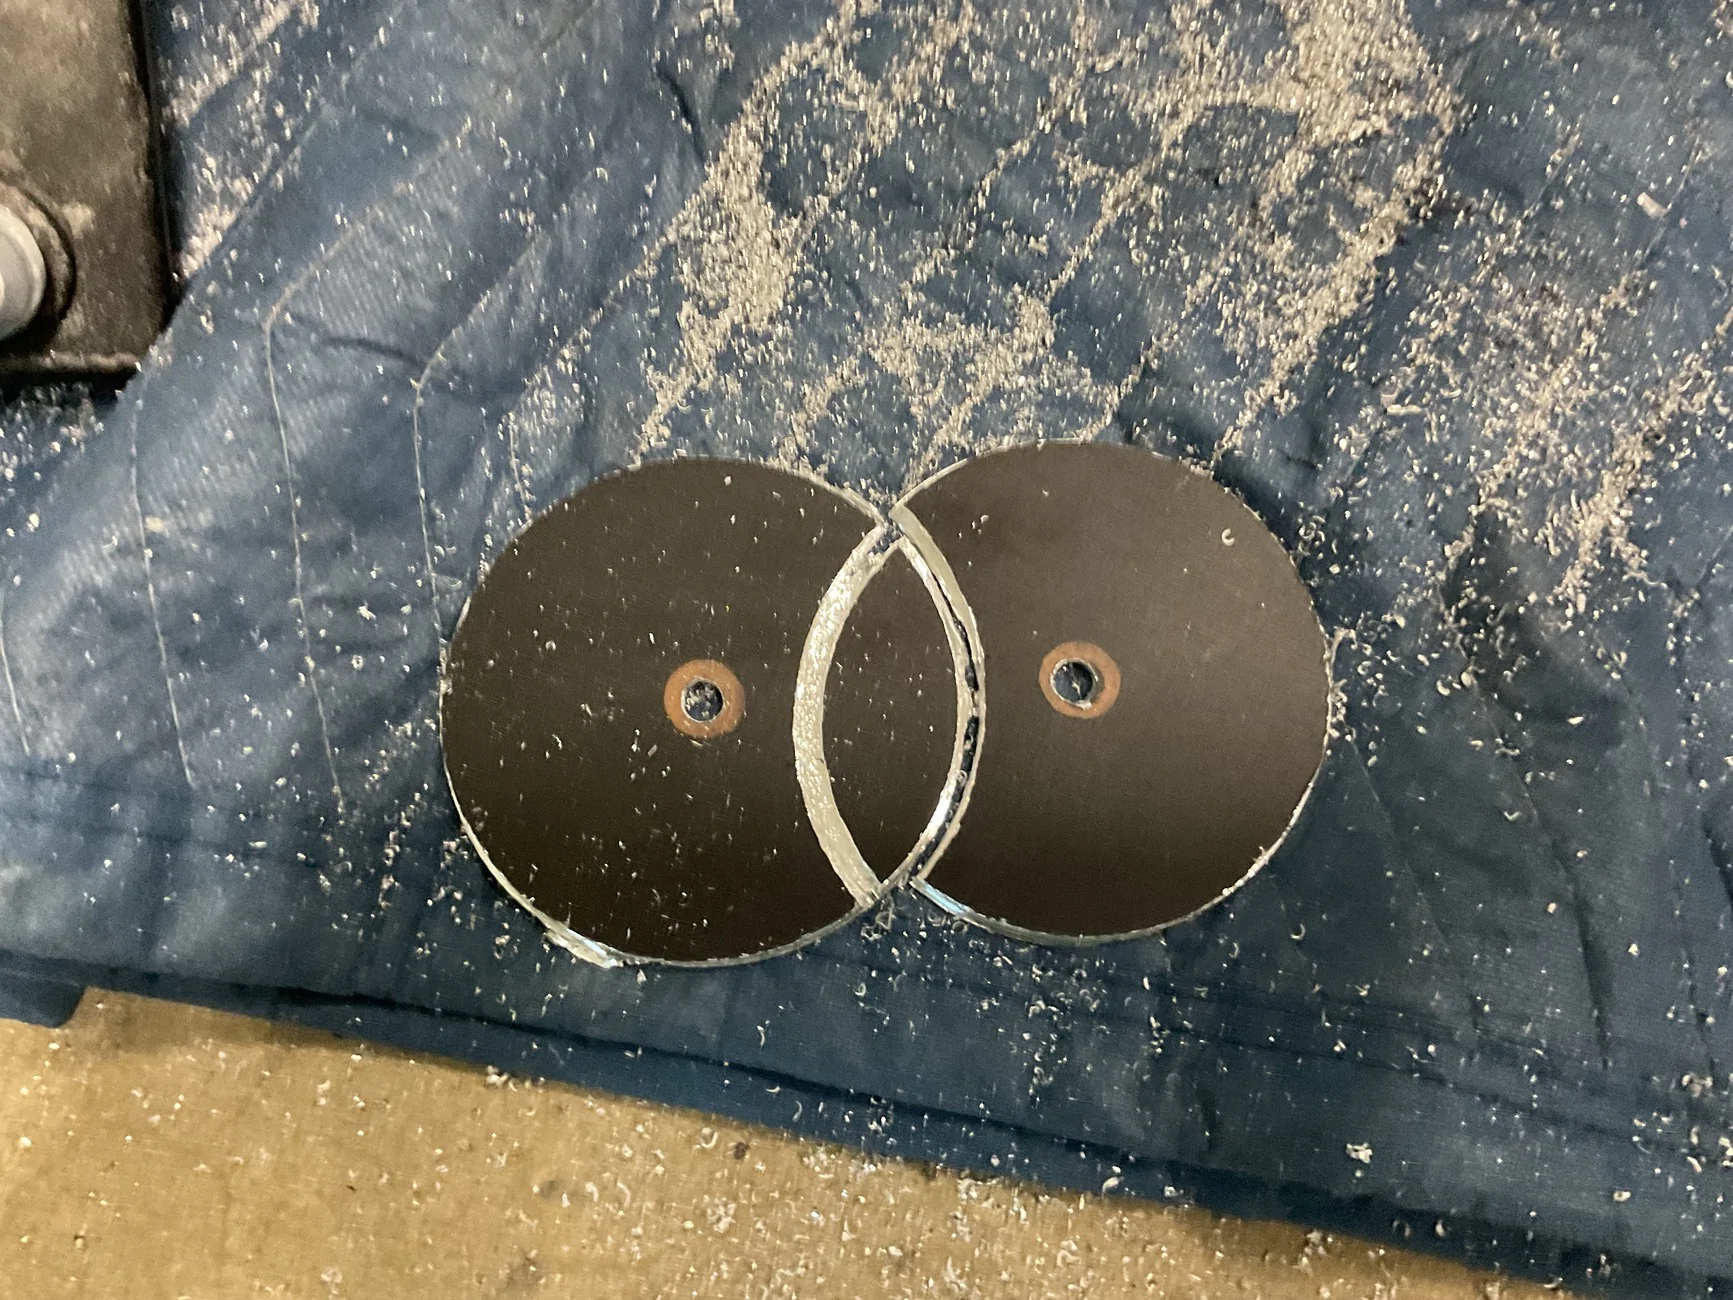
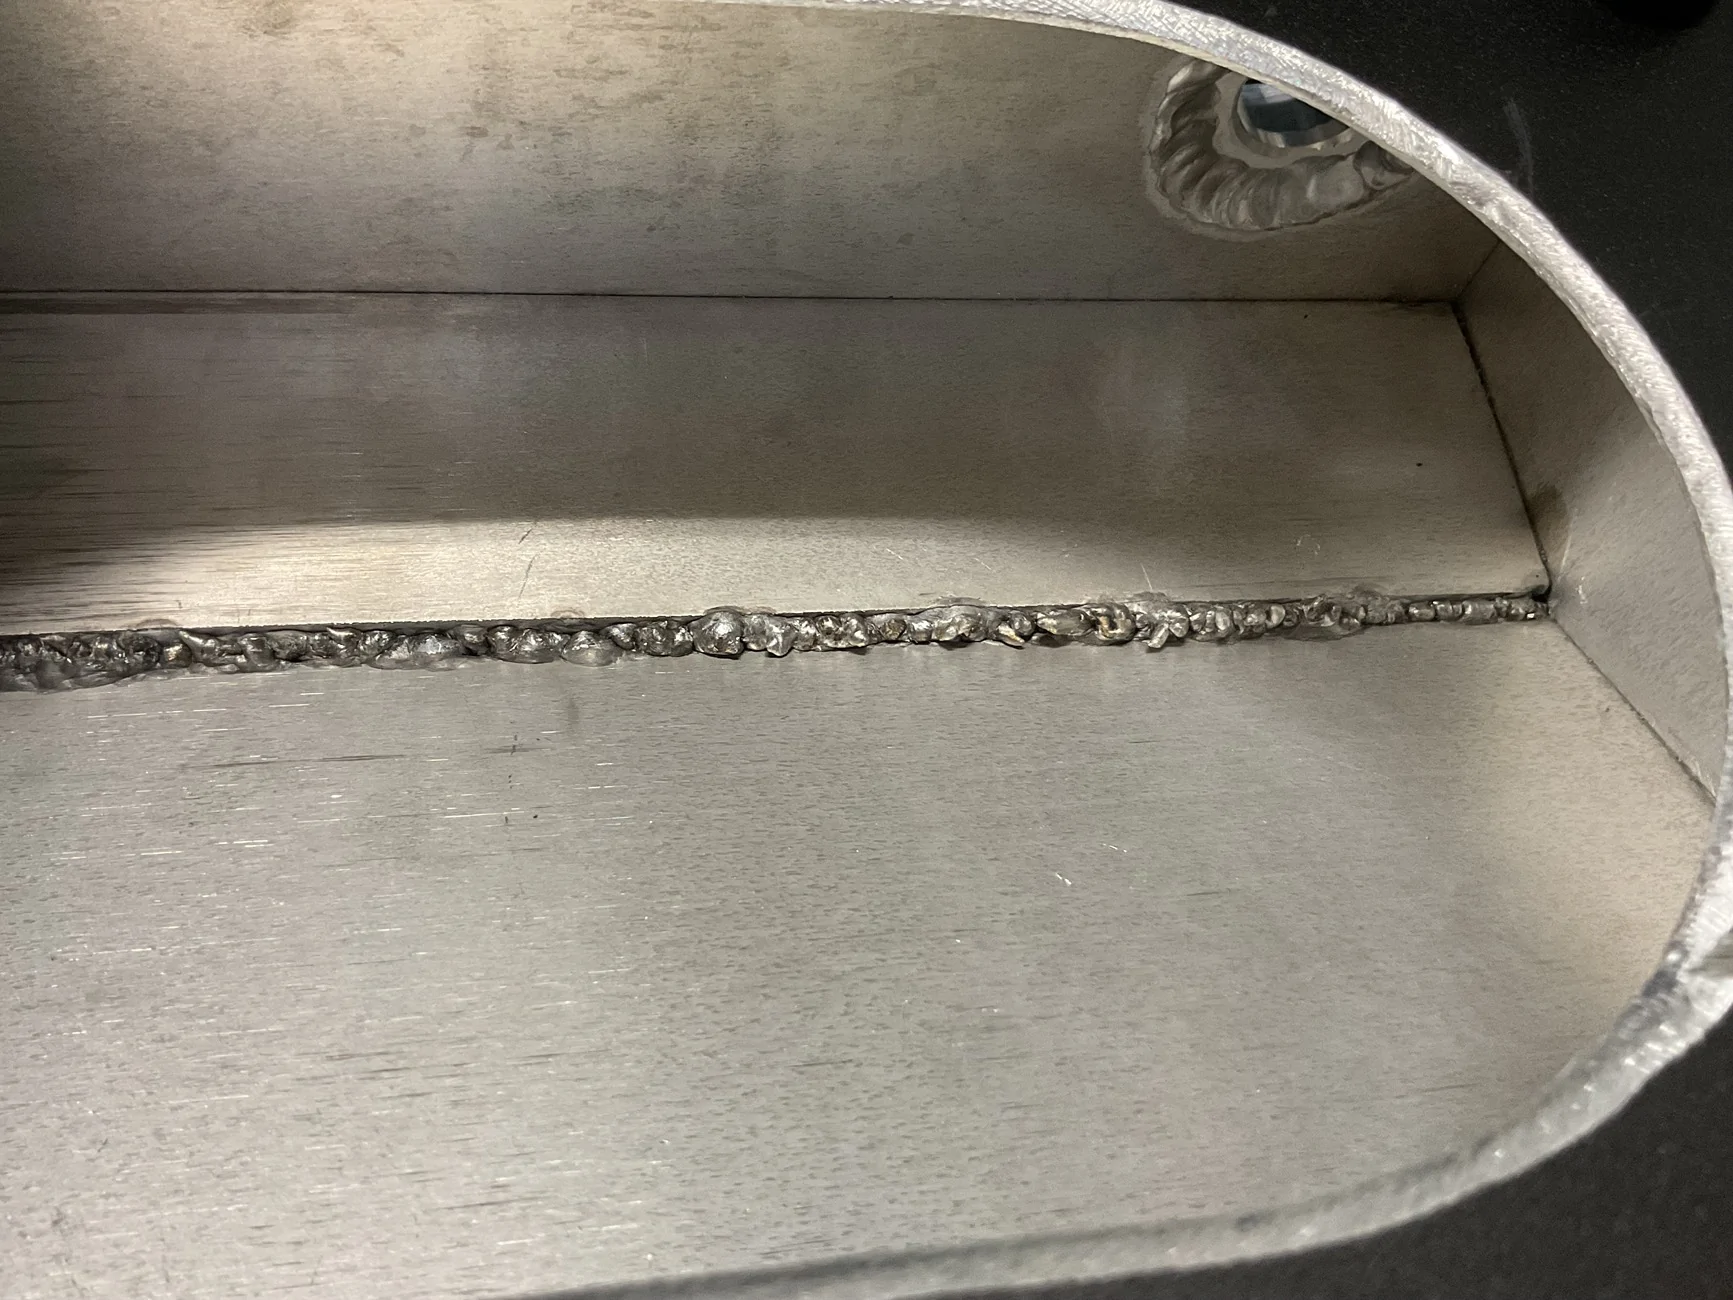
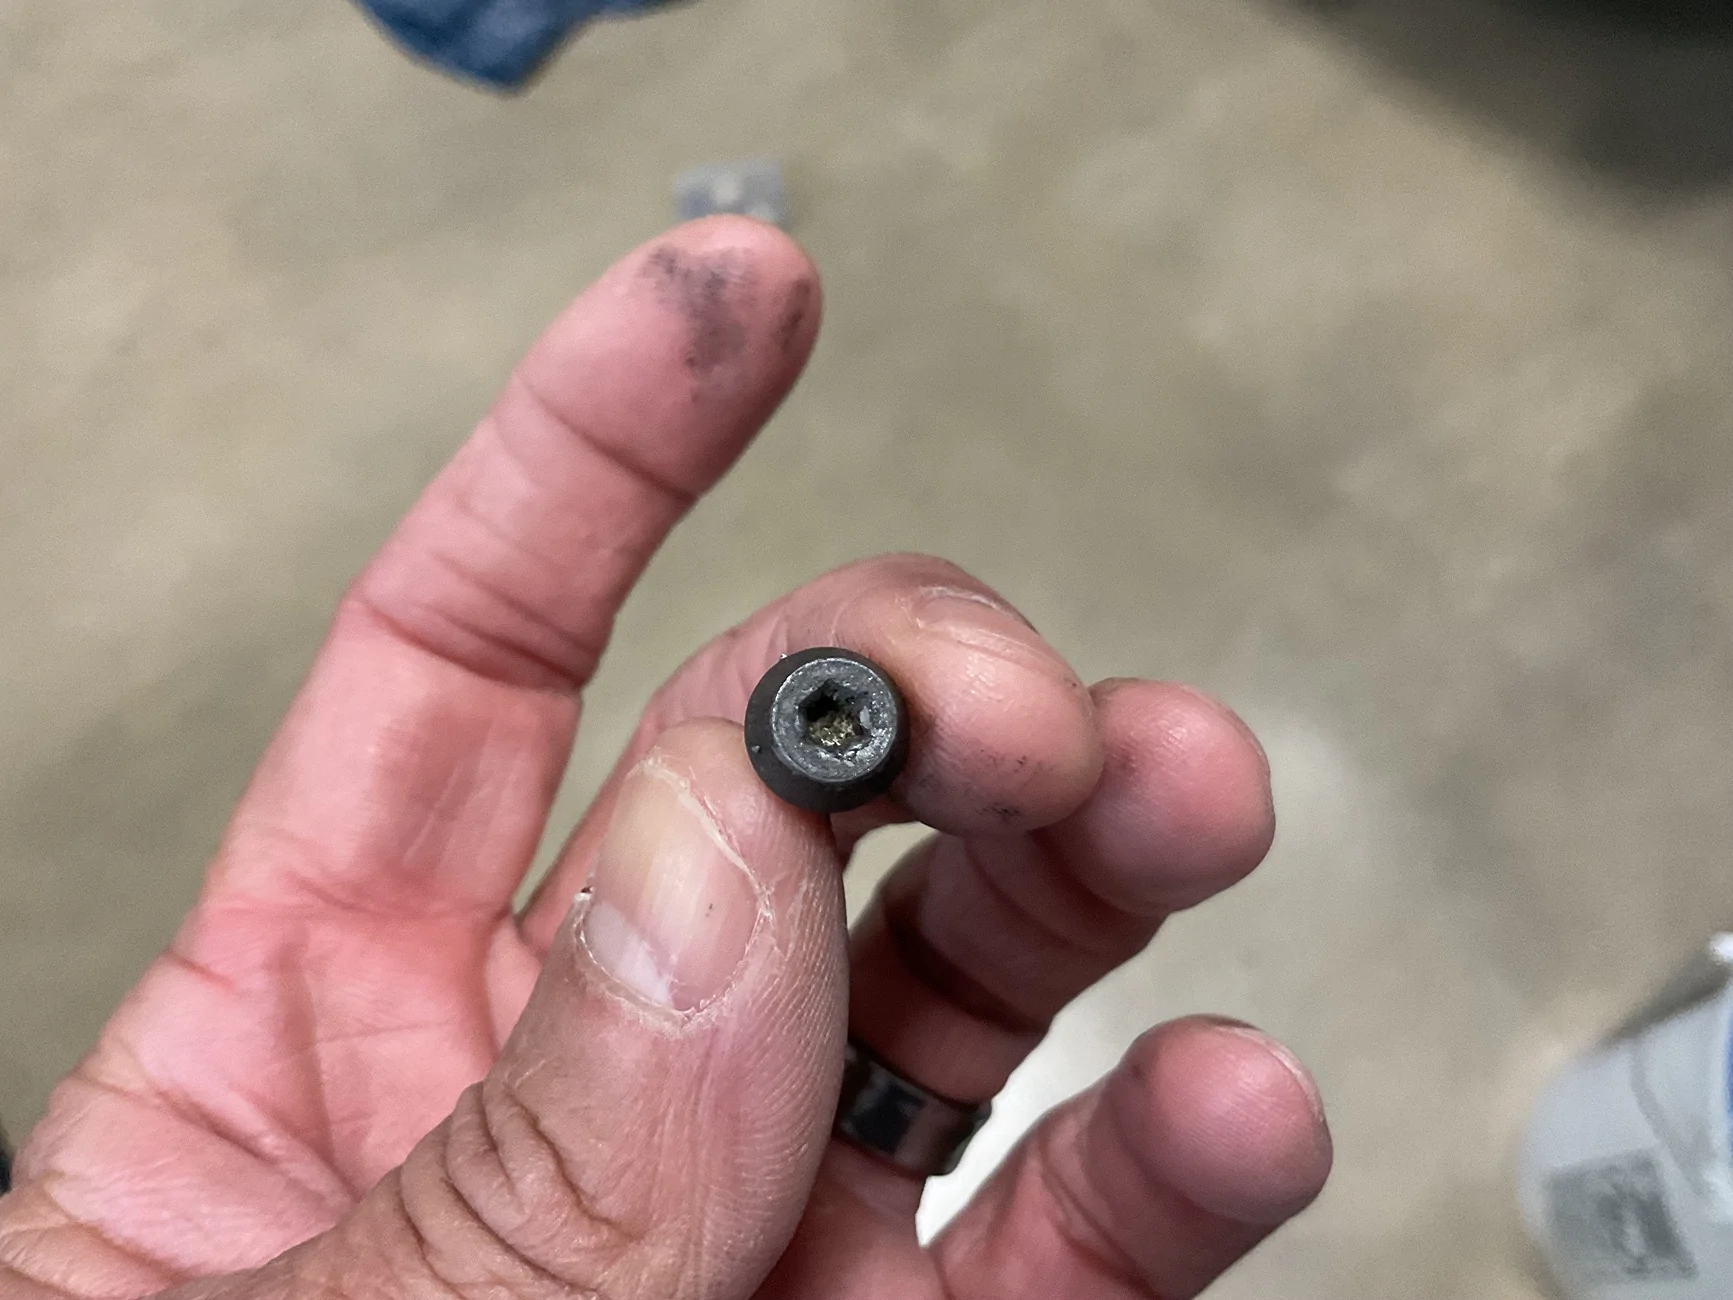
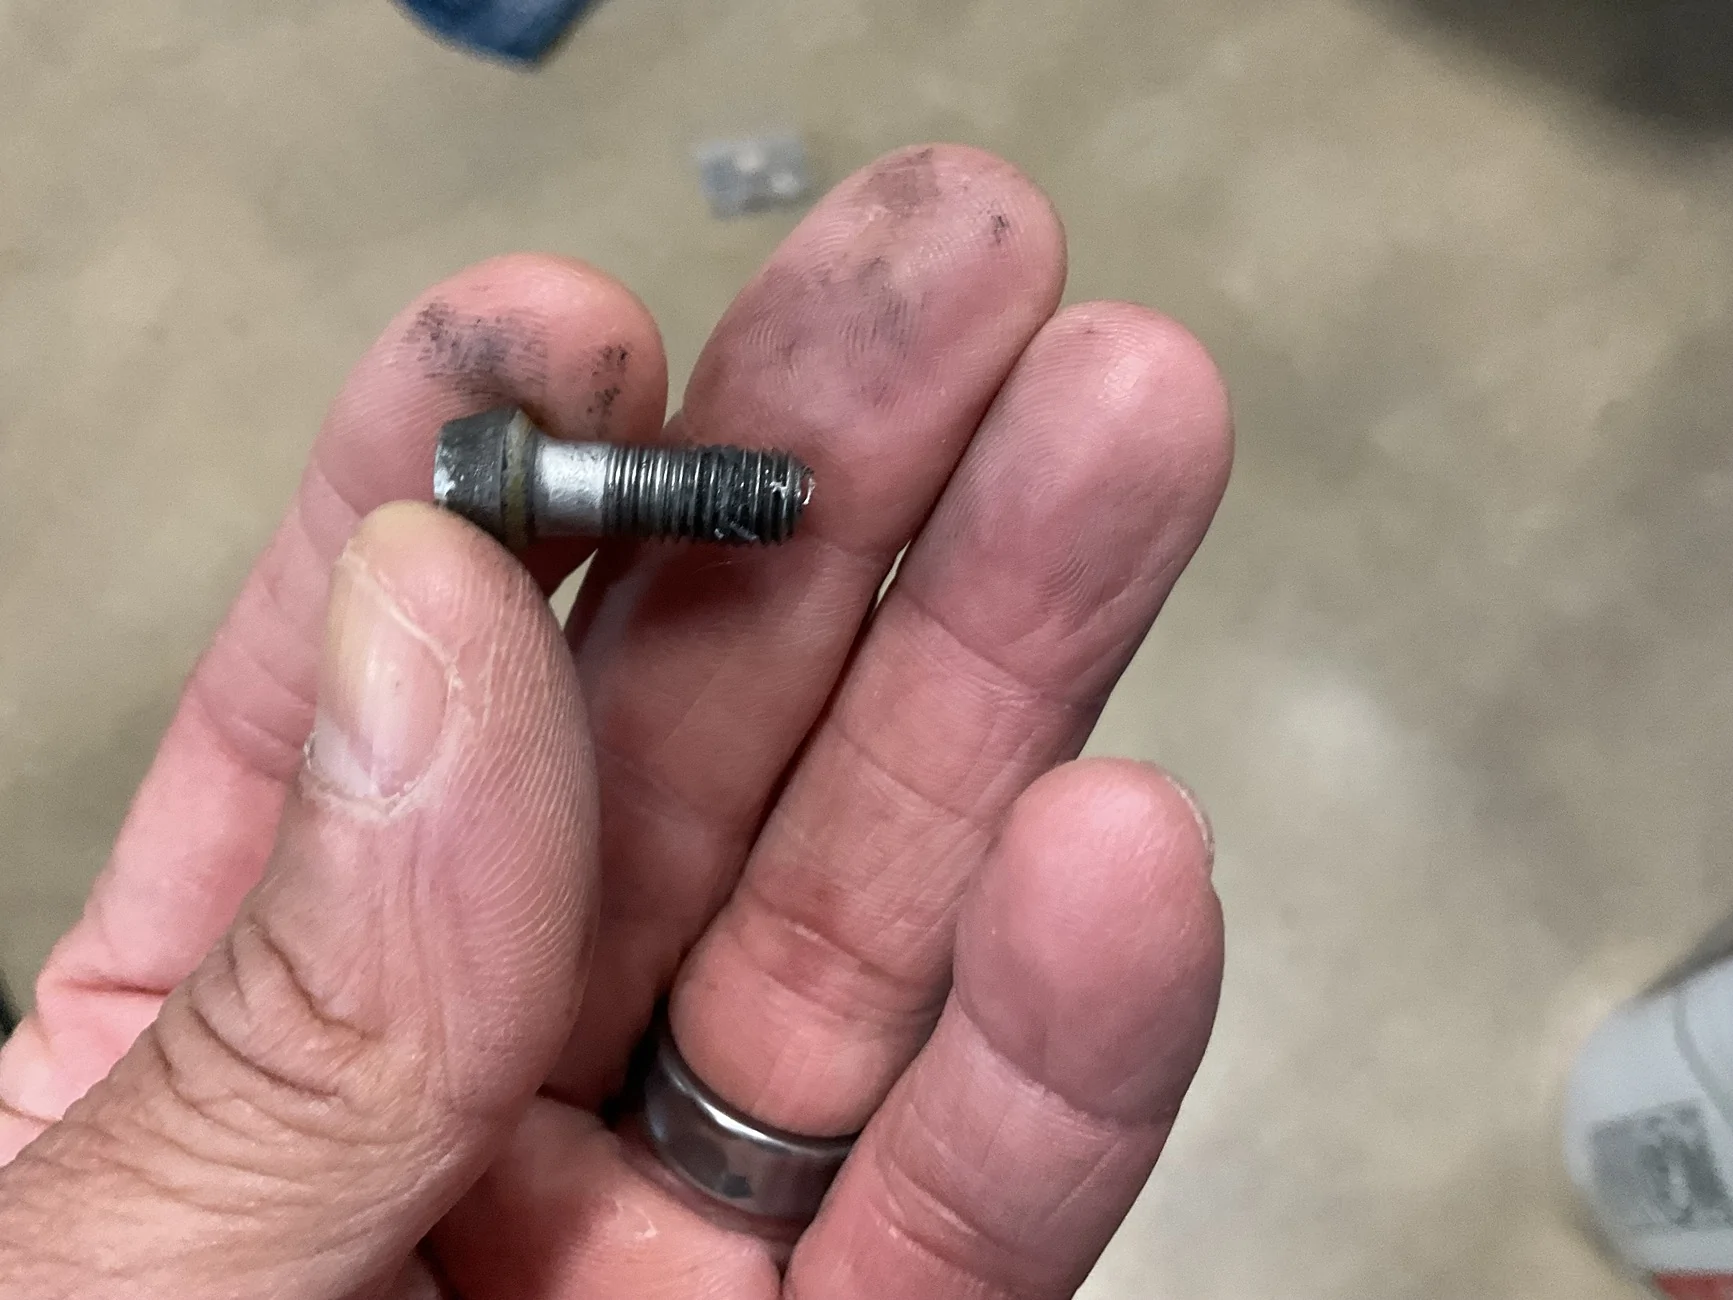
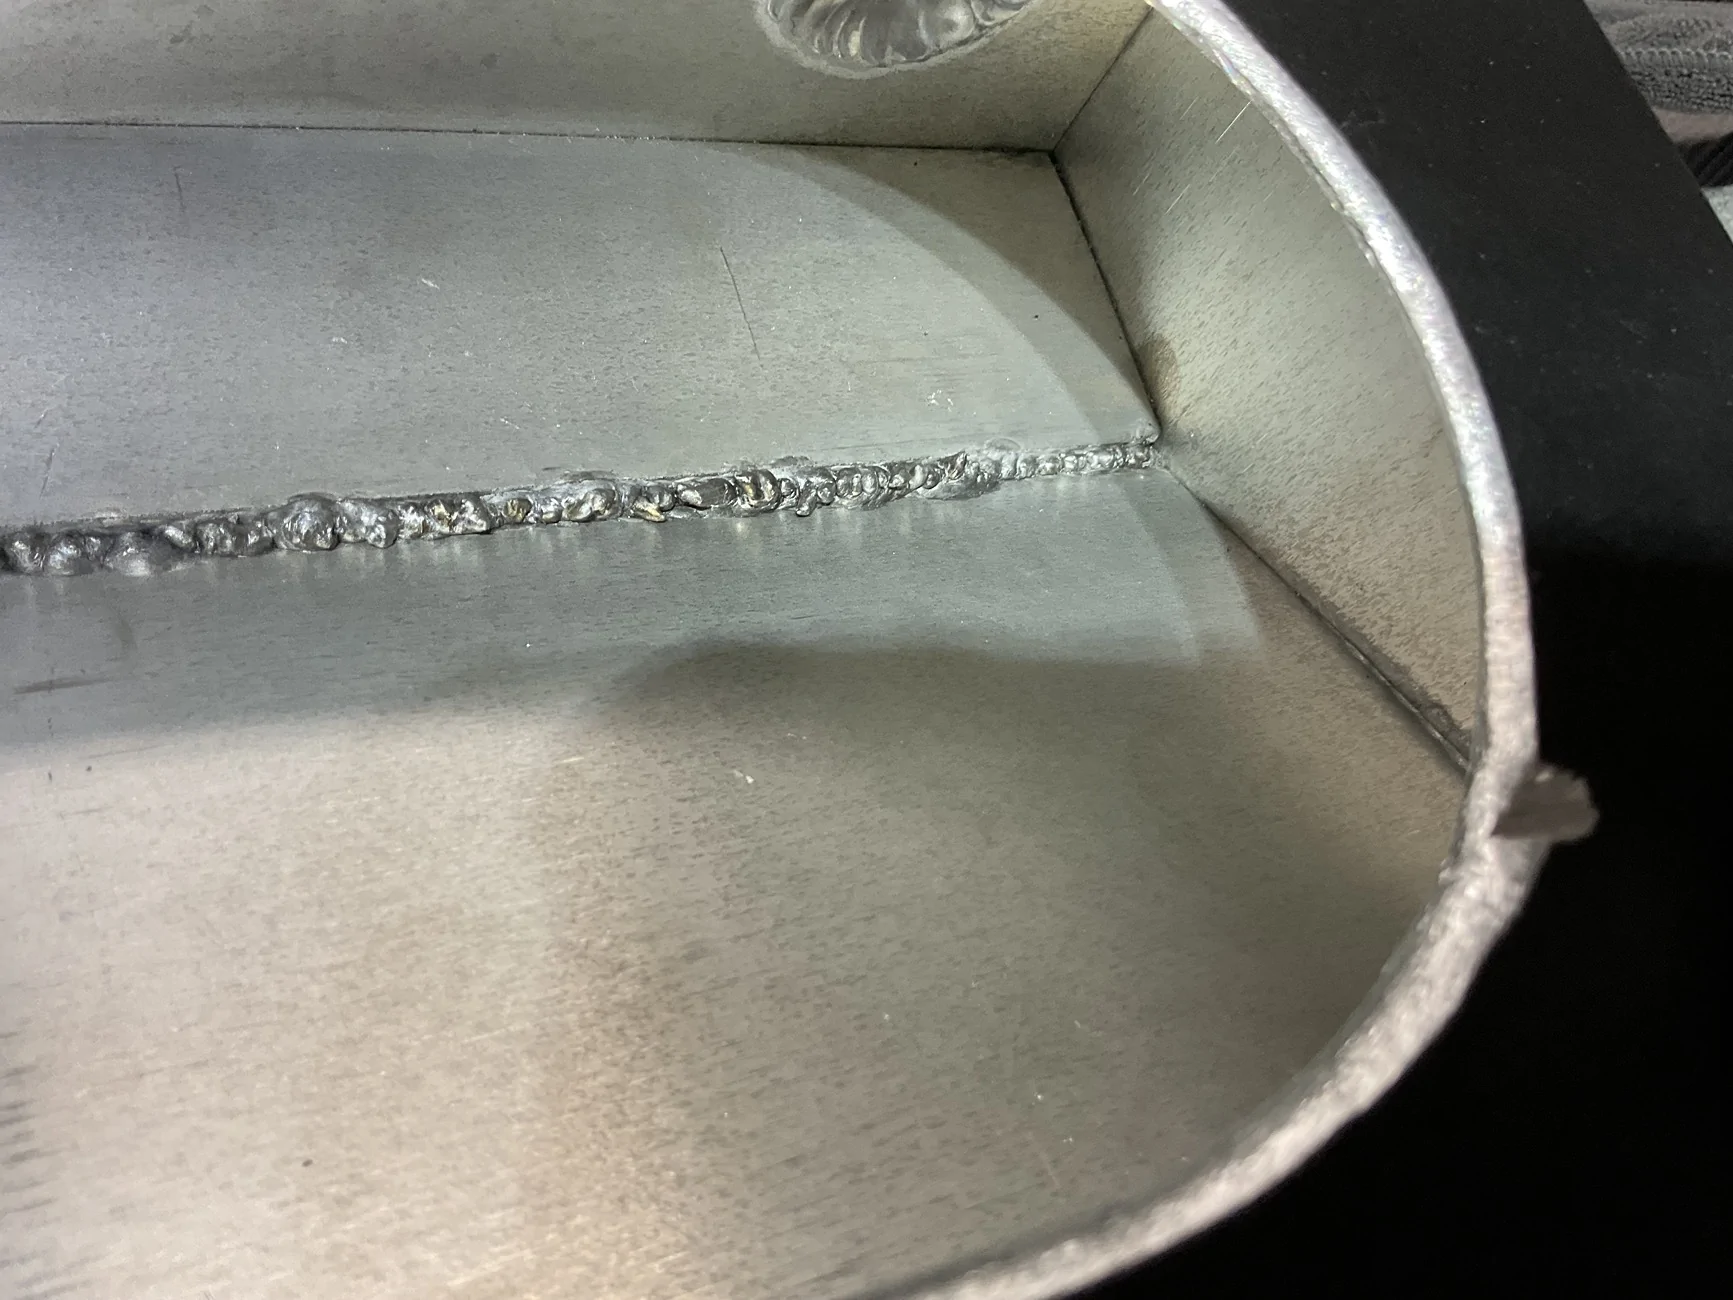
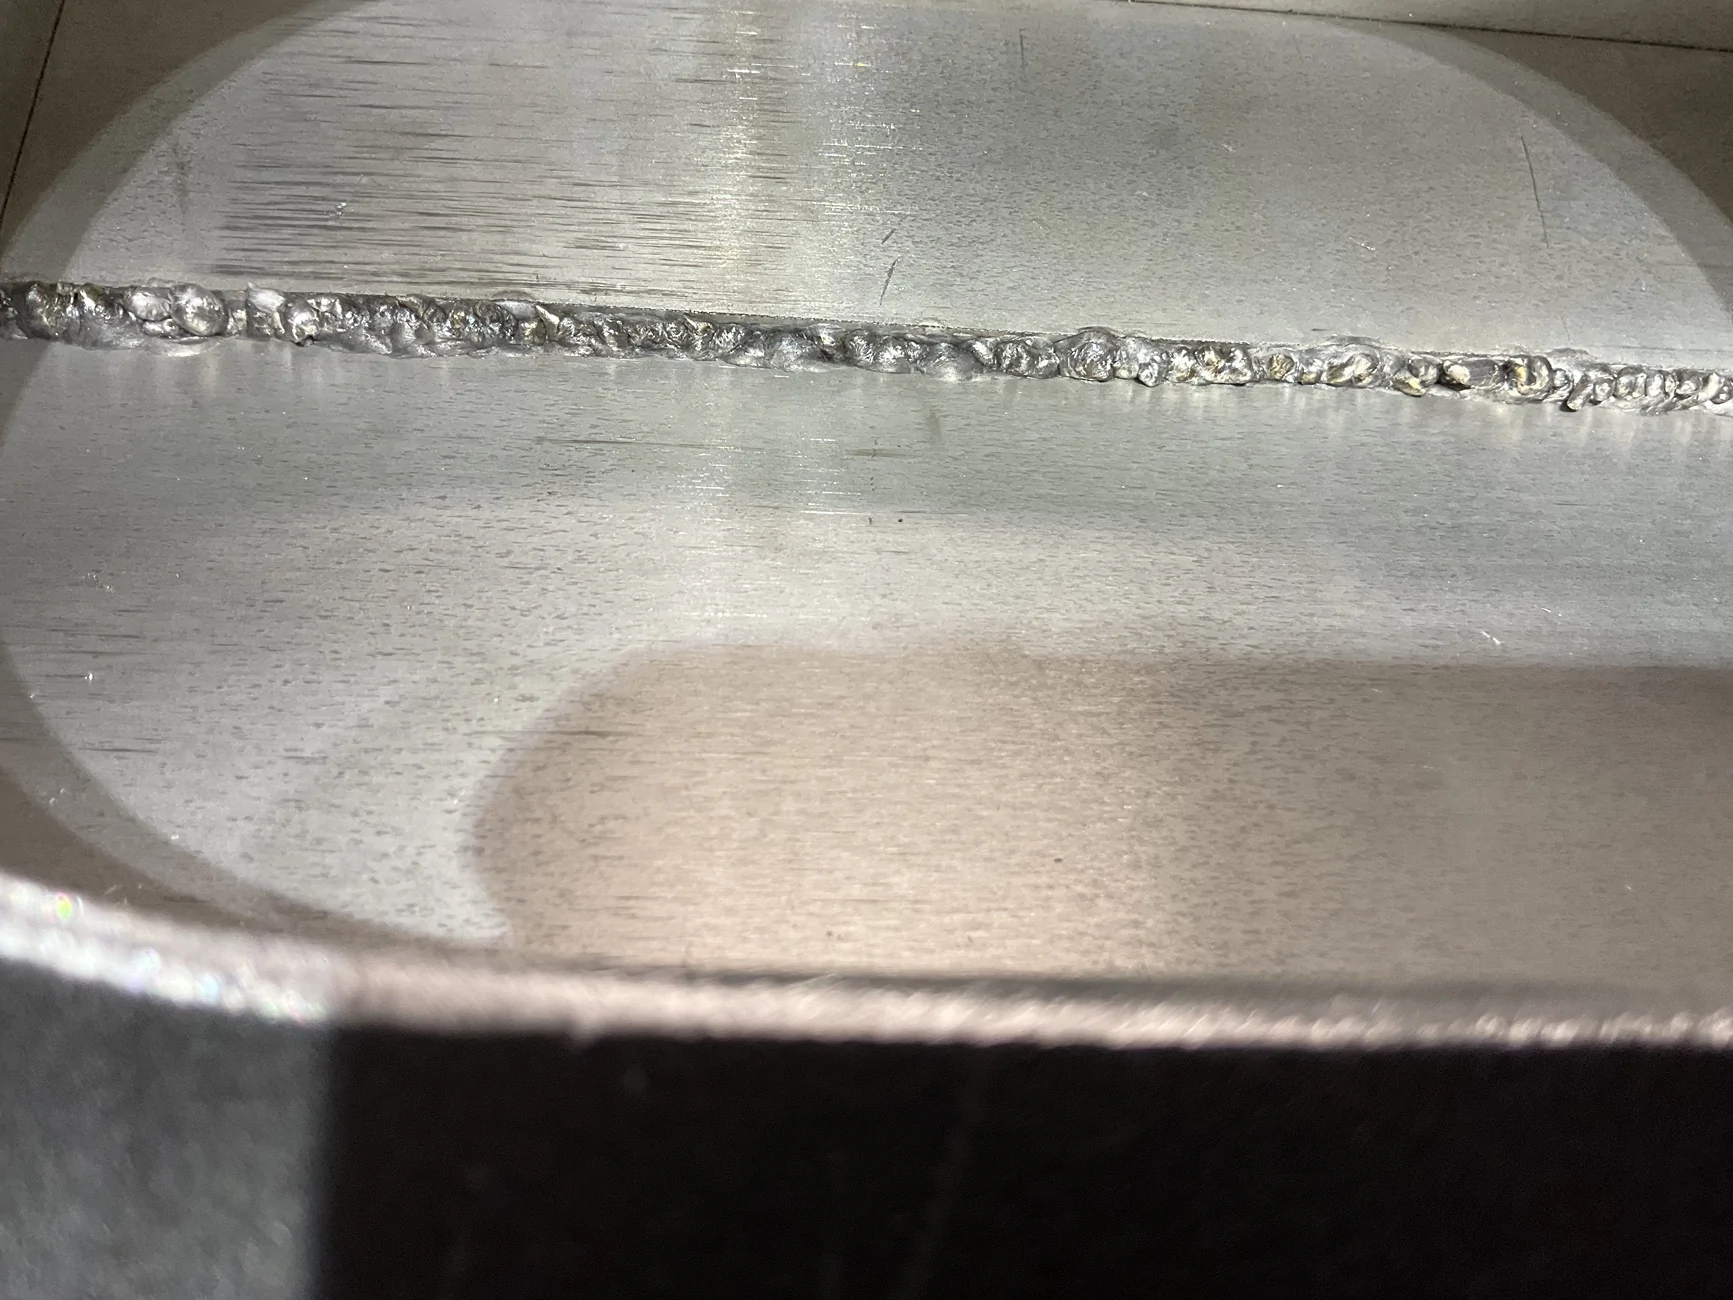
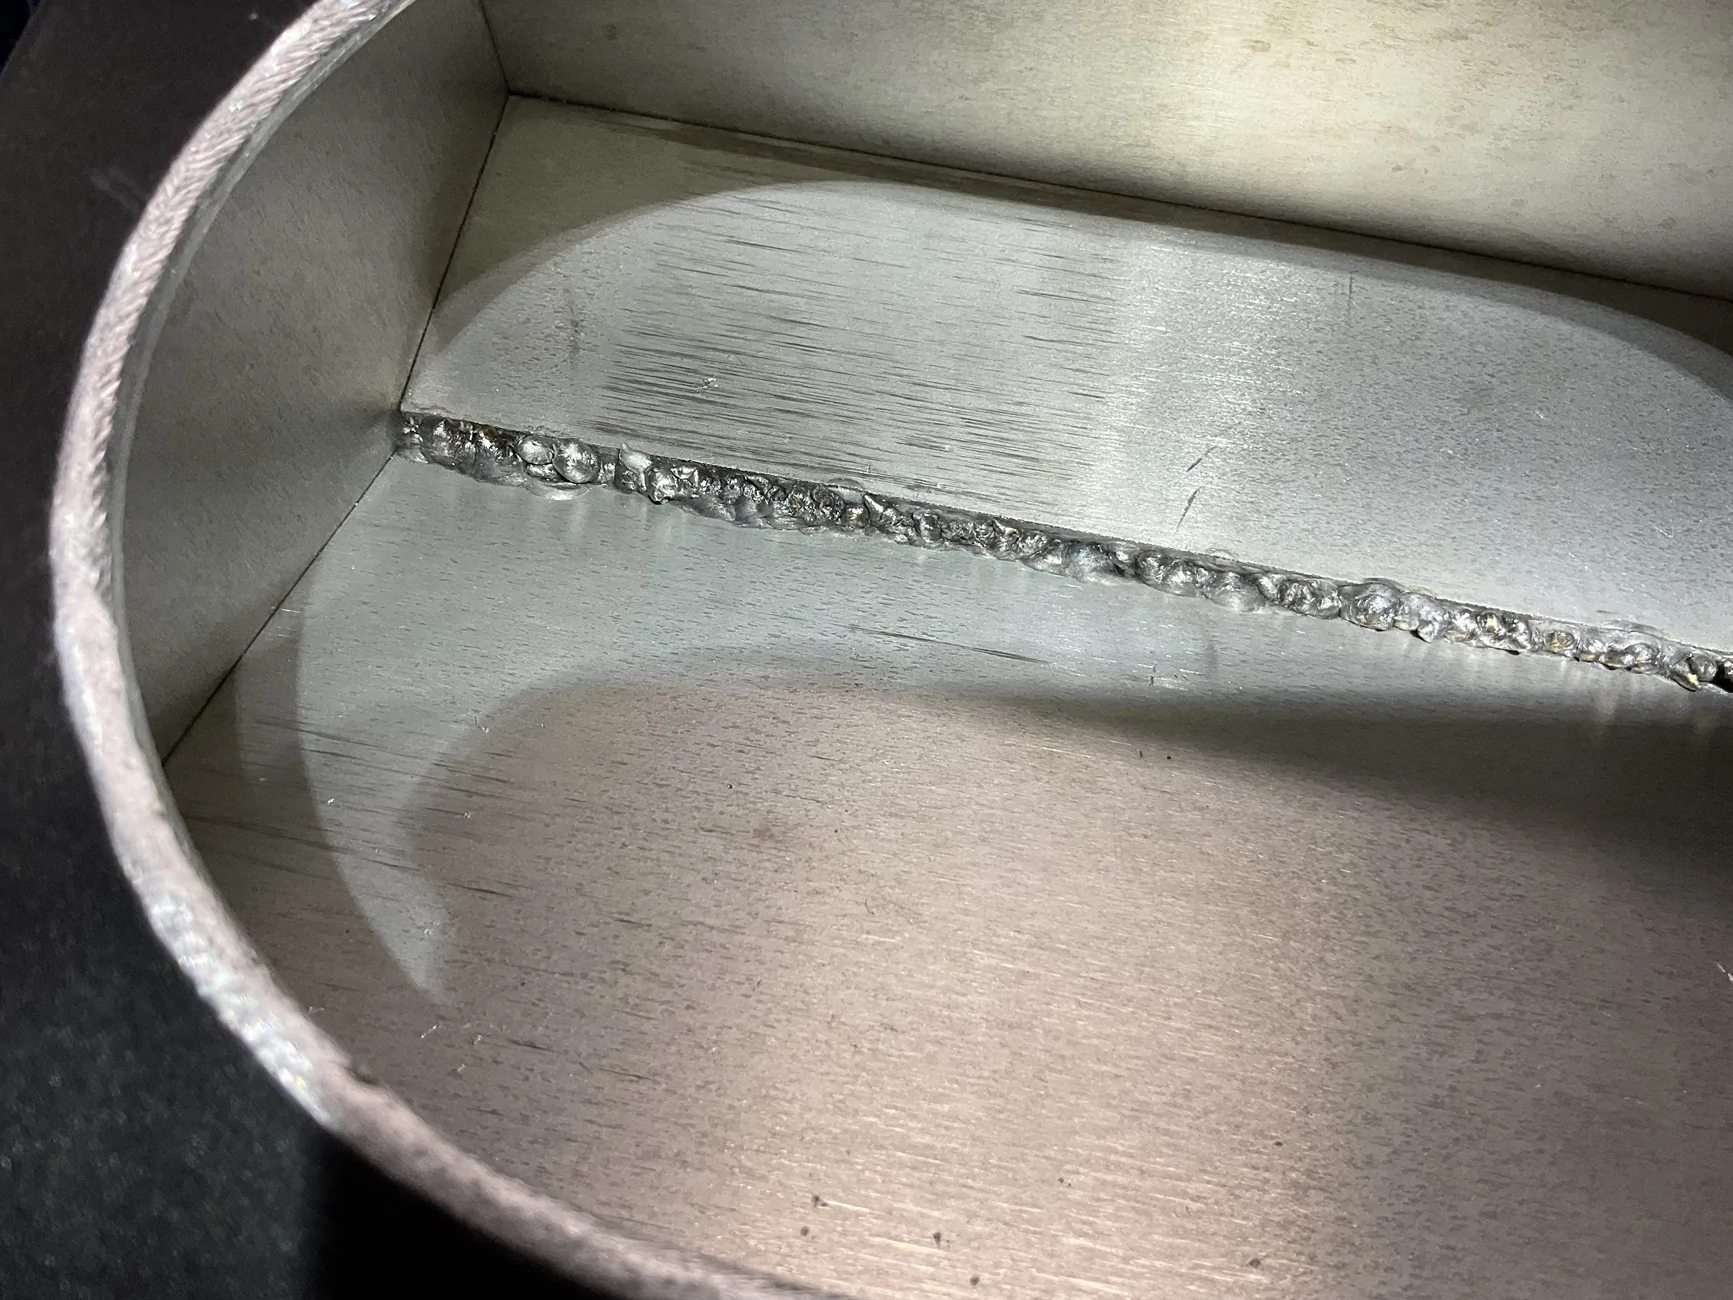
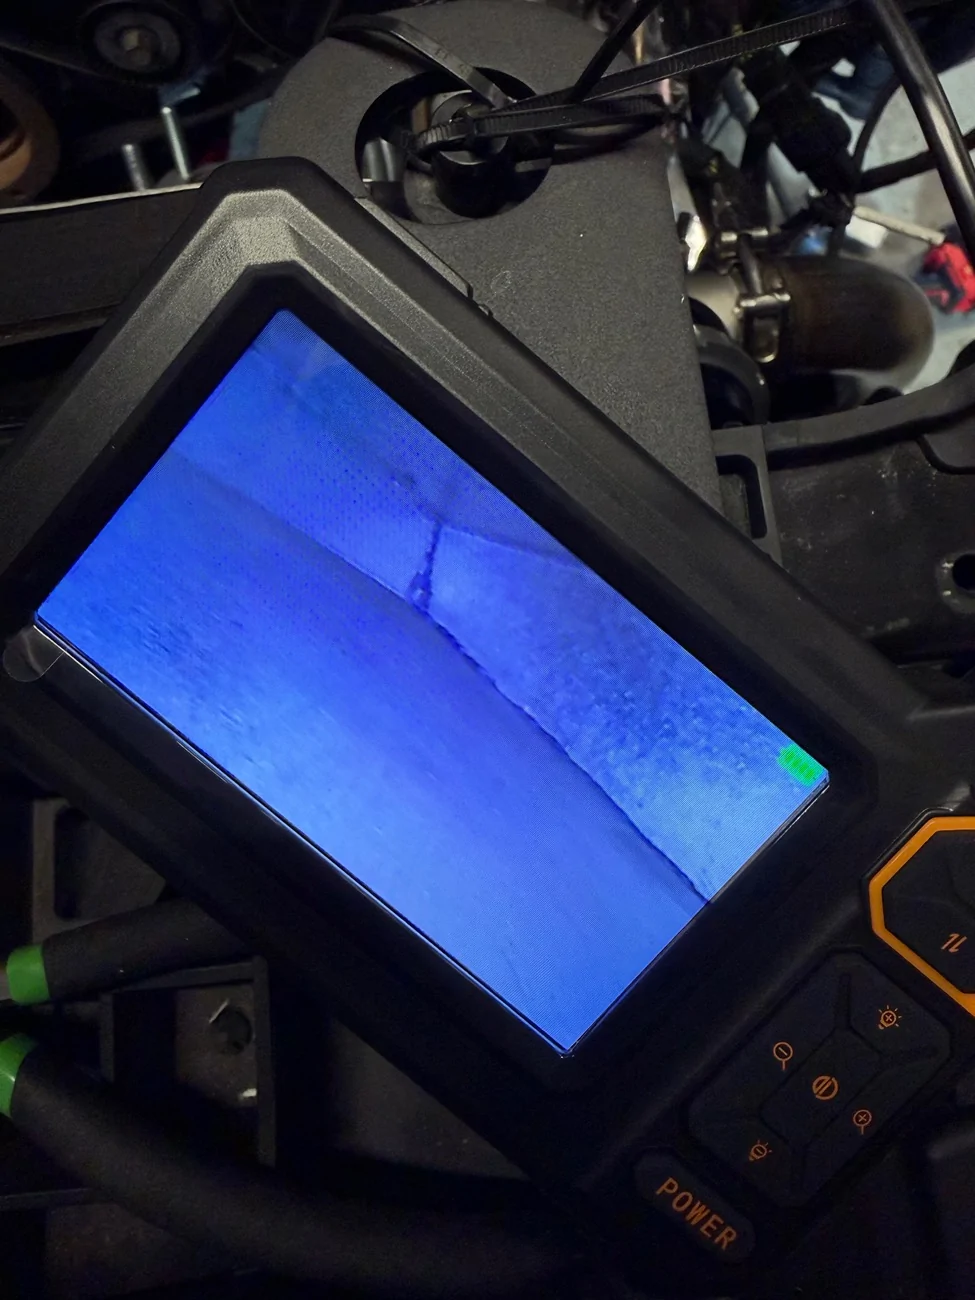
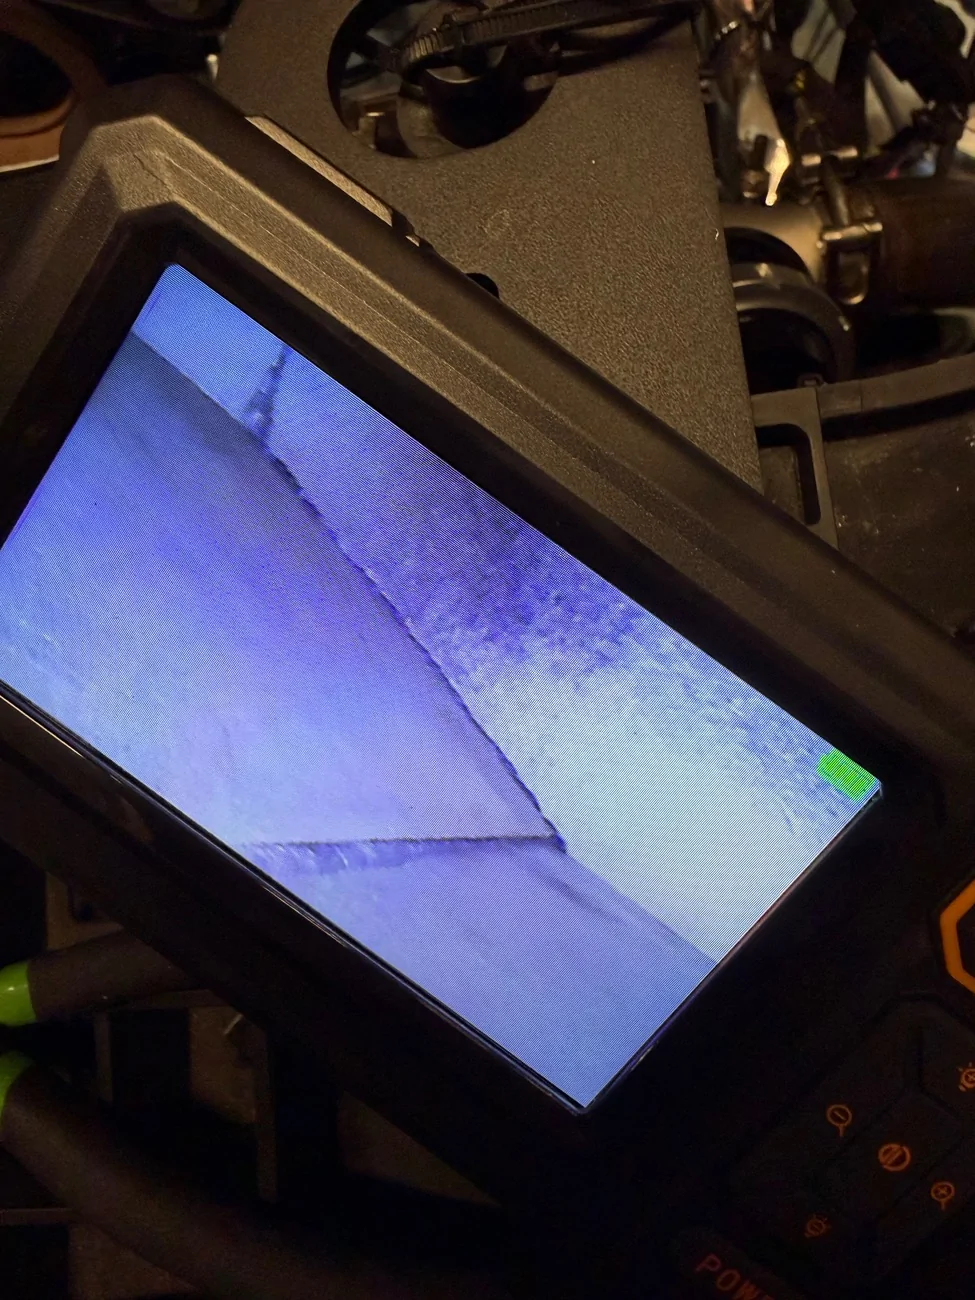
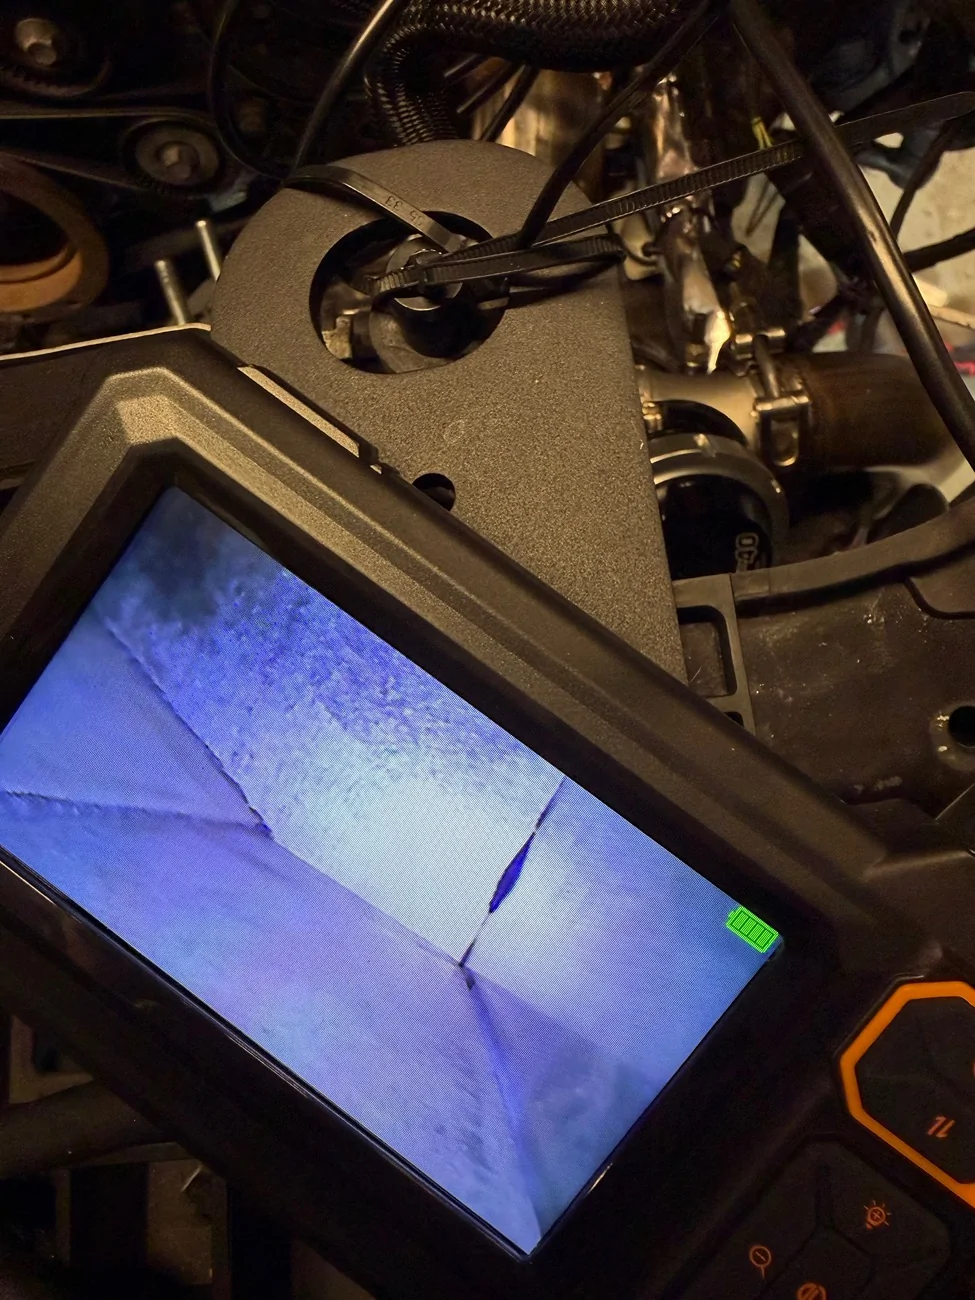
Holleee Shit. No.I went ahead and windowed the BL Fab tank today, to see what in the heck was going on inside. To my surprise, I found an old small screw inside. Not a big deal compared to the weld inside. It looks like…I’ll just let you guys judge for yourselves, as to what it looks like. I can clearly see why the coolant side leaked over into the catch can side.
Furthermore, with heat and pressure fluctuations, perhaps one or more of the weld pebbles/slag could have dislodged over time and clogged up my coolant system.
Now let’s talk about how I made the window. I used a 4” hole saw and traced halfway around it, drew a straight line and traced halfway around the hole saw again to form an oval. I then drilled pilot holes and went to work with the hole saw and cut two circles, followed by a straight cut in the middle with my Dremel to complete the oval. Finally, I hand filed and beveled the window.
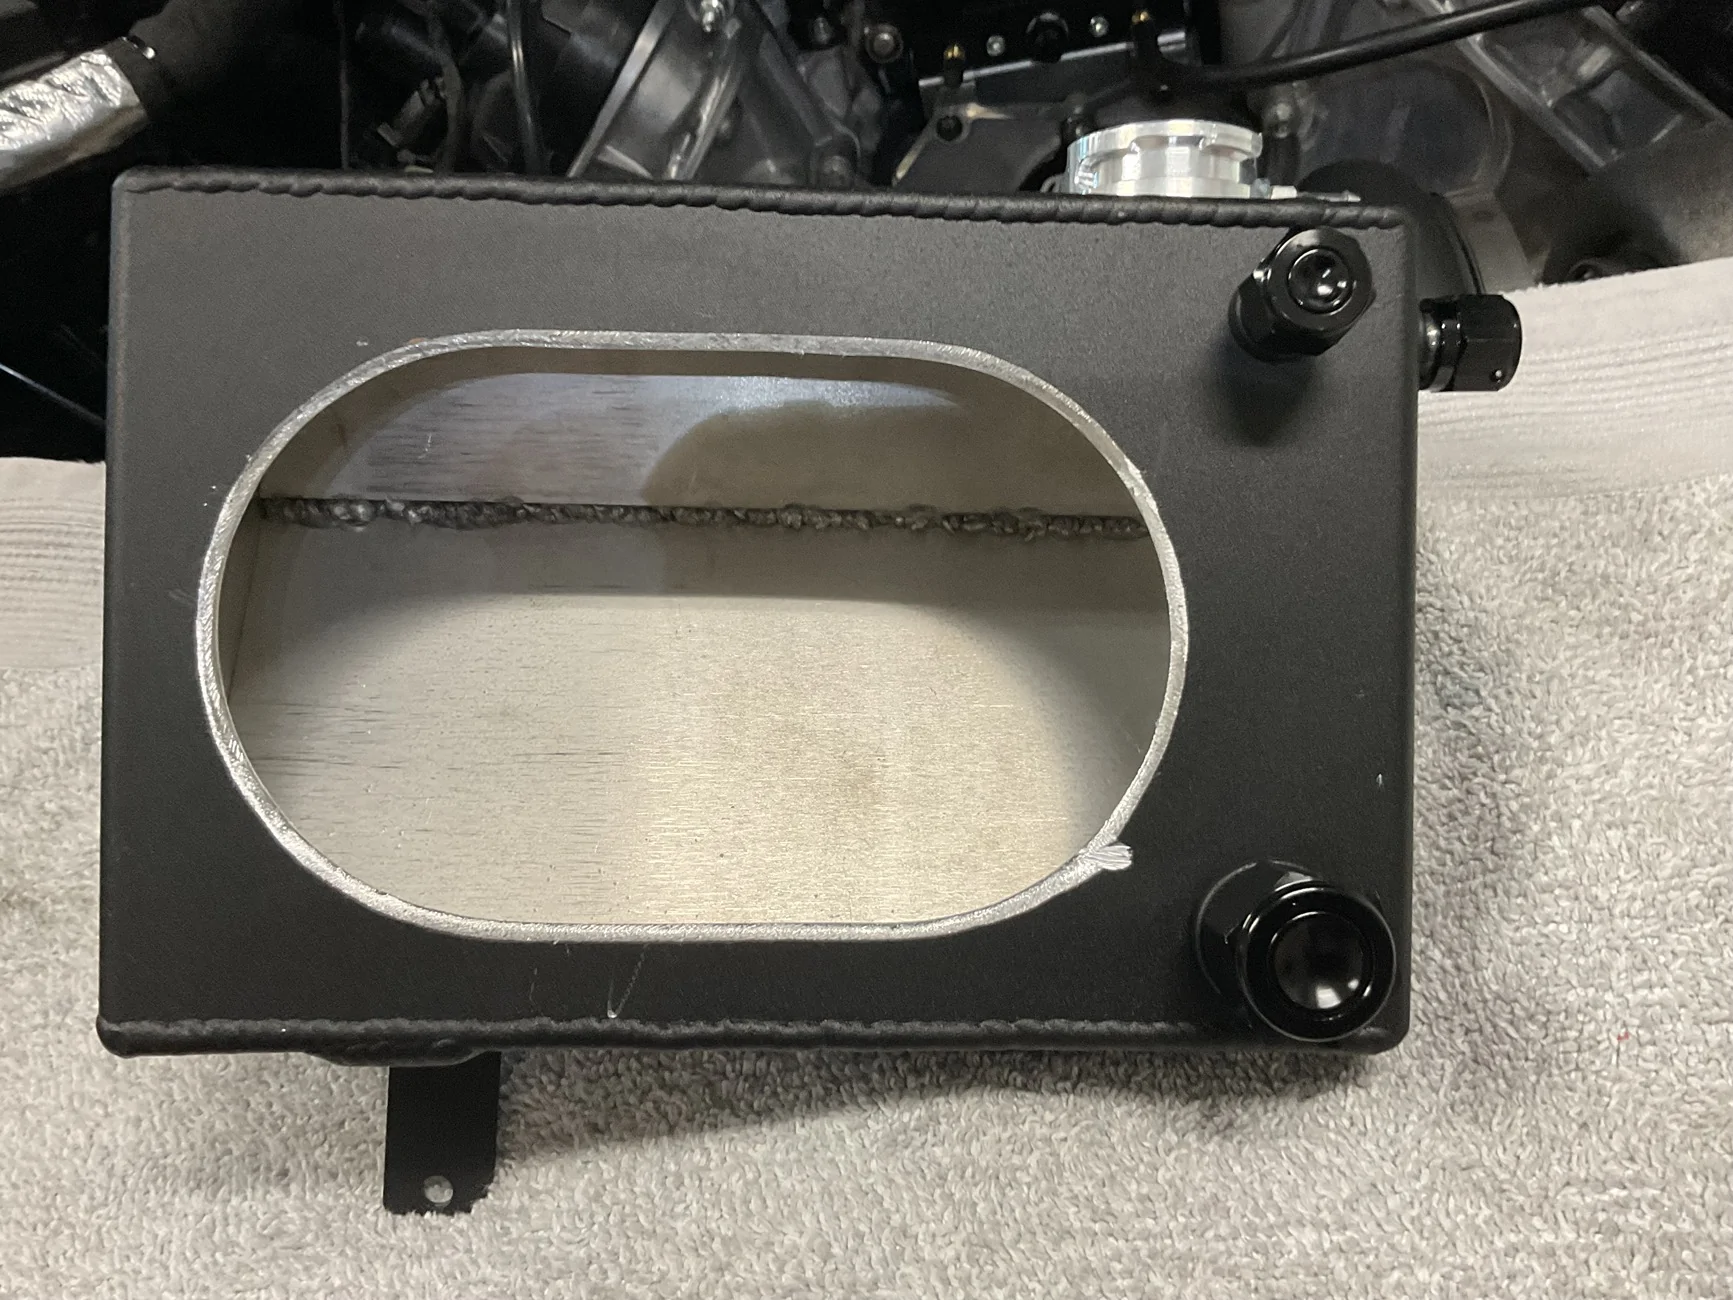
I don’t know what the type or thickness of the material is that was used, but I’ll need to find out, so that I can make a piece to have welded back in. Overall, I’d say it tuned out pretty good, minus the small spot where the hole saw jumped. That should be taken care of when it gets welded back up.

AcceptableNebula
Well-Known Member
- Joined
- Apr 5, 2023
- Threads
- 19
- Messages
- 335
- Reaction score
- 927
- Location
- Massachusetts
- First Name
- Jake
- Vehicle(s)
- 2023 Ford Mustang GT Premium
If you can weld better than BL Fab can weld tanks, I would suggest trying to at least get the ends of your factory bumper support on there. The bumper sags horribly with just a race support bar. On top of that, that welded 90 past the tangent of the bend shifts a ton of stress onto the very small foot print weld. That thing is only slightly better than not having one at all.
I’m addressing my saggy bumper this weekend since Steeda did the same thing, just slightly better welding on the tangent of the 90 so it’s more of an oval weld to the plate.
I’m addressing my saggy bumper this weekend since Steeda did the same thing, just slightly better welding on the tangent of the 90 so it’s more of an oval weld to the plate.
OP
OP
NGOT8R
Well-Known Member
- Thread starter
- #400
I’ve been wondering about this. I saw Beefcake had a plate welded across the bottom of his IC for additional support. Perhaps he was trying to correct bumper sag as wellIf you can weld better than BL Fab can weld tanks, I would suggest trying to at least get the ends of your factory bumper support on there. The bumper sags horribly with just a race support bar. On top of that, that welded 90 past the tangent of the bend shifts a ton of stress onto the very small foot print weld. That thing is only slightly better than not having one at all.
I’m addressing my saggy bumper this weekend since Steeda did the same thing, just slightly better welding on the tangent of the 90 so it’s more of an oval weld to the plate.
 .
.Here’s how he explained it:
We got everything mocked up and then sent the car via flat bed to our fabricator at Rogue Race cars. We made custom mounts for the radiator and intercooler, to give us a litlte more room, and make everything fit ultra perfect. We have a Double AA k member on the car, and we just added on to it. Rob also welded on a lower brace to the lower bumper to the intercooler to keep everything ultra stable at 160-180mph. His welds are incredible.
https://cdn.mustang6g.com/attachments/536/536556-d3588c9e9dab909c89ecaadf3fb173a6.webp
Sponsored
OP
OP
NGOT8R
Well-Known Member
- Thread starter
- #402
I’m working on an idea that will allow me to take the IC and other items to the welder (off the car) and have them stitched up.
This may not be the best way, but towing the car somewhere could mean I’d have to leave it, which I don’t want to do. It would also be a hassle getting it pushed back into the shop to resume work on it.

This may not be the best way, but towing the car somewhere could mean I’d have to leave it, which I don’t want to do. It would also be a hassle getting it pushed back into the shop to resume work on it.

AcceptableNebula
Well-Known Member
- Joined
- Apr 5, 2023
- Threads
- 19
- Messages
- 335
- Reaction score
- 927
- Location
- Massachusetts
- First Name
- Jake
- Vehicle(s)
- 2023 Ford Mustang GT Premium
On the intercooler for sure. I was talking about the ends contacting the foam inner section of the bumper. It sags below the headlights. Cutting the factory support and incorporating it to the tubular bar could offer the bumper enough support to not droop at the headlights. Minor welding required.As for welding, I don’t have that level of experience to be able to pull that off without risking ruining the IC. Gotta leave the welding to those, who do it on a regular basis.
As for your IC support doesn’t have to be welded on if you don’t have someone qualified to do that. It doesn’t get heavier at 180mph, it just wants to push into the radiator. So a straight piece coming from your subframe under it will offer some weight support but if there is a capture feature that supports the back side of the intercooler, that would also offer support at speed. Throw an insulator material on the contact points.
OP
OP
NGOT8R
Well-Known Member
- Thread starter
- #404
I think I’m following what you’re saying, but any pics and further explanation that you can add when you get started would be greatly appreciated.If you can weld better than BL Fab can weld tanks, I would suggest trying to at least get the ends of your factory bumper support on there. The bumper sags horribly with just a race support bar. On top of that, that welded 90 past the tangent of the bend shifts a ton of stress onto the very small foot print weld. That thing is only slightly better than not having one at all.
I’m addressing my saggy bumper this weekend since Steeda did the same thing, just slightly better welding on the tangent of the 90 so it’s more of an oval weld to the plate.
masonhoare9
Well-Known Member
- Joined
- Nov 11, 2025
- Threads
- 1
- Messages
- 51
- Reaction score
- 198
- Location
- united states
- First Name
- mason
- Vehicle(s)
- 2015 mustang gt
I’ve decided to completely eliminate the possibility of my coolant and oil mixing. Im going to be capping off all the catch cans ports and switch to the jdm engineering engine breathers. I also will share some pictures of what the inside of my tank looked like.


Sponsored