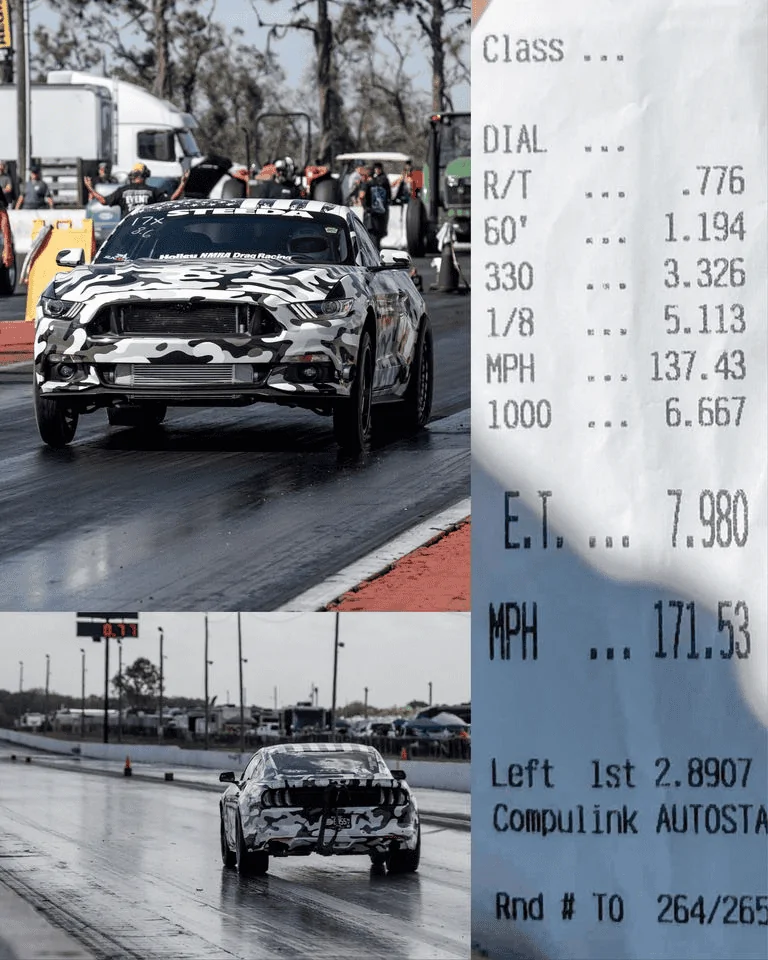
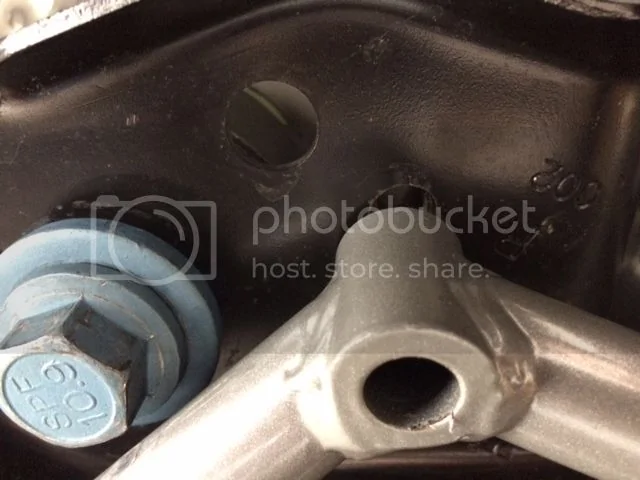
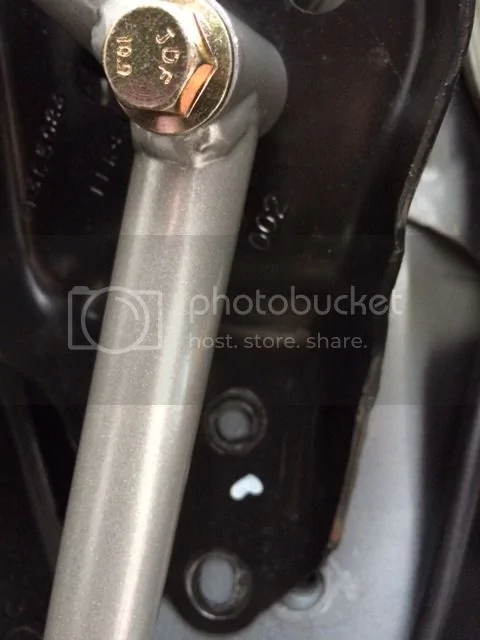
Sponsored

Steeda Rear IRS Subframe Support Brace - Install + Review

tj@steeda

Well-Known Member
Diamond Sponsor
Joined
Mar 21, 2014
Threads
526
Messages
6,388
Reaction score
3,878
Location
Florida
First Name
Timothy
Vehicle(s)
2019 Steeda Mustang - White Carbon Edition
Vehicle Showcase
1

tj@steeda

Well-Known Member
Diamond Sponsor
Joined
Mar 21, 2014
Threads
526
Messages
6,388
Reaction score
3,878
Location
Florida
First Name
Timothy
Vehicle(s)
2019 Steeda Mustang - White Carbon Edition
Vehicle Showcase
1
Further showcasing the effectiveness of the Steeda IRS Braces!


tj@steeda

Well-Known Member
Diamond Sponsor
Joined
Mar 21, 2014
Threads
526
Messages
6,388
Reaction score
3,878
Location
Florida
First Name
Timothy
Vehicle(s)
2019 Steeda Mustang - White Carbon Edition
Vehicle Showcase
1
Add another impressive run to the list:

A huge congrats to Matt Ballard and his incredibly impressive turbo #S550 for hitting 7s in the 1/4 mile! 7.98 @ 171 to be exact! Check out that 1.19 60' on #Steeda suspension, too! Keep up the great work, Matt!

1648516413545.png
 

Robottrainer

Well-Known Member
Joined
Apr 25, 2021
Threads
51
Messages
432
Reaction score
187
Location
Canada
First Name
John
Vehicle(s)
Robottrainer
I'm in the process of installing these, along with several other Steeda items, and I got a bit "stuck" on the passenger side install. Like you, I got the driver side installed no problem, but the passenger side is fighting me on that last center-bolt.

I loosened up the front subframe bolts and still no luck in getting this thing aligned with the bolt-hole.

Anyone that have had this issue end have any tips for getting this thing to move/align? The only thing I haven't tried yet is to loosen up the rear subframe on the passenger side to see if that gives it a bit more freedom to move, or possibly pulling the subframe alignment stuff on the passenger side (grasping at straws) to see if that gives it enough room to move.

I've emailed Steeda but thought maybe someone here that's been through this would have an idea that gets me rolling today before I hear back from Steeda.

A few pics of the situation - first the way things line-up:
IMG_0992.jpg


And here's what it looks like if I pulled the 2x13mm bolts from the front of the subframe and connect the center-bolt:
IMG_0990.jpg
Mine was like that. I had to make sure everything bolt on the bracket was loose and it was till a fight to get it in. I also used washers to make up the space. I fount the bolt was a little short. Ended up installing my own socket head cap screw in that location.
 

Robottrainer

Well-Known Member
Joined
Apr 25, 2021
Threads
51
Messages
432
Reaction score
187
Location
Canada
First Name
John
Vehicle(s)
Robottrainer
But [MENTION=10893]David@Steeda[/MENTION], throwing parts at is is half the fun!

My car is a DD. Pretty much to buy groceries and beach trips lol 🤷
Mine is too but if I can make it work better and possibly someday want to push it harder or have a track day, its ready to go. Better to have it and not use it than need it and not have it.
 

Sponsored

mkcotton

Well-Known Member
Joined
Mar 30, 2022
Threads
7
Messages
265
Reaction score
198
Location
Virginia
Vehicle(s)
2018 Mustang GT PP1


I got these braces after reading Nate's review. As you can see from my signature, I already have a bunch of Steeda corner fast and stop the hop goodies. I think the main benefit of these are to reduce wheel hop. That became more apparent as I did the install and saw where the connection points were. I can't really comment on how well it did there because I had already gotten rid of the wheel hop from my other parts. After my test drive though I can definitely see how these would help with that. I was amazed at how connected the rear end feels now! I really didn't think it would make that much difference in cornering but it does. There may be another added benefit but I don't want to comment on that until I can do some more testing. There's a certain road I want to test drive on before I decide. Either way I'm once again overwhelmed, a simple brace, this was the part I decided to skip originally thinking it would probably do the least.

Now for the install. I'm not going to give instructions because between Steeda's instructions that come with the braces and Bill from CJ Pony Parts video, you should get it. I will add a little color to tie them together. Notice in all of Bill's videos, the installs are ALWAYS a breeze? Well I'm not sure if it is just convenient editing so we don't see all of it and hear the curse words or if he truly does get the perfect car every time. I'll choose to believe the later because I really appreciate them.

You'll notice in Bill's video, there is no jack supporting the front of the subframe. This gives the camera a nice clear view of Bill for the video. In Steeda's instructions they tell you in step #1 to lift the car by the chassis and then in step #2 to support the front of the subframe with a jack. I found out why. Where Bill got the perfect car and all holes lined up perfect, 1 side of mine didn't. In Steeda's instructions step #9, they tell you, "If at this point, everything is not lining up correctly, the 2 13mm hex head bolts on the front sub frame support brackets, and the main sub frame support bolt may need to be loosened up, so that the sub frame support bracket can be repositioned slightly." Well the first side I did, this was the case and I'm glad I read Steeda's instructions because this would be the time I'm cursing because it didn't bolt right in. I would change one thing in the instructions. All bolts to begin with should be installed very loose. Start with the factory bolt they mention in the front of the brace, then install the bolt that goes into the threaded plate that slides into the frame.
Note: Look carefully at the threaded plate, you'll see there is a top and bottom. You want the side with the clean threads facing down to get the bolt threaded in there easier.​
Doing this will both support the brace and help so you're not having to muscle the bar around like Bill in the video. Then put the other bolt in the front of the brace, then the bolt and nut at the very back. I recommend putting the nut up there first. You can look up there and see if it is centered over the hole, then install the bolt. At this point all you have left is the dreaded center bolt that goes into the sub frame brace. If it lines up, you are lucky like Bill (and me on the driver's side). If not, this is where you'll need to support the front of the sub frame with the jack and loosen those 13mm and 22mm bolts that Steeda mentions in step #9. Just adjust it until you can get that bolt in and you're all set. Snug everything down then torque per specs that Steeda conveniently put in the instructions.

Link to Bill from CJ Pony Parts install video:
[ame]

Thank you again to David@Steeda for the great support and Steeda for the goodies that make my car amazing!
I've had these on my 2018 GT PP1 within the first 3 months of purchasing. They help a lot. I also have the IRS bushing lockouts, BMR rear upper control arms and vertical bones and the BMR front k-member brace, steeda front lower control arms and tension links.... the upside is the car is a handling beast, the downside is the car gets upset fairly easy on rough roads.
 

tj@steeda

Well-Known Member
Diamond Sponsor
Joined
Mar 21, 2014
Threads
526
Messages
6,388
Reaction score
3,878
Location
Florida
First Name
Timothy
Vehicle(s)
2019 Steeda Mustang - White Carbon Edition
Vehicle Showcase
1

ChitownStang

Well-Known Member
Joined
Mar 9, 2015
Threads
74
Messages
2,860
Reaction score
3,342
Location
Chicago, North Shore
Vehicle(s)
2021 Mach 1
Vehicle Showcase
1

tj@steeda

Well-Known Member
Diamond Sponsor
Joined
Mar 21, 2014
Threads
526
Messages
6,388
Reaction score
3,878
Location
Florida
First Name
Timothy
Vehicle(s)
2019 Steeda Mustang - White Carbon Edition
Vehicle Showcase
1
They benefit any application - wheel hop or not by adding more rigidity to the rear of the vehicle.

They are easy to install & don't require much more support after they are installed - so from a cost & timing perspective - it's a nice investment.

I am looking for the Shelby Subframe but I can't find it on their site - can you send a link?

TJ
 

ChitownStang

Well-Known Member
Joined
Mar 9, 2015
Threads
74
Messages
2,860
Reaction score
3,342
Location
Chicago, North Shore
Vehicle(s)
2021 Mach 1
Vehicle Showcase
1
I attached the comparison chart, GT500 Subframe and toe links.
So I guess I still don't understand where I would feel this extra stiffness that would be worth adding weight to the Mach 1. From a dig or around a corner?

Mach 1 specs_bottom.jpg


Mach 1 specs_top.jpg
 

Sponsored

tj@steeda

Well-Known Member
Diamond Sponsor
Joined
Mar 21, 2014
Threads
526
Messages
6,388
Reaction score
3,878
Location
Florida
First Name
Timothy
Vehicle(s)
2019 Steeda Mustang - White Carbon Edition
Vehicle Showcase
1
Ahh - when you said Shelby, I looked at Shelby's website for that part. We have had it on the car for a ton of testing & mainly corner carving. Based on Jamie, Dario & Chris's feedback - it was an improvement over stock.

I don't have specific data from there but that is their feedback.

May another Mach 1 owner will weigh in & provide their real work feedback.

TJ
 

2022 Mach 1

Well-Known Member
Joined
Jun 6, 2022
Threads
17
Messages
879
Reaction score
1,659
Location
Brentwood ca
First Name
Cameron
Vehicle(s)
2022 Mach 1...2014 Mustag GT whipple supercharger
I have them on a non hp Mach 1 due to experiencing wheel hop at the drag strip upon launch and 1-2 shift. I've yet to go back to the track but already on the street the rear has less shutter from side to side from a dig and upon shift 1-2 in drag mode.
 

ChitownStang

Well-Known Member
Joined
Mar 9, 2015
Threads
74
Messages
2,860
Reaction score
3,342
Location
Chicago, North Shore
Vehicle(s)
2021 Mach 1
Vehicle Showcase
1
I have them on a non hp Mach 1 due to experiencing wheel hop at the drag strip upon launch and 1-2 shift. I've yet to go back to the track but already on the street the rear has less shutter from side to side from a dig and upon shift 1-2 in drag mode.
Thanks for the feedback.
I had these on my 15gt stick and noticed the benefit with the side to side slop and wheel hop.
I just feel way more planted in the Mach as far as corners and on take off.
I wonder if the A10 makes a difference too.
Yours is stick or auto?
 

2022 Mach 1

Well-Known Member
Joined
Jun 6, 2022
Threads
17
Messages
879
Reaction score
1,659
Location
Brentwood ca
First Name
Cameron
Vehicle(s)
2022 Mach 1...2014 Mustag GT whipple supercharger
Thanks for the feedback.
I had these on my 15gt stick and noticed the benefit with the side to side slop and wheel hop.
I just feel way more planted in the Mach as far as corners and on take off.
I wonder if the A10 makes a difference too.
Yours is stick or auto?
Mine is an A10. I will probably notice an even bigger difference back on a prepped surface where wheel spin is not as much of an issue as it is on the street and wheel hop is with the torsen constantly shifting power side to side. I still spin 1st (on the street)but now when shifting to second, I don't have the violent shutter from the rear.

I could have found worse ways to spend $275 on the car, that's for sure.
 

tosha

Well-Known Member
Joined
Jun 8, 2021
Threads
1
Messages
1,438
Reaction score
1,539
Location
Canada
Vehicle(s)
Mustang GT PP1
I attached the comparison chart, GT500 Subframe and toe links.
So I guess I still don't understand where I would feel this extra stiffness that would be worth adding weight to the Mach 1. From a dig or around a corner?
I mean... it's a brace, it adds stiffness to the chassis, which would improve overall feel and handling in all scenarios. Now, whether you notice it or not is an open question. What problem are you looking to solve? Don't just throw random parts at your car for no reason, or don't listen to me and do it anyways, it's your choice )))

I will be adding these braces along with diff bushing insert kit and subframe bushing supports, maybe also subframe alignment kit while I'm there (I have GT with magride). I kinda have a good idea why I'm doing this - I want to address rear end wobbliness in specific performance applications, and prevent diff bushings from failing prematurely. I couldn't care less about wheel hop despite it being supercharged, and I don't think I would worry about all that stuff for street use scenarios. So, my point is - think about why you think you might need it in first place and go from there.
Sponsored


Top