whalesalad
Well-Known Member
- Joined
- Apr 30, 2016
- Threads
- 38
- Messages
- 433
- Reaction score
- 241
- Location
- Costa Mesa, CA
- Vehicle(s)
- 2016 GT PP
- Thread starter
- #1
Hey Y'all,
I just got finished with a mega suspension and wheel/tire makeover. This all started during the winter where I knew that I wanted to start prepping for a set of aftermarket forged wheels. I was unhappy with the rake from the BMR SP080 springs so I started to do a ton of research.
That culminated with this thread here, where I made the decision to go with Steeda's Ultralite linear springs, 1/8" spacer, pro action non-adjustible shocks/struts, camber plates, and the billet rear shock mounts.
Here is the story of how everything has gone as far as the installation and troubleshooting.
First off, here is how my car looked after installing the BMR springs and 25mm spacers around this time last year:

Here is how she sat on my winter wheels, again with the SP080 springs and a fairly substantial rake:
Finally, after spending a few weeks out of town for my honeymoon and enduring a couple more crappy Michigan days... the weather was good enough to get started.
I made the mistake of not checking my shipment from Steeda until the day of the install. Turns out they accidentally sent me the adjustable rear shocks which would not fit in the top mounts that I ordered. Their support was excellent and they sent me a fresh set right away.
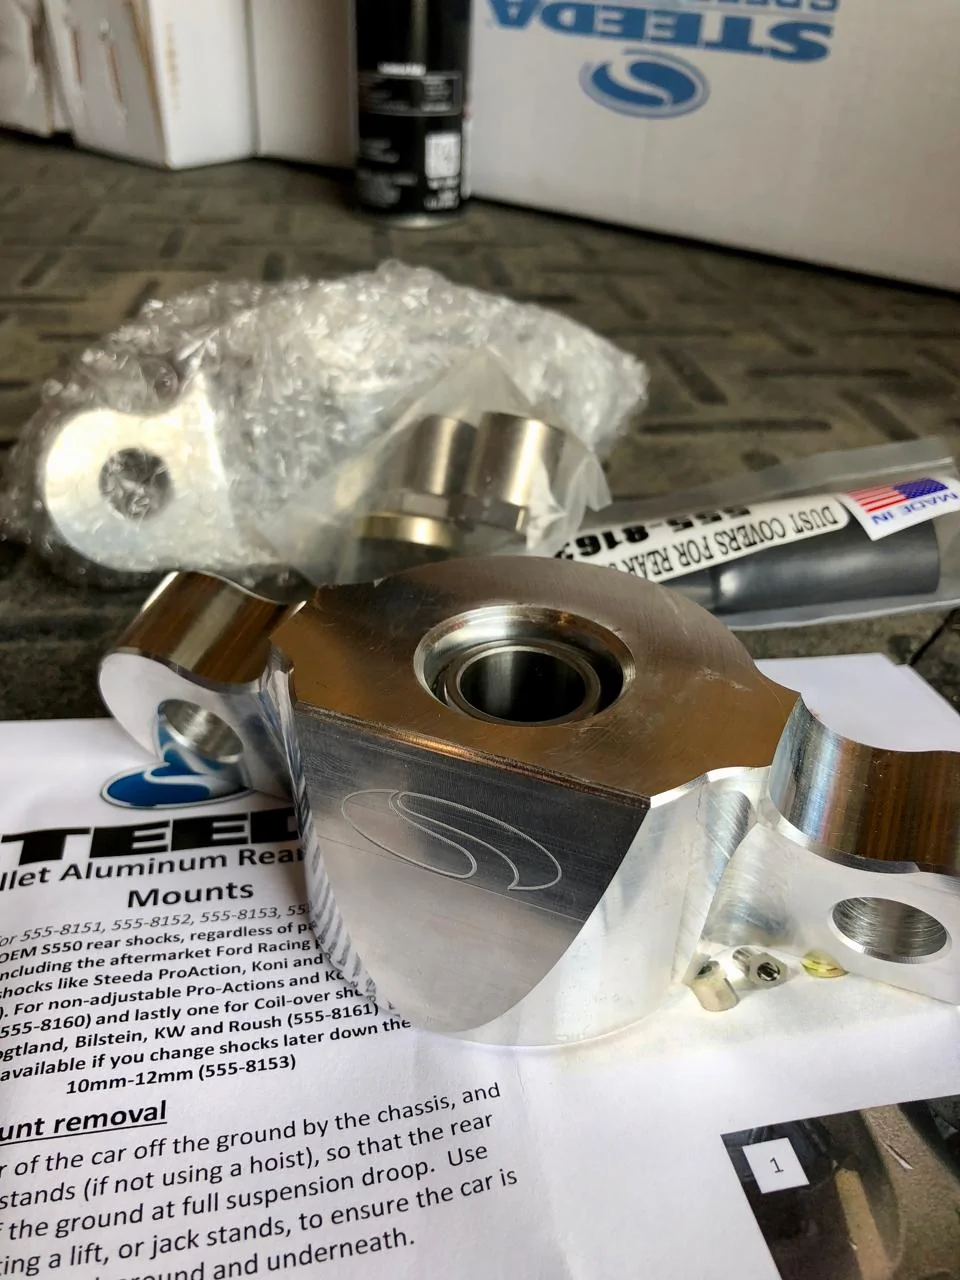
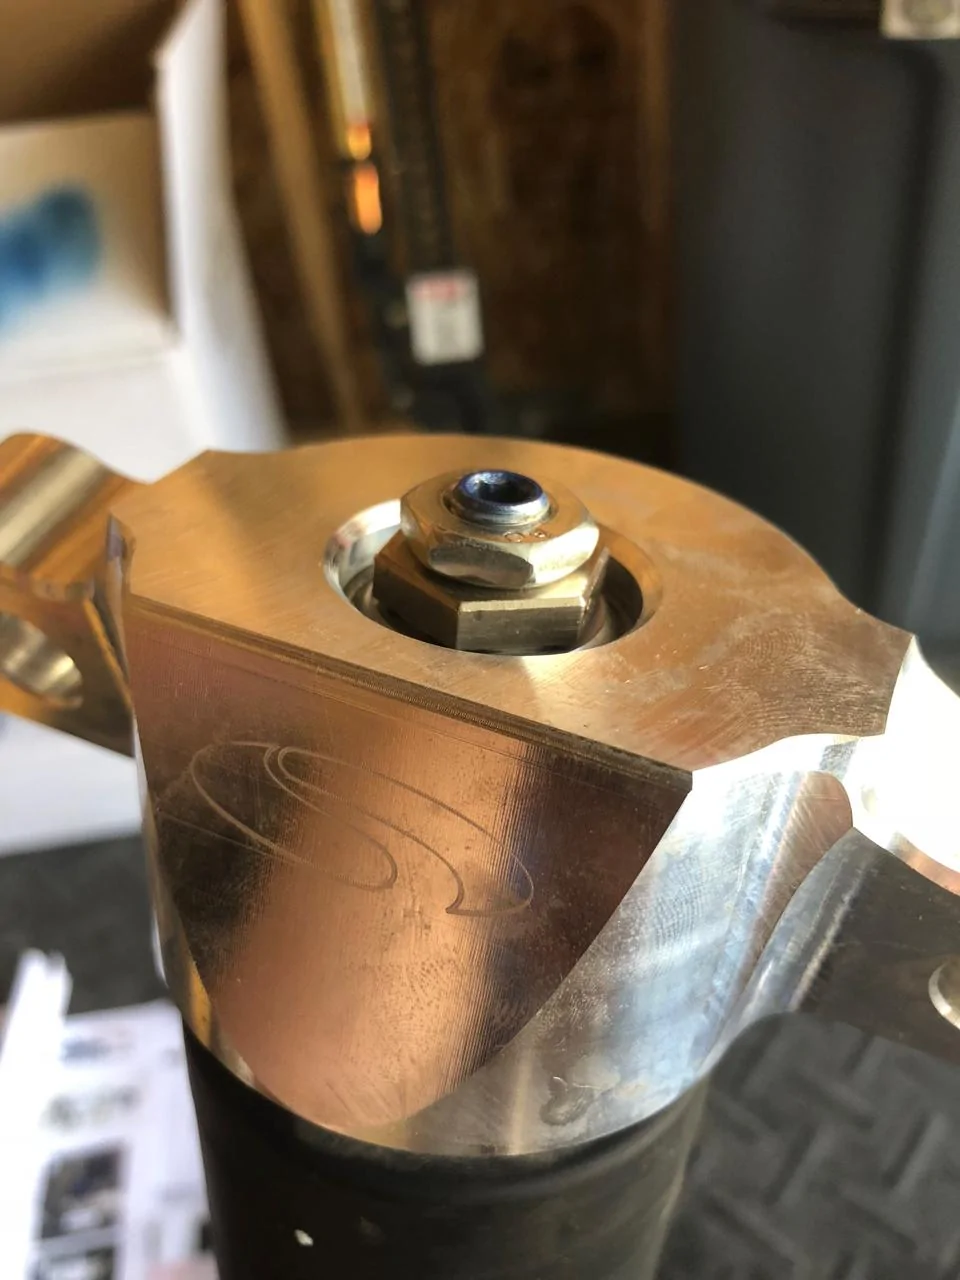
Inspecting the mounts prior to installation,

I couldn't do the rear shocks, but I figured I would install the rear springs anyway to finally be rid of the rake.
Here are the Steeda Ultralite linear's compared to the BMR SP080 rear springs:
I finally got to start using the tiny 3/8" impact I got over the holidays from my father-in-law. This thing is so useful!
After the install and putting my OEM rear tires back on, things were already looking good without giving them time to settle down:
I finished so quickly, that I decided to start working on the front-end since I had the correct front struts.
I really hate using spring compressors... here is before:
Another side-by-side comparison of the Steeda Ultralite linear springs and BMR SP080:
And after,
Here is how the car sat the next day after putting some miles on her:
I was much happier with the fitment!
But... the happiness wouldn't last long. There was a rattle coming from the front-end and I was having a difficult time figuring it out. From my experience with cars over the years, the strut nut was an obvious suspect. Unfortunately, the tiny little female-hex tip of the strut is not very robust and makes torquing the top nut very difficult. Contrast that to the OEM strut which has a very meaty male tip that makes tightening the strut nut much easier.
I am incredibly sensitive to sounds and noises. I'm also a perfectionist and a software engineer by day... so ensuring all the i's are dotted and the t's are crossed is incredibly important to me. I always torque things to spec, use loctite, buy the right tools for the job, etc...
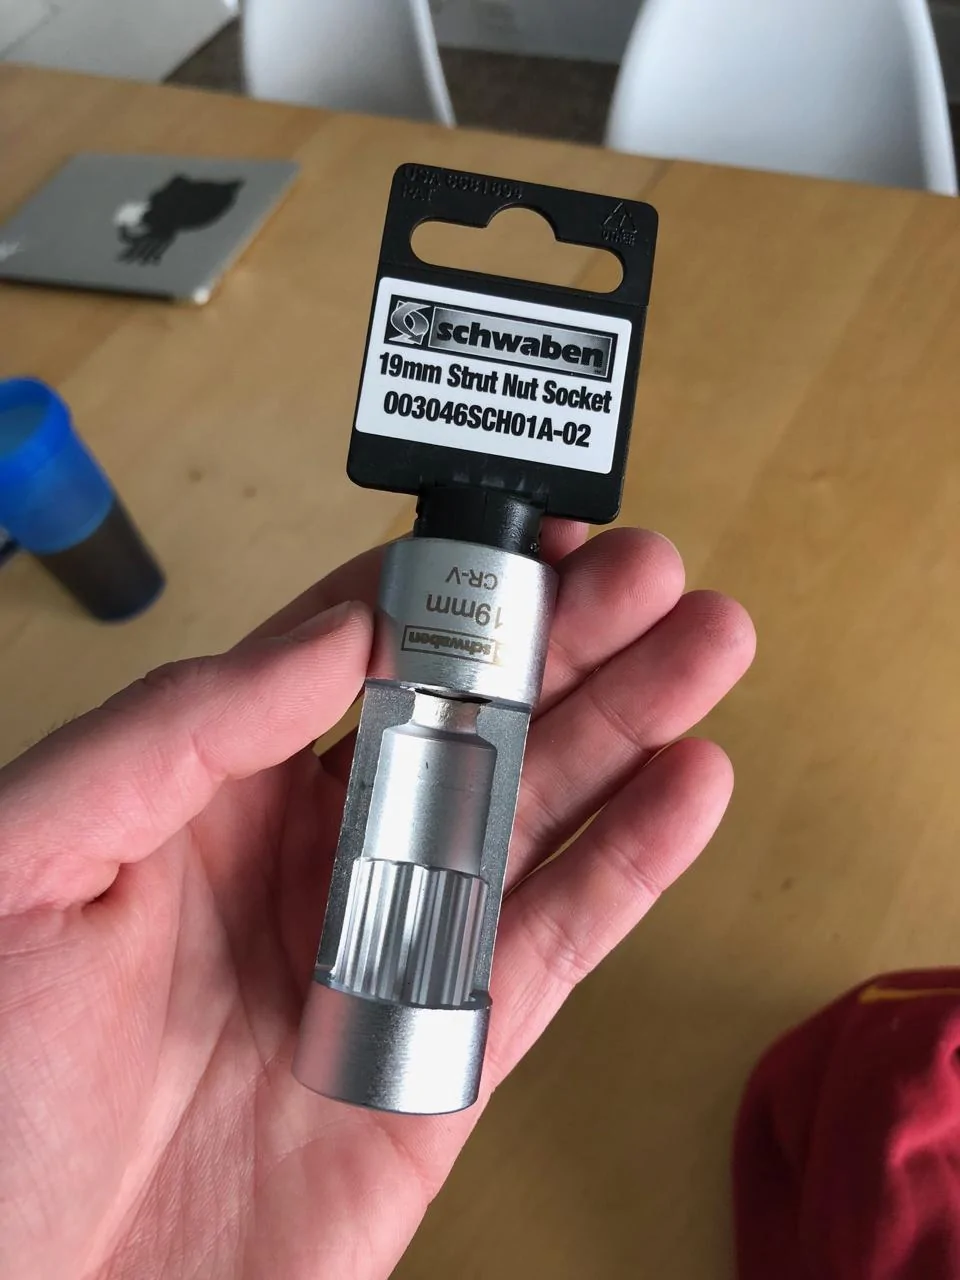
So I figured I would order a strut socket and really try to get things torqued down properly.
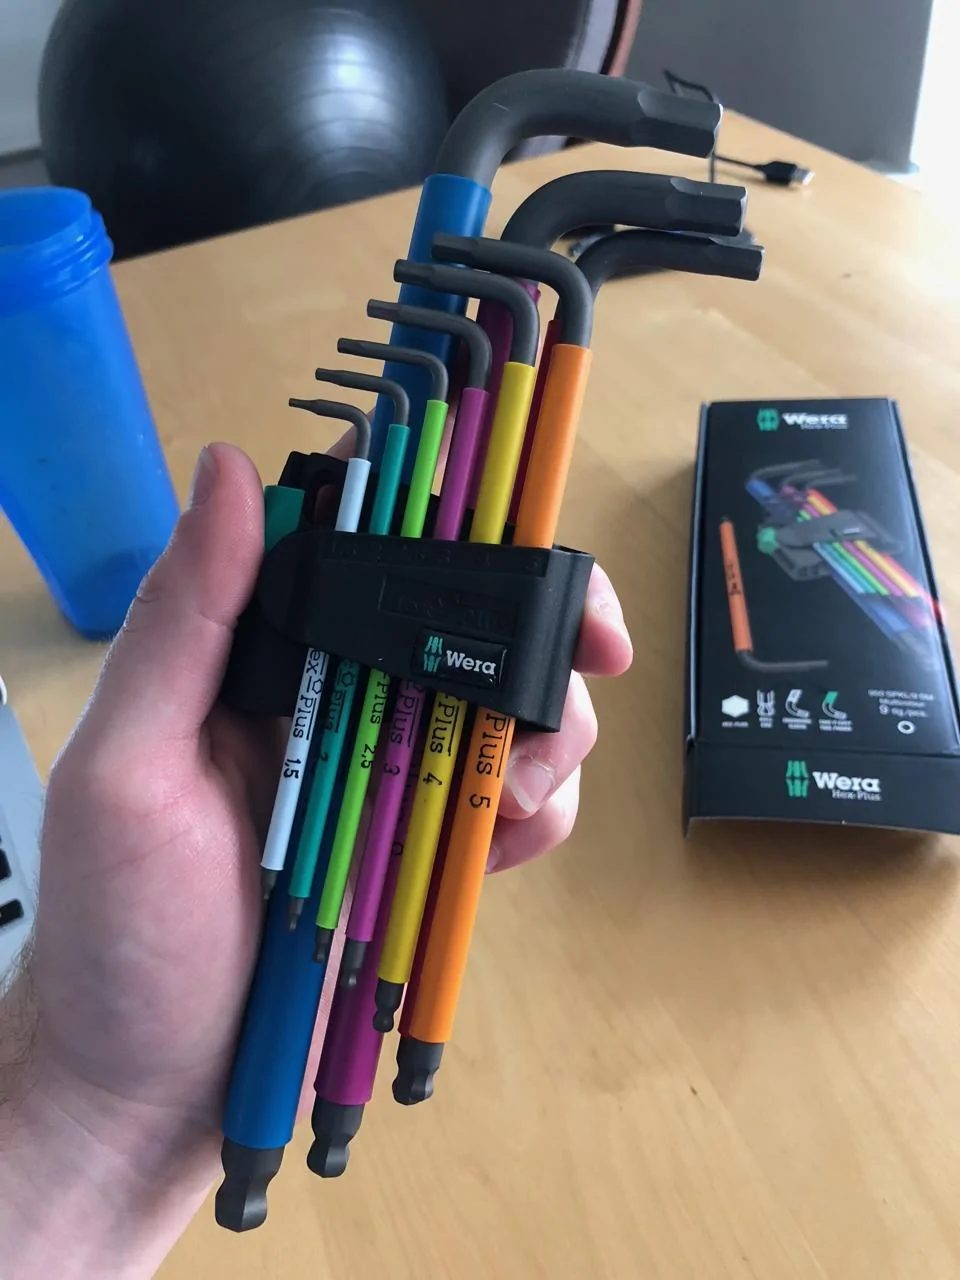
I also ordered high-end hex wrenches so that I wouldn't face issues with breaking them:
This is what happened to my previous hex wrench when trying to torque the nut properly:
Even the new hex wrench was warping a bit.
Here is what the top of the pro action strut looks like... Steeda, if you are listening, PLEASE redesign this part of the strut. This is very unfriendly to the consumer.
Ultimately, I was unable to get things tightened up properly because the noises remained. Here is a thread that describes the issue: https://www.mustang6g.com/forums/showthread.php?t=103487
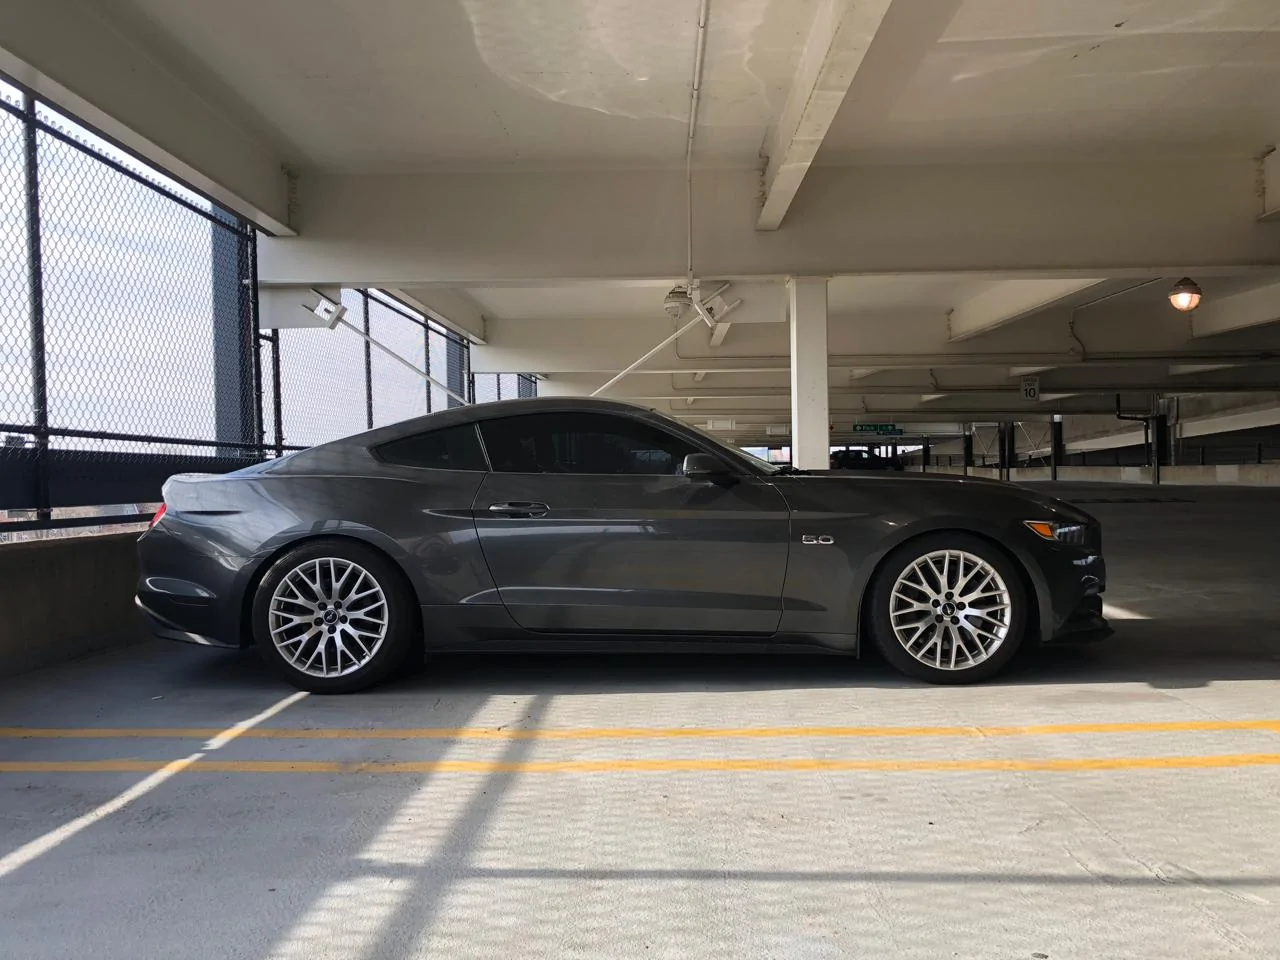
A shot taken after driving up 7 levels of a parking garage, dreading every speedbump:
Throughout this entire time, quite a few folks at Steeda went above and beyond to try and help me get this issue sorted. Jamie in the engineering department, Mike (the infamous [MENTION=25806]SteedaTech[/MENTION]) and many others were communicating with me on a regular basis via email, phone, etc...
At one point I took it to a shop operated by some friends of Steeda to have them see if they could sort it out. We ended up replacing the front struts and re-doing the installation (the shop had to cut the top strut nuts off because of how bad the female-hex design is)
Things were better (less rattle/loose material sound, but still something not quite right) – the (egregious in my mind) NVH still remained.
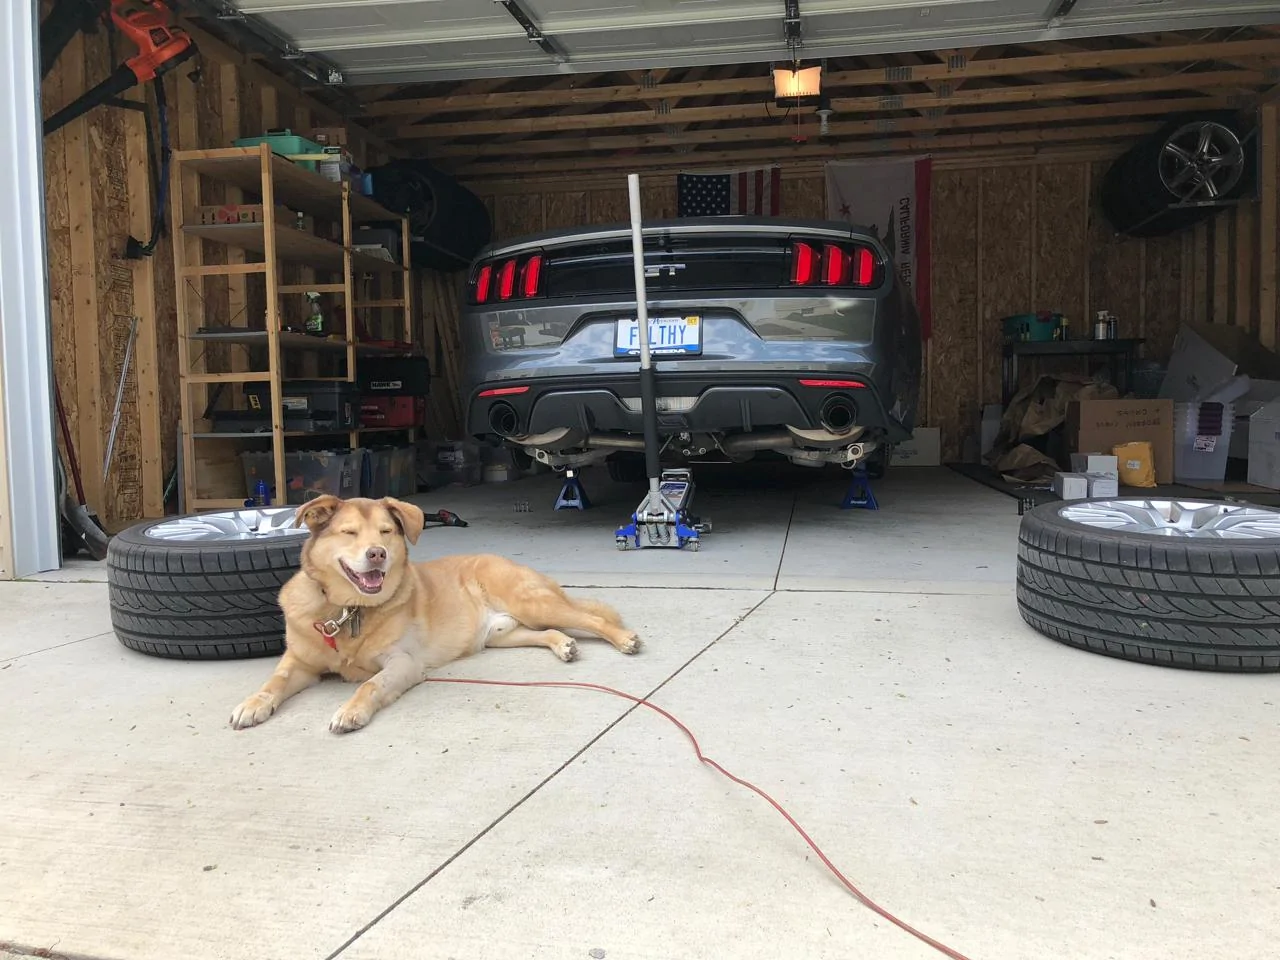
By this time the rear end parts had arrived (the correct struts) so I installed those with the help of my pooch Mason:
Old shocks
Installing the top nut
New stuff ready to go in:
The rear assembly was a breeze compared to the front.
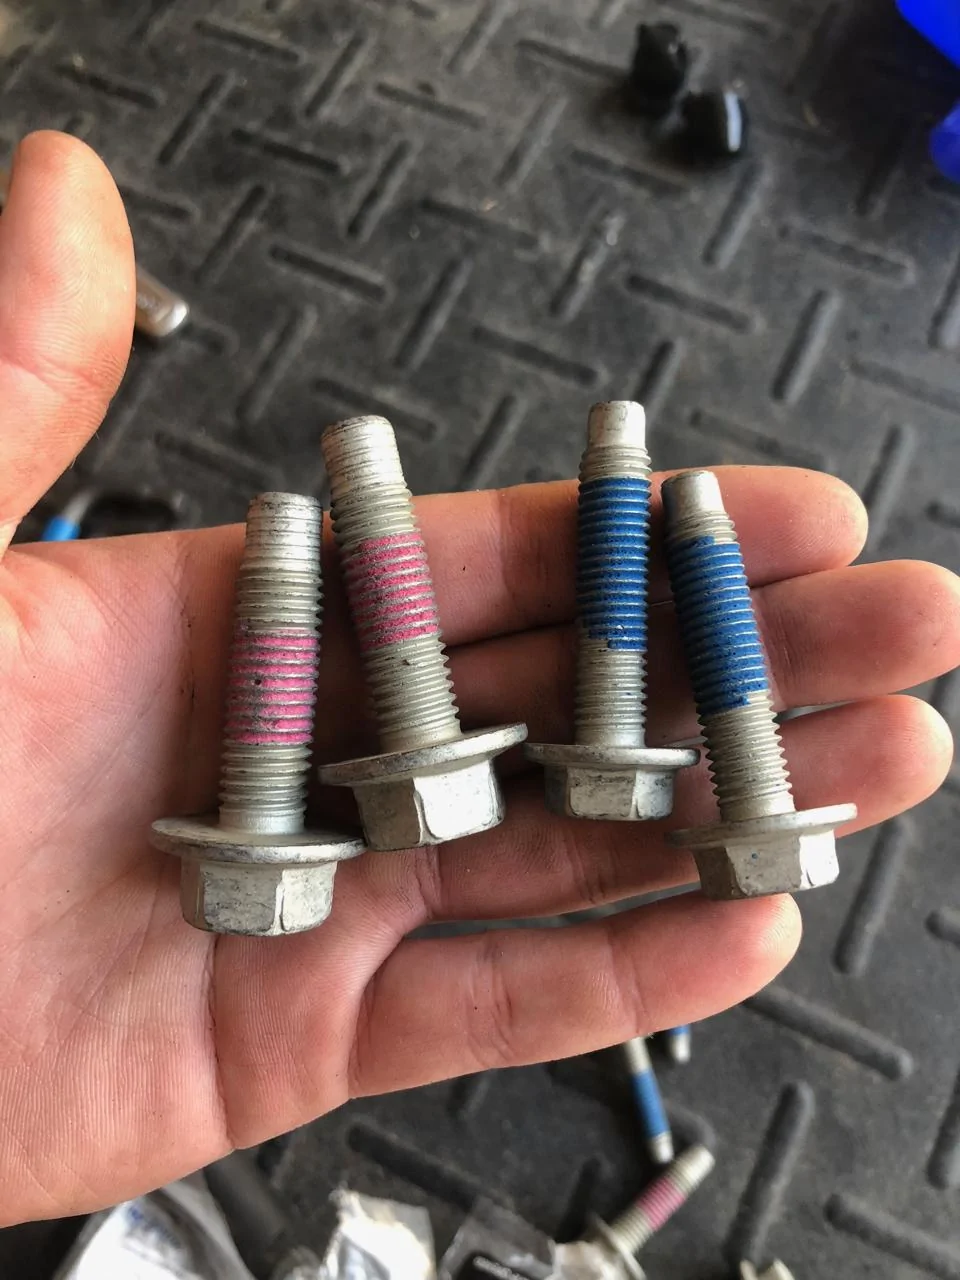
I made sure to use new hardware since these parts are torque-to-yield:
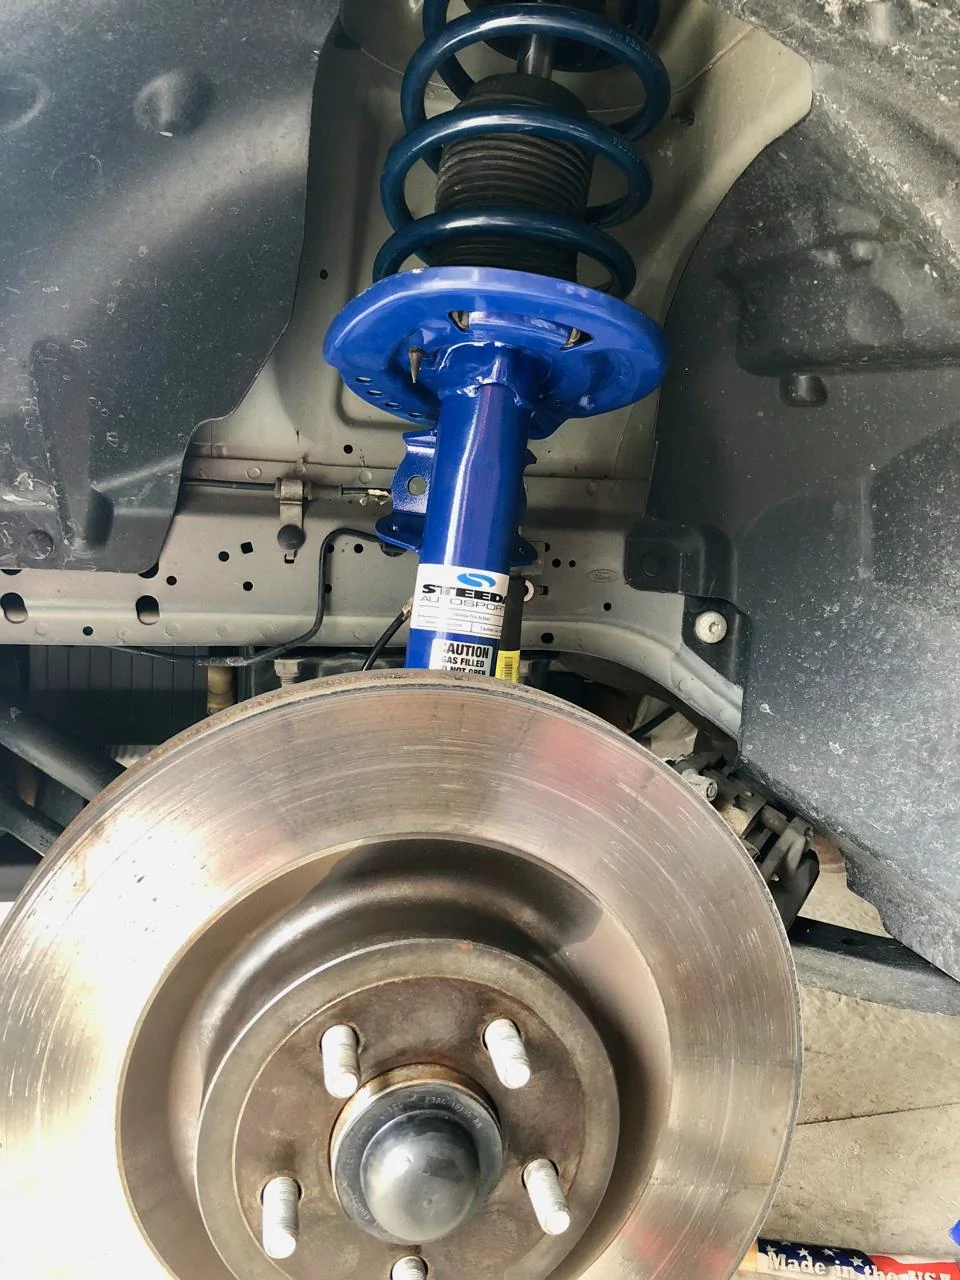
Installed:
By this time I've put about 300 miles on the car and the feeling of the front-end just wasn't right. A drop-off in elevation would cause a thud that I really didn't like. It was as though the spring assembly wasn't "solid".
As a last ditch effort, Mike at Steeda suggested switching away from the Ultralite linear springs and moving to the progressive springs. In hindsight, I should have done this from the beginning. The roads here in Michigan (especially this time of year, right after winter) are outrageously bad.
This is not uncommon for Michigan:
[ame]
So Mike had the Progressive springs shot up to Michigan so that I could install them this weekend before my alignment next week. I think Mike might hate me at this point but good lord he has been a tremendous help through this entire process. I've never received such first-class support from anyone before. Despite the issues I have had, Steeda is a phenomenal company.
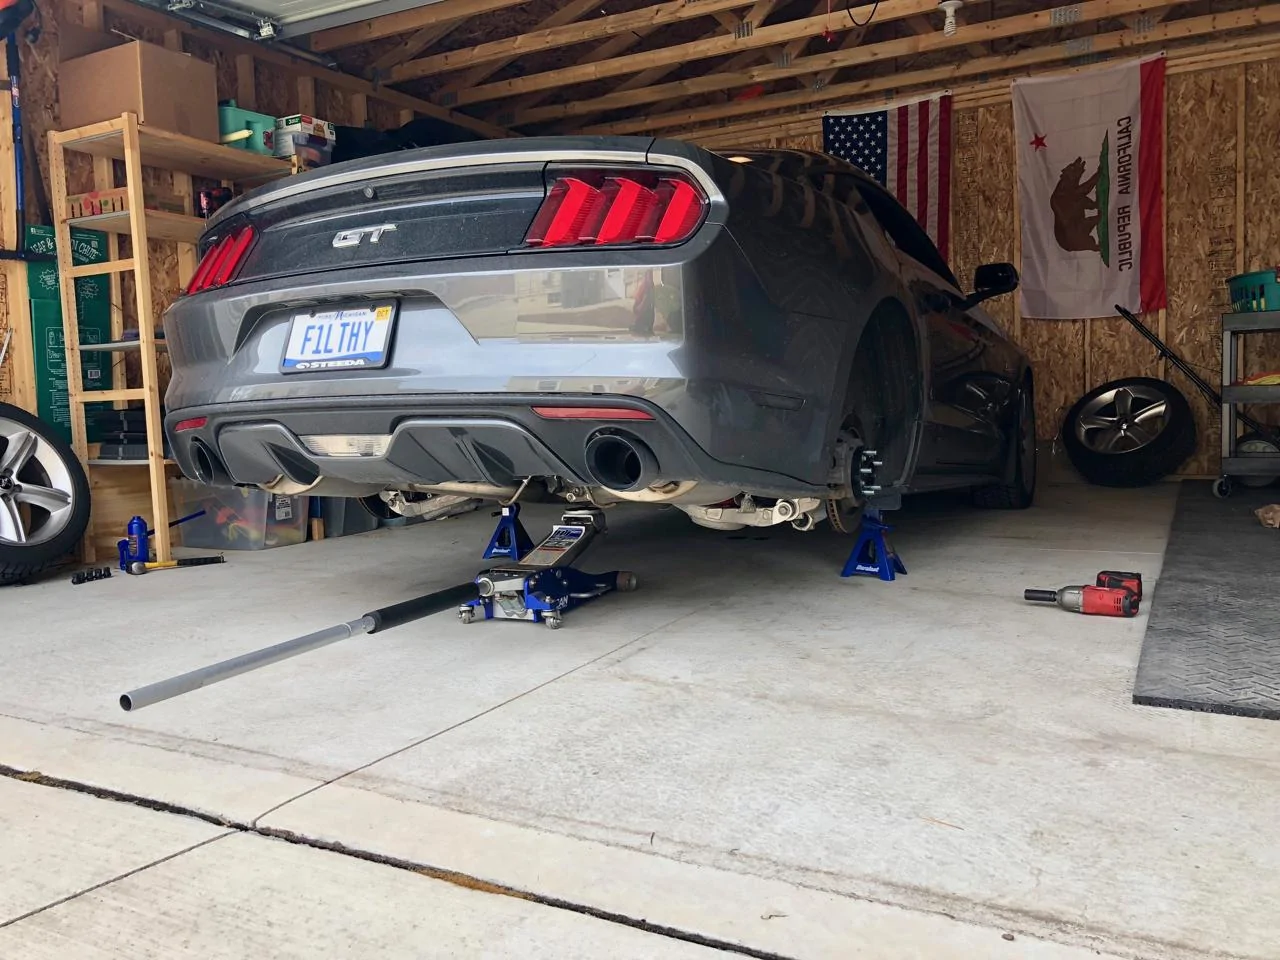
This weekend I psyched myself up for ANOTHER full suspension job and got to work.
Here are the new rear springs (progressive) vs the linear:
And the front springs:
Removing the strut nut from the old assembly required me to cut it off, just like the shop when helping out. I really think the female hex design needs to be rethought!!!
After a trip to ACE to try and find new top nuts, I had everything reassembled:
I ended up going with a 9/16-18 zinc jam nut. After 4-5 turns I got *slight* resistance on the shock... but a half turn or so the resistance went away and it threaded up and down just fine. I... think that's okay?
After a test drive earlier today... REALLY bad rattle. This time way more worse than before. Even my wife who is not nearly as OCD as me was like woah that is bad. I brought it home and checked over everything... nothing was loose.
Took my electric impact to the top nut and just hammered the piss out of it. Then took my hex wrench and 22mm wrench and cranked on it. Test drove again... far less noise but still a bit.
Pulled it back in the driveway, cranked on it again with the impact and again with the wrench.
Went for a test drive... so far so good! No noises!

I’ll be honest... I’m worried the issue will come back. The tolerance on that top nut is sooooo small and the female hex interface is so weak that I don’t have a lot of confidence in the solution. I hope it holds up.
The progressive springs are much better than the linear for these roads. So far I have only driven about 5 miles but it feels great. Can't wait to see how it holds up during the commute this week.
Finally... here is a sneak peek at the new wheels I put on. I'm putting together a thread on that too because these were custom made by my friend Alex of wheelflip.com & arcanewheels.com.
I just got finished with a mega suspension and wheel/tire makeover. This all started during the winter where I knew that I wanted to start prepping for a set of aftermarket forged wheels. I was unhappy with the rake from the BMR SP080 springs so I started to do a ton of research.
That culminated with this thread here, where I made the decision to go with Steeda's Ultralite linear springs, 1/8" spacer, pro action non-adjustible shocks/struts, camber plates, and the billet rear shock mounts.
Here is the story of how everything has gone as far as the installation and troubleshooting.
First off, here is how my car looked after installing the BMR springs and 25mm spacers around this time last year:

Here is how she sat on my winter wheels, again with the SP080 springs and a fairly substantial rake:


Finally, after spending a few weeks out of town for my honeymoon and enduring a couple more crappy Michigan days... the weather was good enough to get started.
I made the mistake of not checking my shipment from Steeda until the day of the install. Turns out they accidentally sent me the adjustable rear shocks which would not fit in the top mounts that I ordered. Their support was excellent and they sent me a fresh set right away.
Inspecting the mounts prior to installation,
I couldn't do the rear shocks, but I figured I would install the rear springs anyway to finally be rid of the rake.
Here are the Steeda Ultralite linear's compared to the BMR SP080 rear springs:

I finally got to start using the tiny 3/8" impact I got over the holidays from my father-in-law. This thing is so useful!

After the install and putting my OEM rear tires back on, things were already looking good without giving them time to settle down:

I finished so quickly, that I decided to start working on the front-end since I had the correct front struts.
I really hate using spring compressors... here is before:

Another side-by-side comparison of the Steeda Ultralite linear springs and BMR SP080:

And after,
Here is how the car sat the next day after putting some miles on her:

I was much happier with the fitment!
But... the happiness wouldn't last long. There was a rattle coming from the front-end and I was having a difficult time figuring it out. From my experience with cars over the years, the strut nut was an obvious suspect. Unfortunately, the tiny little female-hex tip of the strut is not very robust and makes torquing the top nut very difficult. Contrast that to the OEM strut which has a very meaty male tip that makes tightening the strut nut much easier.
I am incredibly sensitive to sounds and noises. I'm also a perfectionist and a software engineer by day... so ensuring all the i's are dotted and the t's are crossed is incredibly important to me. I always torque things to spec, use loctite, buy the right tools for the job, etc...
So I figured I would order a strut socket and really try to get things torqued down properly.
I also ordered high-end hex wrenches so that I wouldn't face issues with breaking them:
This is what happened to my previous hex wrench when trying to torque the nut properly:
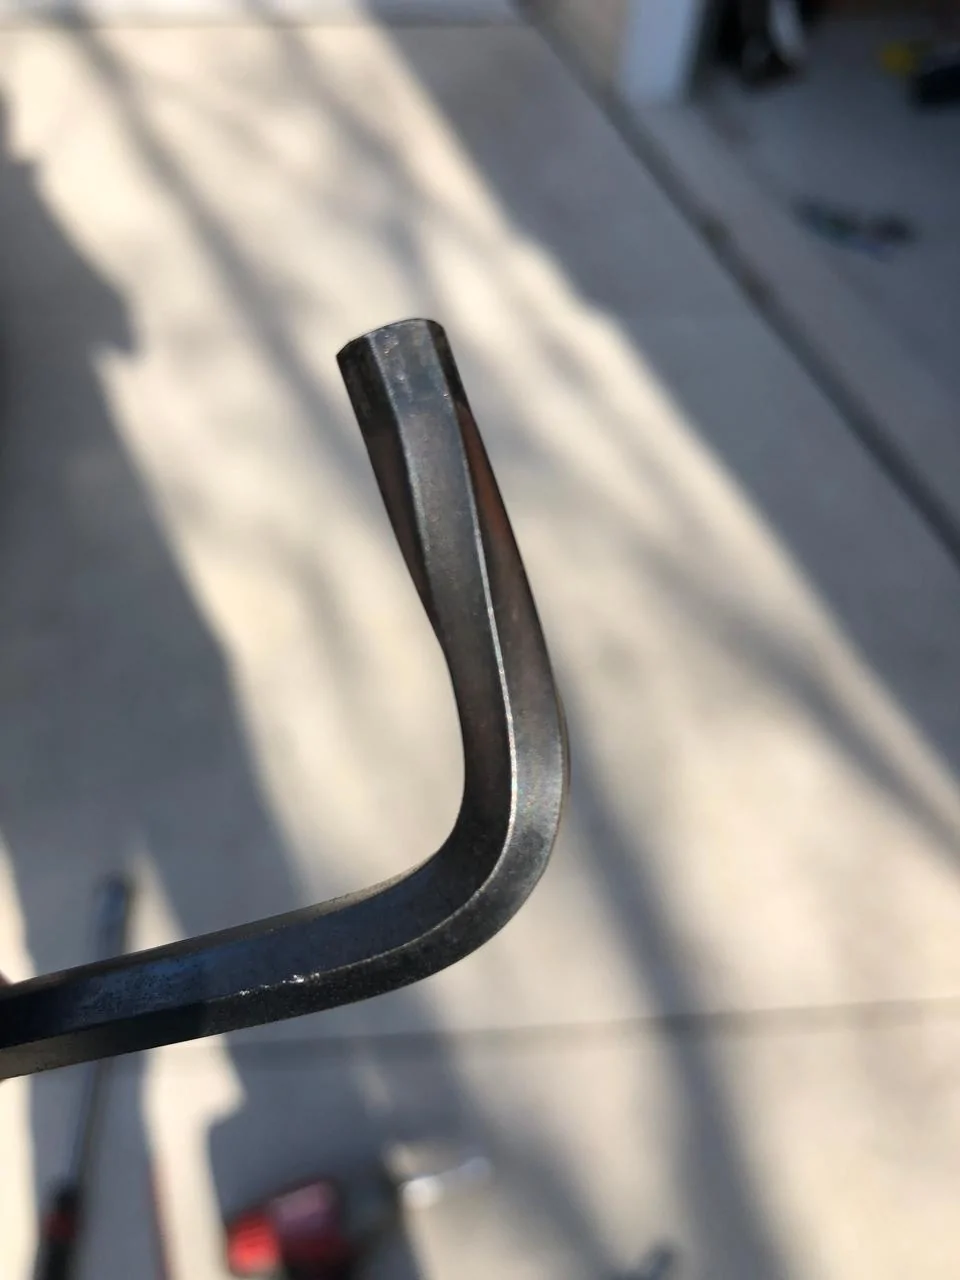
Even the new hex wrench was warping a bit.

Here is what the top of the pro action strut looks like... Steeda, if you are listening, PLEASE redesign this part of the strut. This is very unfriendly to the consumer.

Ultimately, I was unable to get things tightened up properly because the noises remained. Here is a thread that describes the issue: https://www.mustang6g.com/forums/showthread.php?t=103487
A shot taken after driving up 7 levels of a parking garage, dreading every speedbump:
Throughout this entire time, quite a few folks at Steeda went above and beyond to try and help me get this issue sorted. Jamie in the engineering department, Mike (the infamous [MENTION=25806]SteedaTech[/MENTION]) and many others were communicating with me on a regular basis via email, phone, etc...
At one point I took it to a shop operated by some friends of Steeda to have them see if they could sort it out. We ended up replacing the front struts and re-doing the installation (the shop had to cut the top strut nuts off because of how bad the female-hex design is)
Things were better (less rattle/loose material sound, but still something not quite right) – the (egregious in my mind) NVH still remained.
By this time the rear end parts had arrived (the correct struts) so I installed those with the help of my pooch Mason:
Old shocks

Installing the top nut
New stuff ready to go in:

The rear assembly was a breeze compared to the front.
I made sure to use new hardware since these parts are torque-to-yield:
Installed:

By this time I've put about 300 miles on the car and the feeling of the front-end just wasn't right. A drop-off in elevation would cause a thud that I really didn't like. It was as though the spring assembly wasn't "solid".
As a last ditch effort, Mike at Steeda suggested switching away from the Ultralite linear springs and moving to the progressive springs. In hindsight, I should have done this from the beginning. The roads here in Michigan (especially this time of year, right after winter) are outrageously bad.
This is not uncommon for Michigan:
[ame]
So Mike had the Progressive springs shot up to Michigan so that I could install them this weekend before my alignment next week. I think Mike might hate me at this point but good lord he has been a tremendous help through this entire process. I've never received such first-class support from anyone before. Despite the issues I have had, Steeda is a phenomenal company.
This weekend I psyched myself up for ANOTHER full suspension job and got to work.
Here are the new rear springs (progressive) vs the linear:

And the front springs:

Removing the strut nut from the old assembly required me to cut it off, just like the shop when helping out. I really think the female hex design needs to be rethought!!!
After a trip to ACE to try and find new top nuts, I had everything reassembled:

I ended up going with a 9/16-18 zinc jam nut. After 4-5 turns I got *slight* resistance on the shock... but a half turn or so the resistance went away and it threaded up and down just fine. I... think that's okay?
After a test drive earlier today... REALLY bad rattle. This time way more worse than before. Even my wife who is not nearly as OCD as me was like woah that is bad. I brought it home and checked over everything... nothing was loose.
Took my electric impact to the top nut and just hammered the piss out of it. Then took my hex wrench and 22mm wrench and cranked on it. Test drove again... far less noise but still a bit.
Pulled it back in the driveway, cranked on it again with the impact and again with the wrench.
Went for a test drive... so far so good! No noises!
I’ll be honest... I’m worried the issue will come back. The tolerance on that top nut is sooooo small and the female hex interface is so weak that I don’t have a lot of confidence in the solution. I hope it holds up.
The progressive springs are much better than the linear for these roads. So far I have only driven about 5 miles but it feels great. Can't wait to see how it holds up during the commute this week.
Finally... here is a sneak peek at the new wheels I put on. I'm putting together a thread on that too because these were custom made by my friend Alex of wheelflip.com & arcanewheels.com.


Sponsored
Last edited: