joe603
Well-Known Member
- Thread starter
- #1
I just finished wiring up a 2F capacitor and I think she's finally done. Figured I'd share some pics and install thoughts to help anyone who hates the "B&O" stereo. I quoted it because there aren't actually any B&O components.
First, thank you to a few audio fanatics on this site who helped immensely with questions and concerns to include Evolvd and Johnny man and others who helped on other threads. There are also excellent guides on this site and some good full installation videos out there that will help you get some ideas.
So before you take this project on, here are a few recommendations...you will be pulling most of the interior panels off to do it right, so unless you have a huge garage, expect that you'll need to use your house. Really this is for us married guys; give the wife a heads' up. I also pulled my wife's SUV out and had the Mustang in the center so I could access both doors. A bench will be helpful along with simple hand tools.
Hand Drill
Plastic panel remover tools
saw or router
hand tools
Mechanical finger retriever
Wire tape (tessa tape is awesome)
heat gun
4 or 0 GA wire for main power lead
fuse holder for main power run near battery
fuse holder for amp(s)
distro block for ground
proper fuses...make sure if they are mini ANL that's what you buy!)
6ch Good RCAs! (unless you want to re-do your RCA run due to noise, get good shielded RCAs
PAC AmpPro AP4FD21
PAC APHFD01 wire harness
3-way speakers component set for fronts
-I'm running Morel Virtus 603s
2-way components or coax for rear
-I'm running Morel Maximo Ultra 602s
Amp(s) as needed
-I'm running a Memphis MXC 1.1100 for the subs and a Focal 600.4 for the mids/highs
Subs (I used 2x 12s and a pre-fab box...but I love bass)
-I'm running Memphis 12s DVC
Audio Control Epicenter bass processor
2x 6.5 speaker adapter plates
3.5 adapter plates
2x speaker baffles for 6.5s (front/rear)
2.0 Farad capacitor
New battery terminal connectors (not needed, but I wanted a better connection for the main power wire for the amps)
Braided wire sleeving
4ga, 8ga, power wire for amp wiring from fused block
12ga, 16ga for speaker/sub runs
18ga for remote turn on
1A fuse holder for REM run
Crimping tool
Various crimp connectors
3-4 rolls of tessa tape
CAT5 wire
RJ11/RJ45 connector and tool (depending on the remote gain)
Dremel tool
Ohmmeter

The First thing I did was disconnect the negative lead on the battery and put the windows down. Then pull all interior panels to include the passenger side dash. You will need to pull out the LCD screen and radio/CD player to plug in the AmpPro harnesses. Lots of videos on that for help, just go slow and try not to break tabs. After everything is out, running the power wire from the battery to the trunk was next for me. This is more involved than I thought and had to remove the passenger side wheel to get access to the battery box. Just do it...makes life much easier. Run the power wire from the lower battery box to the firewall, through the OEM grommet. I used my mechanical finger tool to grab the wire and pull it through the passenger side firewall. You'll be running the main power wire on this side of the car.
After the main power is ran, I also ran some CAT5 along with it for the remote gain that will go under the console switches. Best to just run that now also. I found that running under the carpet works better than trying to run under the dash and back to the console. There's a gap near the center console, in the passenger area that a finisher piece uses a magnet to secure along with tabs. I used this to pull up the carpet and grab with mechanical fingers. From there, run the CAT5 under the switches. You could also run the wire that comes with whatever remote gain you want...or the AmpPro remote sub control. I'm using the Audio Control Epicenter remote. For the power wire, just run along the side, following the wire harness that's there. I zip tied everything and used tessa tape were it could rub metal. Make sure to leave extra in the trunk. You can also start dynomatting...this is VERY time consuming. I did it in stages starting with the trunk.
Next, tackle the AmpPro. This essentially goes between your radio/lcd screen and the car wiring harness. You'll need to pull the dash apart to get to it...not as bad as you think. Again, watch a few youtube videos for help. While you have this apart, remove the center speaker connector...you won't be using this (yes, all NAV/camera alerts/and OEM dings will work through the speakers with the AmpPro). I mounted the AmpPro in the driver's side footwell, up out of the way. It's a tight fit behind the radio/screen, so take your time. Also, run a USB from the AmpPro to wherever (I ran mine to the glovebox) for accessing the AmpPro to configure later.
Have your RCAs ready at this point. Before mounting the AmpPro, connect the RCAs and note the colors that go to the front/rear/sub. This will help later! Here's the trick I learned...do not run the RCAs around the foofwell and down the drivers side...instead, run them under the driver's side carpet (similar to the CAT5 you ran on the passenger side). This will help avoid any electrical interference. I had a nasty popping sound when the seat heaters were turned on that went away when I wired under the carpet. Along with the RCAs, run your remote wire. I used a 1A blade fuse...but probably not needed. It's just a low amp 12v to turn on your amps/components.
Run the RCA and remote wire along the driver's side of the car...similar to the power wire on the other side. I used zip ties to secure and tessa tape for protection. A braided wire sleeve will give you more protection. Now, before running the wire, you need to install the PAC wiring harness as it will run along with the RCAs. I used 2 braided sleeves for this as I didn't want a huge wire that would get in the way of the plastic trim piece that goes in the door jam by the seat. The wire harness plugs into the Sony amp in the driver's footwell. (Here's a tip, you can use a 10mm long socket to take out the trunk release lever!). I didn't use the subwoofer harness as that will be direct wire to the amp...but if you want to use the OEM sub enclosure with a replacement sub, this will be helpful.
There's another issue with replacing the tweeters with aftermarket in that the OEM system runs them in parallel to the 3.5s. You need to run speaker wires from both A-Pillars to the harness. I used the rear left/right leads as the rear deck will be wired directly to the amp. This sounds confusing...but really you're just using the PAC wiring harness as a transport from the front of the car to the trunk. All the leads connect to your component sets for each speaker (tweeter, 3.5 and 6.5). It just allows you to not have to run speaker wire to the doors...which is nice. There's a few threads discussing this...PM me if you have questions.
So now we have the wire harness speaker leads and the RCA harness together on the driver's side...run that guy to the trunk. Next, installing the door replacement speakers.

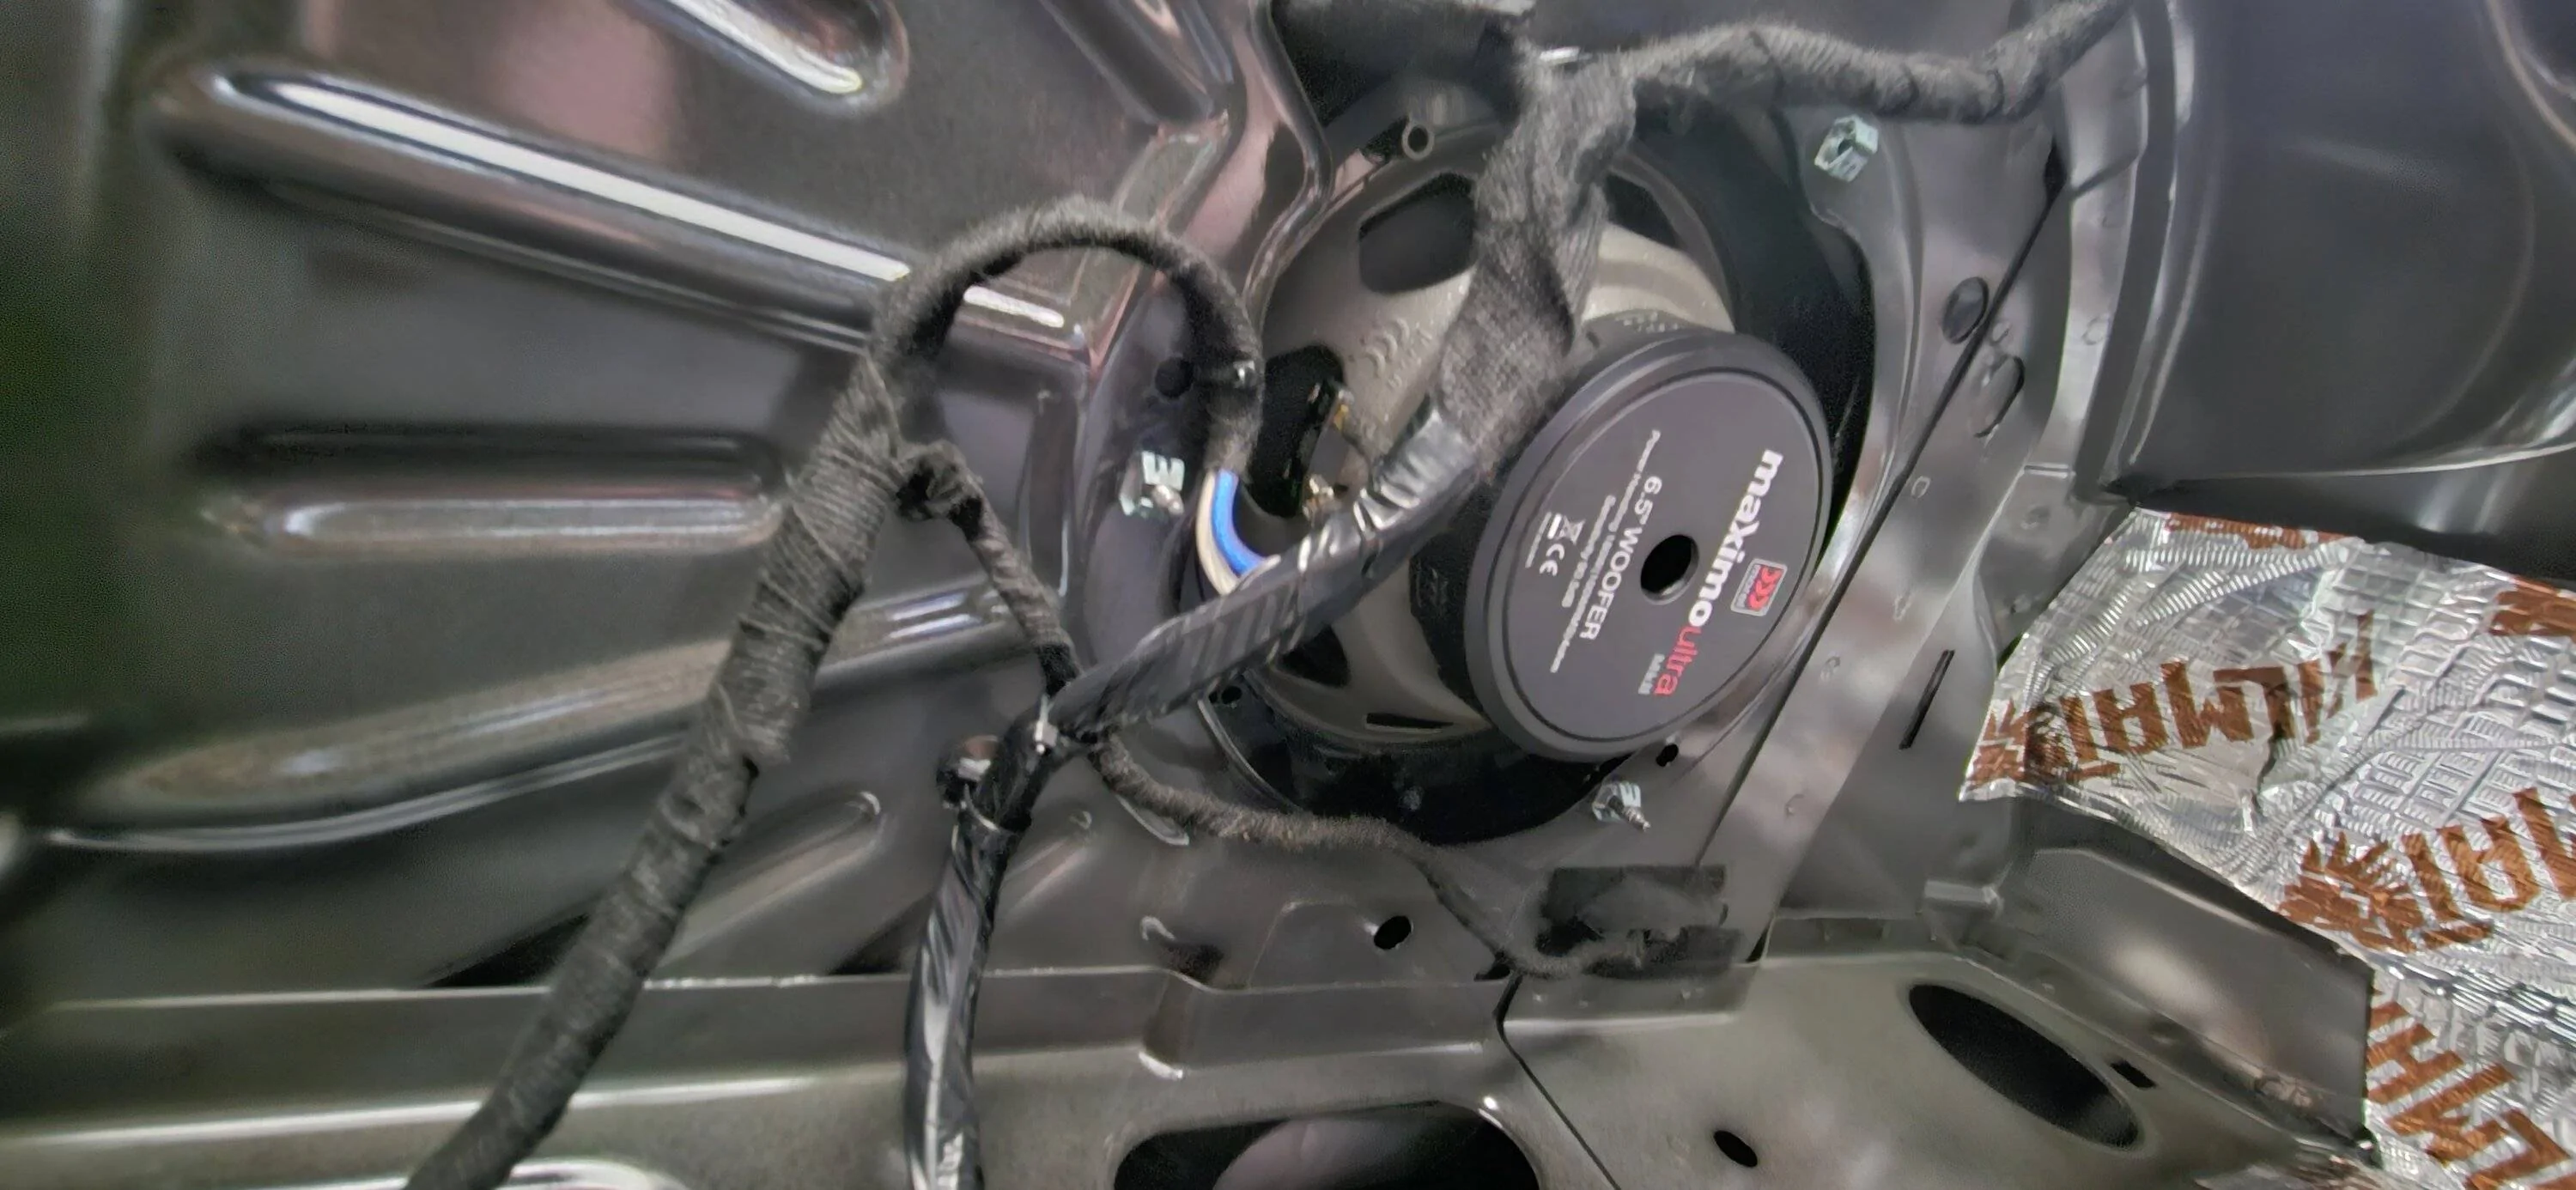
The above isn't my door...but it shows a good dynomat install. The door trim panel isn't too hard, just follow some youtube vids and take it slow. The door latch clip gave me a hard time, but the trick is to use needle nose plyers and pinch the tabs and slide it through the mount plate. It will make sense when you start pulling it apart. As for the speakers...expect to modify the adapter plates to get them to fit. A good Dremel tool will help. Mount the speaker baffles while your doing this so you don't have to remove everything to put one in later...lol, yup I had too. The 6.5s were pretty straight-forward, just have to account for the speaker leads that need to go through the adapters...so a hole will need to be drilled. Do that near the wire connector or you'll be drilling another frigging hole. Now, confirm polarity with a multi-meter/ohmmeter. You want to make sure the + lead is the same on the wire harness lead. The 3.5s can be tricky as you don't have a lot of room behind for a large magnet. This is why I went with Morel as the 3.5s fit perfectly. Focal 3.5s are huge and will require some modification to get them to fit. Do the same for the other door and get ready for a fight with your A-pillars.
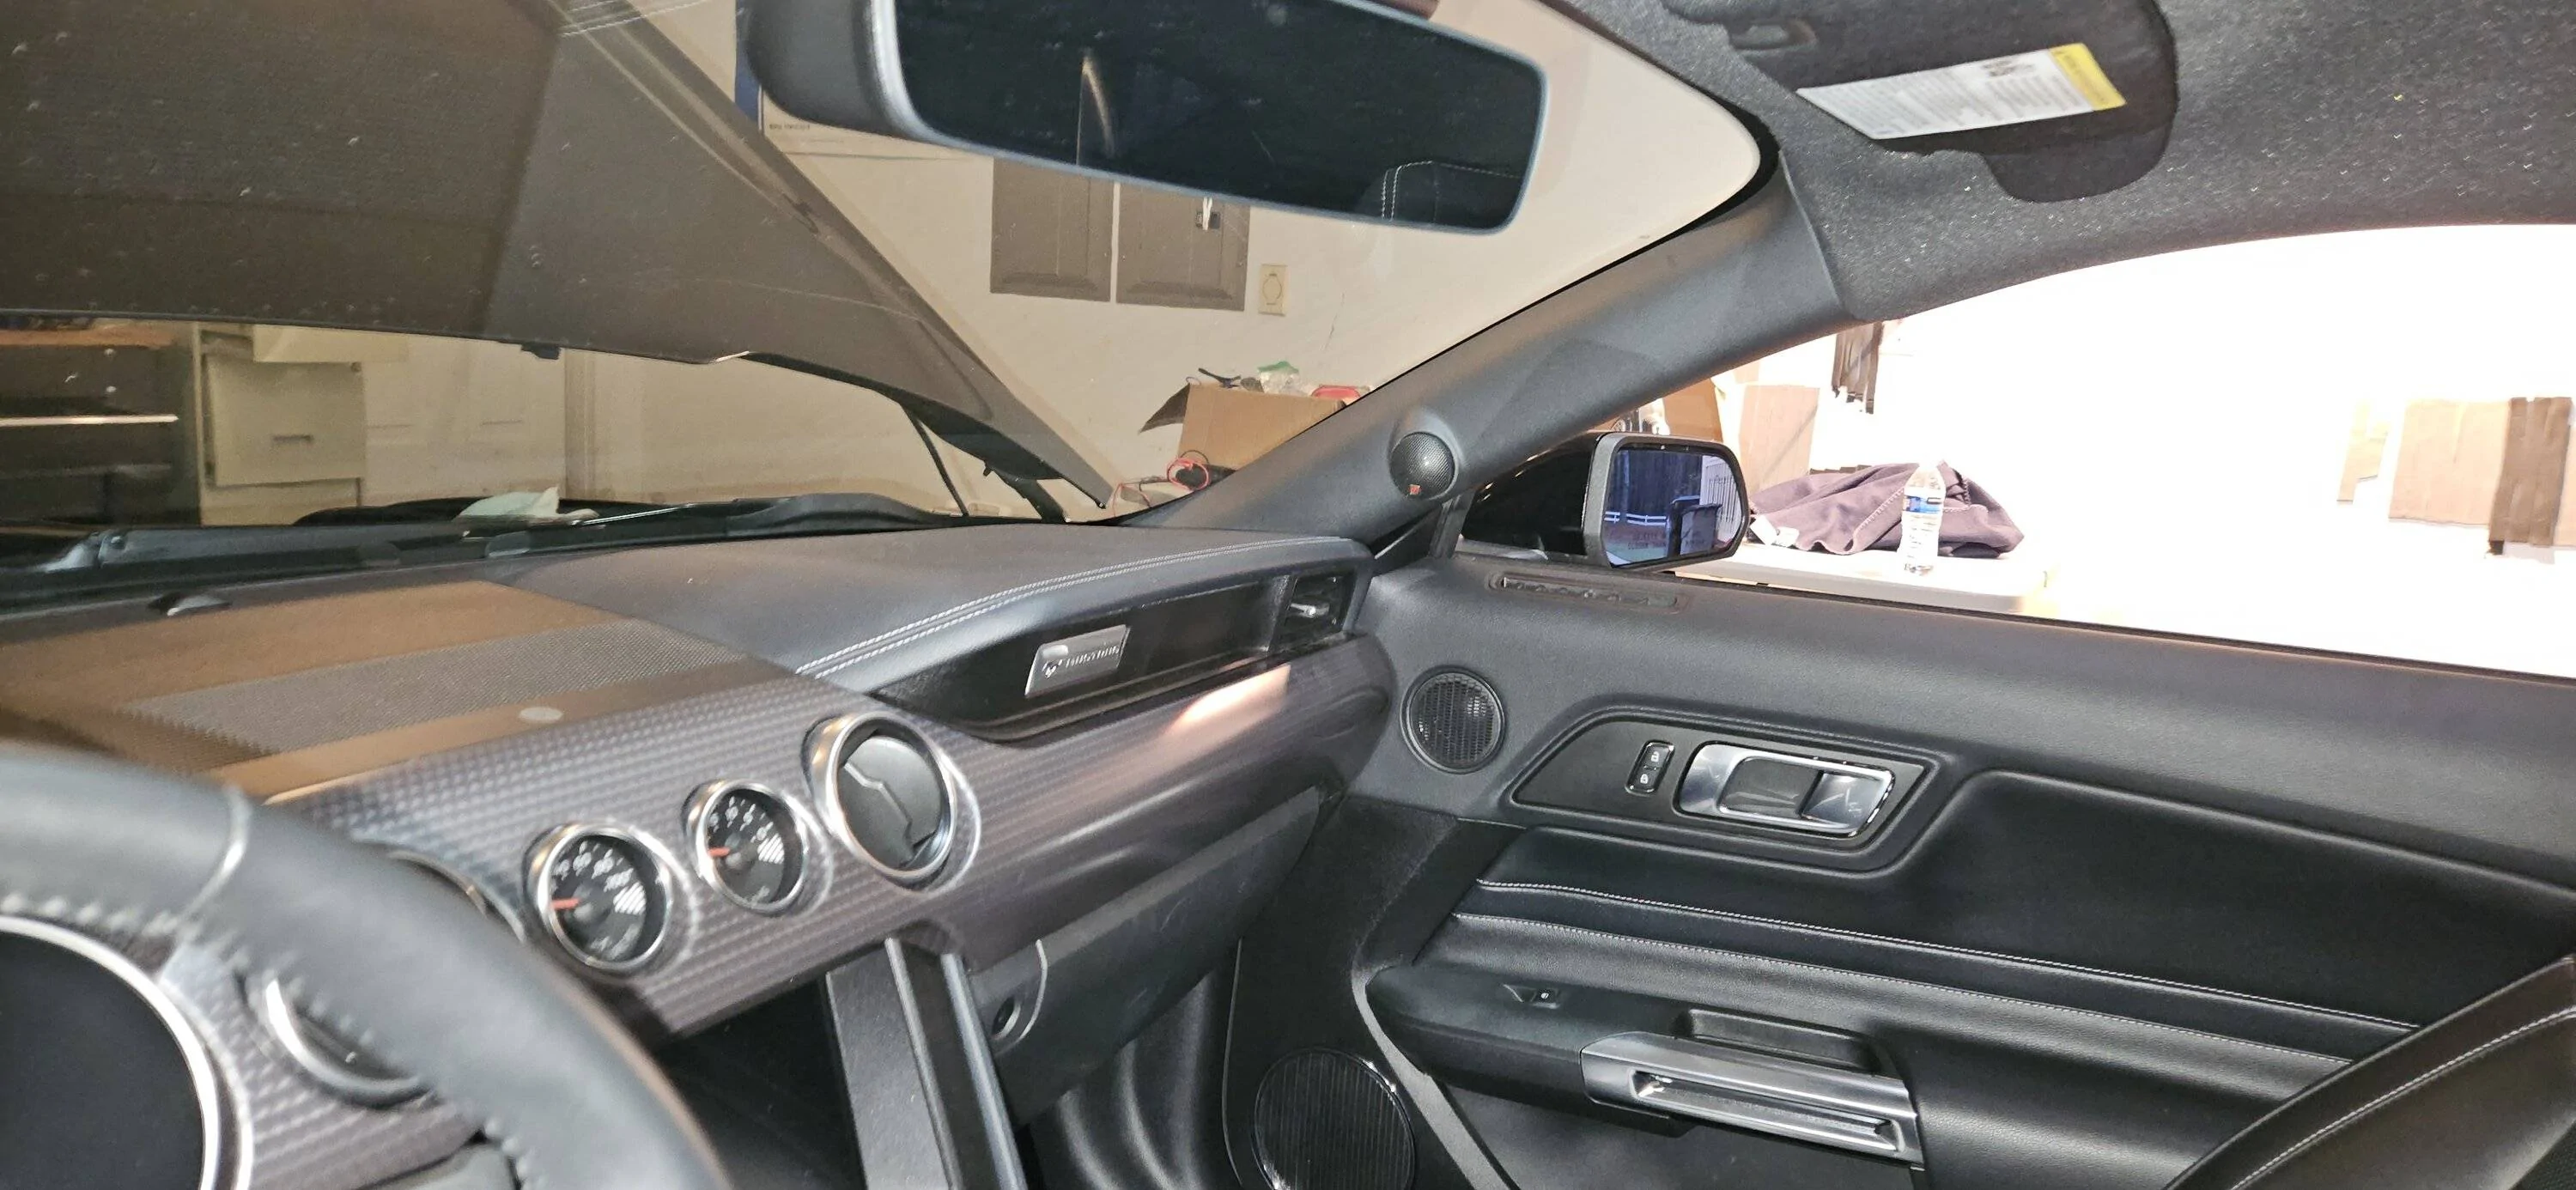
First, the A-pillars suck to remove and install...it's not you, even professional installers bitch about them! Get both out as best you can to not break tabs...youtube. We need to run speaker wire from each A-Pillar to the driver's side wire harness...more on that later. Now I'm not a fabricator...nor do I have a 3D printer...but that would have been nice to get these damn tweeters in the OEM position. I ended up removing the holder/tweeter and snugging the Morel tweeters from the outside. I used some super tough waterproof tape to secure as best I could. (So far no issues) After that, tie them into the speaker wire that you ran and re-install. A few beers after may be needed. Now those tweeter speaker leads are going to go to the PAC harness rear right/left wires. We'll use the harness as a transport from the front of the car to the trunk. On the other end, you simply use the rear right/left for each tweeter. The 3.5 and 6.5s can be used as normal...each wired to your component set.

Hopefully, It will look like this when finished:

Now the doors and A-Pillar's are done! Lets tackle the rear deck. A couple of things...the rear deck speakers have a bolt that sucks to remove...just take your time. This is also a good time to modify the rear deck carpet to add holes to help eliminate any rattles

Its not fun, but I used a punch tool to add the holes. You won't see them in the carpet when finished. For my system, I decided to mount the tweeters in the rear deck...that has some good and bad with it. I had to use double sided tape to secure the tweeter grills as they just popped off when heavy bass hit. But I didn't want to mount in the B-pillar as there's an airbag back there and nobody likes a tweeter to the skull...Dynomat the rear deck while it's open!!!
Here's the finished product.
Rear speaker install...use that tessa tape!!!
Remember, we're wiring directly to the amp, so you don't need the speaker connectors...which are now used for the front tweeters anyway.
Now we're cruising!!! Next, the amp rack. This is fairly personal...you can go all crazy and do a show car quality design...or redneck. I went maybe 80% show car...I like a clean look, but not going to display it in the trunk (at least not yet). Here is the mock up I started with before adding the Cap and Audio Control Epicenter
I used some carpet that had a pull-back sticky side from Amazon...worked great!!
Some wood working skills are helpful as I'm using the trunk spare tire area for my rack. The car didn't come with a spare...so meh. The good thing is that it's a large space and it has a 10mm bolt you can use to secure! You just need to have feet (2x4 blocks worked well) and a top brace for the trunk carpet that will be over it. Here's the finished look:
Components wired up using braded sleeves and tessa tape to help protect wires. It was a tight fit to get the audio control epicenter and 2F cap added...would have done things differently if I knew those components were going to be used from the start.
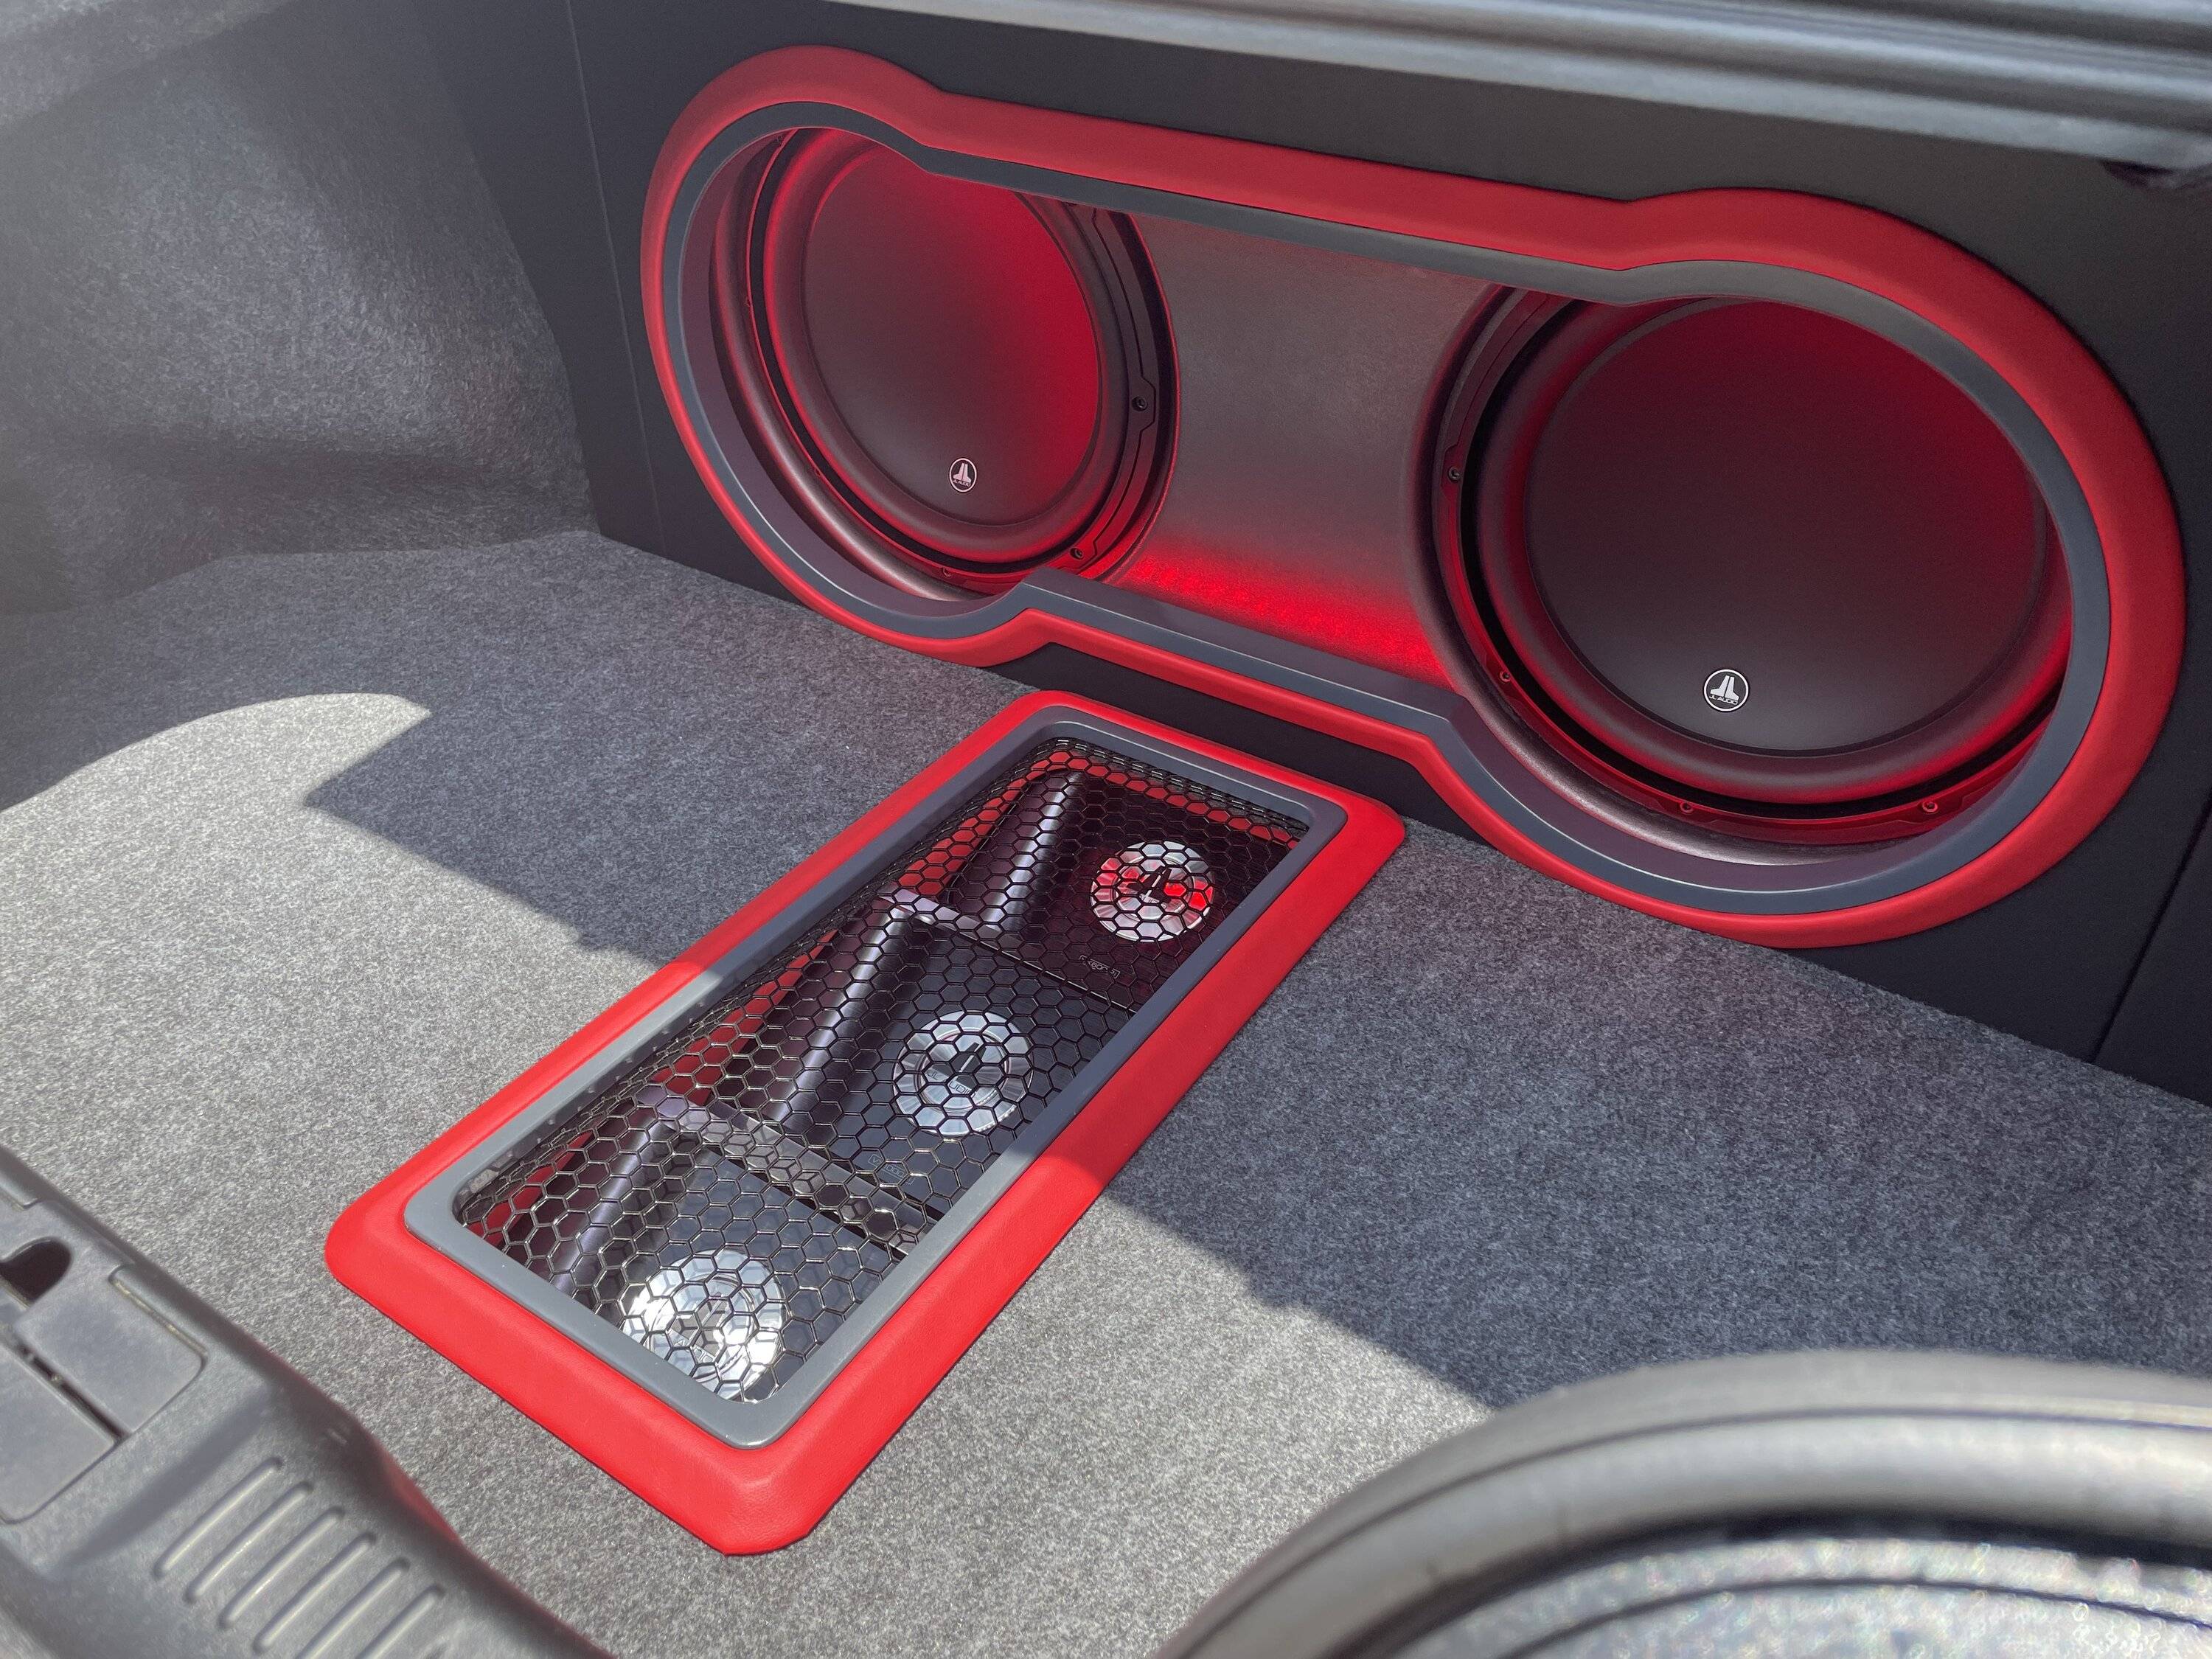
Here are the subs and the pre-fab enclosure
Last detail I have is the OEM passenger side carpet trim that the B&O sub was mounted...with all the cutouts. Need to replace with trim from a non-subwoofer equipped car...or get a carpet.
All and all it took me a good 5 days...so depending on your skill level, be ready to drive it naked for a while during the install. The result is an awesome, almost competition level stereo with plenty of power...I can actually hear it with the windows open now! Good luck on your install!!
First, thank you to a few audio fanatics on this site who helped immensely with questions and concerns to include Evolvd and Johnny man and others who helped on other threads. There are also excellent guides on this site and some good full installation videos out there that will help you get some ideas.
So before you take this project on, here are a few recommendations...you will be pulling most of the interior panels off to do it right, so unless you have a huge garage, expect that you'll need to use your house. Really this is for us married guys; give the wife a heads' up. I also pulled my wife's SUV out and had the Mustang in the center so I could access both doors. A bench will be helpful along with simple hand tools.
Hand Drill
Plastic panel remover tools
saw or router
hand tools
Mechanical finger retriever
Wire tape (tessa tape is awesome)
heat gun
4 or 0 GA wire for main power lead
fuse holder for main power run near battery
fuse holder for amp(s)
distro block for ground
proper fuses...make sure if they are mini ANL that's what you buy!)
6ch Good RCAs! (unless you want to re-do your RCA run due to noise, get good shielded RCAs
PAC AmpPro AP4FD21
PAC APHFD01 wire harness
3-way speakers component set for fronts
-I'm running Morel Virtus 603s
2-way components or coax for rear
-I'm running Morel Maximo Ultra 602s
Amp(s) as needed
-I'm running a Memphis MXC 1.1100 for the subs and a Focal 600.4 for the mids/highs
Subs (I used 2x 12s and a pre-fab box...but I love bass)
-I'm running Memphis 12s DVC
Audio Control Epicenter bass processor
2x 6.5 speaker adapter plates
3.5 adapter plates
2x speaker baffles for 6.5s (front/rear)
2.0 Farad capacitor
New battery terminal connectors (not needed, but I wanted a better connection for the main power wire for the amps)
Braided wire sleeving
4ga, 8ga, power wire for amp wiring from fused block
12ga, 16ga for speaker/sub runs
18ga for remote turn on
1A fuse holder for REM run
Crimping tool
Various crimp connectors
3-4 rolls of tessa tape
CAT5 wire
RJ11/RJ45 connector and tool (depending on the remote gain)
Dremel tool
Ohmmeter

The First thing I did was disconnect the negative lead on the battery and put the windows down. Then pull all interior panels to include the passenger side dash. You will need to pull out the LCD screen and radio/CD player to plug in the AmpPro harnesses. Lots of videos on that for help, just go slow and try not to break tabs. After everything is out, running the power wire from the battery to the trunk was next for me. This is more involved than I thought and had to remove the passenger side wheel to get access to the battery box. Just do it...makes life much easier. Run the power wire from the lower battery box to the firewall, through the OEM grommet. I used my mechanical finger tool to grab the wire and pull it through the passenger side firewall. You'll be running the main power wire on this side of the car.
After the main power is ran, I also ran some CAT5 along with it for the remote gain that will go under the console switches. Best to just run that now also. I found that running under the carpet works better than trying to run under the dash and back to the console. There's a gap near the center console, in the passenger area that a finisher piece uses a magnet to secure along with tabs. I used this to pull up the carpet and grab with mechanical fingers. From there, run the CAT5 under the switches. You could also run the wire that comes with whatever remote gain you want...or the AmpPro remote sub control. I'm using the Audio Control Epicenter remote. For the power wire, just run along the side, following the wire harness that's there. I zip tied everything and used tessa tape were it could rub metal. Make sure to leave extra in the trunk. You can also start dynomatting...this is VERY time consuming. I did it in stages starting with the trunk.


Next, tackle the AmpPro. This essentially goes between your radio/lcd screen and the car wiring harness. You'll need to pull the dash apart to get to it...not as bad as you think. Again, watch a few youtube videos for help. While you have this apart, remove the center speaker connector...you won't be using this (yes, all NAV/camera alerts/and OEM dings will work through the speakers with the AmpPro). I mounted the AmpPro in the driver's side footwell, up out of the way. It's a tight fit behind the radio/screen, so take your time. Also, run a USB from the AmpPro to wherever (I ran mine to the glovebox) for accessing the AmpPro to configure later.
Have your RCAs ready at this point. Before mounting the AmpPro, connect the RCAs and note the colors that go to the front/rear/sub. This will help later! Here's the trick I learned...do not run the RCAs around the foofwell and down the drivers side...instead, run them under the driver's side carpet (similar to the CAT5 you ran on the passenger side). This will help avoid any electrical interference. I had a nasty popping sound when the seat heaters were turned on that went away when I wired under the carpet. Along with the RCAs, run your remote wire. I used a 1A blade fuse...but probably not needed. It's just a low amp 12v to turn on your amps/components.

Run the RCA and remote wire along the driver's side of the car...similar to the power wire on the other side. I used zip ties to secure and tessa tape for protection. A braided wire sleeve will give you more protection. Now, before running the wire, you need to install the PAC wiring harness as it will run along with the RCAs. I used 2 braided sleeves for this as I didn't want a huge wire that would get in the way of the plastic trim piece that goes in the door jam by the seat. The wire harness plugs into the Sony amp in the driver's footwell. (Here's a tip, you can use a 10mm long socket to take out the trunk release lever!). I didn't use the subwoofer harness as that will be direct wire to the amp...but if you want to use the OEM sub enclosure with a replacement sub, this will be helpful.
There's another issue with replacing the tweeters with aftermarket in that the OEM system runs them in parallel to the 3.5s. You need to run speaker wires from both A-Pillars to the harness. I used the rear left/right leads as the rear deck will be wired directly to the amp. This sounds confusing...but really you're just using the PAC wiring harness as a transport from the front of the car to the trunk. All the leads connect to your component sets for each speaker (tweeter, 3.5 and 6.5). It just allows you to not have to run speaker wire to the doors...which is nice. There's a few threads discussing this...PM me if you have questions.
So now we have the wire harness speaker leads and the RCA harness together on the driver's side...run that guy to the trunk. Next, installing the door replacement speakers.
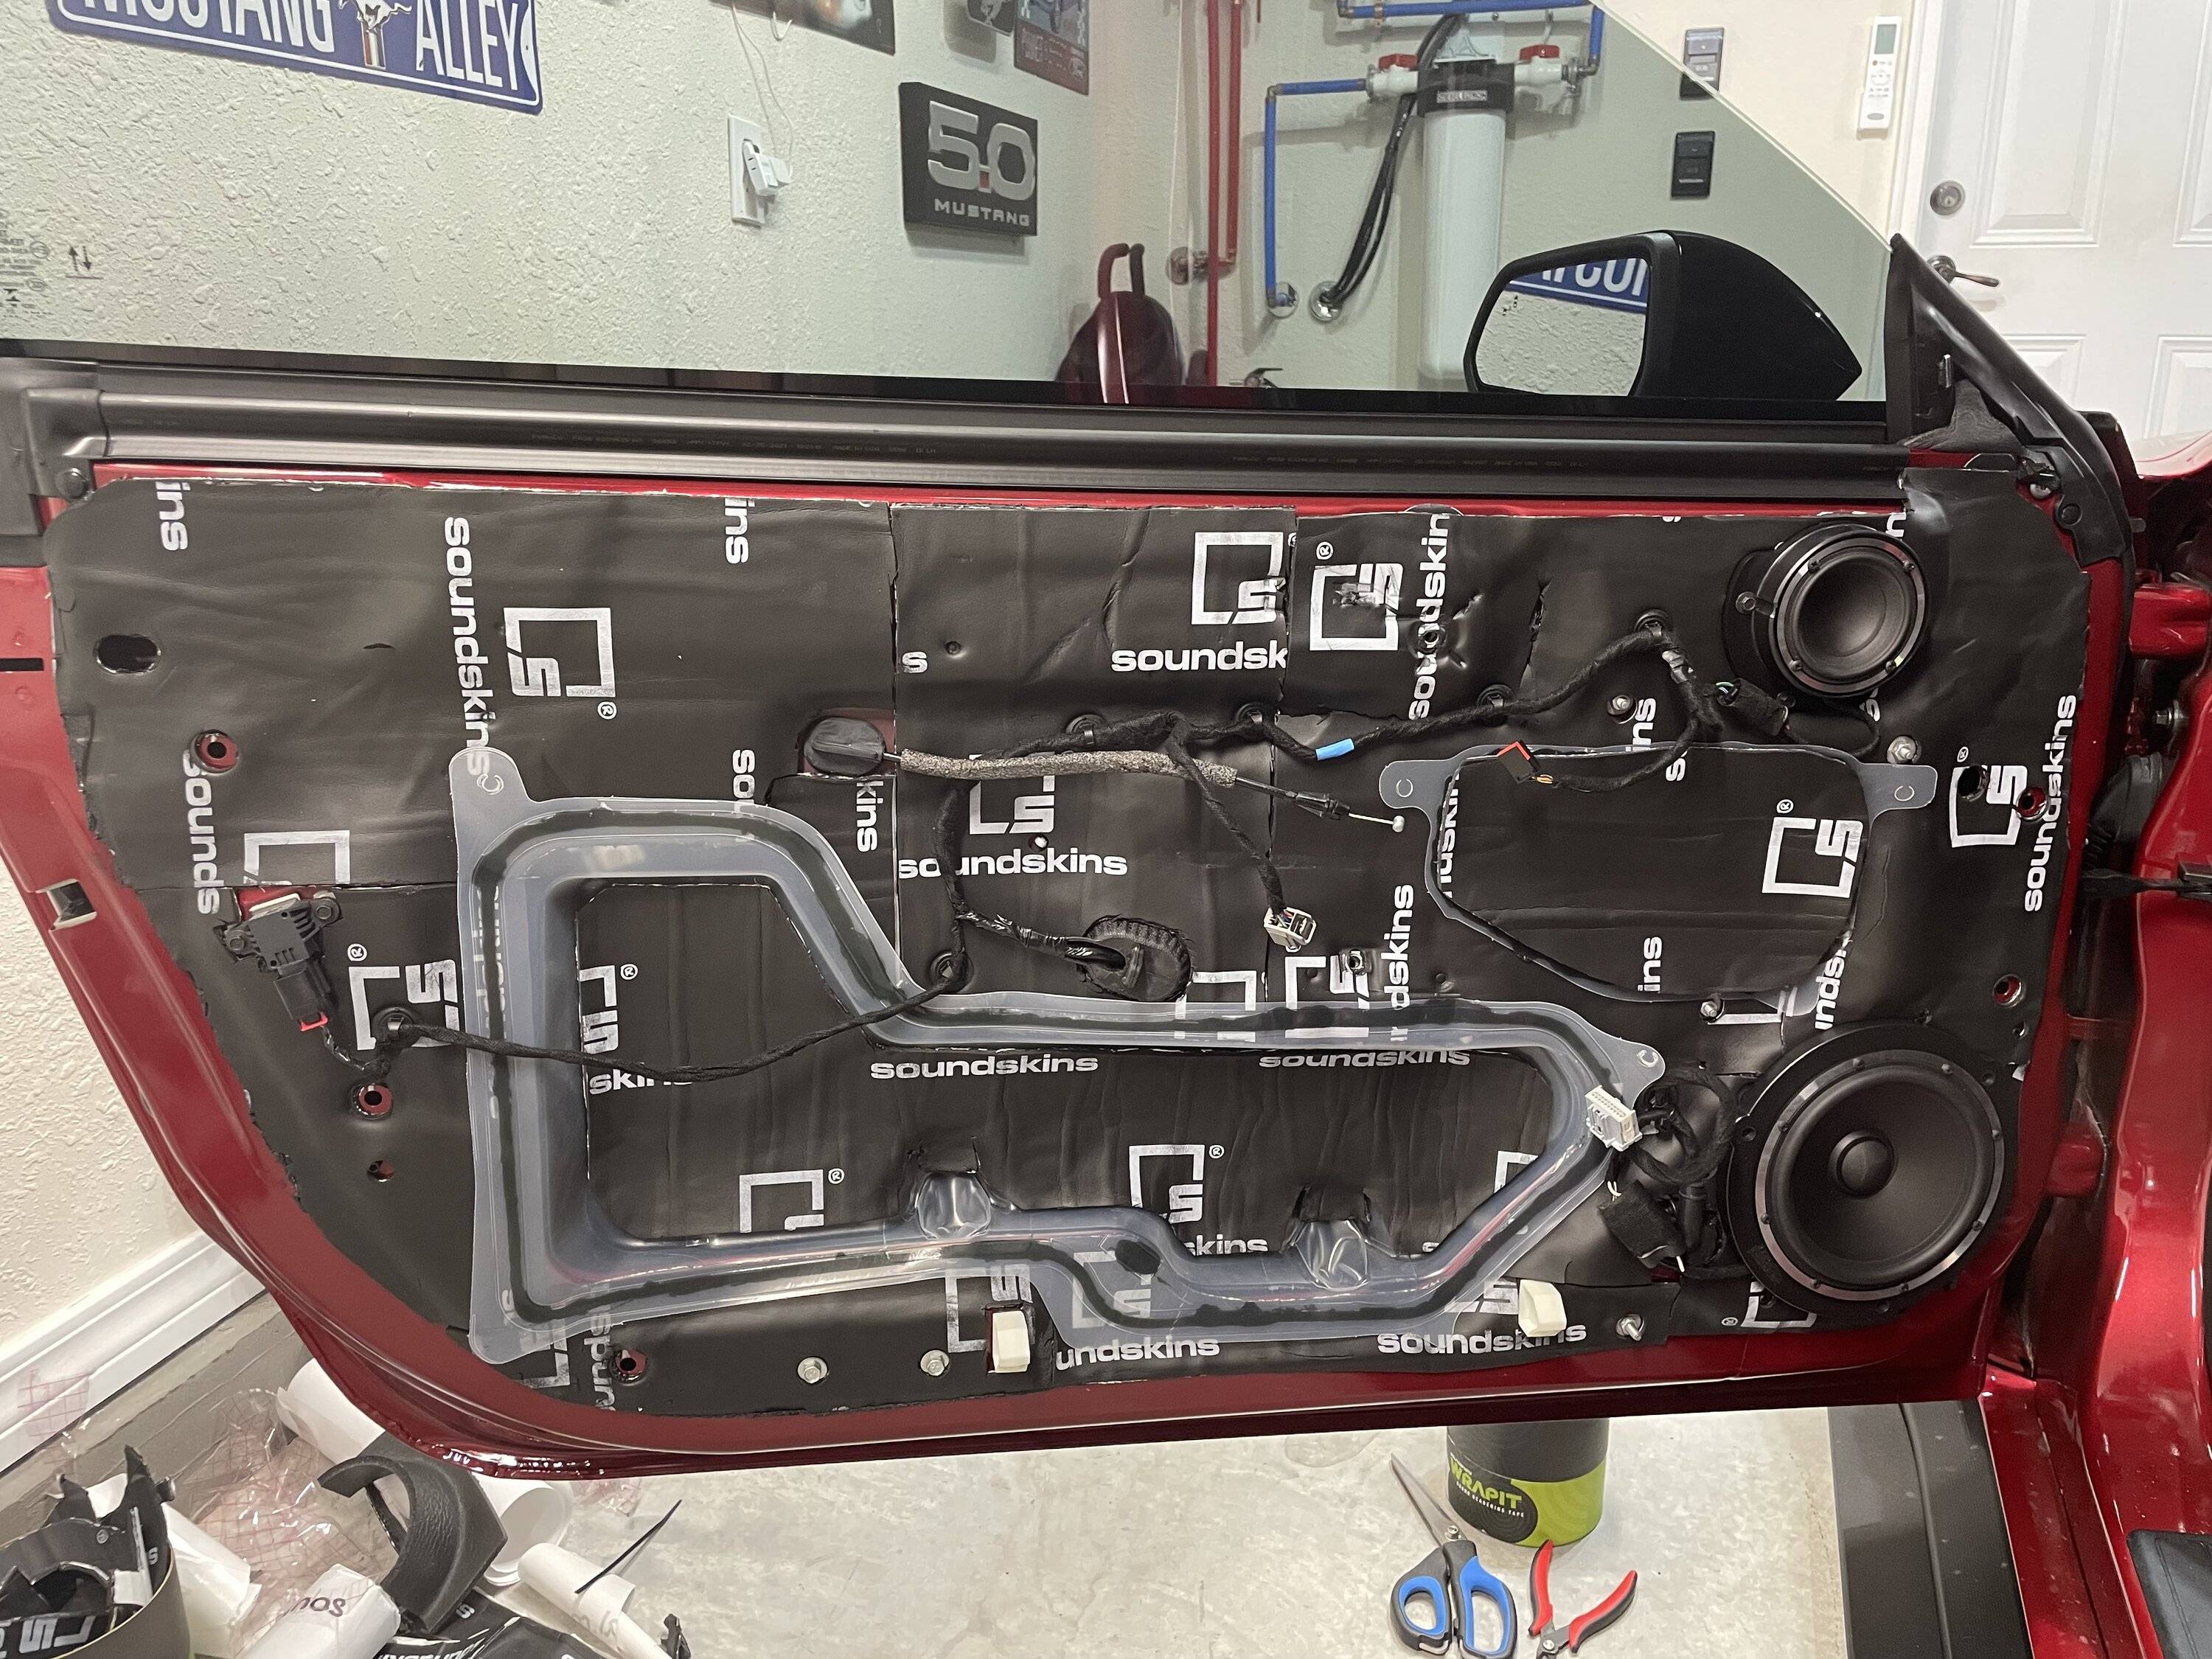
The above isn't my door...but it shows a good dynomat install. The door trim panel isn't too hard, just follow some youtube vids and take it slow. The door latch clip gave me a hard time, but the trick is to use needle nose plyers and pinch the tabs and slide it through the mount plate. It will make sense when you start pulling it apart. As for the speakers...expect to modify the adapter plates to get them to fit. A good Dremel tool will help. Mount the speaker baffles while your doing this so you don't have to remove everything to put one in later...lol, yup I had too. The 6.5s were pretty straight-forward, just have to account for the speaker leads that need to go through the adapters...so a hole will need to be drilled. Do that near the wire connector or you'll be drilling another frigging hole. Now, confirm polarity with a multi-meter/ohmmeter. You want to make sure the + lead is the same on the wire harness lead. The 3.5s can be tricky as you don't have a lot of room behind for a large magnet. This is why I went with Morel as the 3.5s fit perfectly. Focal 3.5s are huge and will require some modification to get them to fit. Do the same for the other door and get ready for a fight with your A-pillars.
First, the A-pillars suck to remove and install...it's not you, even professional installers bitch about them! Get both out as best you can to not break tabs...youtube. We need to run speaker wire from each A-Pillar to the driver's side wire harness...more on that later. Now I'm not a fabricator...nor do I have a 3D printer...but that would have been nice to get these damn tweeters in the OEM position. I ended up removing the holder/tweeter and snugging the Morel tweeters from the outside. I used some super tough waterproof tape to secure as best I could. (So far no issues) After that, tie them into the speaker wire that you ran and re-install. A few beers after may be needed. Now those tweeter speaker leads are going to go to the PAC harness rear right/left wires. We'll use the harness as a transport from the front of the car to the trunk. On the other end, you simply use the rear right/left for each tweeter. The 3.5 and 6.5s can be used as normal...each wired to your component set.

Hopefully, It will look like this when finished:
Now the doors and A-Pillar's are done! Lets tackle the rear deck. A couple of things...the rear deck speakers have a bolt that sucks to remove...just take your time. This is also a good time to modify the rear deck carpet to add holes to help eliminate any rattles

Its not fun, but I used a punch tool to add the holes. You won't see them in the carpet when finished. For my system, I decided to mount the tweeters in the rear deck...that has some good and bad with it. I had to use double sided tape to secure the tweeter grills as they just popped off when heavy bass hit. But I didn't want to mount in the B-pillar as there's an airbag back there and nobody likes a tweeter to the skull...Dynomat the rear deck while it's open!!!

Here's the finished product.

Rear speaker install...use that tessa tape!!!
Remember, we're wiring directly to the amp, so you don't need the speaker connectors...which are now used for the front tweeters anyway.
Now we're cruising!!! Next, the amp rack. This is fairly personal...you can go all crazy and do a show car quality design...or redneck. I went maybe 80% show car...I like a clean look, but not going to display it in the trunk (at least not yet). Here is the mock up I started with before adding the Cap and Audio Control Epicenter

I used some carpet that had a pull-back sticky side from Amazon...worked great!!

Some wood working skills are helpful as I'm using the trunk spare tire area for my rack. The car didn't come with a spare...so meh. The good thing is that it's a large space and it has a 10mm bolt you can use to secure! You just need to have feet (2x4 blocks worked well) and a top brace for the trunk carpet that will be over it. Here's the finished look:

Components wired up using braded sleeves and tessa tape to help protect wires. It was a tight fit to get the audio control epicenter and 2F cap added...would have done things differently if I knew those components were going to be used from the start.
Here are the subs and the pre-fab enclosure

Last detail I have is the OEM passenger side carpet trim that the B&O sub was mounted...with all the cutouts. Need to replace with trim from a non-subwoofer equipped car...or get a carpet.

All and all it took me a good 5 days...so depending on your skill level, be ready to drive it naked for a while during the install. The result is an awesome, almost competition level stereo with plenty of power...I can actually hear it with the windows open now! Good luck on your install!!
Sponsored
Last edited: