Sponsored

Opg install, Whats all required?

db252

Equinsu Ocha
Joined
Jan 1, 2016
Threads
44
Messages
1,474
Reaction score
876
Location
Bay Area, CA
Vehicle(s)
16 GT Premium/PP/Nav
[MENTION=29752]RT302[/MENTION] just pm'd u back and hopefully cleared up your question. There is also YouTube videos that show the purpose of the mmr mod. Please continue to ask anything you need for help.
Sponsored


RT302

RT302
Joined
Apr 9, 2017
Threads
3
Messages
45
Reaction score
1
Location
Pelham, AL
First Name
Jonathan
Vehicle(s)
2015 convertible automatic GT
[MENTION=29752]RT302[/MENTION] just pm'd u back and hopefully cleared up your question. There is also YouTube videos that show the purpose of the mmr mod. Please continue to ask anything you need for help.
You guys are awesome. It is so amazing the support everyone on here shows for each other.
 

Roh92cp

Well-Known Member
Joined
Jun 27, 2015
Threads
79
Messages
2,895
Reaction score
1,169
Location
Fort Kent Maine
First Name
Shawn
Vehicle(s)
OW GTPP Whipple
You guys are awesome. It is so amazing the support everyone on here shows for each other.
There is a tight nitch of of guys on here that are knowledgeable and very helpful and friendly. Best forum I've ever been i, and I've made some life long friends here as well. Wolf pack:thumbsup:
 

bew

Well-Known Member
Joined
Jan 14, 2015
Threads
11
Messages
137
Reaction score
27
Location
Phoenix
Vehicle(s)
Black 2015 GT PP
Add another one to the list of DIY OPG installs. Finally got the car buttoned back up and everything is great!

I installed MMR OPGs, crank gear, and a Romac balancer. Also last second I decided to throw a 170* thermo in there to try and combat the Phoenix heat.

I really enjoyed reading everyone's experiences with the whole process, so I'll add my own to this great thread:

- Be CAREFUL when removing the coil pack / fuel injector harness clips that are stuck to the valve covers. While yanking these out I accidentally pulled one of my fuel injector wires out of the connector. I then had to take the injector connector apart and solder the harness wires back onto each little metal grip. Was a pain in the ass that I would have rather not had to do.

- If you have a cowl extension, take that sucker and the battery heat shield OUT. It takes 10 minutes tops, you don't need to remove the windshield wipers (the plastic cover will lift enough to remove the bolts.) This will save SO much headache when trying to remove those passenger side rear valve cover bolts and clips. I removed everything with the cowl/shield in, however removed the cowl extension & heat shield for the re-install. Night and day, this actually made the passenger side valve cover the easy one. Remove it!

- I'll echo the sentiment about that little oil tube pickup bolt being a pain in the ass. True that skinny fingers makes things a bit easier, however the ultimate stress reliever is if you just already have a one of those magnetic snake tools to retrieve the bolt WHEN it falls. I took my time, was extremely careful, had a rag under the bolt.. however I still lost it when it came time to come out. I went and picked up a magnetic snake tool for 8 bucks and fished it out of the pan immediately. If I had to do it again I'd probably just loosen it up and not stress out about it falling.. If it does, I'll fish it out afterwards.

- When reinstalling the oil pump, poking the oil pickup bolt through some electrical tape was a great suggestion (made earlier in this thread.) This made reinstallation of those oil pickup tube bolts relatively painless.

- I have a ProCharger (HO kit) which during installation actually requires you to remove 4 of the timing cover bolts. 2 of the bolts happen to be on joints where you apply silicone and have a set amount of time to get everything torqued down quickly (5 minutes?) I ended up installing the timing cover normally with the OLD bolts and went back out (24+ hours later) and removed them when it was time to re-install my ProCharger head unit. I tossed around how to do this for a bit, and felt there was no way I was going to be able to get the timing cover + ProCharger in place and fully torqued down within an hour.

- Take note which timing cover bolts are LONG bolts and which are short bolts! I did not and had to figure it out.

- I installed an aftermarket balancer and was unable to use the "zip-tie" method that the ford manual suggests, however you can still walk the AC belt back on relatively easily following the same exact steps, minus the zip-tie. Just when it comes time to turn the crank, go about it very slowly while trying to persuade the belt back on.

- Before starting the car I disconnected the fuel pump (under the back seat) and turned it over a few times. Maybe not necessary, but I did this for piece of mind.

- I changed the oil AFTER starting the car up a first time and letting it warm up a little bit. I figured if there was any dirt/debris from the install, this would at least move it around and get it into the filter/pan and be flushed out when I changed the oil. Otherwise, if you have dirt/debris, it's going to stay in there until you change your oil again. Again, another piece of mind item.

- I did mess up while following the timing instructions but was able to get things right without having to start over. In the timing instructions linked earlier in this thread, be very careful to not miss Step 6 on Page 12. After installing the driver side chain I turned the crank clockwise back to 12 o'clock WITHOUT doing a full rotation first. Completely overlooked this step. Easy to fix but caused me quite a bit of anxiety!

Anyways, all finished now and this thread was invaluable to completing this with minimal heartburn.

Thank you everyone!
 

Roh92cp

Well-Known Member
Joined
Jun 27, 2015
Threads
79
Messages
2,895
Reaction score
1,169
Location
Fort Kent Maine
First Name
Shawn
Vehicle(s)
OW GTPP Whipple
Add another one to the list of DIY OPG installs. Finally got the car buttoned back up and everything is great!

I installed MMR OPGs, crank gear, and a Romac balancer. Also last second I decided to throw a 170* thermo in there to try and combat the Phoenix heat.

I really enjoyed reading everyone's experiences with the whole process, so I'll add my own to this great thread:

- Be CAREFUL when removing the coil pack / fuel injector harness clips that are stuck to the valve covers. While yanking these out I accidentally pulled one of my fuel injector wires out of the connector. I then had to take the injector connector apart and solder the harness wires back onto each little metal grip. Was a pain in the ass that I would have rather not had to do.

- If you have a cowl extension, take that sucker and the battery heat shield OUT. It takes 10 minutes tops, you don't need to remove the windshield wipers (the plastic cover will lift enough to remove the bolts.) This will save SO much headache when trying to remove those passenger side rear valve cover bolts and clips. I removed everything with the cowl/shield in, however removed the cowl extension & heat shield for the re-install. Night and day, this actually made the passenger side valve cover the easy one. Remove it!

- I'll echo the sentiment about that little oil tube pickup bolt being a pain in the ass. True that skinny fingers makes things a bit easier, however the ultimate stress reliever is if you just already have a one of those magnetic snake tools to retrieve the bolt WHEN it falls. I took my time, was extremely careful, had a rag under the bolt.. however I still lost it when it came time to come out. I went and picked up a magnetic snake tool for 8 bucks and fished it out of the pan immediately. If I had to do it again I'd probably just loosen it up and not stress out about it falling.. If it does, I'll fish it out afterwards.

- When reinstalling the oil pump, poking the oil pickup bolt through some electrical tape was a great suggestion (made earlier in this thread.) This made reinstallation of those oil pickup tube bolts relatively painless.

- I have a ProCharger (HO kit) which during installation actually requires you to remove 4 of the timing cover bolts. 2 of the bolts happen to be on joints where you apply silicone and have a set amount of time to get everything torqued down quickly (5 minutes?) I ended up installing the timing cover normally with the OLD bolts and went back out (24+ hours later) and removed them when it was time to re-install my ProCharger head unit. I tossed around how to do this for a bit, and felt there was no way I was going to be able to get the timing cover + ProCharger in place and fully torqued down within an hour.

- Take note which timing cover bolts are LONG bolts and which are short bolts! I did not and had to figure it out.

- I installed an aftermarket balancer and was unable to use the "zip-tie" method that the ford manual suggests, however you can still walk the AC belt back on relatively easily following the same exact steps, minus the zip-tie. Just when it comes time to turn the crank, go about it very slowly while trying to persuade the belt back on.

- Before starting the car I disconnected the fuel pump (under the back seat) and turned it over a few times. Maybe not necessary, but I did this for piece of mind.

- I changed the oil AFTER starting the car up a first time and letting it warm up a little bit. I figured if there was any dirt/debris from the install, this would at least move it around and get it into the filter/pan and be flushed out when I changed the oil. Otherwise, if you have dirt/debris, it's going to stay in there until you change your oil again. Again, another piece of mind item.

- I did mess up while following the timing instructions but was able to get things right without having to start over. In the timing instructions linked earlier in this thread, be very careful to not miss Step 6 on Page 12. After installing the driver side chain I turned the crank clockwise back to 12 o'clock WITHOUT doing a full rotation first. Completely overlooked this step. Easy to fix but caused me quite a bit of anxiety!

Anyways, all finished now and this thread was invaluable to completing this with minimal heartburn.

Thank you everyone!

Thanks for sharing your experience here, I love the idea of people getting this job done themselves and overcoming the fear to time a coyote motor. How did end up resolving your timing issue with missing the step 6?
 

Sponsored

bew

Well-Known Member
Joined
Jan 14, 2015
Threads
11
Messages
137
Reaction score
27
Location
Phoenix
Vehicle(s)
Black 2015 GT PP
Thanks for sharing your experience here, I love the idea of people getting this job done themselves and overcoming the fear to time a coyote motor. How did end up resolving your timing issue with missing the step 6?
The crank keyway was already at 12 and the passenger side cam was already at 11.. so I pulled the passenger side chain, rotated the crank clockwise one more full rotation and put the chain back on. It would have been easier to come to this conclusion if I hadn't spun the motor over 4 times after forgetting that step.
 

Mootang

Well-Known Member
Joined
Oct 2, 2016
Threads
66
Messages
1,148
Reaction score
415
Location
Sacto, Caliunicornia
First Name
Henry
Vehicle(s)
2017 Mustang GT
So for those who did the OPG, do you have to remove the sway bar?
 

z06psi

Well-Known Member
Joined
May 15, 2015
Threads
72
Messages
4,157
Reaction score
1,395
Location
Evans, GA.
First Name
Andrew
Vehicle(s)
The pot stirrer
No. Radiator stays in also. Just remove the electric fans which is two bolts and an electrical connection for better room.
I did not even remove those.
 

Sponsored

Mootang

Well-Known Member
Joined
Oct 2, 2016
Threads
66
Messages
1,148
Reaction score
415
Location
Sacto, Caliunicornia
First Name
Henry
Vehicle(s)
2017 Mustang GT

db252

Equinsu Ocha
Joined
Jan 1, 2016
Threads
44
Messages
1,474
Reaction score
876
Location
Bay Area, CA
Vehicle(s)
16 GT Premium/PP/Nav
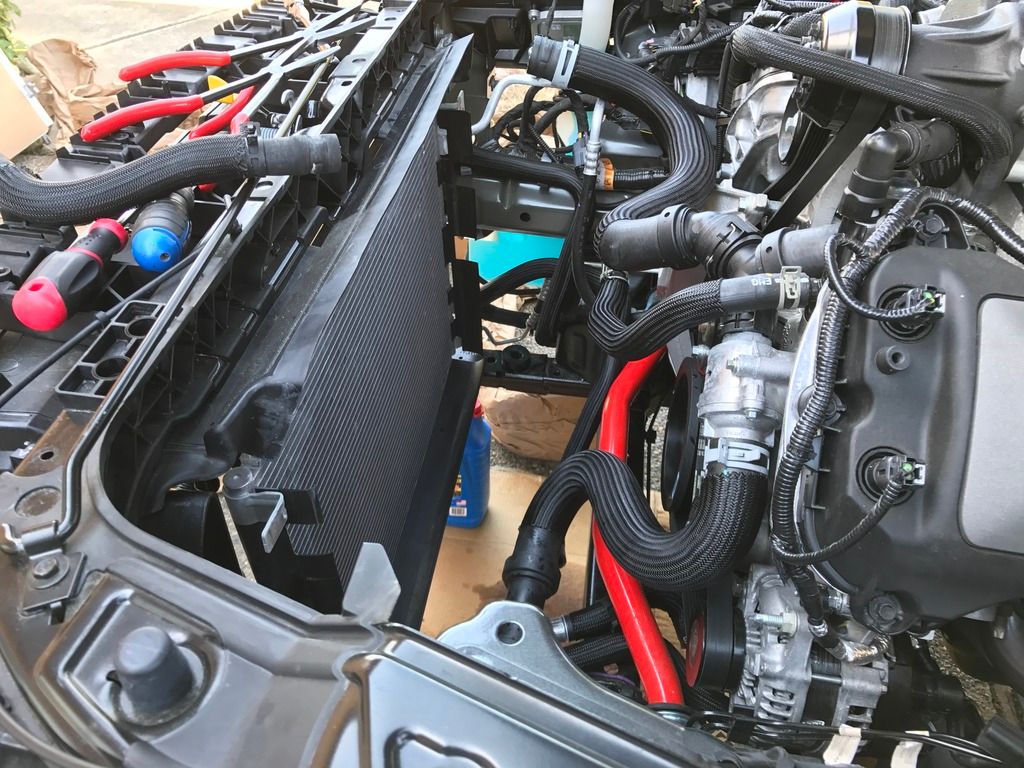
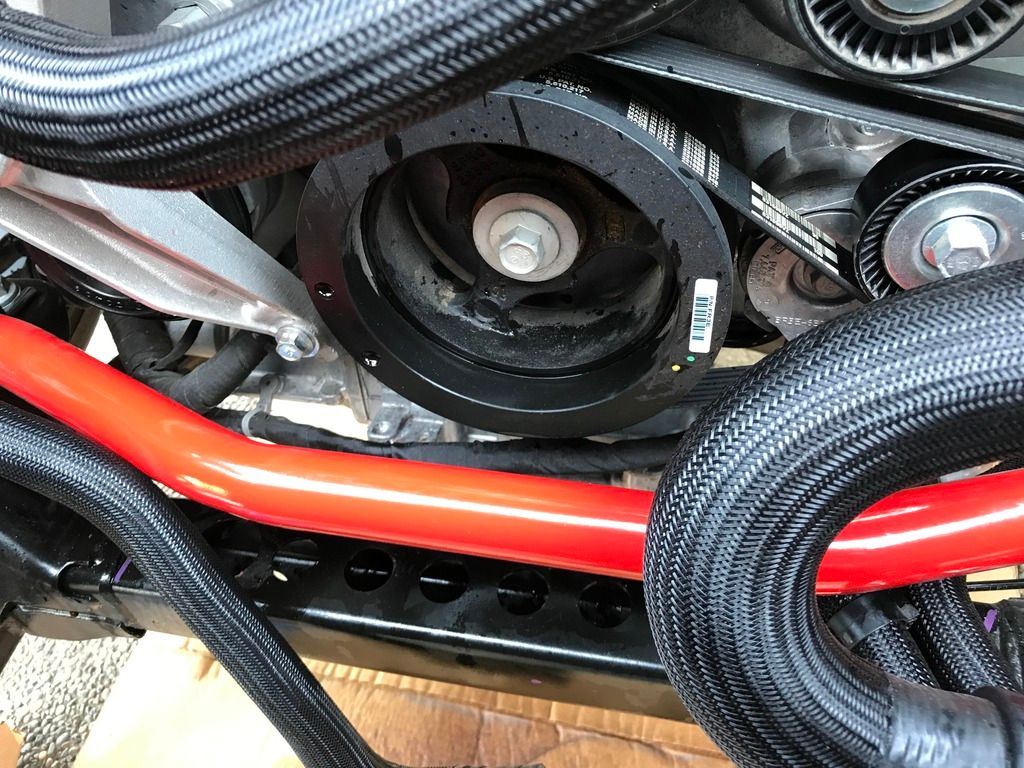
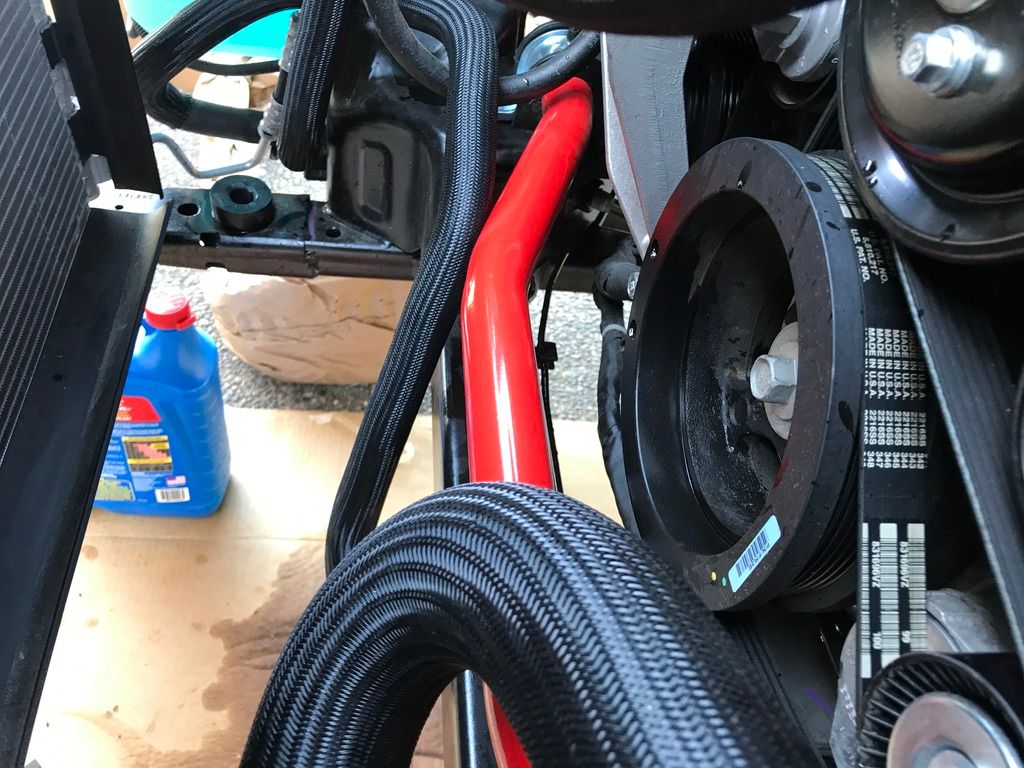
Ahhh, didn't know you lowered your motor which could be a factor but maybe not. You have a better perspective in person as pics make it hard to tell. If by chance you don't have enough room you'll probably have to move the swaybar like you mentioned or be better off loosening the motor mounts and lifting the motor enough to make the damper clear it.
Looks good so far. Remove the serpentine belt and either cut your a/c belt or work it off like others have mentioned.
 

Mootang

Well-Known Member
Joined
Oct 2, 2016
Threads
66
Messages
1,148
Reaction score
415
Location
Sacto, Caliunicornia
First Name
Henry
Vehicle(s)
2017 Mustang GT
Ahhh, didn't know you lowered your motor which could be a factor but maybe not. You have a better perspective in person as pics make it hard to tell. If by chance you don't have enough room you'll probably have to move the swaybar like you mentioned or be better off loosening the motor mounts and lifting the motor enough to make the damper clear it.
Looks good so far. Remove the serpentine belt and either cut your a/c belt or work it off like others have mentioned.
Motor mounts I can probably do, the sway bar was pretty hard to install and I don't want to touch it. In person, the sway goes across it just at the bottom of balance. If looking head on, it is covering 1.5in from the bottom of the balancer up. How far does the balancer need to go out before it is off the crank? I just hope my puller will make it in, if not, I will have to raise the engine, which sucks.
 

db252

Equinsu Ocha
Joined
Jan 1, 2016
Threads
44
Messages
1,474
Reaction score
876
Location
Bay Area, CA
Vehicle(s)
16 GT Premium/PP/Nav
From just looking at the pics you posted, it doesn't look like the puller should have a problem grabbing and you might get lucky enough with the damper coming off in time to clear it. If not, you know what you have to do. Not a big deal, just a bump in the road.
Sponsored


Top