PatrickGT
Well-Known Member
- Joined
- Jun 18, 2016
- Threads
- 3
- Messages
- 599
- Reaction score
- 213
- Location
- Chandler, AZ
- Vehicle(s)
- 2017 GT PP
Cool, guess I'm off the hook then since we're all credentialed up lmao
Sponsored
That honeycomb grille can kill my a**. Here in FL that thing is nothing but a bug trap, especially in love bug season. Those little bastards....Dang. I feel like I've been crazy with going over my car with detail spray every night when I get home from my 55 mile (round trip) commute. The front of my car is covered in no less than 200 small bugs and a couple very LARGE dragonflies just from my drive to work this morning (I cleaned it last night). There was one day I picked at least 14 dragonflies out of my grille and front bumper just from one day of commuting.
I was stationed in 29 Palms for 4 years. Dust? Hell, my car was sandblasted. I had many lively drives to Phoenix and Laughlin/Las Vegas as well as LA/Riverside/San Bernadino.I hear ya on that, i have a 90mile round trip commute each day and it such a hassle.. tho here in the high desert/ Inland empire of SoCal i have to deal with dust....so much dust...
I, for one, certainly appreciate your extensive contribution here and hope to tap into your vast knowledge.Well, it was super dickish.
Hey F this guy who is actively posting trying to help out the community and offering to address specifics, call some dude who is on the hook to sell his companies product and isn't contributing to the forums!

Thanks Patrick...options are always good, but since I've already purchased the Lake Country pads I think I'll just stick with them for now.For sure. So looking here (it won't show black, which is finishing/final finishing and the right pad for your final step):
http://lib.store.yahoo.net/lib/yhst-130020179123853/lcpadchart.jpg
So you should be using the Orange (Yellow if you have larger swirls/deeper scratches to deal with) with the 105 and White with the 205 like you suggested.
I'd like to offer another option, though:
http://www.detailedimage.com/Meguiars-M43/Buffer-Pads-C79/
The Microfiber pads are really great for a two-step like what you're doing. Cutting pad on the compound, finishing pad on the polish, final step on finishing pad or by hand.
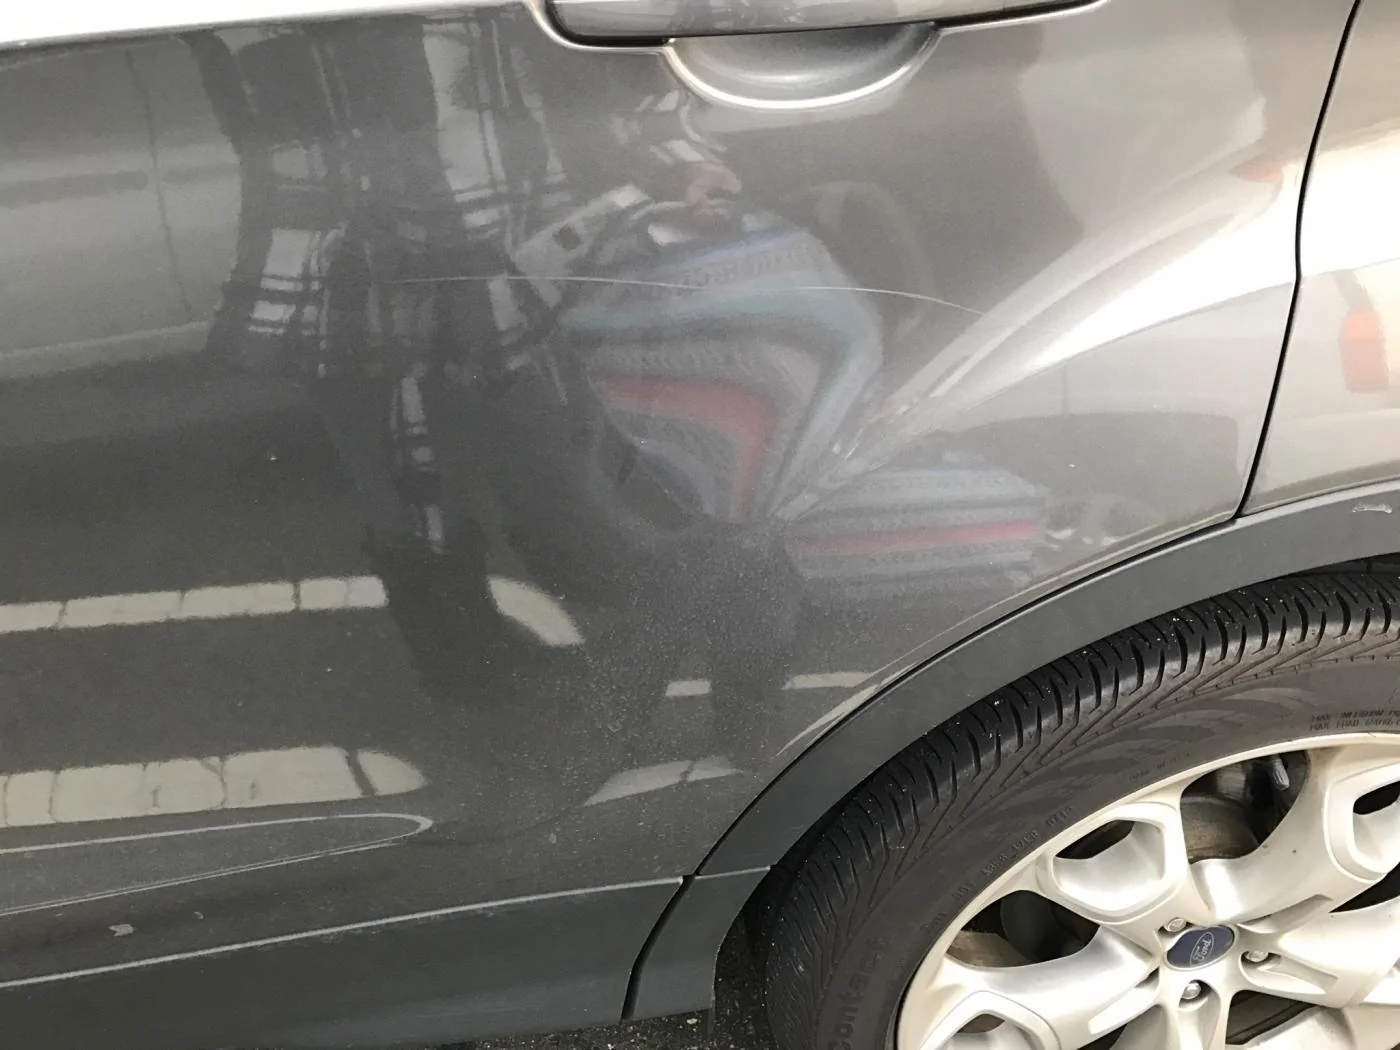
Hey patrick, thanks for that huge write up. all very interesting info in this thread. I've been getting into detailing since purchasing my s550, black is a real bit...... anyway. I have a question for you not related to the s550. My girlfriend has a 2013 Escape in Magnetic Metallic. She just recently purchased this (used) and it has only been cleaned by the dealership. (basically not cleaned. I had an appt set up to have it detailed just a few days after purchase but the guys water tank froze or something we really arent sure how.) Long story short she left work one day to come out to see a scratch on the car starting from the rear door and going back to the taillight. I will be posting pictures for you eventually but they arent that great so... I've been on the fence about purchasing a DA buffer and this made me pull the trigger. I am going to attempt to fix it. I've seen a million and a half detailing/buffer wheel vids to understand the technique of how to use the machine and not damage the car. Do you think the included material with this (link below) is enough to tackle the scratch? Its not super deep at all. Also, what should i do to address it. Clean the car first then clay the scratch then fix the scratch? Do i just clean and clay the scratch area then fix the scratch then full clean the whole car? In all honesty this is probably going to see regular smacky-brushy car wash because its not my car and im sure the previous owners used it. I'm just not sure what the process overall here should be. Sorry if this was super long and wordy. Thanks!Haha, thanks.
Also if anyone has any specific questions or problem areas (water spots on your windows? cake. Tar on your black trim? It's gonna suck, but I have a fix...) let me know and post pics if you can.
I'd recommend:many years ago, I used to work in a high end body shop and I was tasked with doing the colorsanding/buffing/polishing of the cars (especially the black cars) after getting painted - back then, the process was to colorsand with 1500 then 2000, then cut with a coarse wool pad with an aggressive rubbing compound (Glasurit rubbing compound was my favorite), then clean it, and hit it with a different pad and then polish, and then a black foam waffle pad with 3M Finesse-it and then as a final step, we'd use some kind of a glaze by hand (no wax, since it was fresh paint, and needed to breathe for a while).
Things have changed quite a bit since then - AND, I don't really care to spend hours cleaning my car..
But I'm in a pickle now - I just got a 2016 DIB S550, which is a GORGEOUS color, but it shows EVERY speck of dust/dirt - so I've been trying to keep up on it with just a detail spray each night ... tonight I actually washed it and then went over it with Zymol cleaner/wax by hand using some microfiber towels.. it looks good (but it was also dark by the time I was done, so I'll do a final inspection in the morning). I have been seeing so many references to sealers, waxes, and other products - I don't want to get crazy.. but I do want something that keeps the paint looking good and easy to maintain with a quick wipe down with detail spray every now and then.
So - what is the 'order' in which the process should be done?
My understanding is:
Wash car
Clay bar (if necessary - and I will probably never do this)
Polish (hand or machine)
Sealer
Wax
Glaze
is that right? or is the sealer the last thing? Chances are pretty good I'm just gonna wash it and maybe hit it with a wax or sealer every now and then.
Also - are there any popular detail sprays on the market you guys like? Something to use to get the light dust off the car in between washings?
with the most abrasive stuff that came with that buffer, and moving up to the finishing solutions, i was able to remove 96% of it. there's one area where the rear fender meets the bumper that still has an indent. deepest part of the scratch. The rest of it came out for the most part. if you look really really hard you can kinda still see where it was but its pretty good for my first try i would say. I also removed a crap ton of orange peel in the process from the door so thats good. Makes me want to go back and re-polish the entire truck.I would recommend using Meguiar's 105/205 combo on that. Start with the 205 and see if that does the trick, if not move to the 105 with a more aggressive pad then back to the 205 to finish it out. You always want to do the LEAST abrasive step possible to get the result you want, never take off too much.
")