4V Mayhem
Well-Known Member
- Thread starter
- #1
Well I had to do something to my GT. So I bought a GT350 IM with the TB. I found a great deal on here that I just could not pass up. So I took the stock IM off on Tuesday night. The new stuff came in on Wednesday afternoon. I installed it and hit a few snags. I stopped in the middle of the install and took a trip to JDM to get their install kit (thank God they're 20 min away from me). Then returned to bolt everything up.
So after everything was bolted up I had to wait for my tuner to get the base tune file to me. He sent it this morning and I loaded it up. The car started right up but I got an "Engine Coolant Overtemperature" warning. The car idled fine. SO I thought maybe it was just an error and cleared the code but it persisted. On subsequent attempts to start the engine it was progressively harder to start. So I removed the manifold and what do ya know, it turns out that I had accidentally unplugged the temp sensor in the back of the passenger side head. So while I was back there I decided to extend the blue connectors a bit more, reconnected everything, bolted everything back up, and reloaded the base tune. This time there were no issues. It fired right up.
So for now I am currently awaiting further tuning instructions from my tuner. I drove it around my parking lot just giving it light gas only up to about 20 MPH. It ran smoothly. The AFR stayed between 13.9-14.4 at idle. And the only thing I noticed was that it hold the RPMs a slight bit more than usual when I rev it. Other than that everything seems fine. I guess my tuner will start the fine tuning process tonight. I'll keep you posted.
A few notes for those who are attempting this.
-There is a write up on this forum with full details and pics on how to install it. Take a look at it to see what you're in for. Here is the link:
http://www.mustang6g.com/forums/showthread.php?t=53270
-Here is a second link you can look at...
http://www.mustang6g.com/forums/showthread.php?t=65668
-Keep in mind that when you remove the clips on the bottom rear of the stock intake manifold, you have to push down the release tabs on it and then press the clip in to pull the connector off. So again, pull down the release tab, then push in the clip as you pull out the connector. Don't go tugging on it after you release the tabs because you might break something.
-Extend the blue connectors when you get the stock IM off. You just have to cut into the harness where the blue connectors go into and then pull it out some. It'll pull out enough to clip them on the GT350 connectors.
-There are 2 blue connectors. One has black tape wrapped around it while the other one doesn't/ The one with the tape should go to the closest connector. The one without the tape should go to the furthest connector which will be facing towards the passenger side.
-IM torque specs are 100 INCH pounds + 30 degree turn. I have a torque wrench that only goes as low as 120 inch pounds. So while I do not recommend doing this and I hated that I had to do it myself, I did torque it to 120 inch pounds. It isn't much. I talked to several mechanics in the area and all of them agreed that with inch pounds that is not much. Again, if you have the proper torque wrench, then do it the proper way. But sometimes I have to do things my own way.
-SUPER IMPORTANT!! This could be a $1000 mistake so please be very careful!! When you remove the 2 stock bolts on the canister EVAP canister purge on the front of the manifold, you will have to carry it over to the GT350 IM. Be very very cautious when using those bolts in the manifold. Ford put inserts in the housing . The bolts go into the inserts. However, as you try to finger start the thread, you will notice that the bolts do not go in like other bolts do. They slightly maneuver around in the hole. If you tighten them and they do not go in correctly, then you will spin the insert and you'll be down to one bolt. This is a costly mistake because if you spin that second one, then you're SOL my friend. I learned this the hard way as I spun one of them. Luckily for me the second one went right in and is strong enough to securely hold the sensor down by itself. So just make sure you are overly careful with this. I recommend that if any of you ever have this manifold put on, then do the next guy a favor and leave that sensor in there and just get a new one. Because like I said, if you mess it up, then you're out by $1000. FYI, I wish someone had stressed the importance of this beforehand...!!!! LOL!!
-JDM offers a kit that aids in the install. It includes an extension for the EVAP as well as different bolts to use on that purge canister (I mentioned before). It is 80 bucks but I recommend it if only for the extension and the bolts. I wish I had known about the bolts beforehand because I would have bought the kit just for that.
-As far as repositioning and rerouting things, I found that I didn't have to do any of that and everything fit fine. Some may have different experiences.
-It is not difficult to do on your own. I have done intake manifold swaps on lots of different vehicles over the years and this was by far the easiest. Even those clips in the bottom rear, they aren't that bad. I was dreading them but when I actually did it, I realized how easy it was. And I have very large hands BTW. When I had to re-do it, it took me less time to completely remove and re-install the manifold than it took me just to remove the stock one the first time. I would say that your first time around may take a total of 4-8 hours to complete the job. After that you should be able to do it in about an hour or less. Don't waste money paying someone to do it. If you do, then pay me and I'll do it for ya!! LOL!!
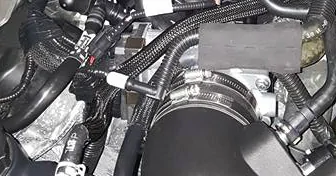
-Oh, and there will be one vacuum hose that has no home. Just grab a vacuum cap assortment pack from a parts store and cap it off. It should cost you only about $3. I included a pic of it for you to see. BTW, the pics of it installed are before I removed it and re-installed it. That was last night. I'll update with some new pics later tonight!!
So with that said I hope you guys feel confident to do one of these on your own!!


So after everything was bolted up I had to wait for my tuner to get the base tune file to me. He sent it this morning and I loaded it up. The car started right up but I got an "Engine Coolant Overtemperature" warning. The car idled fine. SO I thought maybe it was just an error and cleared the code but it persisted. On subsequent attempts to start the engine it was progressively harder to start. So I removed the manifold and what do ya know, it turns out that I had accidentally unplugged the temp sensor in the back of the passenger side head. So while I was back there I decided to extend the blue connectors a bit more, reconnected everything, bolted everything back up, and reloaded the base tune. This time there were no issues. It fired right up.
So for now I am currently awaiting further tuning instructions from my tuner. I drove it around my parking lot just giving it light gas only up to about 20 MPH. It ran smoothly. The AFR stayed between 13.9-14.4 at idle. And the only thing I noticed was that it hold the RPMs a slight bit more than usual when I rev it. Other than that everything seems fine. I guess my tuner will start the fine tuning process tonight. I'll keep you posted.
A few notes for those who are attempting this.
-There is a write up on this forum with full details and pics on how to install it. Take a look at it to see what you're in for. Here is the link:
http://www.mustang6g.com/forums/showthread.php?t=53270
-Here is a second link you can look at...
http://www.mustang6g.com/forums/showthread.php?t=65668
-Keep in mind that when you remove the clips on the bottom rear of the stock intake manifold, you have to push down the release tabs on it and then press the clip in to pull the connector off. So again, pull down the release tab, then push in the clip as you pull out the connector. Don't go tugging on it after you release the tabs because you might break something.
-Extend the blue connectors when you get the stock IM off. You just have to cut into the harness where the blue connectors go into and then pull it out some. It'll pull out enough to clip them on the GT350 connectors.
-There are 2 blue connectors. One has black tape wrapped around it while the other one doesn't/ The one with the tape should go to the closest connector. The one without the tape should go to the furthest connector which will be facing towards the passenger side.
-IM torque specs are 100 INCH pounds + 30 degree turn. I have a torque wrench that only goes as low as 120 inch pounds. So while I do not recommend doing this and I hated that I had to do it myself, I did torque it to 120 inch pounds. It isn't much. I talked to several mechanics in the area and all of them agreed that with inch pounds that is not much. Again, if you have the proper torque wrench, then do it the proper way. But sometimes I have to do things my own way.
-SUPER IMPORTANT!! This could be a $1000 mistake so please be very careful!! When you remove the 2 stock bolts on the canister EVAP canister purge on the front of the manifold, you will have to carry it over to the GT350 IM. Be very very cautious when using those bolts in the manifold. Ford put inserts in the housing . The bolts go into the inserts. However, as you try to finger start the thread, you will notice that the bolts do not go in like other bolts do. They slightly maneuver around in the hole. If you tighten them and they do not go in correctly, then you will spin the insert and you'll be down to one bolt. This is a costly mistake because if you spin that second one, then you're SOL my friend. I learned this the hard way as I spun one of them. Luckily for me the second one went right in and is strong enough to securely hold the sensor down by itself. So just make sure you are overly careful with this. I recommend that if any of you ever have this manifold put on, then do the next guy a favor and leave that sensor in there and just get a new one. Because like I said, if you mess it up, then you're out by $1000. FYI, I wish someone had stressed the importance of this beforehand...!!!! LOL!!
-JDM offers a kit that aids in the install. It includes an extension for the EVAP as well as different bolts to use on that purge canister (I mentioned before). It is 80 bucks but I recommend it if only for the extension and the bolts. I wish I had known about the bolts beforehand because I would have bought the kit just for that.
-As far as repositioning and rerouting things, I found that I didn't have to do any of that and everything fit fine. Some may have different experiences.
-It is not difficult to do on your own. I have done intake manifold swaps on lots of different vehicles over the years and this was by far the easiest. Even those clips in the bottom rear, they aren't that bad. I was dreading them but when I actually did it, I realized how easy it was. And I have very large hands BTW. When I had to re-do it, it took me less time to completely remove and re-install the manifold than it took me just to remove the stock one the first time. I would say that your first time around may take a total of 4-8 hours to complete the job. After that you should be able to do it in about an hour or less. Don't waste money paying someone to do it. If you do, then pay me and I'll do it for ya!! LOL!!
-Oh, and there will be one vacuum hose that has no home. Just grab a vacuum cap assortment pack from a parts store and cap it off. It should cost you only about $3. I included a pic of it for you to see. BTW, the pics of it installed are before I removed it and re-installed it. That was last night. I'll update with some new pics later tonight!!
So with that said I hope you guys feel confident to do one of these on your own!!


Sponsored
Last edited: