Sponsored

Steeda Tri-Ax Race Short Throw Shifter installation questions

MD18EcoStang

Well-Known Member
Joined
Sep 27, 2019
Threads
25
Messages
662
Reaction score
794
Location
MD
Vehicle(s)
2018 Mustang Ecoboost
I've pretty much wrapped up installing a Steeda Tri-Ax Race Short Throw Shifter in my 2018 Ecoboost. I'm curious about a few things and hope to hear from anyone who may have also installed one themselves, or is at least familiar with the installation. I took it for a test drive, and there are definitely some transmission noises to be heard. Not saying it's anything problematic. I think it's just sounds that never previously made their way into the cabin.

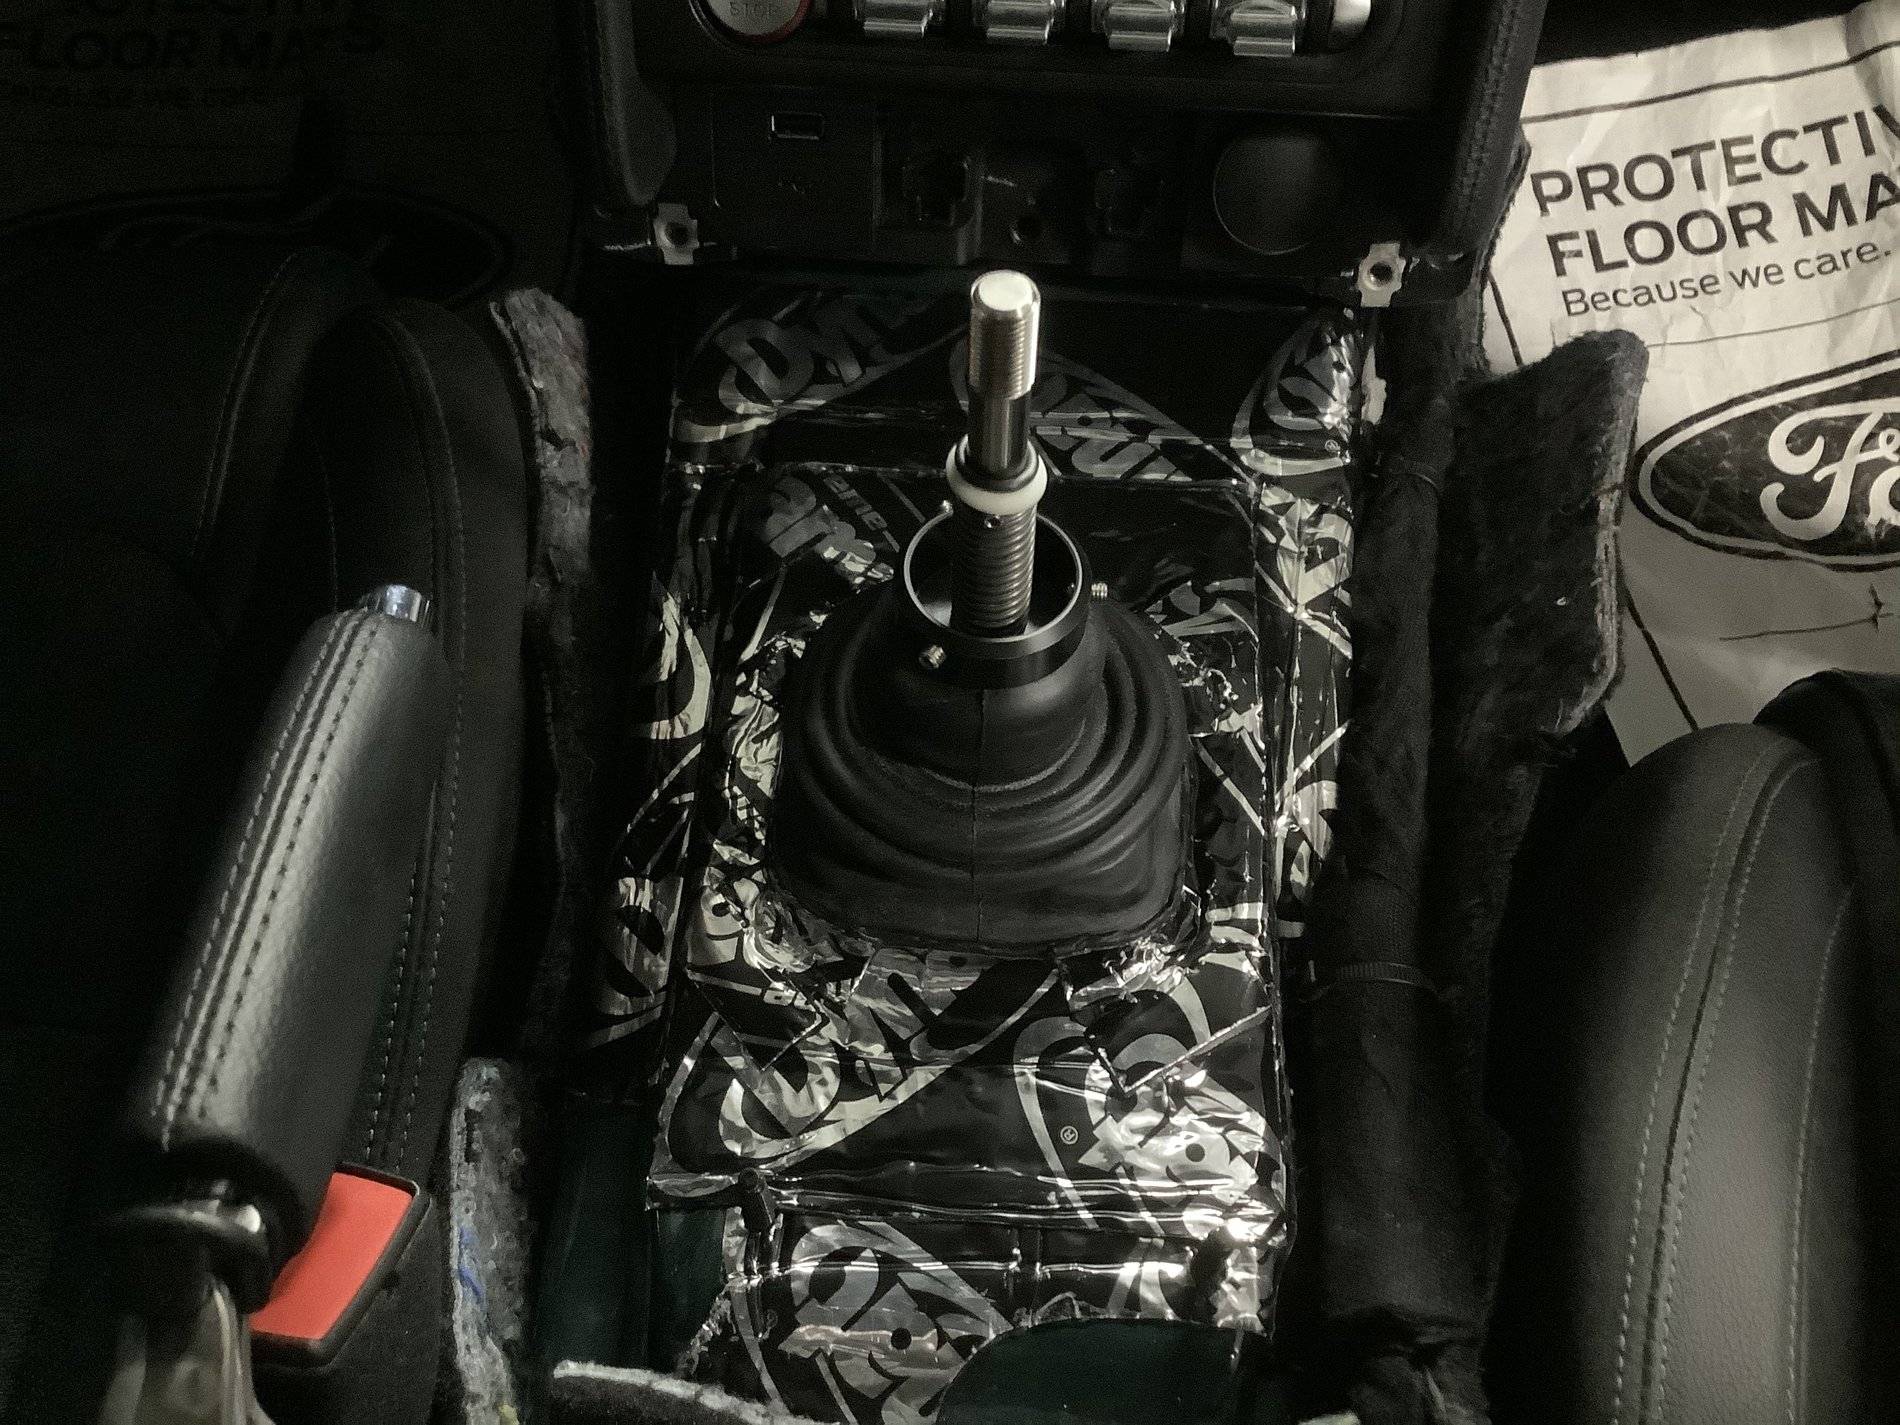
Steeda says to ensure everything around the shifter is well-covered with the included Dynamat. I believe I did a decent job of that, and even had enough to put down a double layer over parts of it. What I think could be an issue is that the instructions said to only reinstall the rubber boot on 15-17 models, as it won't fit newer cars (18+). I actually trimmed mine, so that I could make it fit just over the top of the shifter, but I ended up going with Steeda's recommendation to leave it out. Has anyone else considered or tried this? Any opinions on if it will help reduce NVH?

Next question is about the reverse lockout collar and the shift knob. After some adjustments, I was able to install the collar in a way that allows it to move fairly freely when pulling to to shift into reverse. I do wonder if I should have replaced the collar with the aftermarket option, but $50 for a small piece of plastic... sorry, "Delrin."

I've yet to "lock" the shift knob in place with threadlocker, however, when test fitting the knob, I can only thread it on about 4 complete turns. If I attempt to do just one more full turn, I have problems getting into reverse. Is this typical? Will 4 threads be enough to hold securely?
Sponsored
 
OP
OP
MD18EcoStang

MD18EcoStang

Well-Known Member
Joined
Sep 27, 2019
Threads
25
Messages
662
Reaction score
794
Location
MD
Vehicle(s)
2018 Mustang Ecoboost
I trimmed snd reused my boot and swapped out the knob with one from Steeda.

1656759193960.jpeg


https://www.mustang6g.com/forums/th...t-knob-and-steeda-tri-ax-race-shifter.150130/
Thanks for replying and for the link! I read back through your threads. I have a couple questions if you have another moment, please.
  1. Did you only trim the inside bottom of the boot, so you could push it down over the square top of the shifter? I'm assuming it can't get pushed down far enough to fit back into the factory cutout, like stock. Did you secure it with anything?
  2. I did also buy a Steeda shift knob. The instructions with the shifter mention to insert the little rubber piece (they call it a chord) into the factory shift knob. Did you also use that rubber piece with the Steeda knob?
 

NGOT8R

Well-Known Member
Joined
Jul 19, 2020
Threads
154
Messages
9,403
Reaction score
7,901
Location
Florida
First Name
Adrian
Vehicle(s)
2019 Bullitt
Thanks for replying and for the link! I read back through your threads. I have a couple questions if you have another moment, please.
  1. Did you only trim the inside bottom of the boot, so you could push it down over the square top of the shifter? I'm assuming it can't get pushed down far enough to fit back into the factory cutout, like stock. Did you secure it with anything?
I actually cut off a portion of the boot at one of the pleats. That gave me enough flexibility to trench it over the shifter base. I did not have to use a zip tie to secure it. If fits really tight and won’t come off.

I did also buy a Steeda shift knob. The instructions with the shifter mention to insert the little rubber piece (they call it a chord) into the factory shift knob. Did you also use that rubber piece with the Steeda knob?

I did not use the rubber piece. I used blue loctite and a jam nut from the hardware store instead.
 
OP
OP
MD18EcoStang

MD18EcoStang

Well-Known Member
Joined
Sep 27, 2019
Threads
25
Messages
662
Reaction score
794
Location
MD
Vehicle(s)
2018 Mustang Ecoboost
@NGOT8R Thanks again. I'll start by trimming at the bottom pleat and check the fit, with the intention of making it look like yours. Nice, clean install, btw!
 

Sponsored

NGOT8R

Well-Known Member
Joined
Jul 19, 2020
Threads
154
Messages
9,403
Reaction score
7,901
Location
Florida
First Name
Adrian
Vehicle(s)
2019 Bullitt
@NGOT8R Thanks again. I'll start by trimming at the bottom pleat and check the fit, with the intention of making it look like yours. Nice, clean install, btw!
Thanks! Yes, trim one please at a time and sneakup on it for the best possible fit. Just take a razor blade and punch through at the base of the pleat and go around the entire perimeter for a clean cut.
 

TrackMustang

Banned
Banned
Banned
Joined
Nov 24, 2021
Threads
34
Messages
1,205
Reaction score
1,535
Location
SoCal
Vehicle(s)
2021 Mustang GT
I installed it myself on my 21 GT. I left the stock boot off and noticed NVH mostly in first and second, mostly in the way of transmission “whine”, basically the spinning of the gears is much more pronounced than it was. Otherwise little to no noise issues.

I also did the Delfina lockout. You have to cut and restitch the shift boot to install it. Idk how to friggen sew… luckily my wife did a great job with that.

Very few threads left for the shift knob. I have an aftermarket knob with a nut that you thread on before the knob, I had to remove it because it would not work with the nut in place. I’d say four turns is about right, I just went a bit heavy with threadlock and it is fine. I’ve taken the knob off andput It back on a few times without issues, just gotta make sure I clean any excess threadlock.
 

NGOT8R

Well-Known Member
Joined
Jul 19, 2020
Threads
154
Messages
9,403
Reaction score
7,901
Location
Florida
First Name
Adrian
Vehicle(s)
2019 Bullitt
I installed it myself on my 21 GT. I left the stock boot off and noticed NVH mostly in first and second, mostly in the way of transmission “whine”, basically the spinning of the gears is much more pronounced than it was. Otherwise little to no noise issues.

I also did the Delfina lockout. You have to cut and restitch the shift boot to install it. Idk how to friggen sew… luckily my wife did a great job with that.

Very few threads left for the shift knob. I have an aftermarket knob with a nut that you thread on before the knob, I had to remove it because it would not work with the nut in place. I’d say four turns is about right, I just went a bit heavy with threadlock and it is fine. I’ve taken the knob off andput It back on a few times without issues, just gotta make sure I clean any excess threadlock.
Did you use a regular nut or a jam nut? A jam nut is thinner than a standard nut. I used a jam nut, marked it with a sharpie and counted the number of full turns on it (I want to say mine was something like 8-9 full turns down onto the shift lever), then install the knob and it should bottom out or kiss the jam nut at or between the 11 and 12 o’clock position. If it does, then you know you’re set pretty close. Remove the shift knob again, verify the number of turns on the jam nut haven’t changed. Use blue loctite on the shaft and then position the jam nut back in place. Install the knob again and run it down until it kisses the jam nut again (gear numbers should be pointing at or between the 11 and 12 o’clock position). continue twisting the knob until the gear numbers are straight and you’re done.
 

TrackMustang

Banned
Banned
Banned
Joined
Nov 24, 2021
Threads
34
Messages
1,205
Reaction score
1,535
Location
SoCal
Vehicle(s)
2021 Mustang GT
Did you use a regular nut or a jam nut? A jam nut is thinner than a standard nut. I used a jam nut, marked it with a sharpie and counted the number of full turns on it (I want to say mine was something like 8-9 full turns down onto the shift lever), then install the knob and it should bottom out or kiss the jam nut at or between the 11 and 12 o’clock position. If it does, then you know you’re set pretty close. Remove the shift knob again, verify the number of turns on the jam nut haven’t changed. Use blue loctite on the shaft and then position the jam nut back in place. Install the knob again and run it down until it kisses the jam nut again (gear numbers should be pointing at or between the 11 and 12 o’clock position). continue twisting the knob until the gear numbers are straight and you’re done.
I didn’t use a nut at all. Without the nut I get four complete turns before I can’t lift the reverse collar enough to shift into reverse. The stock knob didn’t use a nut so I figured I didn’t need it, and I haven’t had any issues at all.

Have you had any issues that you needed the nut?
 

NGOT8R

Well-Known Member
Joined
Jul 19, 2020
Threads
154
Messages
9,403
Reaction score
7,901
Location
Florida
First Name
Adrian
Vehicle(s)
2019 Bullitt
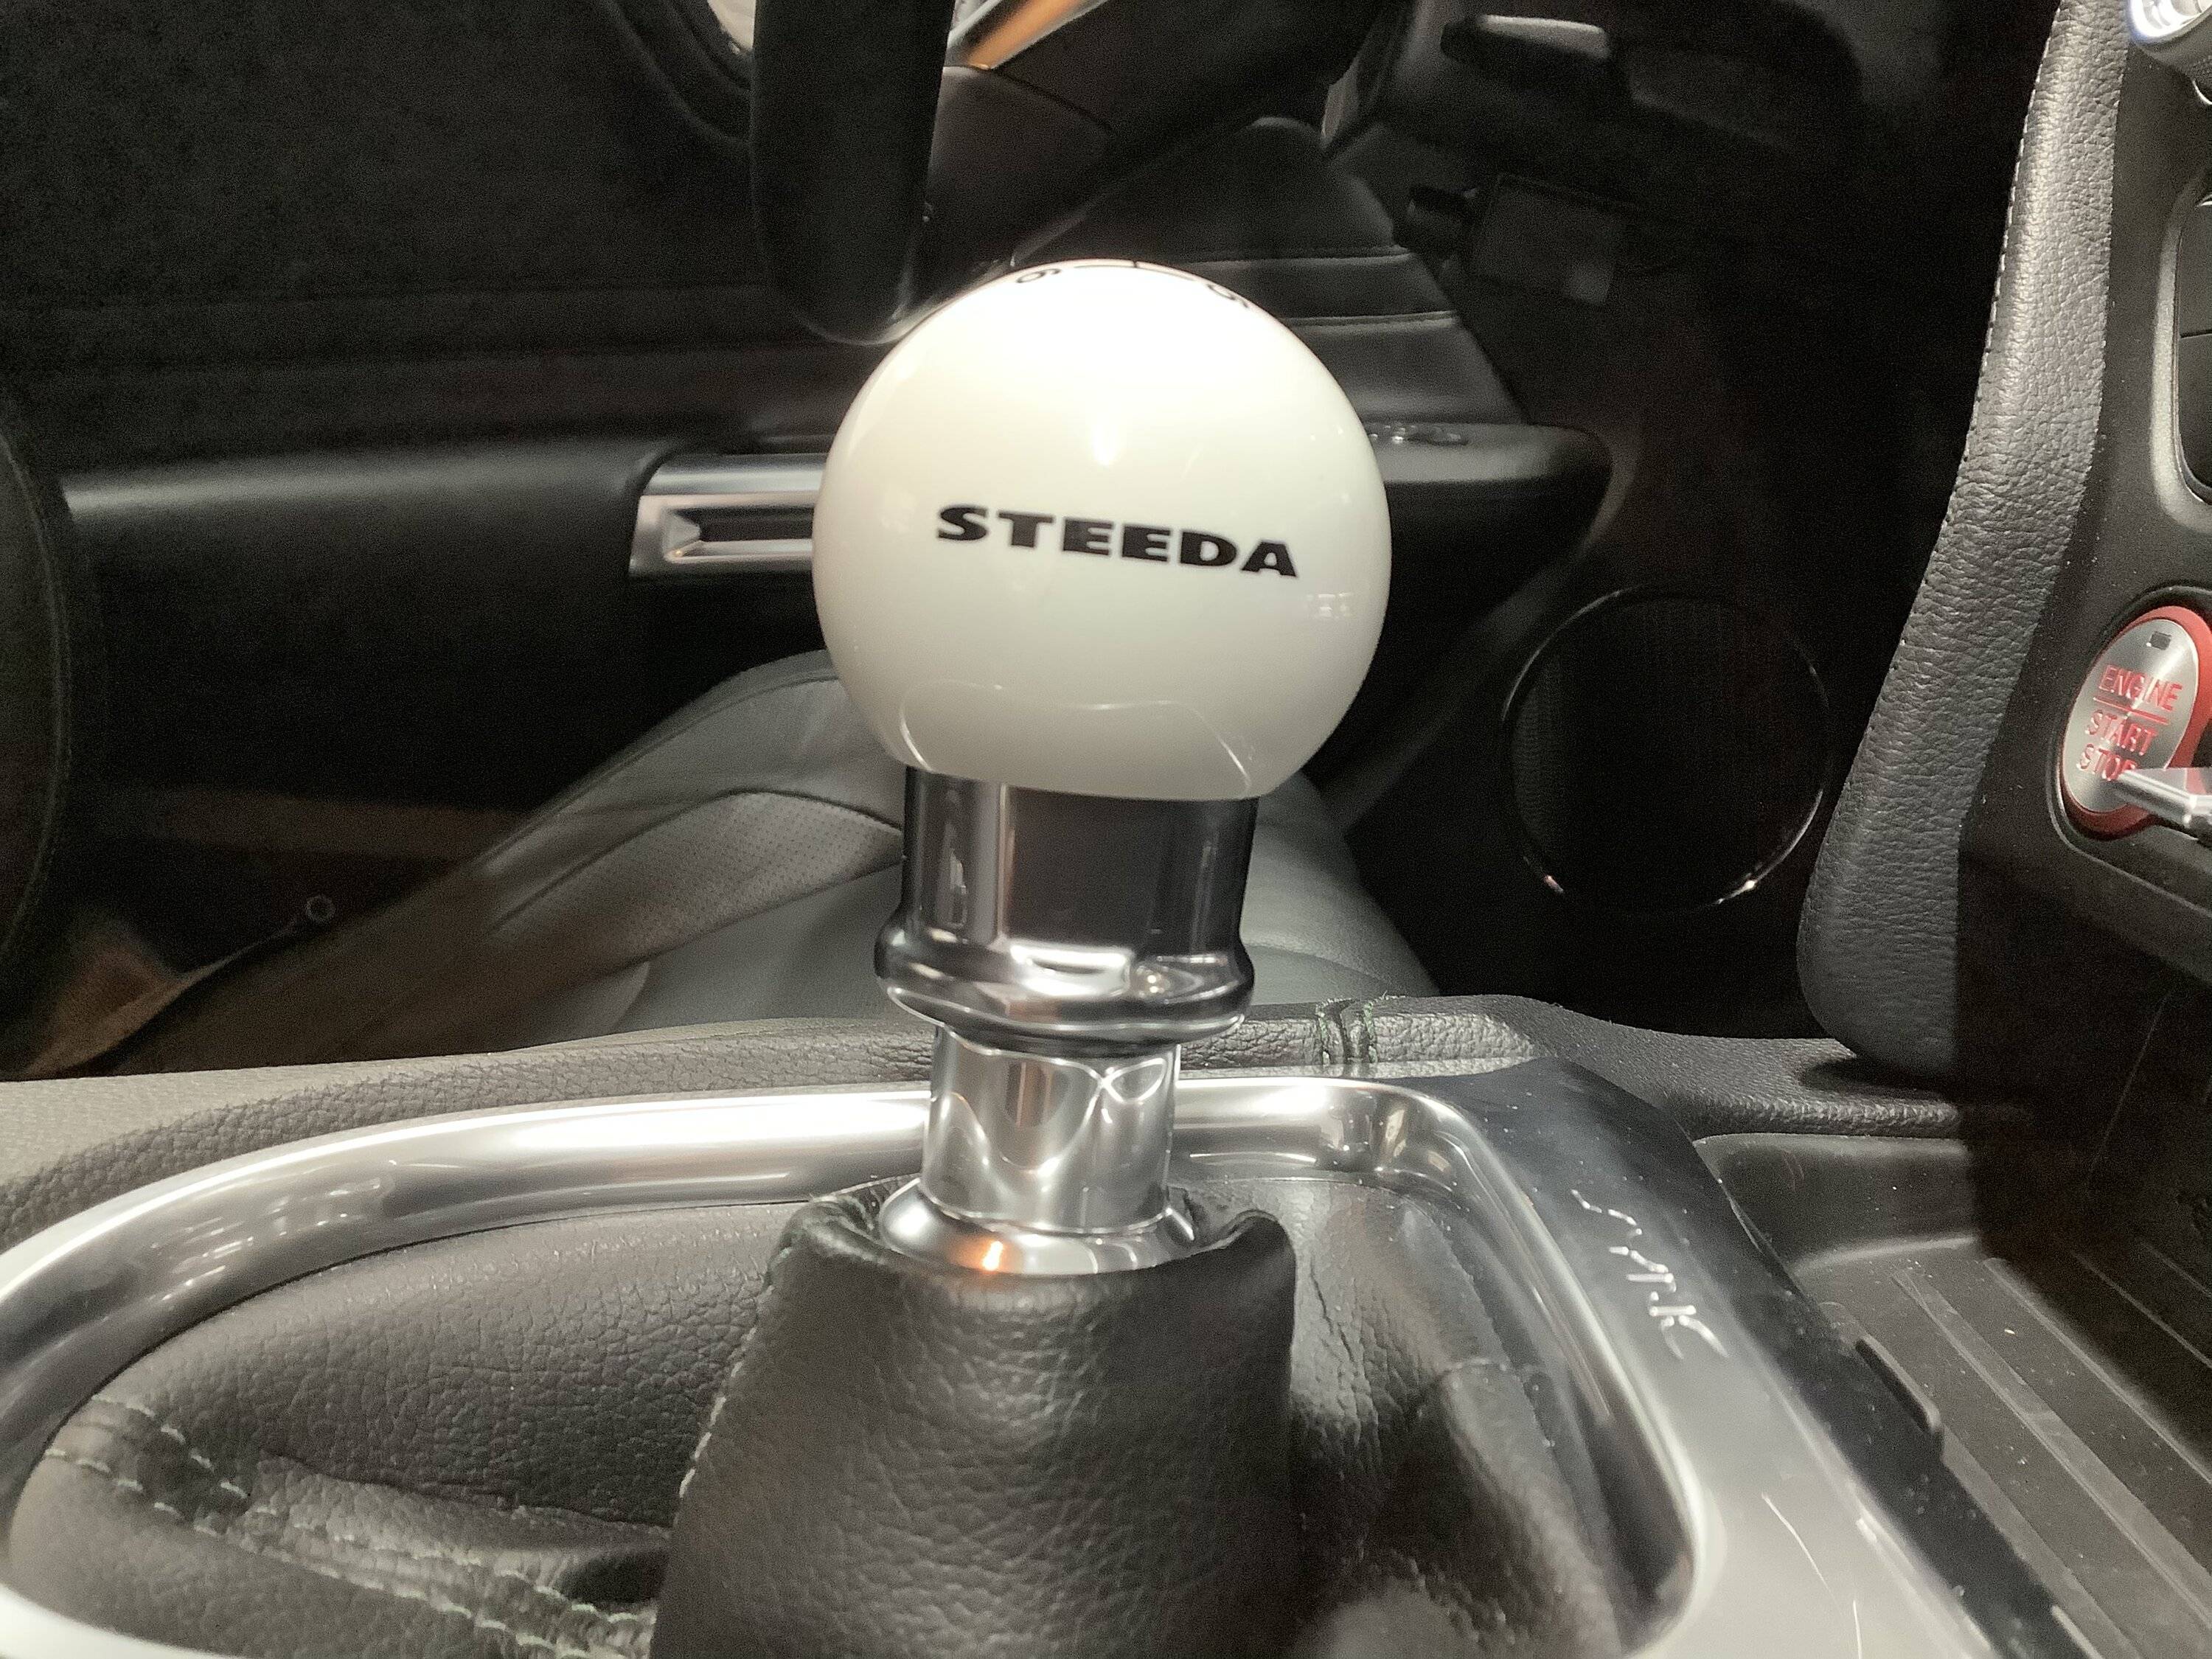
My factory knob’s threads stripped out, so I ordered a Steeda knob and bought a jam nut at my local hardware store to avoid any issues with my knob loosening up. It takes the right amount of adjustment (number of turns on the jam nut) to determine what is needed before locking everything down for the final time with the loctite. I should also mention that once the knob was on and before final lockdown, I verified that I could get the car into reverse easily with no binding and that the rear view camera was working. Here is a side pic I took just now to show that I don’t have a gap like some people have between the reverse lockout collar and the bottom of the knob. Mine works perfectly and it’s not coming off without me possibly damaging the knob.

1DFD2D24-881D-44E1-9236-52335DB1ACE1.jpeg
 

Sponsored

NGOT8R

Well-Known Member
Joined
Jul 19, 2020
Threads
154
Messages
9,403
Reaction score
7,901
Location
Florida
First Name
Adrian
Vehicle(s)
2019 Bullitt
Have a look here guys. This is the method I was attempting to explain.

 
OP
OP
MD18EcoStang

MD18EcoStang

Well-Known Member
Joined
Sep 27, 2019
Threads
25
Messages
662
Reaction score
794
Location
MD
Vehicle(s)
2018 Mustang Ecoboost
Thanks! Yes, trim one please at a time and sneakup on it for the best possible fit. Just take a razor blade and punch through at the base of the pleat and go around the entire perimeter for a clean cut.
Mission accomplished. 👍🏼 Thanks for the assist. I pulled it all apart and I'm pretty sure I cut my boot just about the same as yours. It fit perfectly. I also took time to more thoroughly apply some additional Dynamat.

Anyhow, the extra practice of taking it all apart and putting it back together again seems to have resulted in a smoother operating reverse lockout, since I took extra care to tighten the 3 set screws as evenly as I could.

I ended up using the loctite approach to securing the shift knob. Letting it cure overnight before taking it for another test drive.
Sponsored


Top