bmrylnd5
Well-Known Member
- Thread starter
- #1
Issue:
My clutch master cylinder was failing to the point where one day I would have clutch pressure and overnight I would have nothing. I had to repump > 100 times to get any kind of pressure back. Overtime it eventually lost all pressure and couldn't get it back. I couldn't find any leaks or could see that the brake fluid was low which led me to think it was a failed cylinder.
That said, I could not find any good instructions online and wanted to have a guide here while the info was still fresh in my mind.
A few notes before I begin:
- I have a 2017 GT/CS
- I am using the Steeda spring/perch: https://www.steeda.com/steeda-mustang-clutch-spring-assist-spring-perch-kit-555-7027.html
- I am using the Steeda clutch hose upgrade: https://www.steeda.com/steeda-555-7035-s550-clutch-hose
- I am using the Steeda upgrade clutch line: https://www.steeda.com/steeda-s550-heavy-duty-braided-clutch-line-2015-555-7016.html
- Absolutely remove the driver seat, it makes a world of difference
- You don't need to remove the pedal assembly, sure it might be easier, but it's not a requirement
- I would've recorded myself, but there's barely any room down in the footwell and I had no idea if what I was doing was correct
Tools needed:
- Replacement cylinder: https://parts.levittownfordparts.com/oem-parts/ford-master-cylinder-fr3z7a543c
- T50 torx for removing the seat
- 5mm allen key for 2x bolts on cylinder
- I didn't have enough space for a ratchet so I used a normal long allen key
- Grease for new cylinder
- Headlamp is crucial
- Small flathead screwdriver
- Brake fluid vacuum hand pump
- 50mm rubber stopper
Instructions:
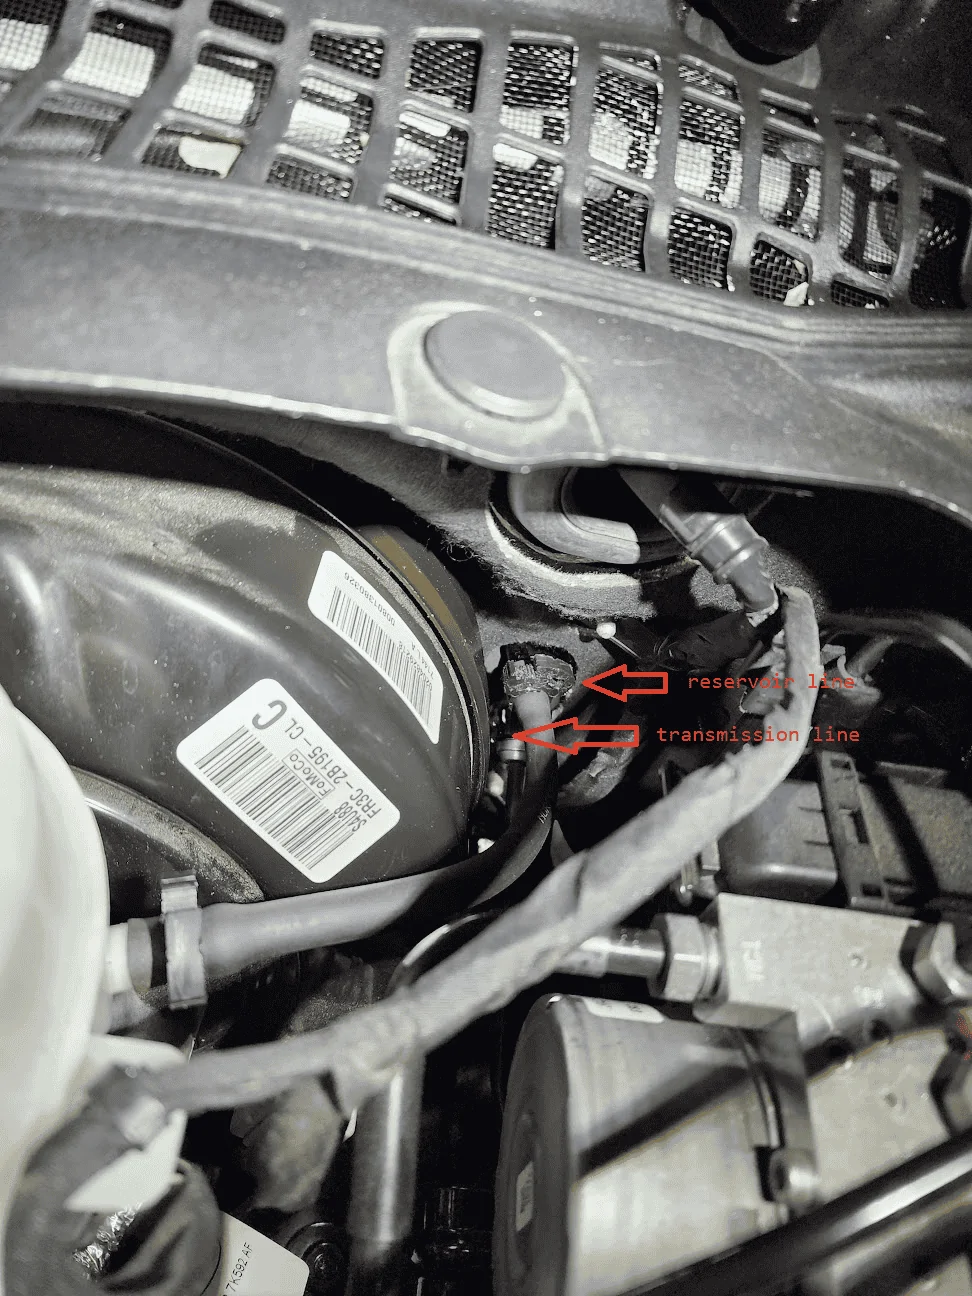
Remove clutch fluid lines
- Open the hood and place a lot of towels underneath the 2 fluid lines (1x reservoir line, 1x transmission line), there will be brake fluid spillage. If there is, clean it up ASAP.

- Depending on which clutch hose you have, remove the clamp and pull the hose off the master cylinder nipple
- For the trans clutch line, there's a hose clip you need to pop before you can remove the line. You can use a flathead screwdriver to get under the connector and pop the flip down towards the floor. Or you can do what I did and push down on the clip ends since you can see it clearer.

- Once both lines are removed, put them off to the side on some towels just in case they leak some fluid
Unmount the clutch master cylinder
- Remove driver seat:
- Yoga yourself and lay down on the floor, then physically and mentally prepare yourself for long core exercises

- Familiarize yourself with the area

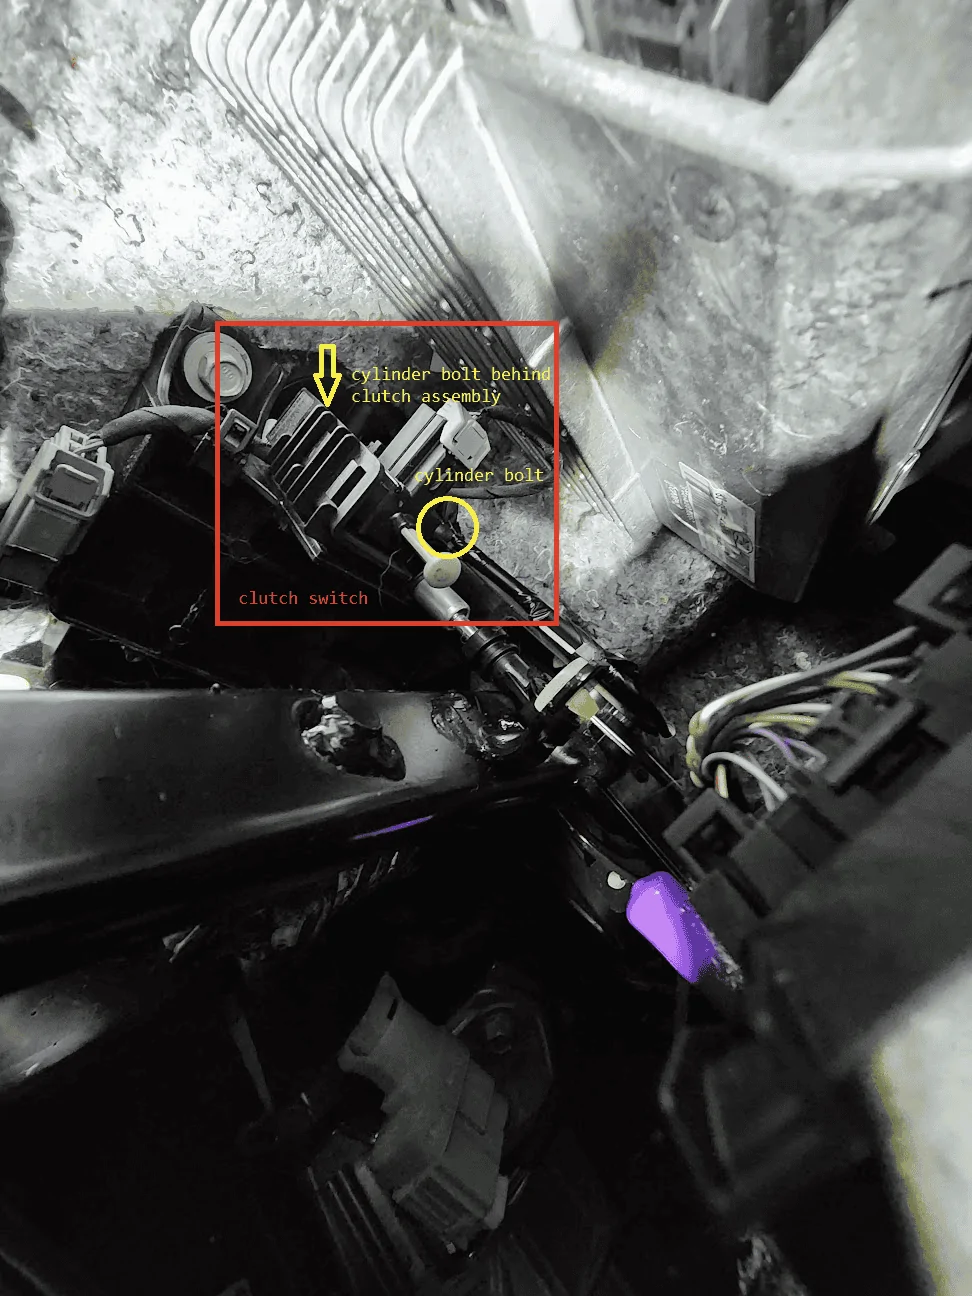
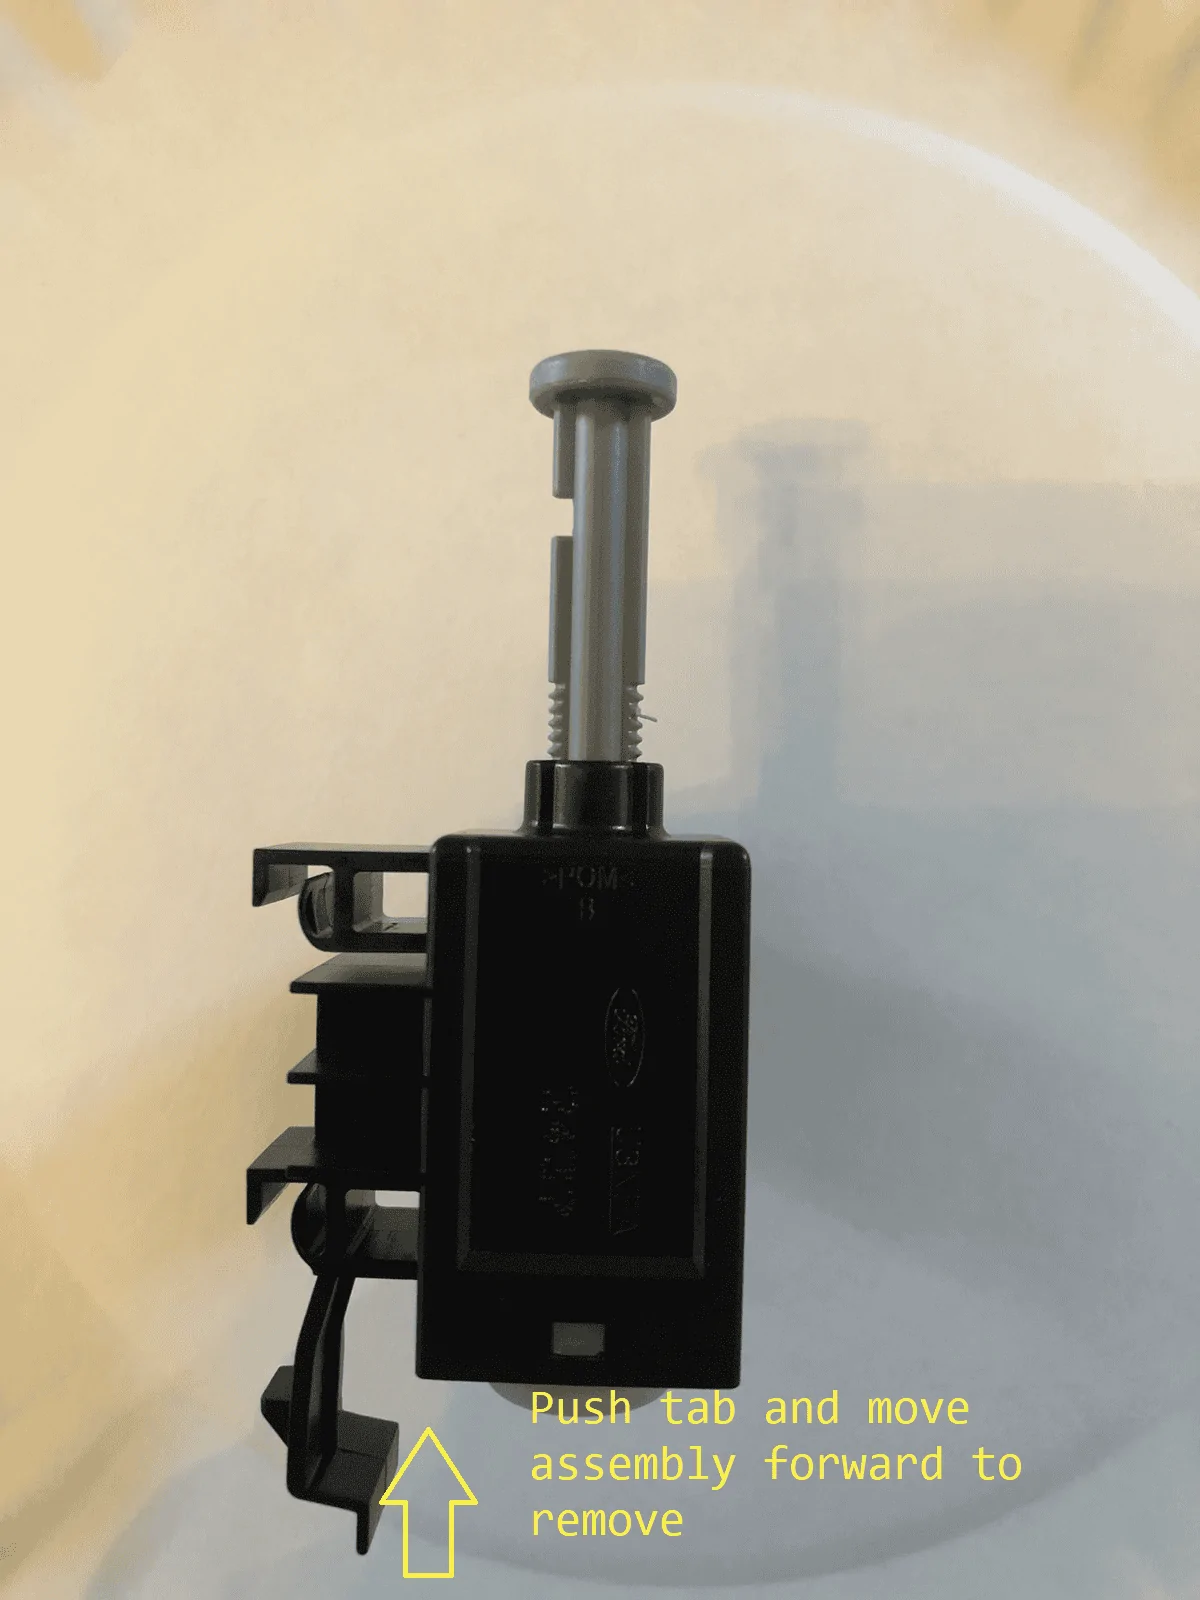
Remove the clutch switch assembly
- From the rear of the assembly, there's a tab you'll need to push inward to release the clip to be able to move the whole assembly forward and out of the bracket
- Once removed, you'll have better access to both cylinder bolts

Remove the master cylinder
- Pull the clutch pedal out so that it's not fully depressed, and you can get more space for your hand.
- Using a 5mm allen key, break loose both cylinder bolts and unscrew the rest with your hand (it's faster)
Protip: to get a better angle you can stick your head out the door and angle yourself to get a better position to unscrew the bolts using your left hand.
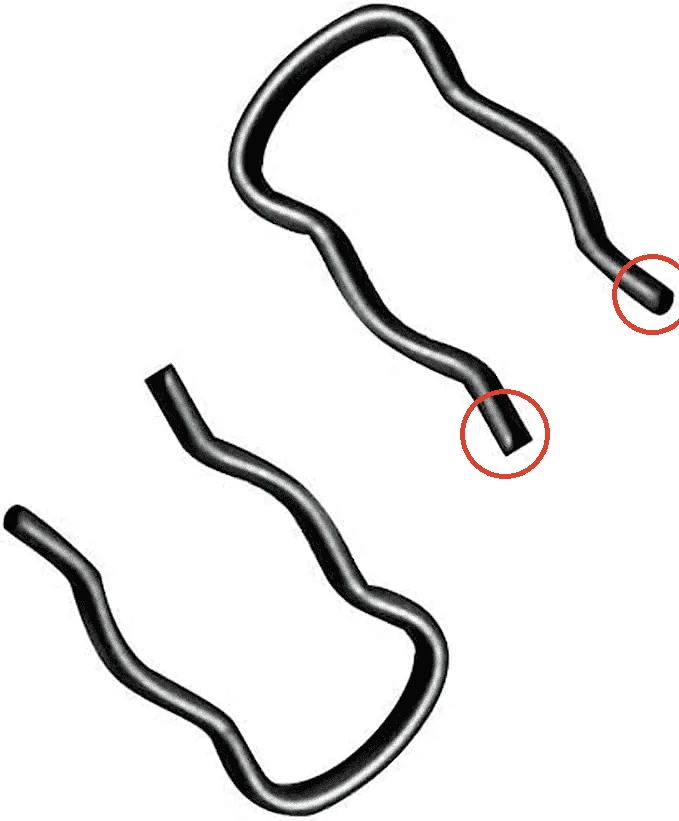
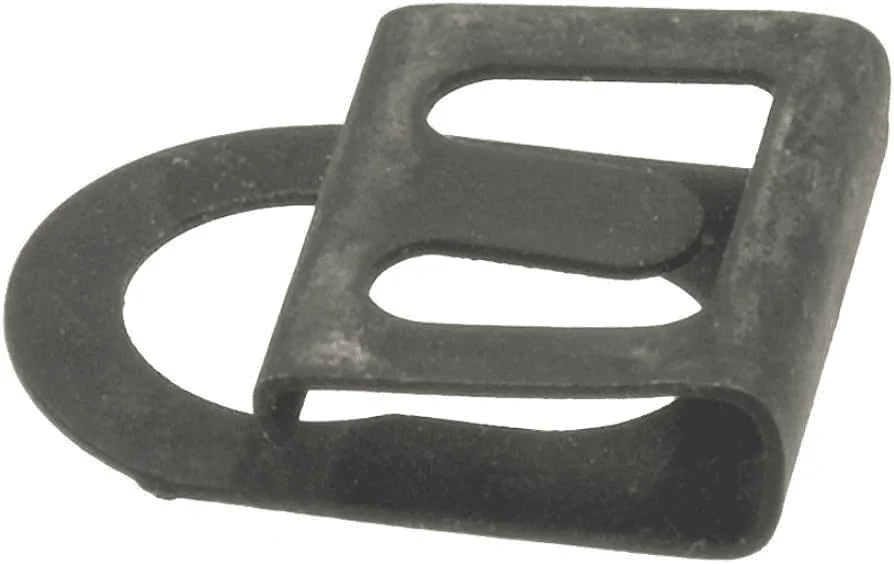
- Once the bolts are out you will need to remove the retaining clip at the end of the cylinder connected to the clutch pedal. The clip looks like this:

- Takes some finessing, but you just need to lift the top tab enough to push the clip to the side (where the bigger hole is) and you can remove it (keep this, you will be reusing it)
- Once the retainer is off, the master cylinder can be fully removed. First remove the pedal side by sliding the end off the peg, then from the firewall side, you'll have to rotate the master cylinder to clear some metal bits, but it will come out if you jiggle it around enough.
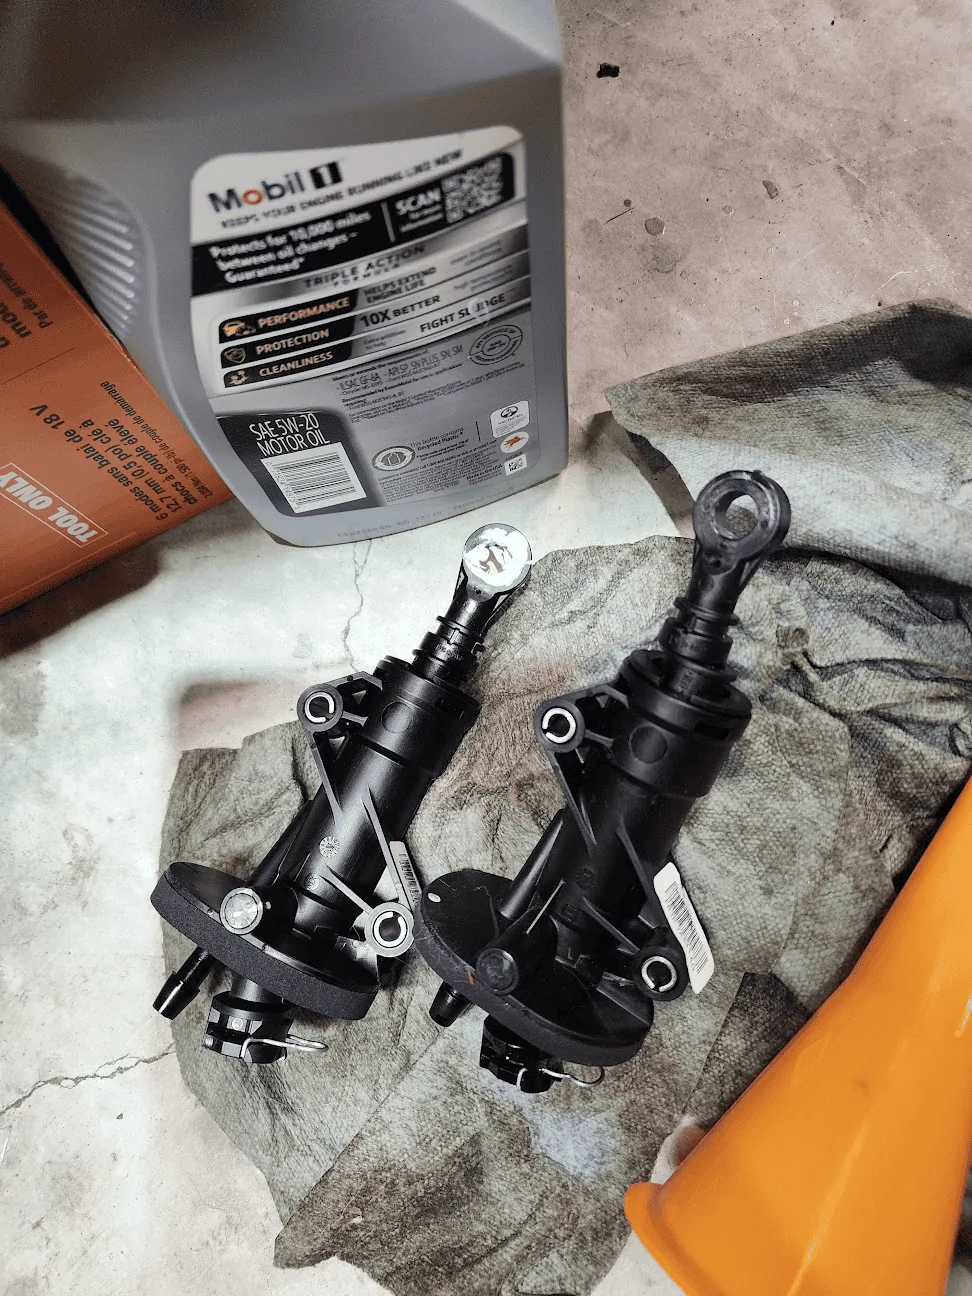
- Prepare the new cylinder by greasing it
- No need to bench bleed beforehand (someone can correct if I'm wrong, but I didn't)
- Comparison between new (left) and old (right) :
Install the new master cylinder
- Repeat the removal step but in reverse, make sure the orientation is correct, when putting it back (reservoir nipple = top, trans clutch w/ hose clip = bottom)
- Once the cylinder is aligned, put both bolts back in and tighten somewhat in unison so make sure it's mounted evenly
- Reinstall the cylinder retainer clip
- Re-attach trans clutch line and press the retaining clip in, give it a tug to make sure it is secured
- Re-attach reservoir hose (attach clamp if needed) and make sure it is secured
- Once both lines are attached, give the clutch pedal about 10 pumps and make sure you can build some pressure
- Re-attach clutch pedal switch assembly
Bleed clutch
- Since we disconnected and reconnected the fluid lines, we need to bleed the system
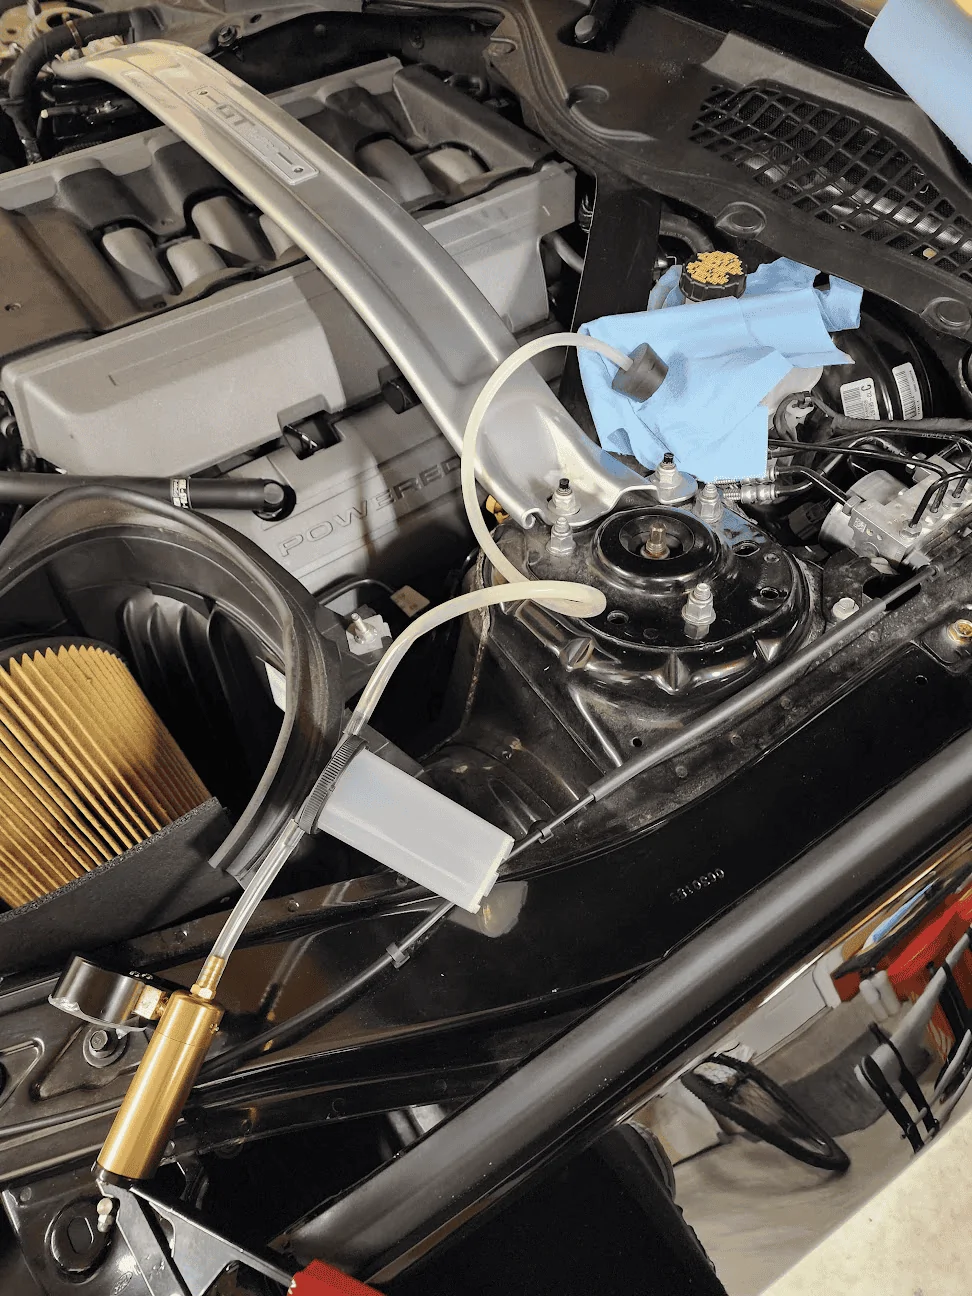
- I used a vacuum hand pump attached to a rubber stopper that is placed in the opening of the brake fluid reservoir
- Open the reservoir cap and place the rubber stopper in the opening, make sure it's tight and sealed
- Pull 15-20 inches of vacuum and hold it for a minute
- Quickly release the pressure and remove the vacuum
- Put the cap back on
- Press the clutch pedal 10-15 times
- Repeat as needed until the pressure is good
Re-mount the driver seat
- Once you're satisfied with the clutch feel, re-mount the driver seat...watch that youtube video, but backwards
- Take it for a quick spin and you'll be back on the road in no time
Hopefully I didn't miss anything, and sorry again for no video, but hopefully these instructions were helpful. Let me know if I missed anything and I will edit the post!
My clutch master cylinder was failing to the point where one day I would have clutch pressure and overnight I would have nothing. I had to repump > 100 times to get any kind of pressure back. Overtime it eventually lost all pressure and couldn't get it back. I couldn't find any leaks or could see that the brake fluid was low which led me to think it was a failed cylinder.
That said, I could not find any good instructions online and wanted to have a guide here while the info was still fresh in my mind.
A few notes before I begin:
- I have a 2017 GT/CS
- I am using the Steeda spring/perch: https://www.steeda.com/steeda-mustang-clutch-spring-assist-spring-perch-kit-555-7027.html
- I am using the Steeda clutch hose upgrade: https://www.steeda.com/steeda-555-7035-s550-clutch-hose
- I am using the Steeda upgrade clutch line: https://www.steeda.com/steeda-s550-heavy-duty-braided-clutch-line-2015-555-7016.html
- Absolutely remove the driver seat, it makes a world of difference
- You don't need to remove the pedal assembly, sure it might be easier, but it's not a requirement
- I would've recorded myself, but there's barely any room down in the footwell and I had no idea if what I was doing was correct
Tools needed:
- Replacement cylinder: https://parts.levittownfordparts.com/oem-parts/ford-master-cylinder-fr3z7a543c
- T50 torx for removing the seat
- 5mm allen key for 2x bolts on cylinder
- I didn't have enough space for a ratchet so I used a normal long allen key
- Grease for new cylinder
- Headlamp is crucial
- Small flathead screwdriver
- Brake fluid vacuum hand pump
- 50mm rubber stopper
Instructions:
Remove clutch fluid lines
- Open the hood and place a lot of towels underneath the 2 fluid lines (1x reservoir line, 1x transmission line), there will be brake fluid spillage. If there is, clean it up ASAP.
- Depending on which clutch hose you have, remove the clamp and pull the hose off the master cylinder nipple
- For the trans clutch line, there's a hose clip you need to pop before you can remove the line. You can use a flathead screwdriver to get under the connector and pop the flip down towards the floor. Or you can do what I did and push down on the clip ends since you can see it clearer.
- Once both lines are removed, put them off to the side on some towels just in case they leak some fluid
Unmount the clutch master cylinder
- Remove driver seat:
- Yoga yourself and lay down on the floor, then physically and mentally prepare yourself for long core exercises

- Familiarize yourself with the area

Remove the clutch switch assembly
- From the rear of the assembly, there's a tab you'll need to push inward to release the clip to be able to move the whole assembly forward and out of the bracket
- Once removed, you'll have better access to both cylinder bolts
Remove the master cylinder
- Pull the clutch pedal out so that it's not fully depressed, and you can get more space for your hand.
- Using a 5mm allen key, break loose both cylinder bolts and unscrew the rest with your hand (it's faster)
Protip: to get a better angle you can stick your head out the door and angle yourself to get a better position to unscrew the bolts using your left hand.
- Once the bolts are out you will need to remove the retaining clip at the end of the cylinder connected to the clutch pedal. The clip looks like this:
- Takes some finessing, but you just need to lift the top tab enough to push the clip to the side (where the bigger hole is) and you can remove it (keep this, you will be reusing it)
- Once the retainer is off, the master cylinder can be fully removed. First remove the pedal side by sliding the end off the peg, then from the firewall side, you'll have to rotate the master cylinder to clear some metal bits, but it will come out if you jiggle it around enough.
- Prepare the new cylinder by greasing it
- No need to bench bleed beforehand (someone can correct if I'm wrong, but I didn't)
- Comparison between new (left) and old (right) :
Install the new master cylinder
- Repeat the removal step but in reverse, make sure the orientation is correct, when putting it back (reservoir nipple = top, trans clutch w/ hose clip = bottom)
- Once the cylinder is aligned, put both bolts back in and tighten somewhat in unison so make sure it's mounted evenly
- Reinstall the cylinder retainer clip
- Re-attach trans clutch line and press the retaining clip in, give it a tug to make sure it is secured
- Re-attach reservoir hose (attach clamp if needed) and make sure it is secured
- Once both lines are attached, give the clutch pedal about 10 pumps and make sure you can build some pressure
- Re-attach clutch pedal switch assembly
Bleed clutch
- Since we disconnected and reconnected the fluid lines, we need to bleed the system
- I used a vacuum hand pump attached to a rubber stopper that is placed in the opening of the brake fluid reservoir

- Open the reservoir cap and place the rubber stopper in the opening, make sure it's tight and sealed
- Pull 15-20 inches of vacuum and hold it for a minute
- Quickly release the pressure and remove the vacuum
- Put the cap back on
- Press the clutch pedal 10-15 times
- Repeat as needed until the pressure is good
Re-mount the driver seat
- Once you're satisfied with the clutch feel, re-mount the driver seat...watch that youtube video, but backwards
- Take it for a quick spin and you'll be back on the road in no time
Hopefully I didn't miss anything, and sorry again for no video, but hopefully these instructions were helpful. Let me know if I missed anything and I will edit the post!
Sponsored
Last edited:
 ,
, .
.